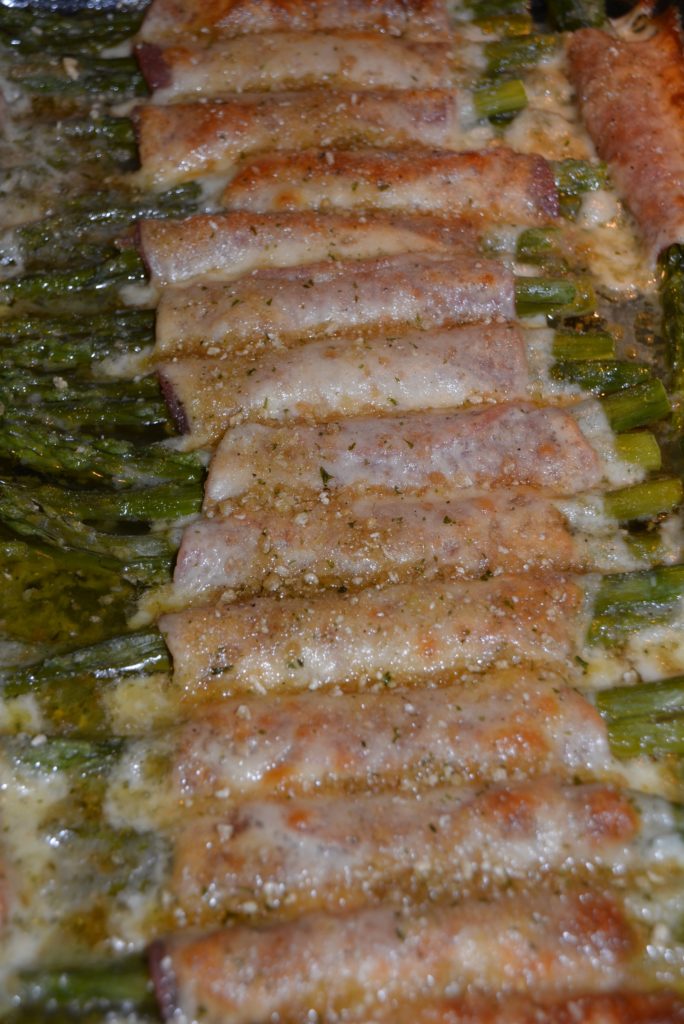
Too many years ago, I first tasted the deliciousness of Asparagus Rollatini at our favorite fine dining restaurant. Unfortunate for me, their version was gluten filled, which made it’s way onto my no go list soon after. Among other restricted foods, I took losing my new favorite appetizer pretty hard. But little did I know just how simple this dish could be. Literally 5 ingredients, well my version anyway, and free of gluten and equally delicious! Just pick your favorite fresh asparagus spears (I prefer thin ones), salami or prosciutto your choice, provolone cheese, olive oil, and your favorite seasoned bread crumbs, and voila Asparagus Rollatini!
When I say this is a favorite for me, I should actually mention that it’s a favorite for everyone. It’s my go to dish for holidays and dinner parties and surely a party pleaser for all! So without further ado, check out my Gluten Free Asparagus Rollatini!
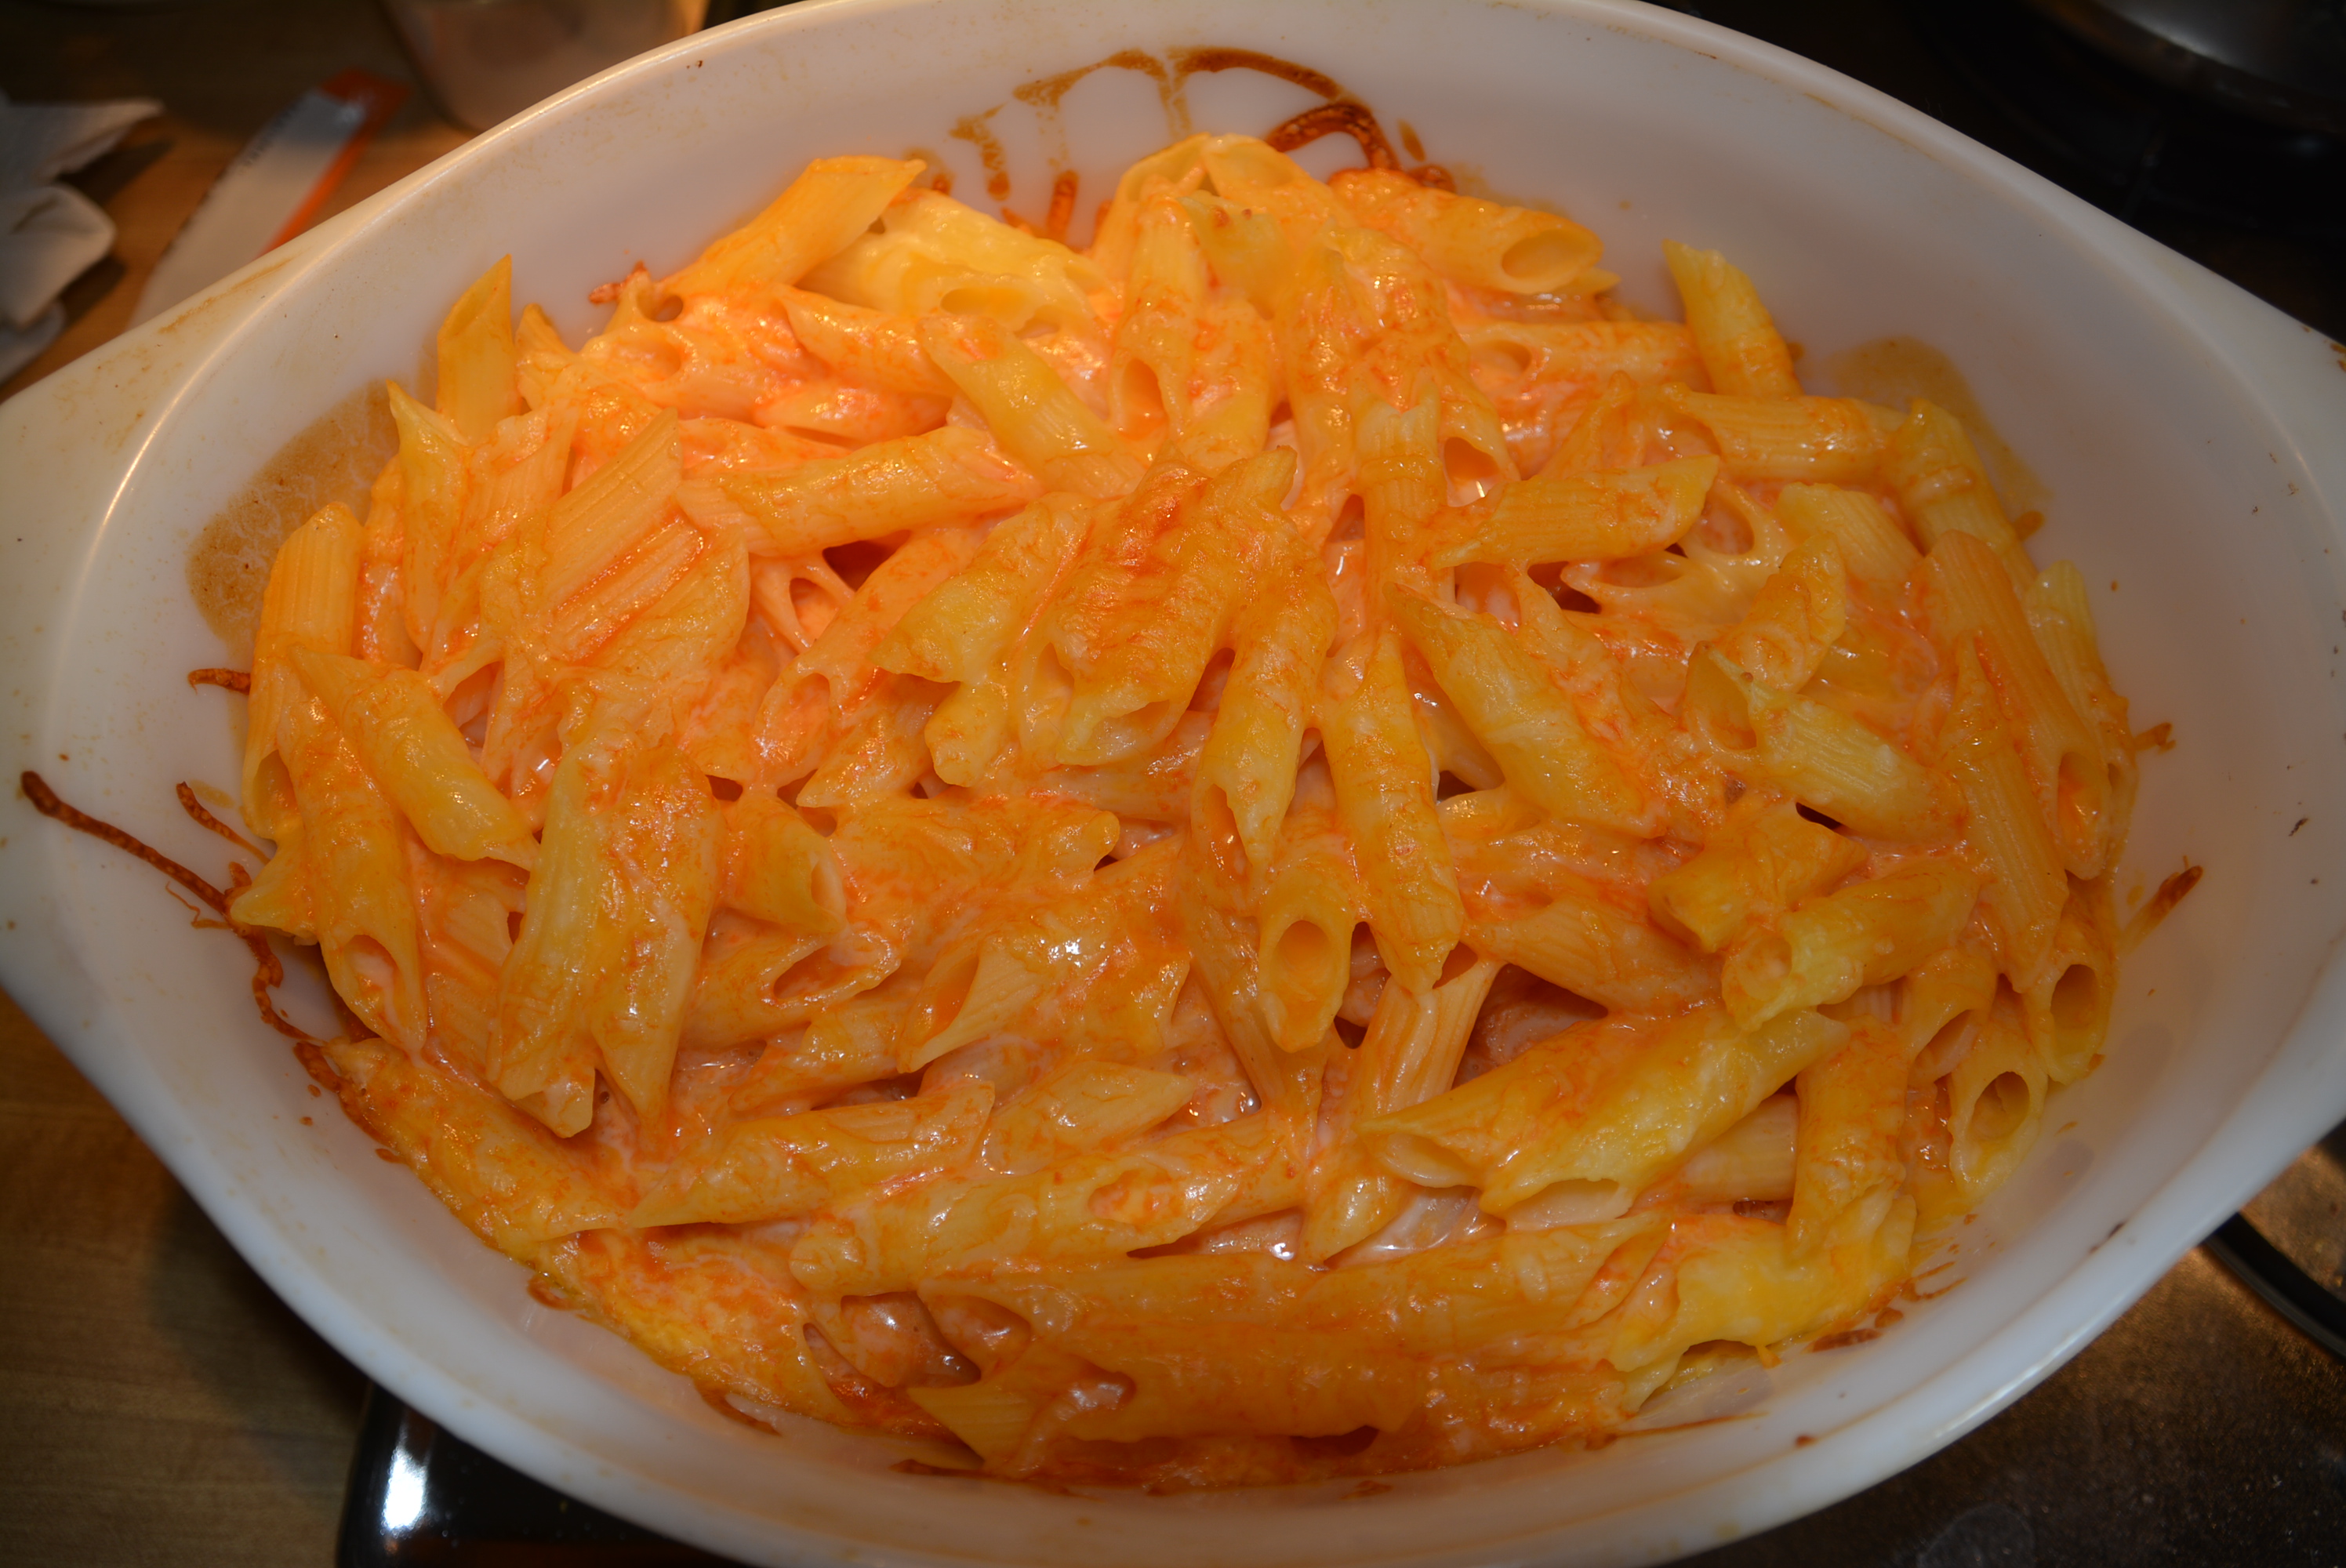
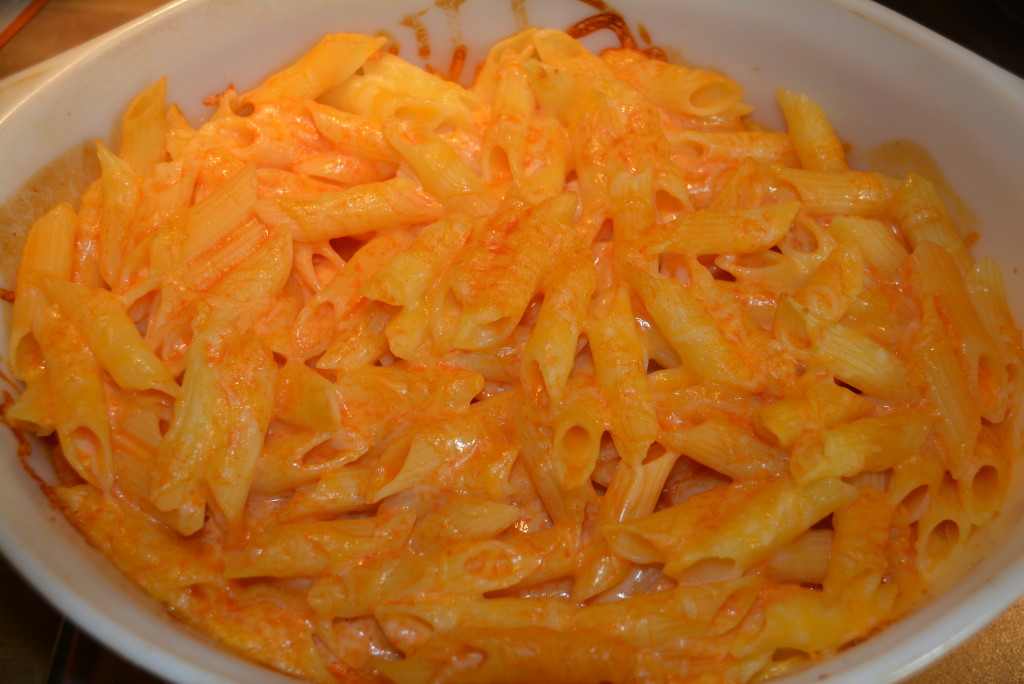
Growing up, anytime I had a bad day, good day, holiday, and all of the fun days between my mom would come to the rescue with her tomato soup macaroni and cheese. Nice warm garlicky Campbell’s tomato soup sandwiched between layers of pasta and shredded cheddar cheese and American cheese. Such a perfect combination and heaven to my tastebuds that’s for sure. Looking back I probably should’ve requested it a couple more times seeing as my days of enjoying her classic were numbered and I didn’t even know it. At least I still have my lovely food memories to keep me warm, along with a few gluten free tricks in my pocket too!
Even though I’m not able to enjoy some of my favorite childhood delights in the same way that I used to, my mom’s recipe has been passed down to me and adapted to be gluten free by yours truly. I’m happy to report that it’s not just as delicious as I remember but I think a little bit more now that I’m the mommy sharing this delicious bowl of tomato, cheesy goodness with my little girl. That’s right, she’s a girl after my heart loving every bite of pasta that we give her but especially a good bowl of homemade macaroni and cheese. I’m sure in the days to come, that just like my mom, I’ll receive quite a few requests for a warm plate of Tomato Soup Macaroni And Cheese!
Ingredients:
12 oz box Gluten Free Pasta, elbows or penne will do (My favorites are Ronzoni and Barilla)
Between 1 1/2 and 2 cups Gluten Free Tomato Soup (No more Campbell’s Soup because it’s loaded with wheat, but my favorite substitute is Pacific Foods Organic Creamy Tomato Soup, it’s so creamy and perfect for this macaroni and cheese.)
1 1/2 – 2 cups Shredded Cheddar, Colby Jack, Mozzarella or any mixture of them (I also like to add in American Cheese if I have it, it really matches well with the tomato soup, kind of like grilled cheese dipped in tomato soup.)
Garlic Powder
Salt
Directions:
Cook your pasta according to the directions on the box, cutting off 2 minutes or so since you’re cooking your pasta in the oven afterwards. Whenever I use pasta like this I always cut a few minutes off of the total cook time since it’ll continue to cook in the oven after, just to prevent it from being mushy.
Preheat oven to 350 degrees.
Measure out 1 1/2 to 2 cups Gluten Free Creamy Tomato Soup, Pacific Foods is my favorite. I use somewhere in the middle of 1 1/2 to 2 cups, it really depends on what casserole dish I choose to use. Basically, you just want to make sure your macaroni and cheese will be creamy enough without it turning to soup.
Add some garlic powder to tomato soup and mix, adding just enough to melt in that delicious garlic flavor.
To a 2.5 qt baking dish, cover the bottom of the dish with tomato soup mixture until layer is about 1/4 inch deep.
When pasta has finished cooking, drain and add first layer of pasta to cover the bottom tomato soup layer. Note: I usually have enough pasta to do about 3 layers in total.
After the pasta is added, sprinkle on a generous amount of either Shredded Cheddar, Colby Jack, Mozzarella, or a little American Cheese, or if you feel really fancy do a combination of your favorites.
I always like to make sure the dish is seasoned throughout so after the cheese layer I sprinkle on some salt or garlic salt, just enough to add a little seasoning.
Next, top the cheese with your next layer of tomato soup, enough to go around the whole layer, but don’t make the dish too soupy. And continue layering with pasta and then cheese until your top layer is finished off with some cheese.
Cook at 350 for about 15-20 minutes until the top is melted and begins to brown.
Enjoy!
Gluten Free Tomato Soup Macaroni And Cheese
Nothing beats a warm bowl of tomato soup or steaming plate of cheesy macaroni and cheese when there’s inches upon inches of snow on the ground. Just looking at the snow makes me crave both; so why not combine them into this one delicious Gluten Free Tomato Soup Macaroni And Cheese! I certainly know what’s on our dinner menu for today since we’ll definitely be putting in some cold but fun playtime out in the freshly fallen snow.
12 oz box Gluten Free Pasta, elbows or penne will do (My favorites are Ronzoni and Barilla)
Between 1 1/2 and 2 cups Gluten Free Tomato Soup (No more Campbell's Soup because it's loaded with wheat, but my favorite substitute is Pacific Foods Organic Creamy Tomato Soup, it's so creamy and perfect for this macaroni and cheese.)
1 1/2 - 2 cups Shredded Cheddar, Colby Jack, Mozzarella or any mixture of them (I also like to add in American Cheese if I have it, it really matches well with the tomato soup, kind of like grilled cheese dipped in tomato soup.)
Garlic Powder
Salt
Instructions
Cook your pasta according to the directions on the box, cutting off 2 minutes or so since you're cooking your pasta in the oven afterwards. Whenever I use pasta like this I always cut a few minutes off of the total cook time since it'll continue to cook in the oven after, just to prevent it from being mushy.
Preheat oven to 350 degrees.
Measure out 1 1/2 to 2 cups Gluten Free Creamy Tomato Soup, Pacific Foods is my favorite. I use somewhere in the middle of 1 1/2 to 2 cups, it really depends on what casserole dish I choose to use. Basically, you just want to make sure your macaroni and cheese will be creamy enough without it turning to soup.
Add some garlic powder to tomato soup and mix, adding just enough to melt in that delicious garlic flavor.
To a 2.5 qt baking dish, cover the bottom of the dish with tomato soup mixture until layer is about 1/4 inch deep.
When pasta has finished cooking, drain and add first layer of pasta to cover the bottom tomato soup layer. Note: I usually have enough pasta to do about 3 layers in total.
After the pasta is added, sprinkle on a generous amount of either Shredded Cheddar, Colby Jack, Mozzarella, or a little American Cheese, or if you feel really fancy do a combination of your favorites.
I always like to make sure the dish is seasoned throughout so after the cheese layer I sprinkle on some salt or garlic salt, just enough to add a little seasoning.
Next, top the cheese with your next layer of tomato soup, enough to go around the whole layer, but don't make the dish too soupy. And continue layering with pasta and then cheese until your top layer is finished off with some cheese.
Cook at 350 for about 15-20 minutes just until cheese has melted and top begins to brown slightly.
Enjoy!
By Gluten Free Mom To Be
Gluten Free Mom To Be http://www.glutenfreemomtobe.com/
Not too long ago I shared with you a very special review of one of my favorite gluten free cookbooks by BabyCakes in my very first vlog! I hope you caught on to how much I love their cookbook because I do, I really do! Each one of their recipes uses a reasonable amount of gluten free ingredients that you stock up on one time and you’re good to enjoy countless recipes down the road. And just as an added bonus, they use one of my favorite gluten free all purpose flours out there, by Bob’s Red Mill.
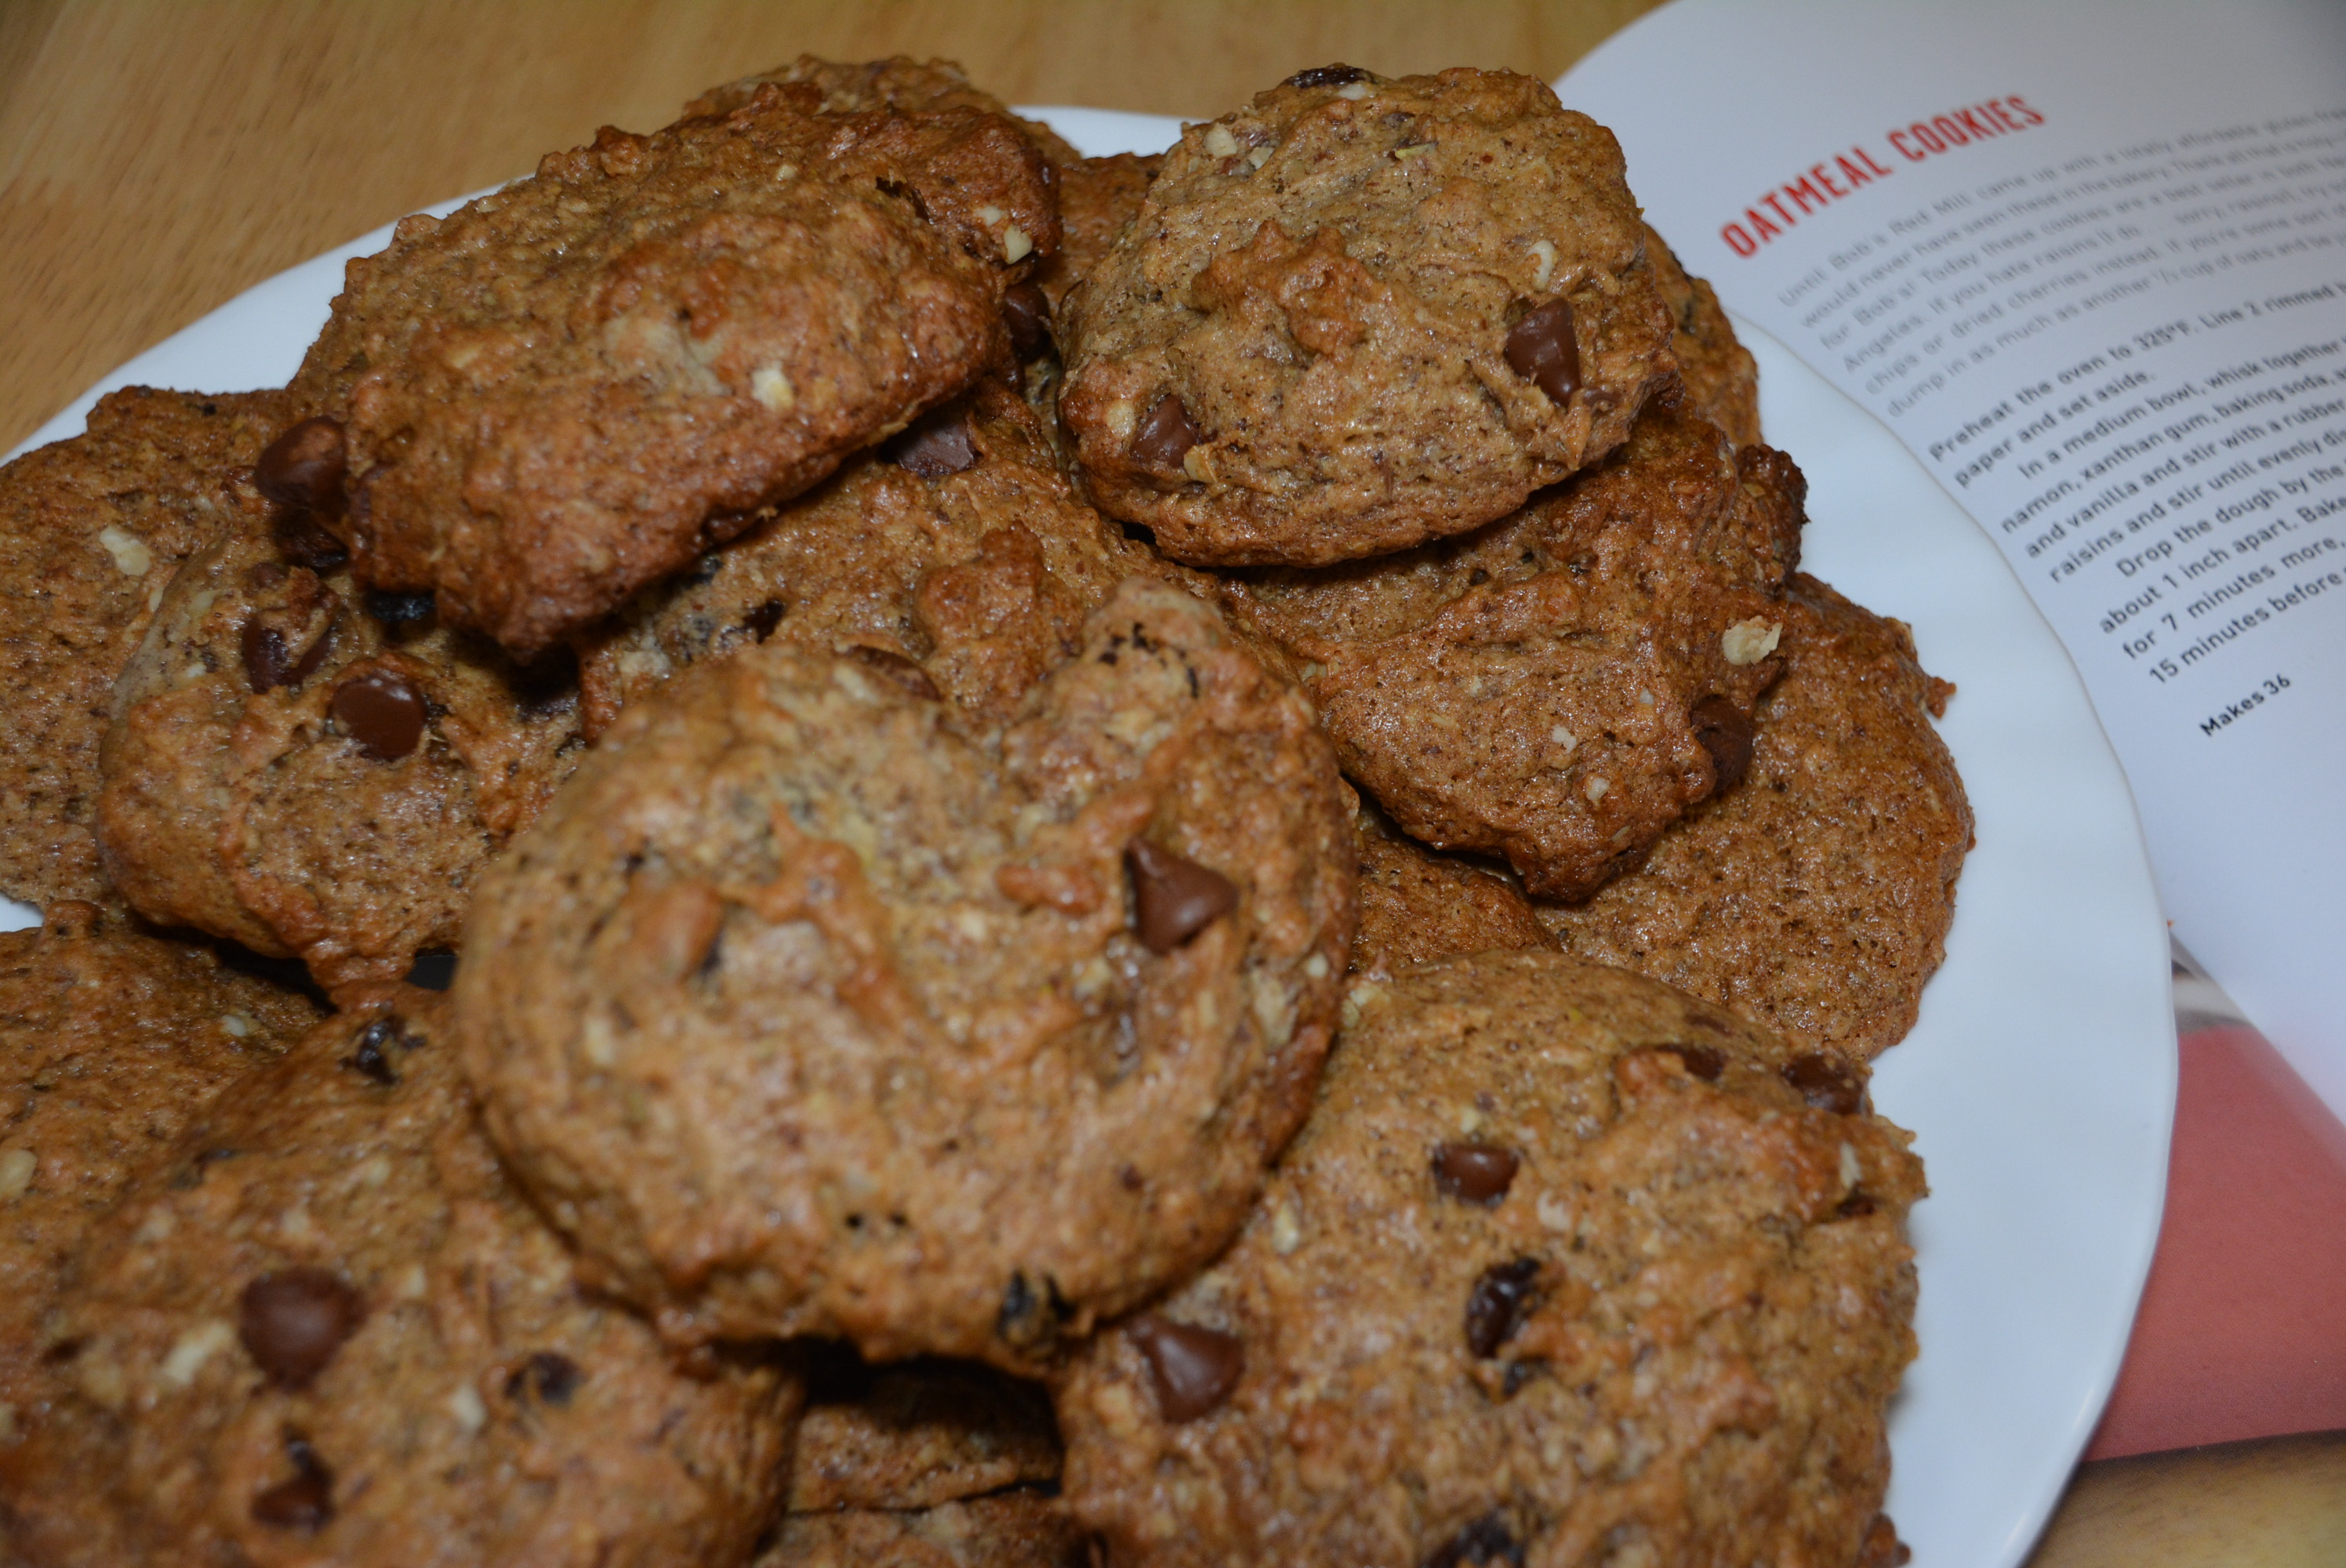
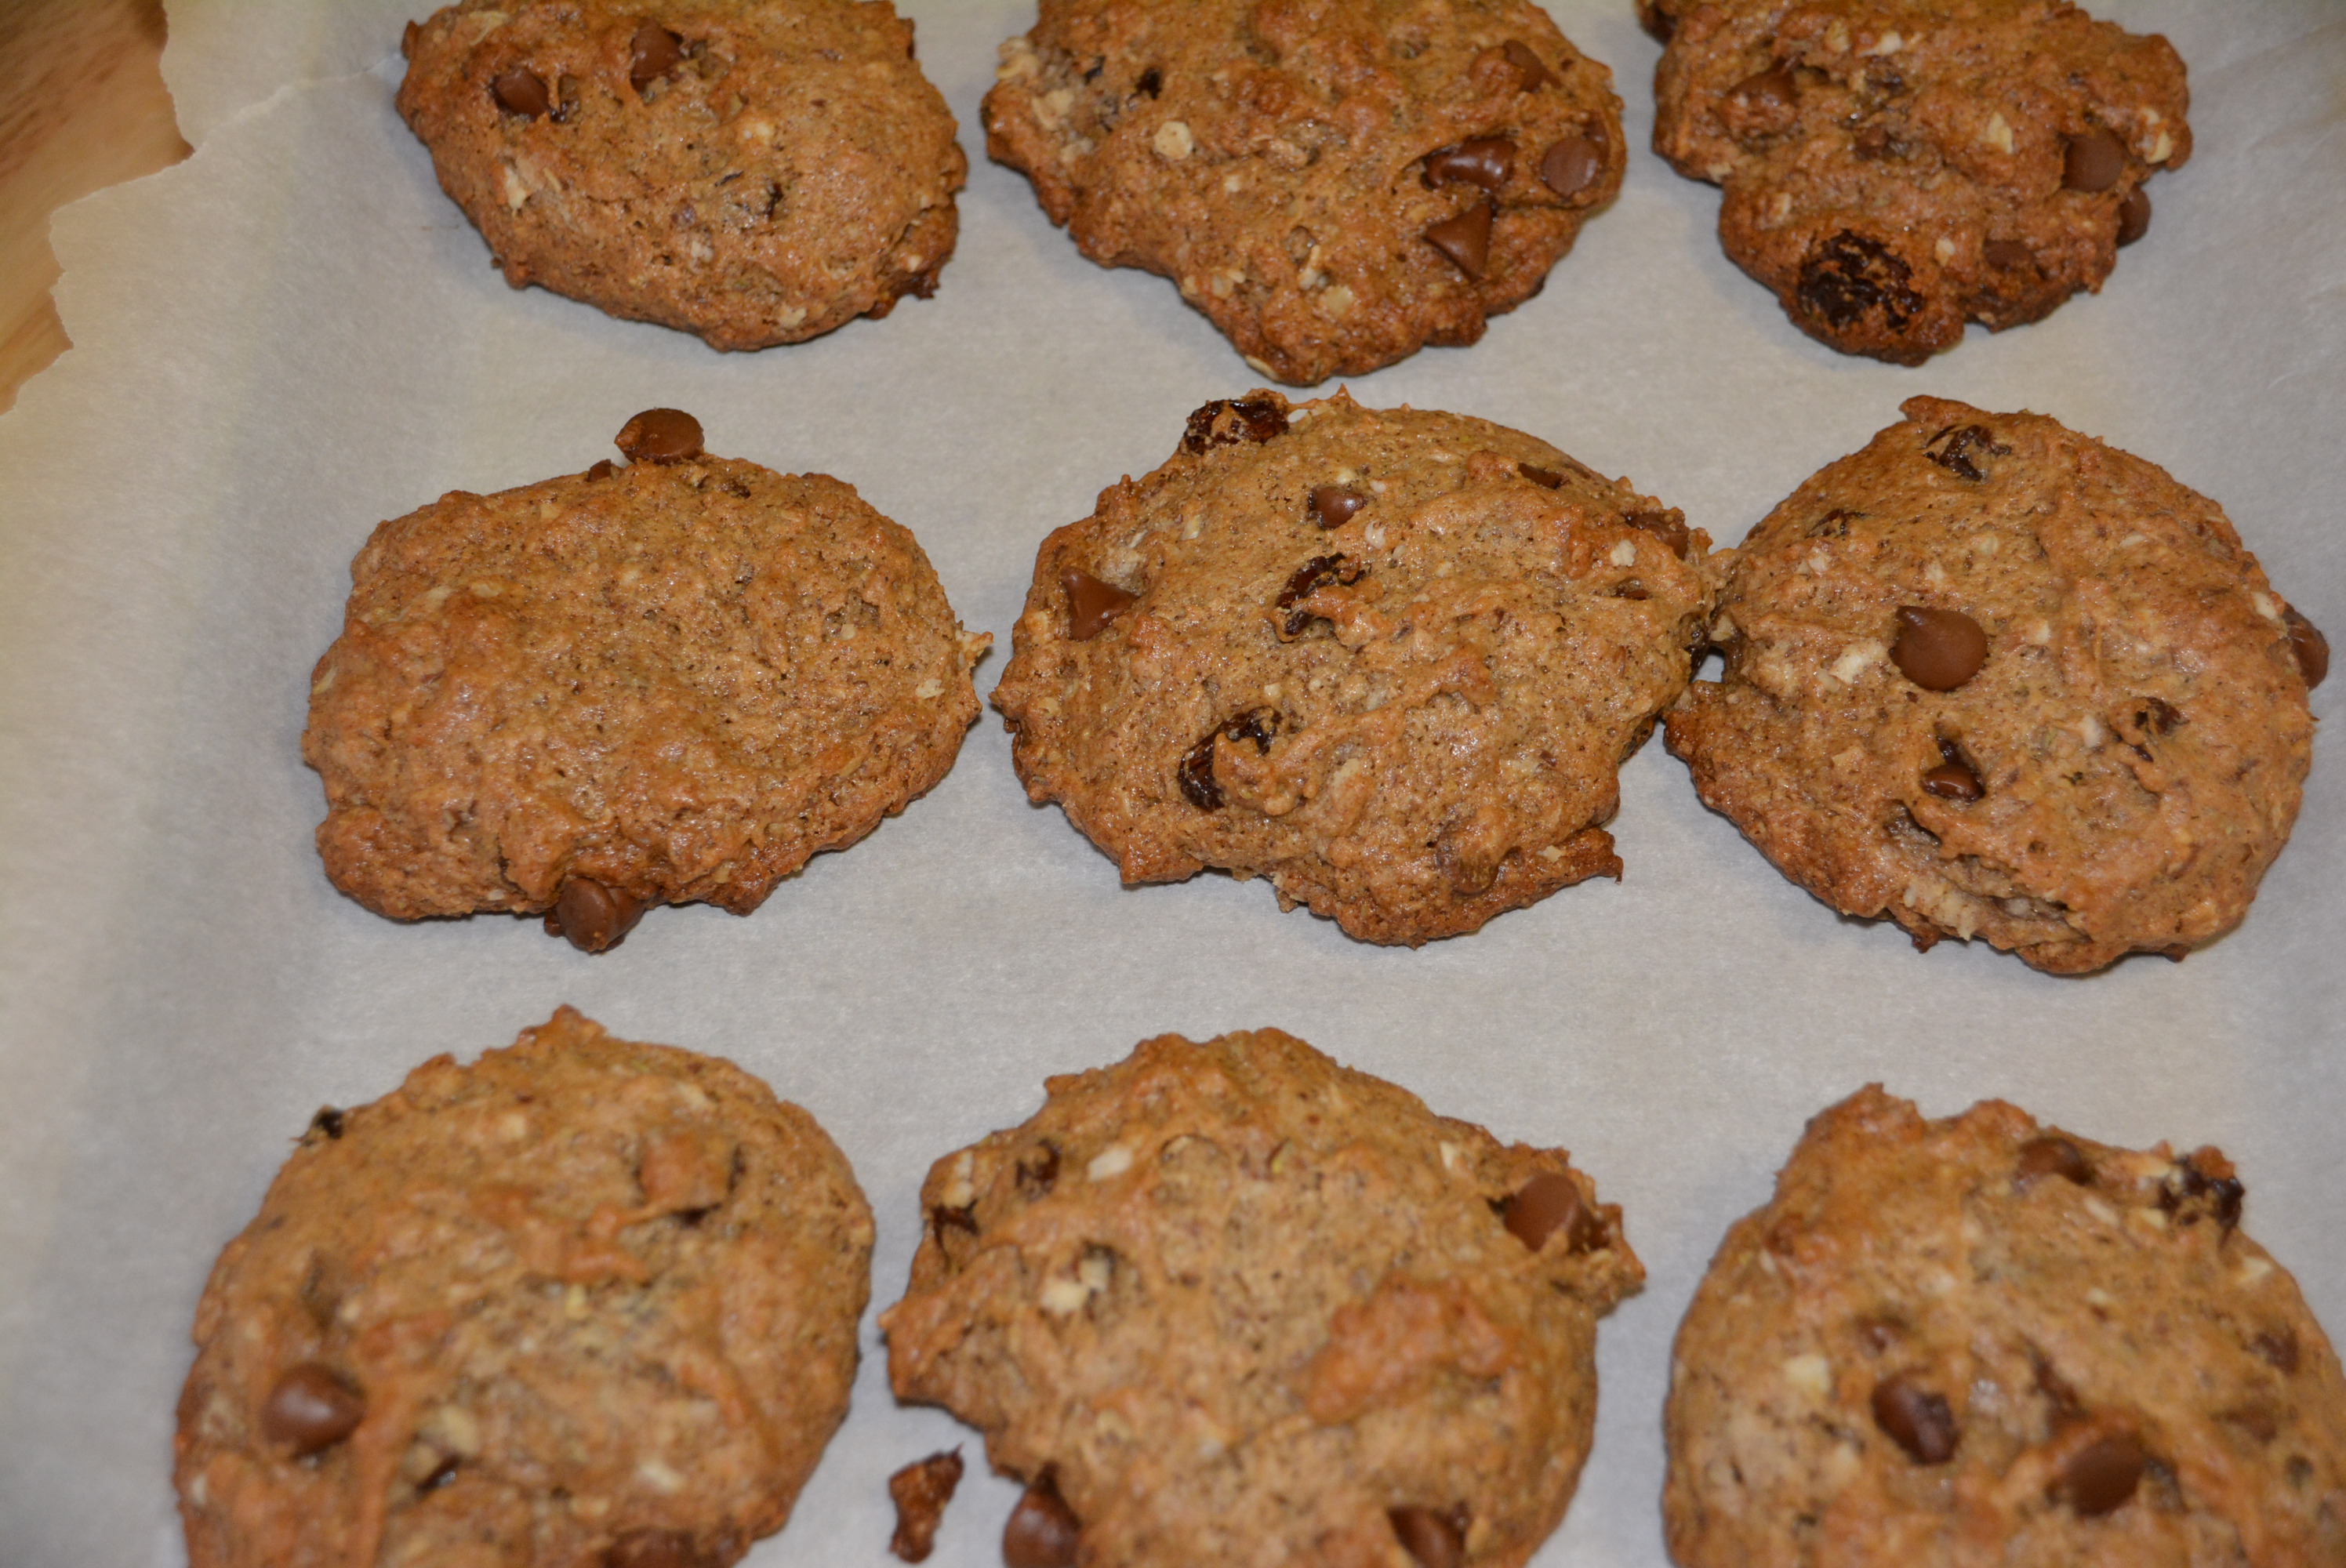
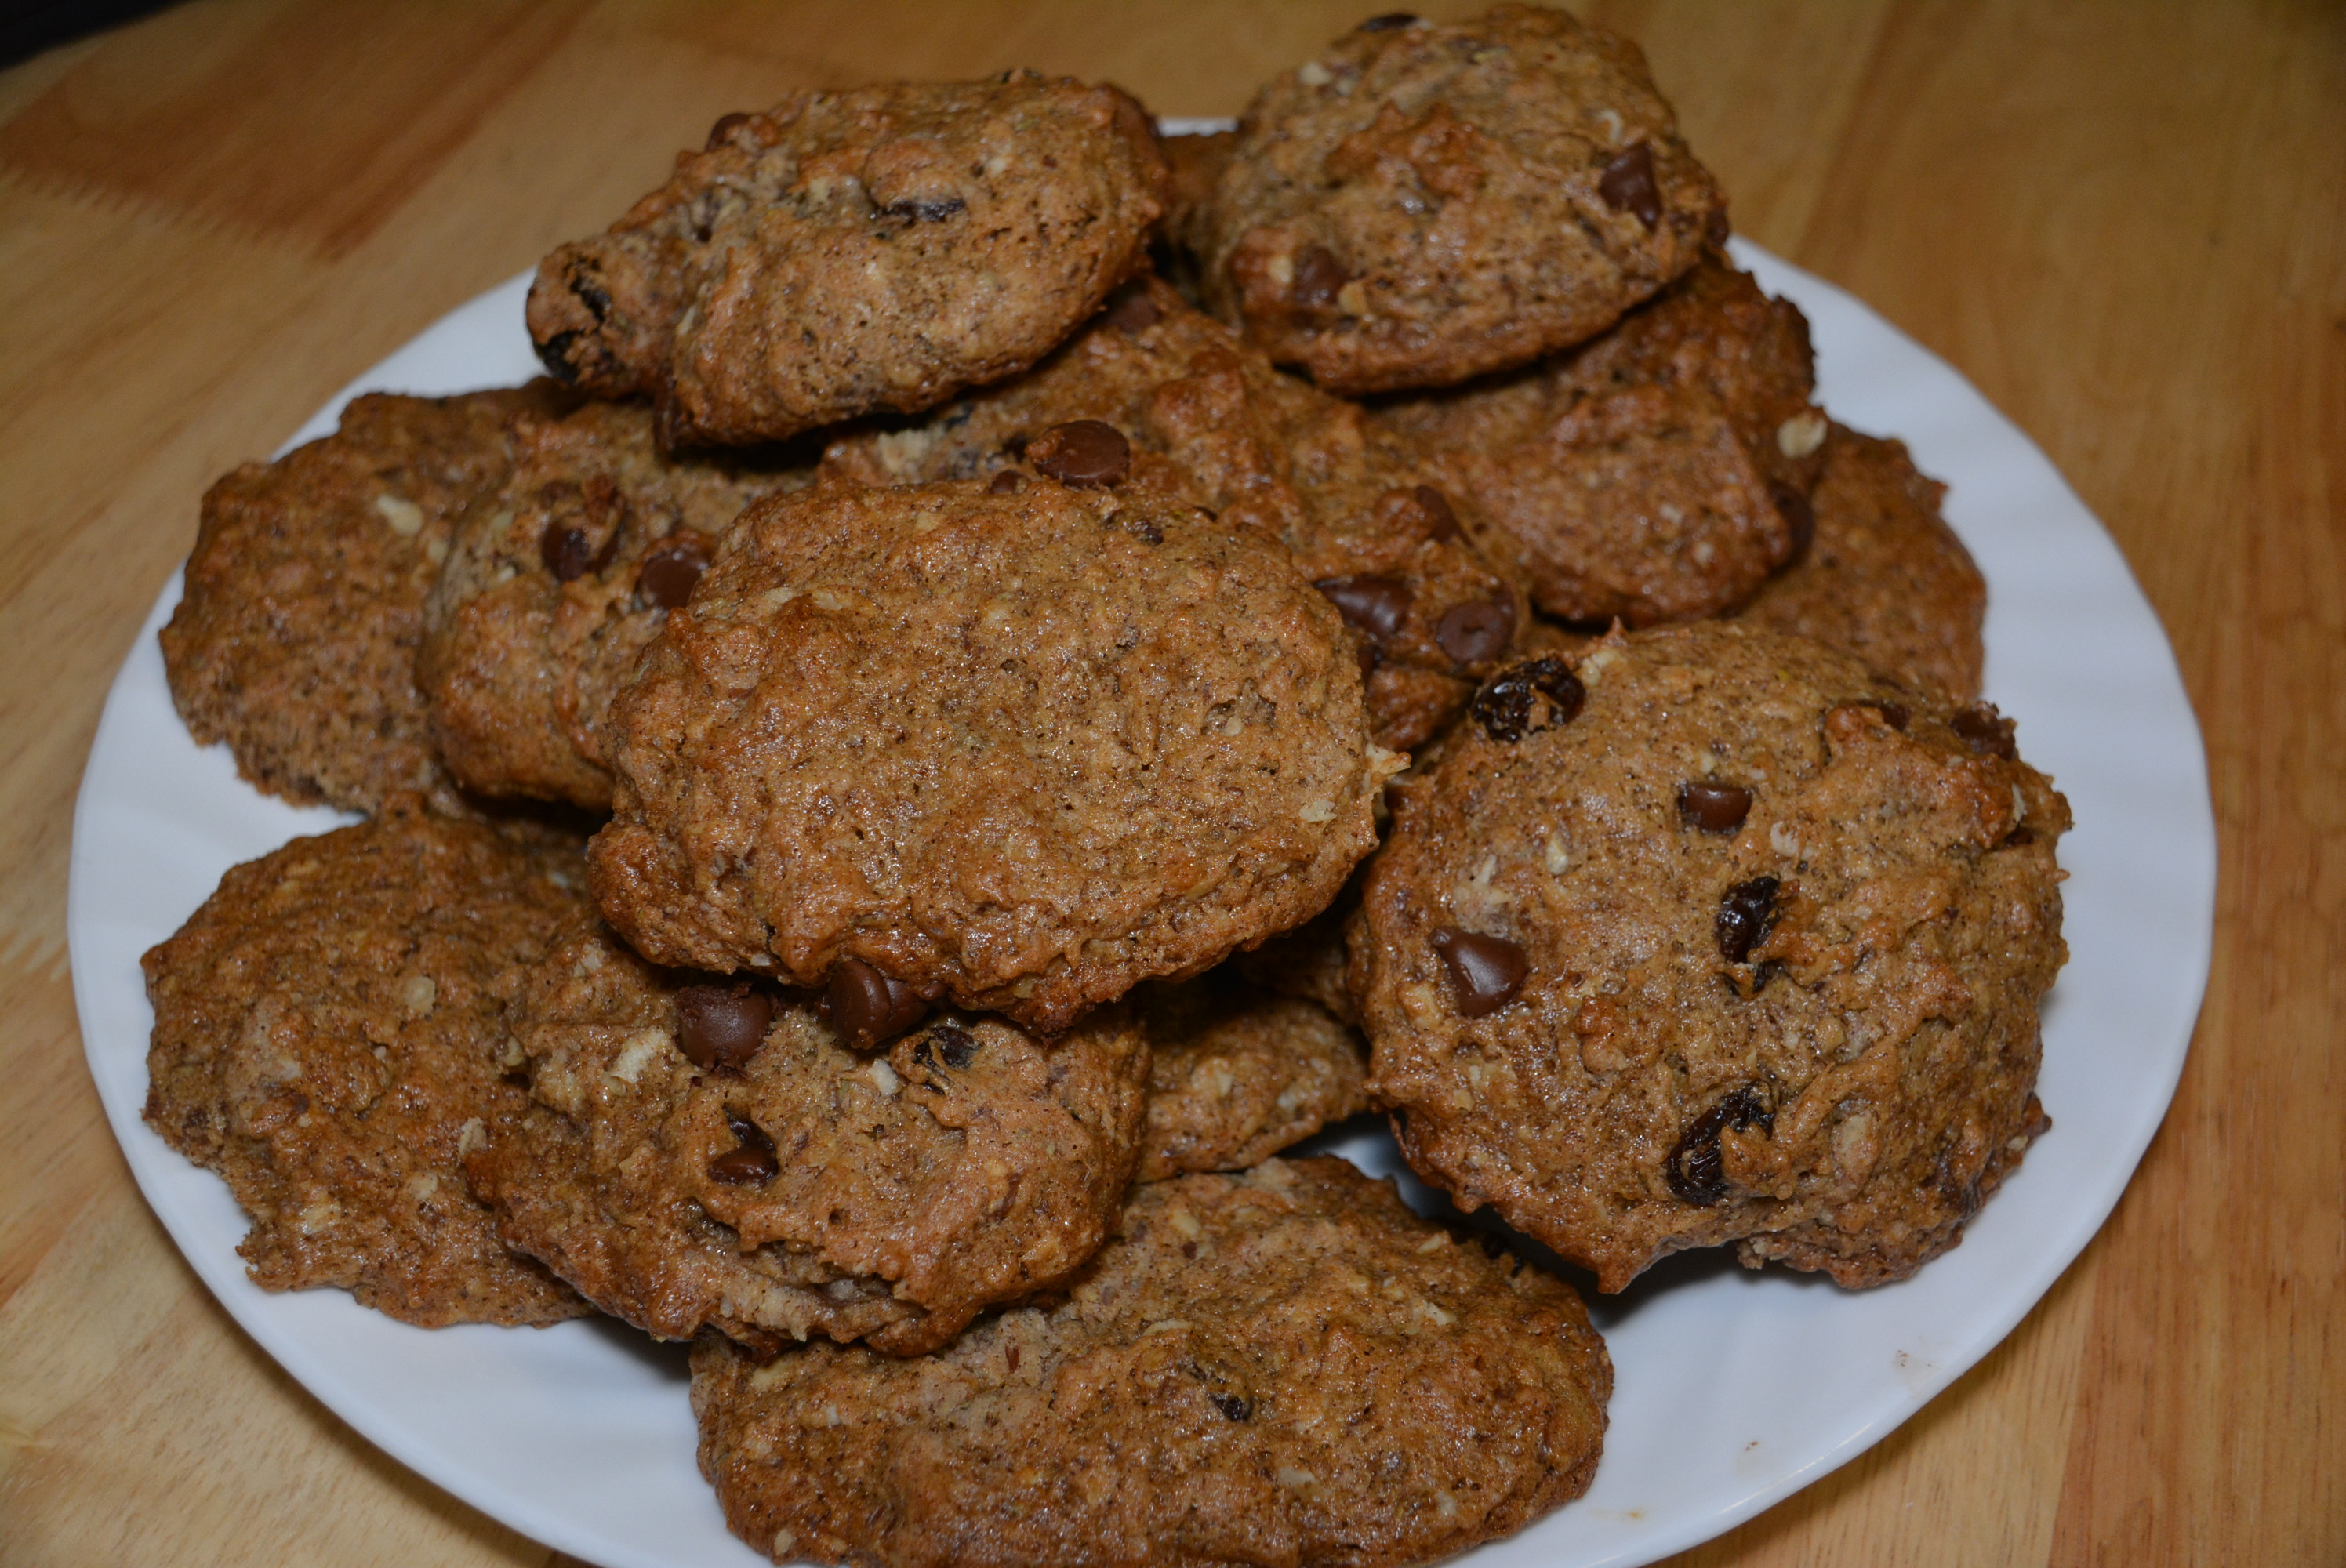
So with the holidays rolling around, I thought I’d remind you about their fantastic BabyCakes Covers The Classics cookbook that shares amazing allergy free cookie recipes. They share your basic cookie recipes, made special by BabyCakes of course, to some pretty special kinds that’ll surely be gobbled up by all, making it pretty tough to keep some around to put out for Santa Christmas Eve night. One of my favorites happens to be a classic cookie that I honestly haven’t tasted in my gluten free life, that’s the Oatmeal Raisin Cookie. I teasingly shared a glimpse of my special batch with you on my vlog but now today I thought I’d share the recipe with you too. Now, BabyCakes gives you the basic Oatmeal Cookie recipe but suggests a few swap outs or changes that would work too. I decided to add a little twist inspired by my all time favorite gluten free candy, Raisinets. So without further ado, I introduce you to Oatmeal Chocolaty Raisin Cookies!
Ingredients:
1 3/4 cups Bob’s Red Mill All Purpose Gluten Free Flour
1 cup sugar
1/2 cup Gluten Free Oats (I actually used the new Plain Gluten Free Oatmeal by Chex.)
1/4 cup Ground Flax Meal (I always use Bob’s Red Mill which is certified gluten free.)
2 tbsp Ground Cinnamon
1 1/2 tsp Xanthan Gum
1 tsp Baking Soda
1 tsp Salt
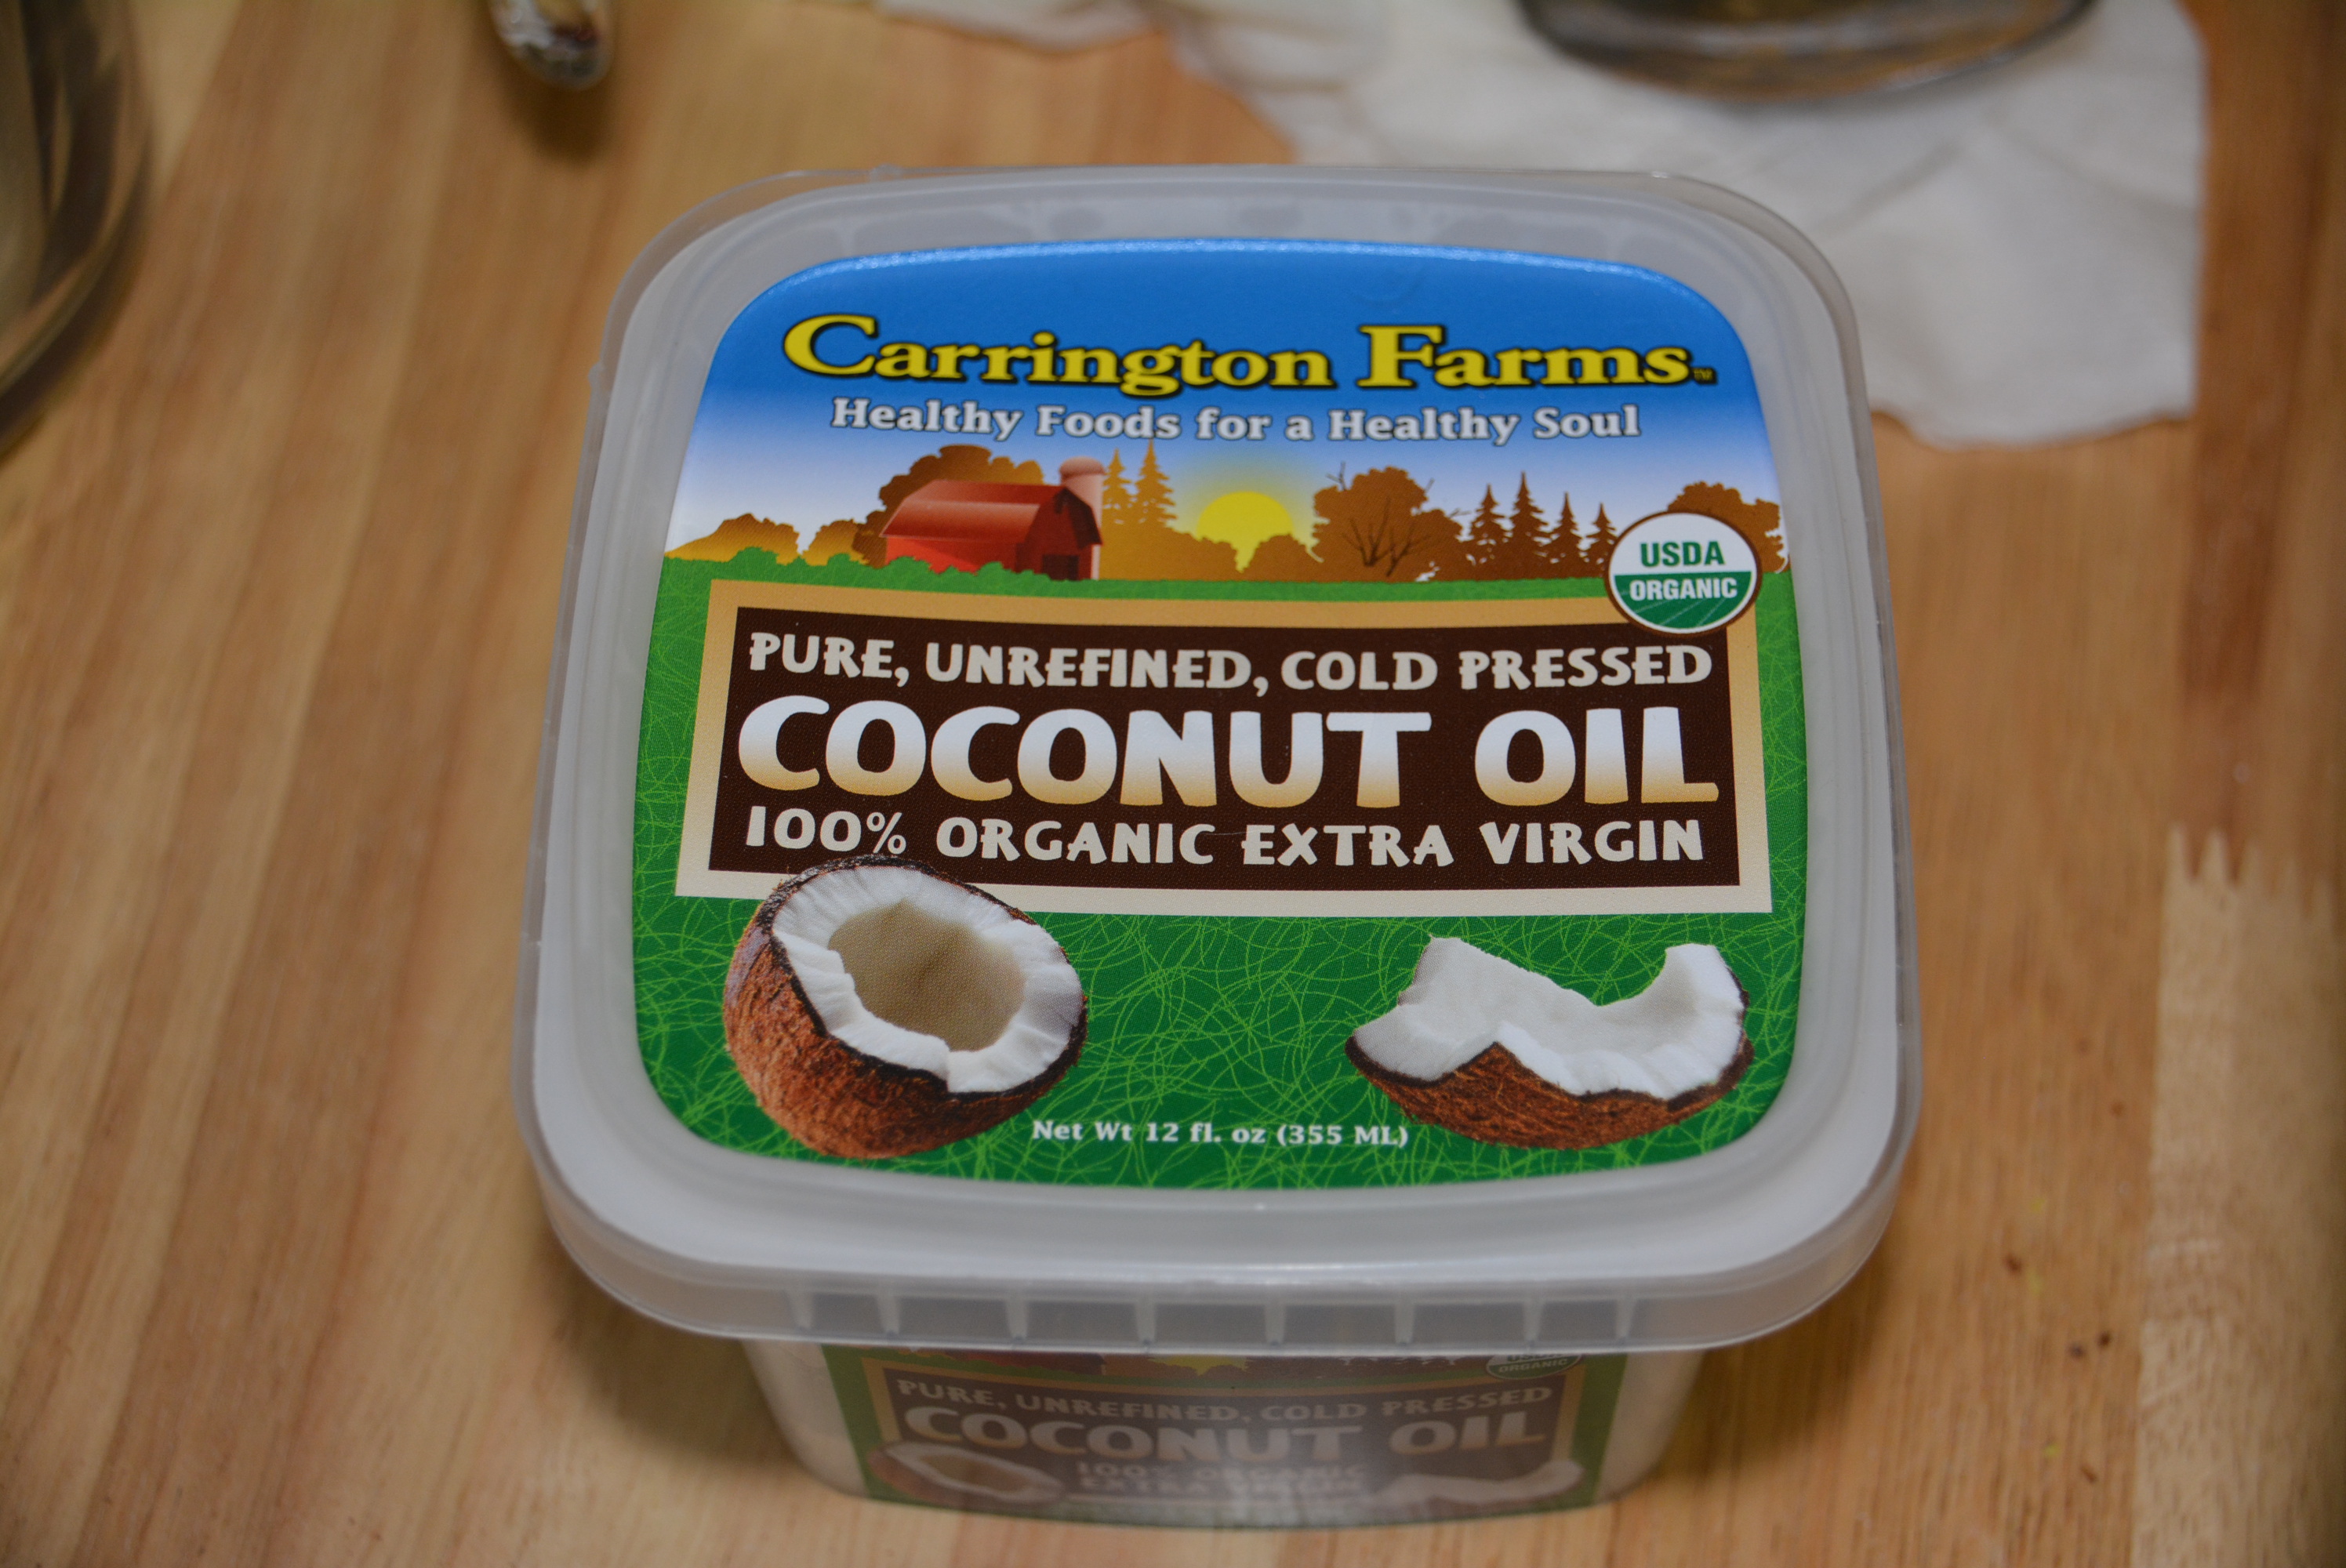
1 cup Melted Refined Coconut Oil (Pick a gluten free variety like the one by Carrington Farms. Alternatively you can use a canola oil.)
1/2 cup Unsweetened Applesauce (I like Musselman’s which states gluten free on the label.)
2 tbsp Vanilla Extract (Always make sure it’s pure vanilla extract, McCormick’s is gluten free.)
3/4 cup Raisins
3/4 cup Milk Chocolate Chips (Hershey’s are gluten free.)
Note: Feel free to use less chocolate if you prefer just a hint of chocolaty flavor or you could get really fancy and add in Raisinets instead of the raisins and chocolate chips but this is just a slightly less sugary method.
Directions:
Preheat your oven to 325 degrees and line 2 baking sheets with parchment paper.
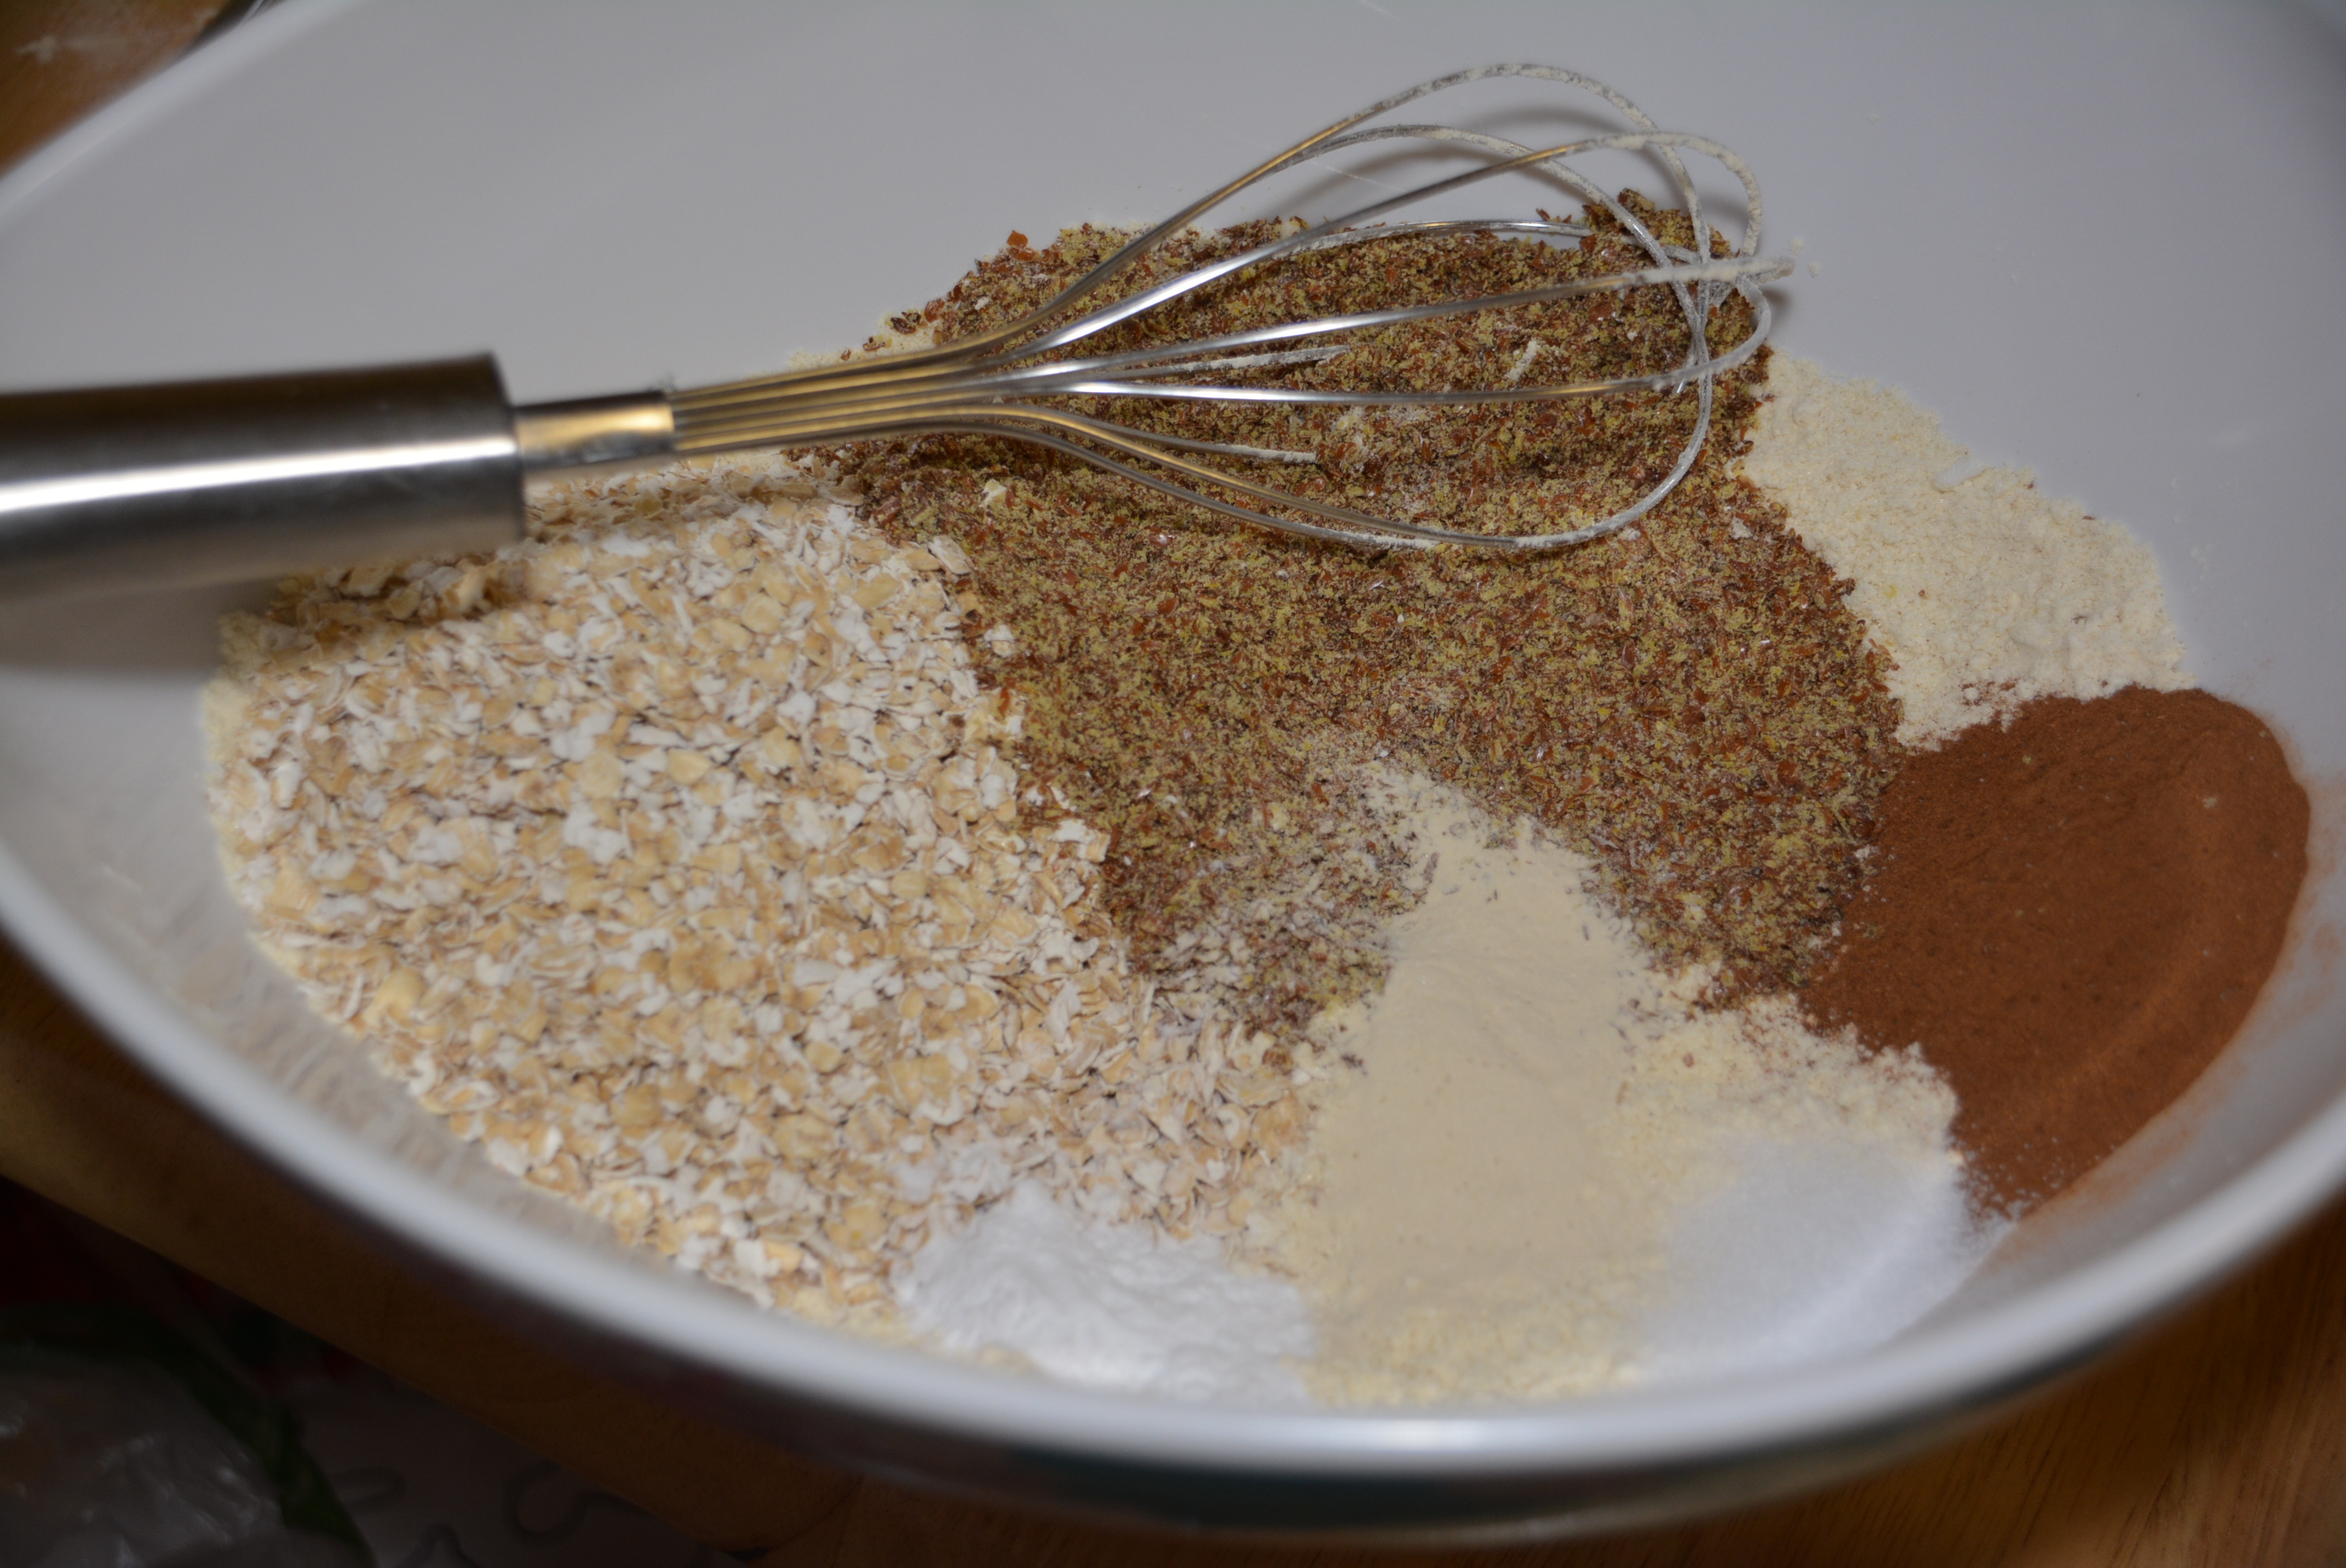
Using a whisk, combine all of the dry ingredients into a large mixing bowl including 1 3/4 cups gluten free all purpose flour, 1 cup sugar, 1/2 cup gluten free oats, 1/4 cup flax meal, 2 tbsp cinnamon, 1 1/2 tsp xanthan gum, 1 tsp baking soda, and 1 tsp salt.
Next, melt 1 cup coconut oil for measuring, which I like to do in a glass measuring cup.
Add 1 cup of your melted coconut oil along with 1/2 cup applesauce and 2 tbsp vanilla to the dry mix and gently stir with a rubber spatula until a thicker dough forms.
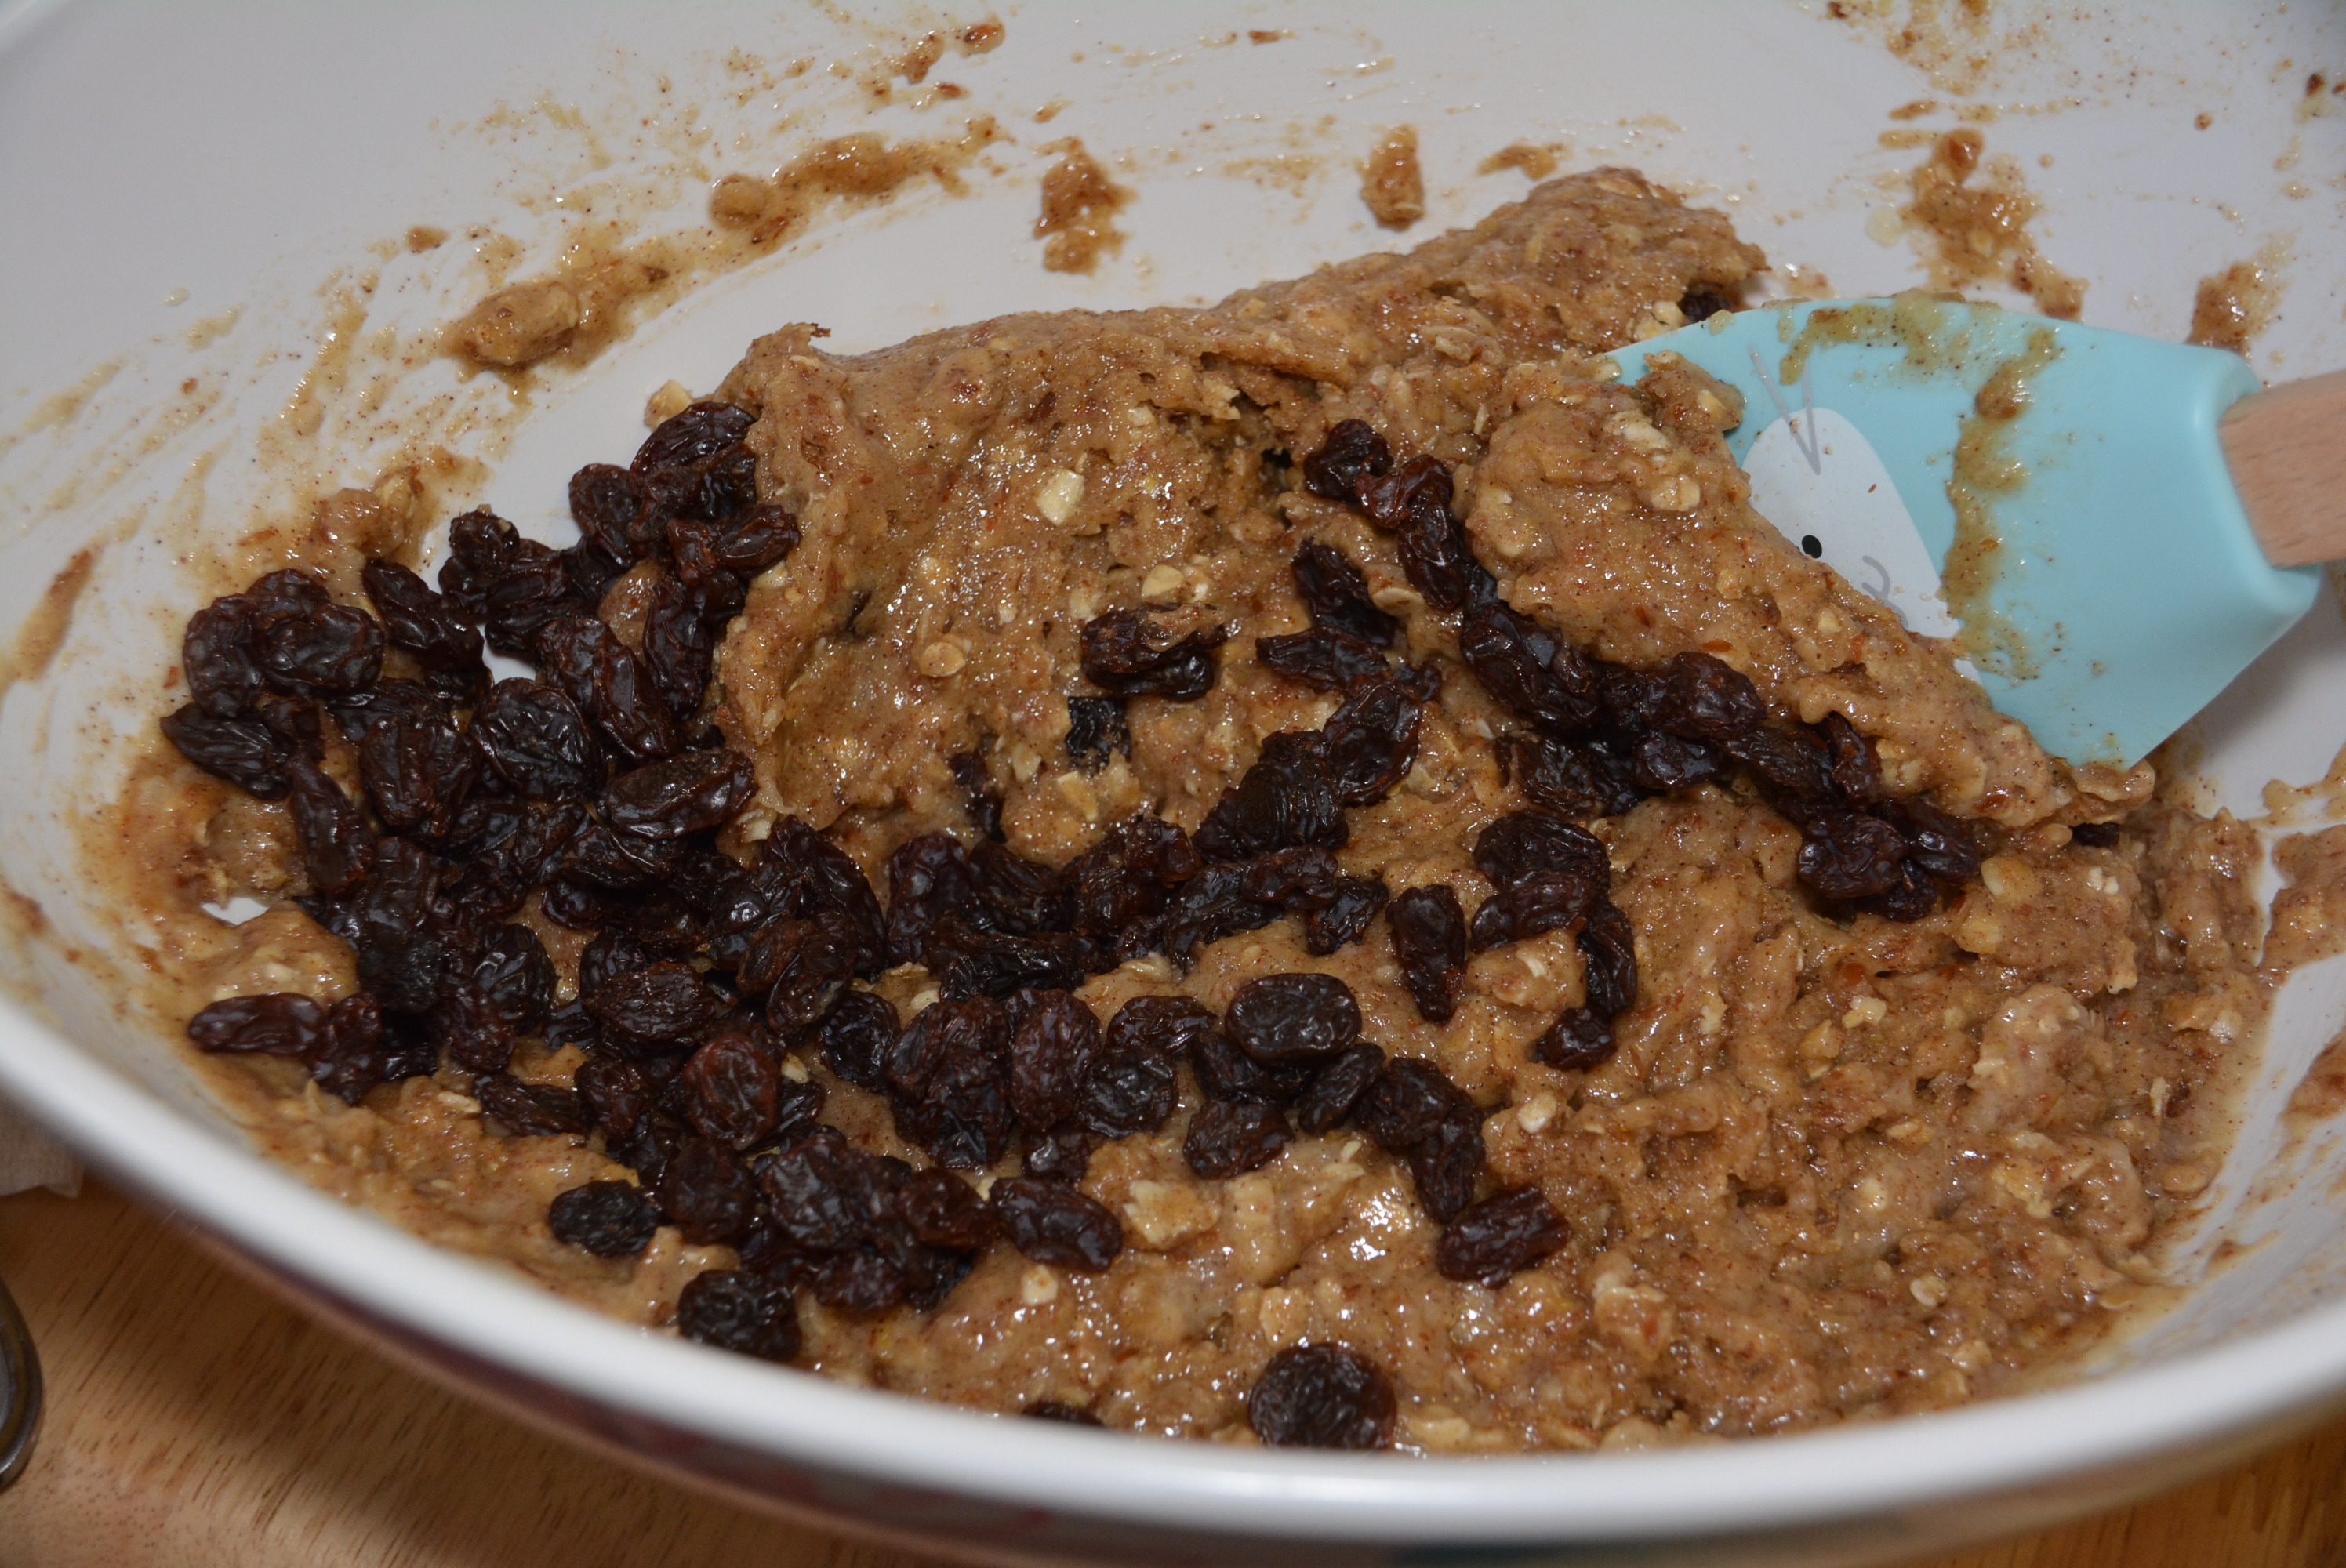
Finally, add in 3/4 cup raisins and 3/4 cup chocolate chips. If you want to make some raisin cookies without chocolate, add your raisins and mix your dough up, split your dough into two, and add just half the amount of chocolate chips to one bowl of dough.
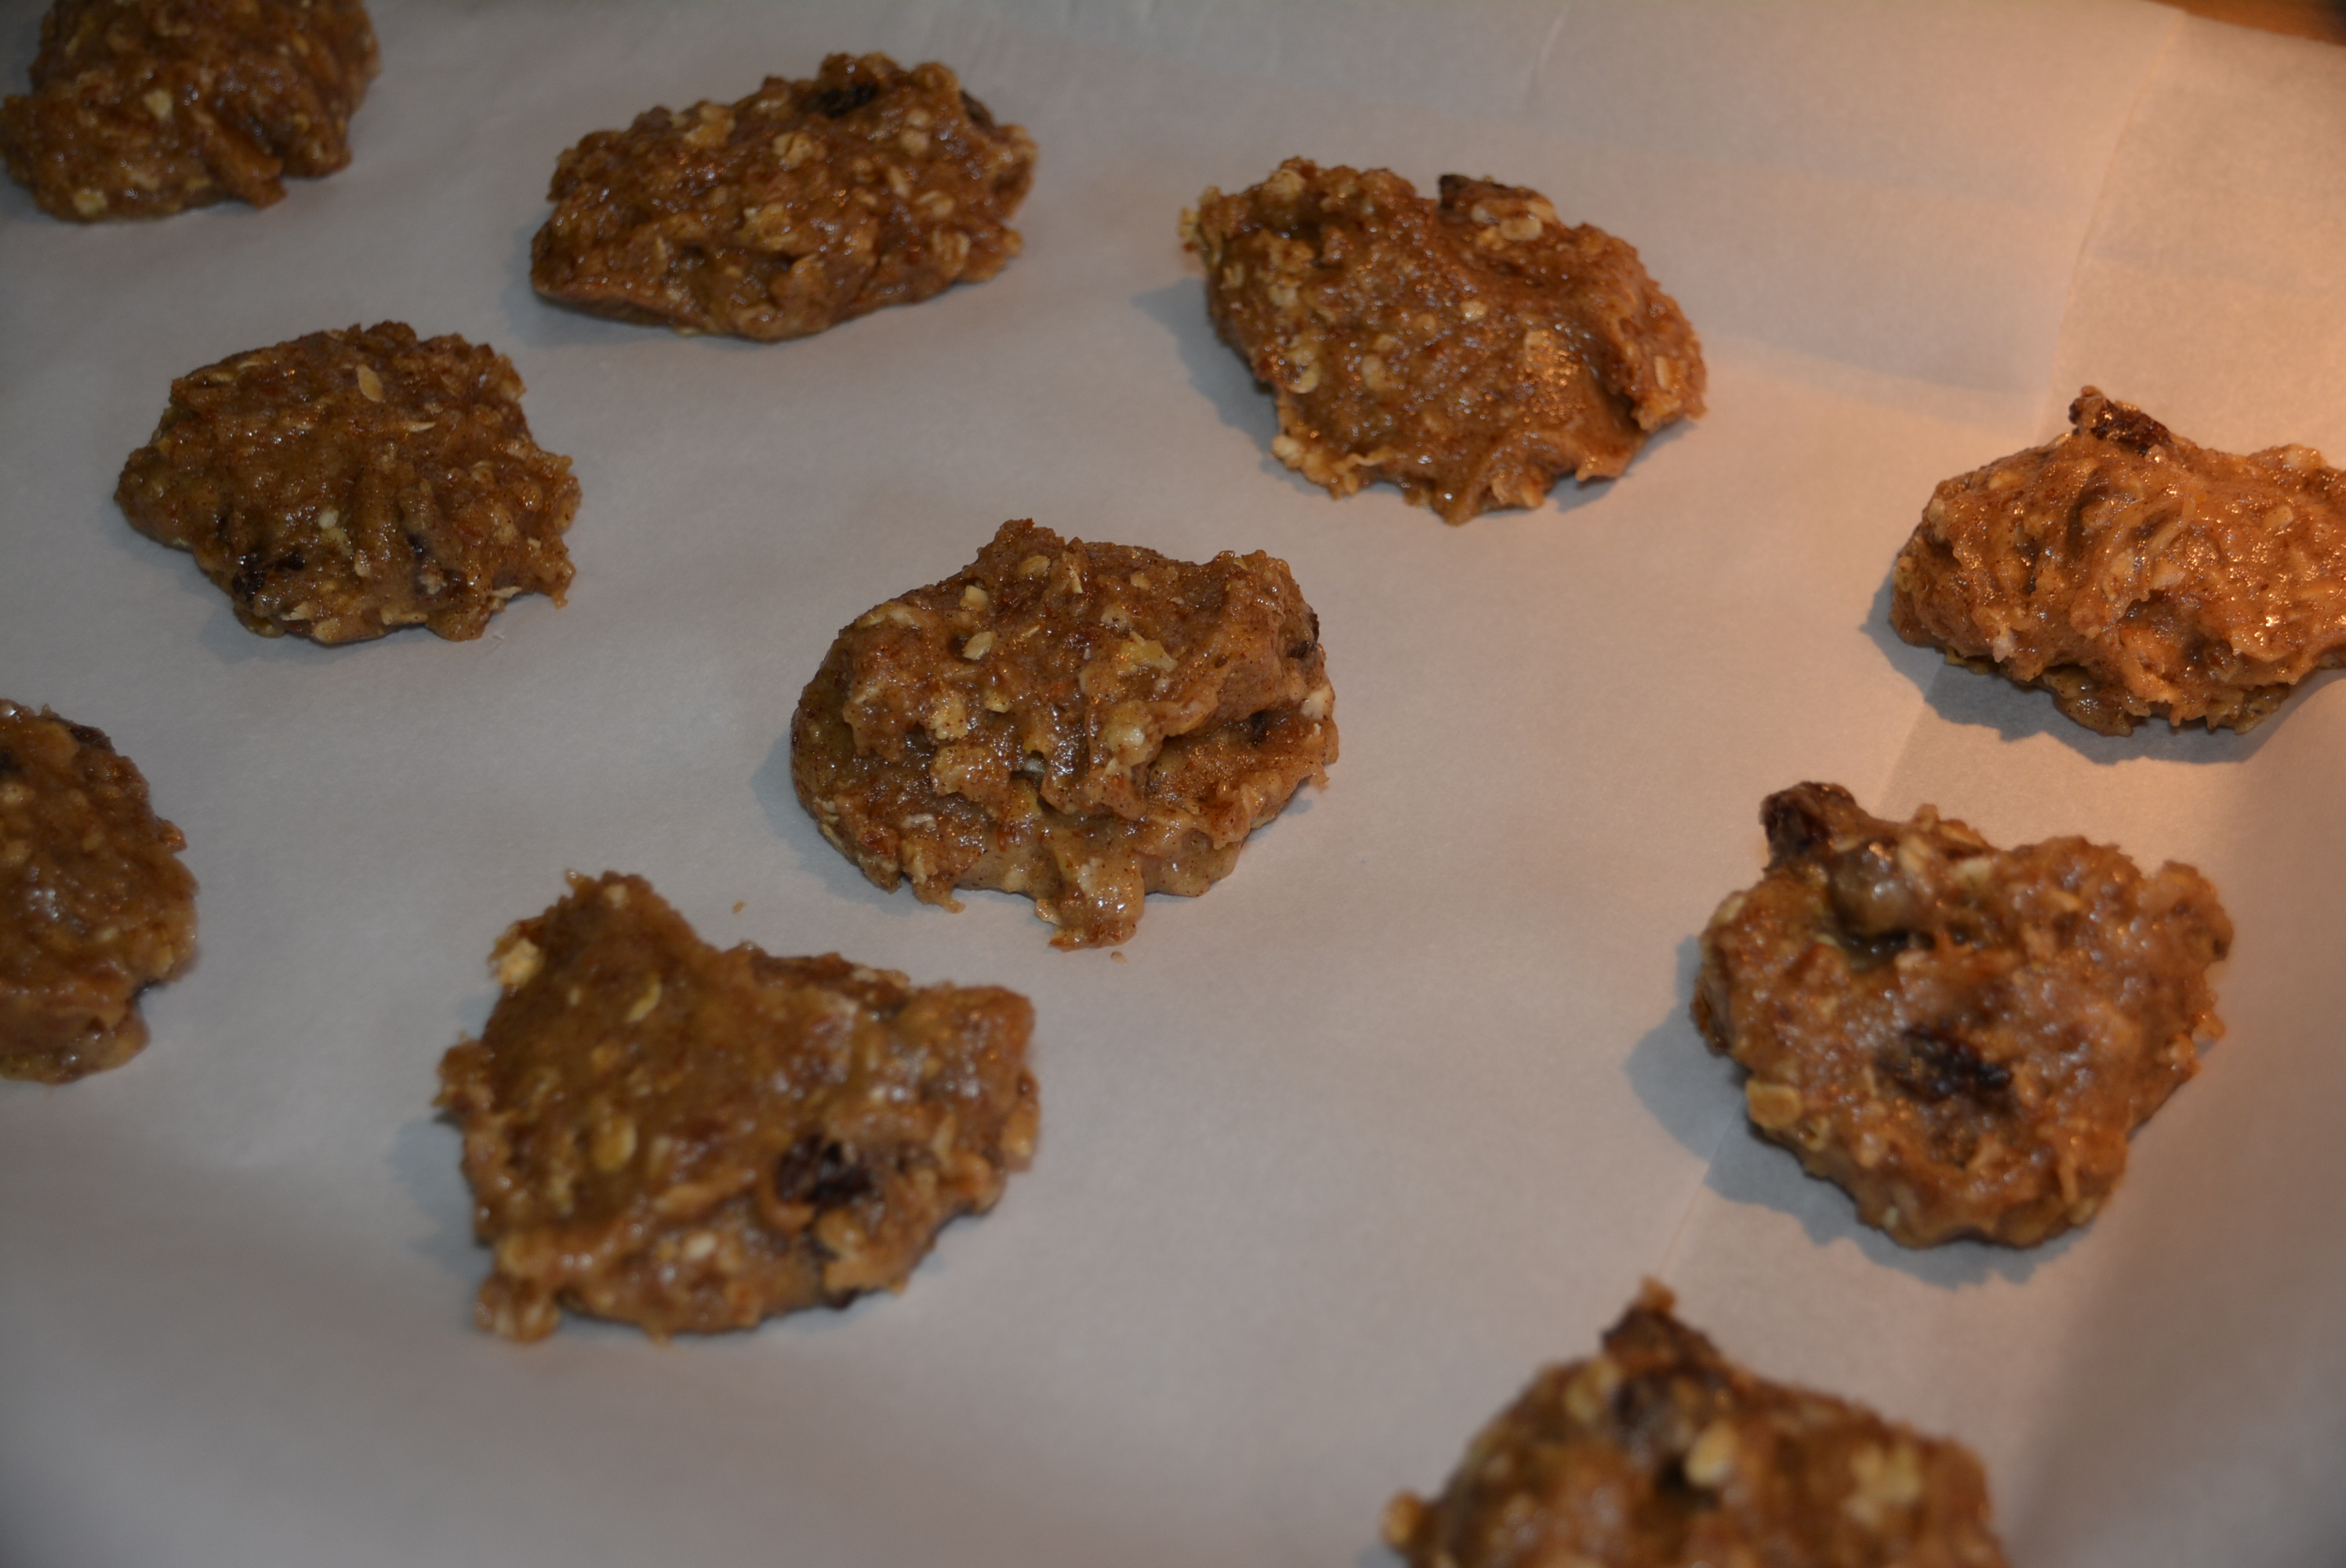
Using a tablespoon, drop the dough by spoonful onto the parchment paper covered baking sheets.
Bake for about 8 minutes, turn the baking sheet 180 degrees, and bake for an additional 7 minutes until your cookies turn golden brown. Always make sure you keep an eye on your cookies and cook times. Sometimes you may have to cook a little longer or a little shorter depending on your oven.
Remove your baking sheets from the oven and let the cookies cool a bit on the baking sheets for about 15 minutes and enjoy!
As I’m sure we all could agree, gluten free baking in general is no easy task. It’s really tough to get just the right texture without changing the flavor for the worse. But somehow, someway BabyCakes makes gluten free baking look easy and taste perfect! And I just love that through their cookbooks we too can learn the secrets behind the tastiness of their recipes and tons of gluten free baking tips and tricks between. Thanks to their cookbooks I feel a bit more confident in my gluten free baker’s shoes, and not too afraid of unique ingredients that appear all too often in gluten free baking. So make sure you snatch up a BabyCakes cookbook for your gluten free holiday baking this year and in the meantime, try my Oatmeal Chocolaty Raisin Cookies!
1 3/4 cups Bob's Red Mill All Purpose Gluten Free Flour
1 cup sugar
1/2 cup Gluten Free Oats (I actually used the new Plain Gluten Free Oatmeal by Chex.)
1/4 cup Ground Flax Meal (I always use Bob's Red Mill which is certified gluten free.)
2 tbsp Ground Cinnamon
1 1/2 tsp Xanthan Gum
1 tsp Baking Soda
1 tsp Salt
1 cup Melted Refined Coconut Oil (Pick a gluten free variety like the one by Carrington Farms. Alternatively you can use a canola oil.)
1/2 cup Unsweetened Applesauce (I like Musselman's which states gluten free on the label.)
2 tbsp Vanilla Extract (Always make sure it's pure vanilla extract, McCormick's is gluten free.)
3/4 cup Raisins
3/4 cup Milk Chocolate Chips (Hershey's are gluten free.)
Instructions
Preheat your oven to 325 degrees and line 2 baking sheets with parchment paper.
Using a whisk, combine all of the dry ingredients into a large mixing bowl including 1 3/4 cups gluten free all purpose flour, 1 cup sugar, 1/2 cup gluten free oats, 1/4 cup flax meal, 2 tbsp cinnamon, 1 1/2 tsp xanthan gum, 1 tsp baking soda, and 1 tsp salt.
Next, melt 1 cup coconut oil for measuring, which I like to do in a glass measuring cup.
Add 1 cup of your melted coconut oil along with 1/2 cup applesauce and 2 tbsp vanilla to the dry mix and gently stir with a rubber spatula until a thicker dough forms.
Finally, add in 3/4 cup raisins and 3/4 cup chocolate chips. If you want to make some raisin cookies without chocolate, add your raisins and mix your dough up, split your dough into two, and add just half the amount of chocolate chips to one bowl of dough.
Using a tablespoon, drop the dough by spoonful onto the parchment paper covered baking sheets.
Bake for about 8 minutes, turn the baking sheet 180 degrees, and bake for an additional 7 minutes until your cookies turn golden brown. Always make sure you keep an eye on your cookies and cook times. Sometimes you may have to cook a little longer or a little shorter depending on your oven.
Remove your baking sheets from the oven and let the cookies cool a bit on the baking sheets for about 15 minutes and enjoy!
By Gluten Free Mom To Be
Adapted from BabyCakes
Adapted from BabyCakes
Gluten Free Mom To Be http://www.glutenfreemomtobe.com/
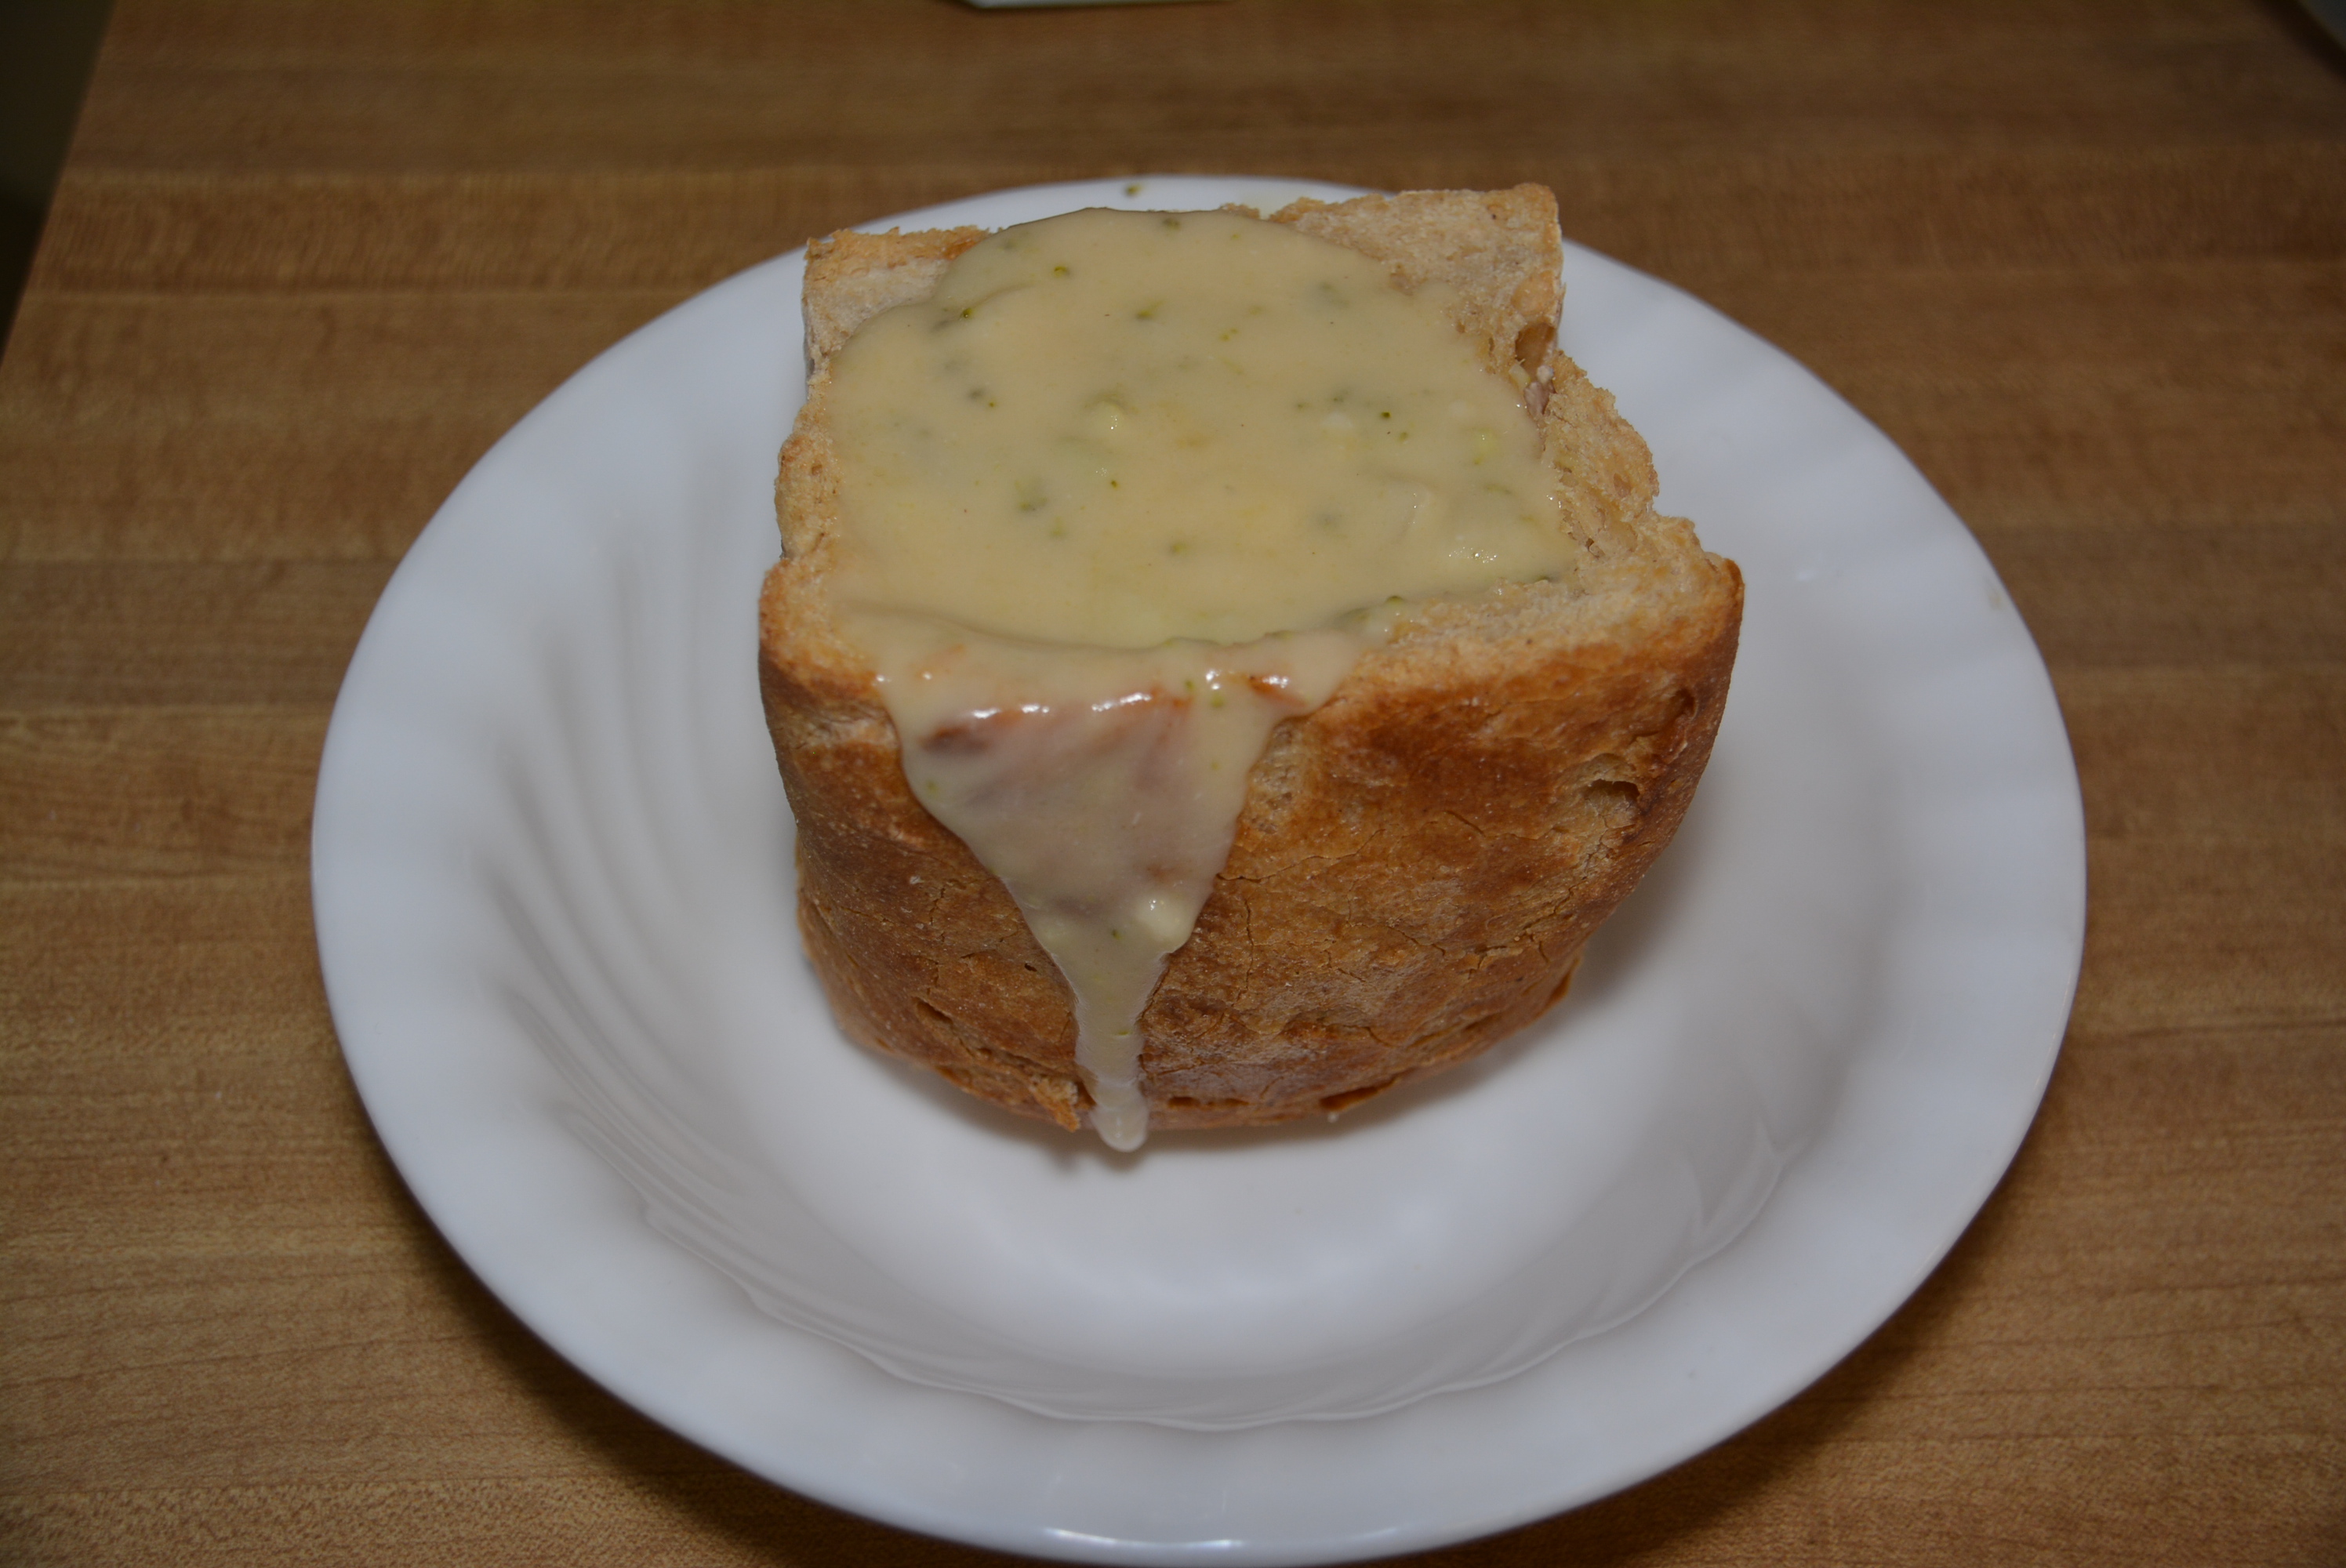
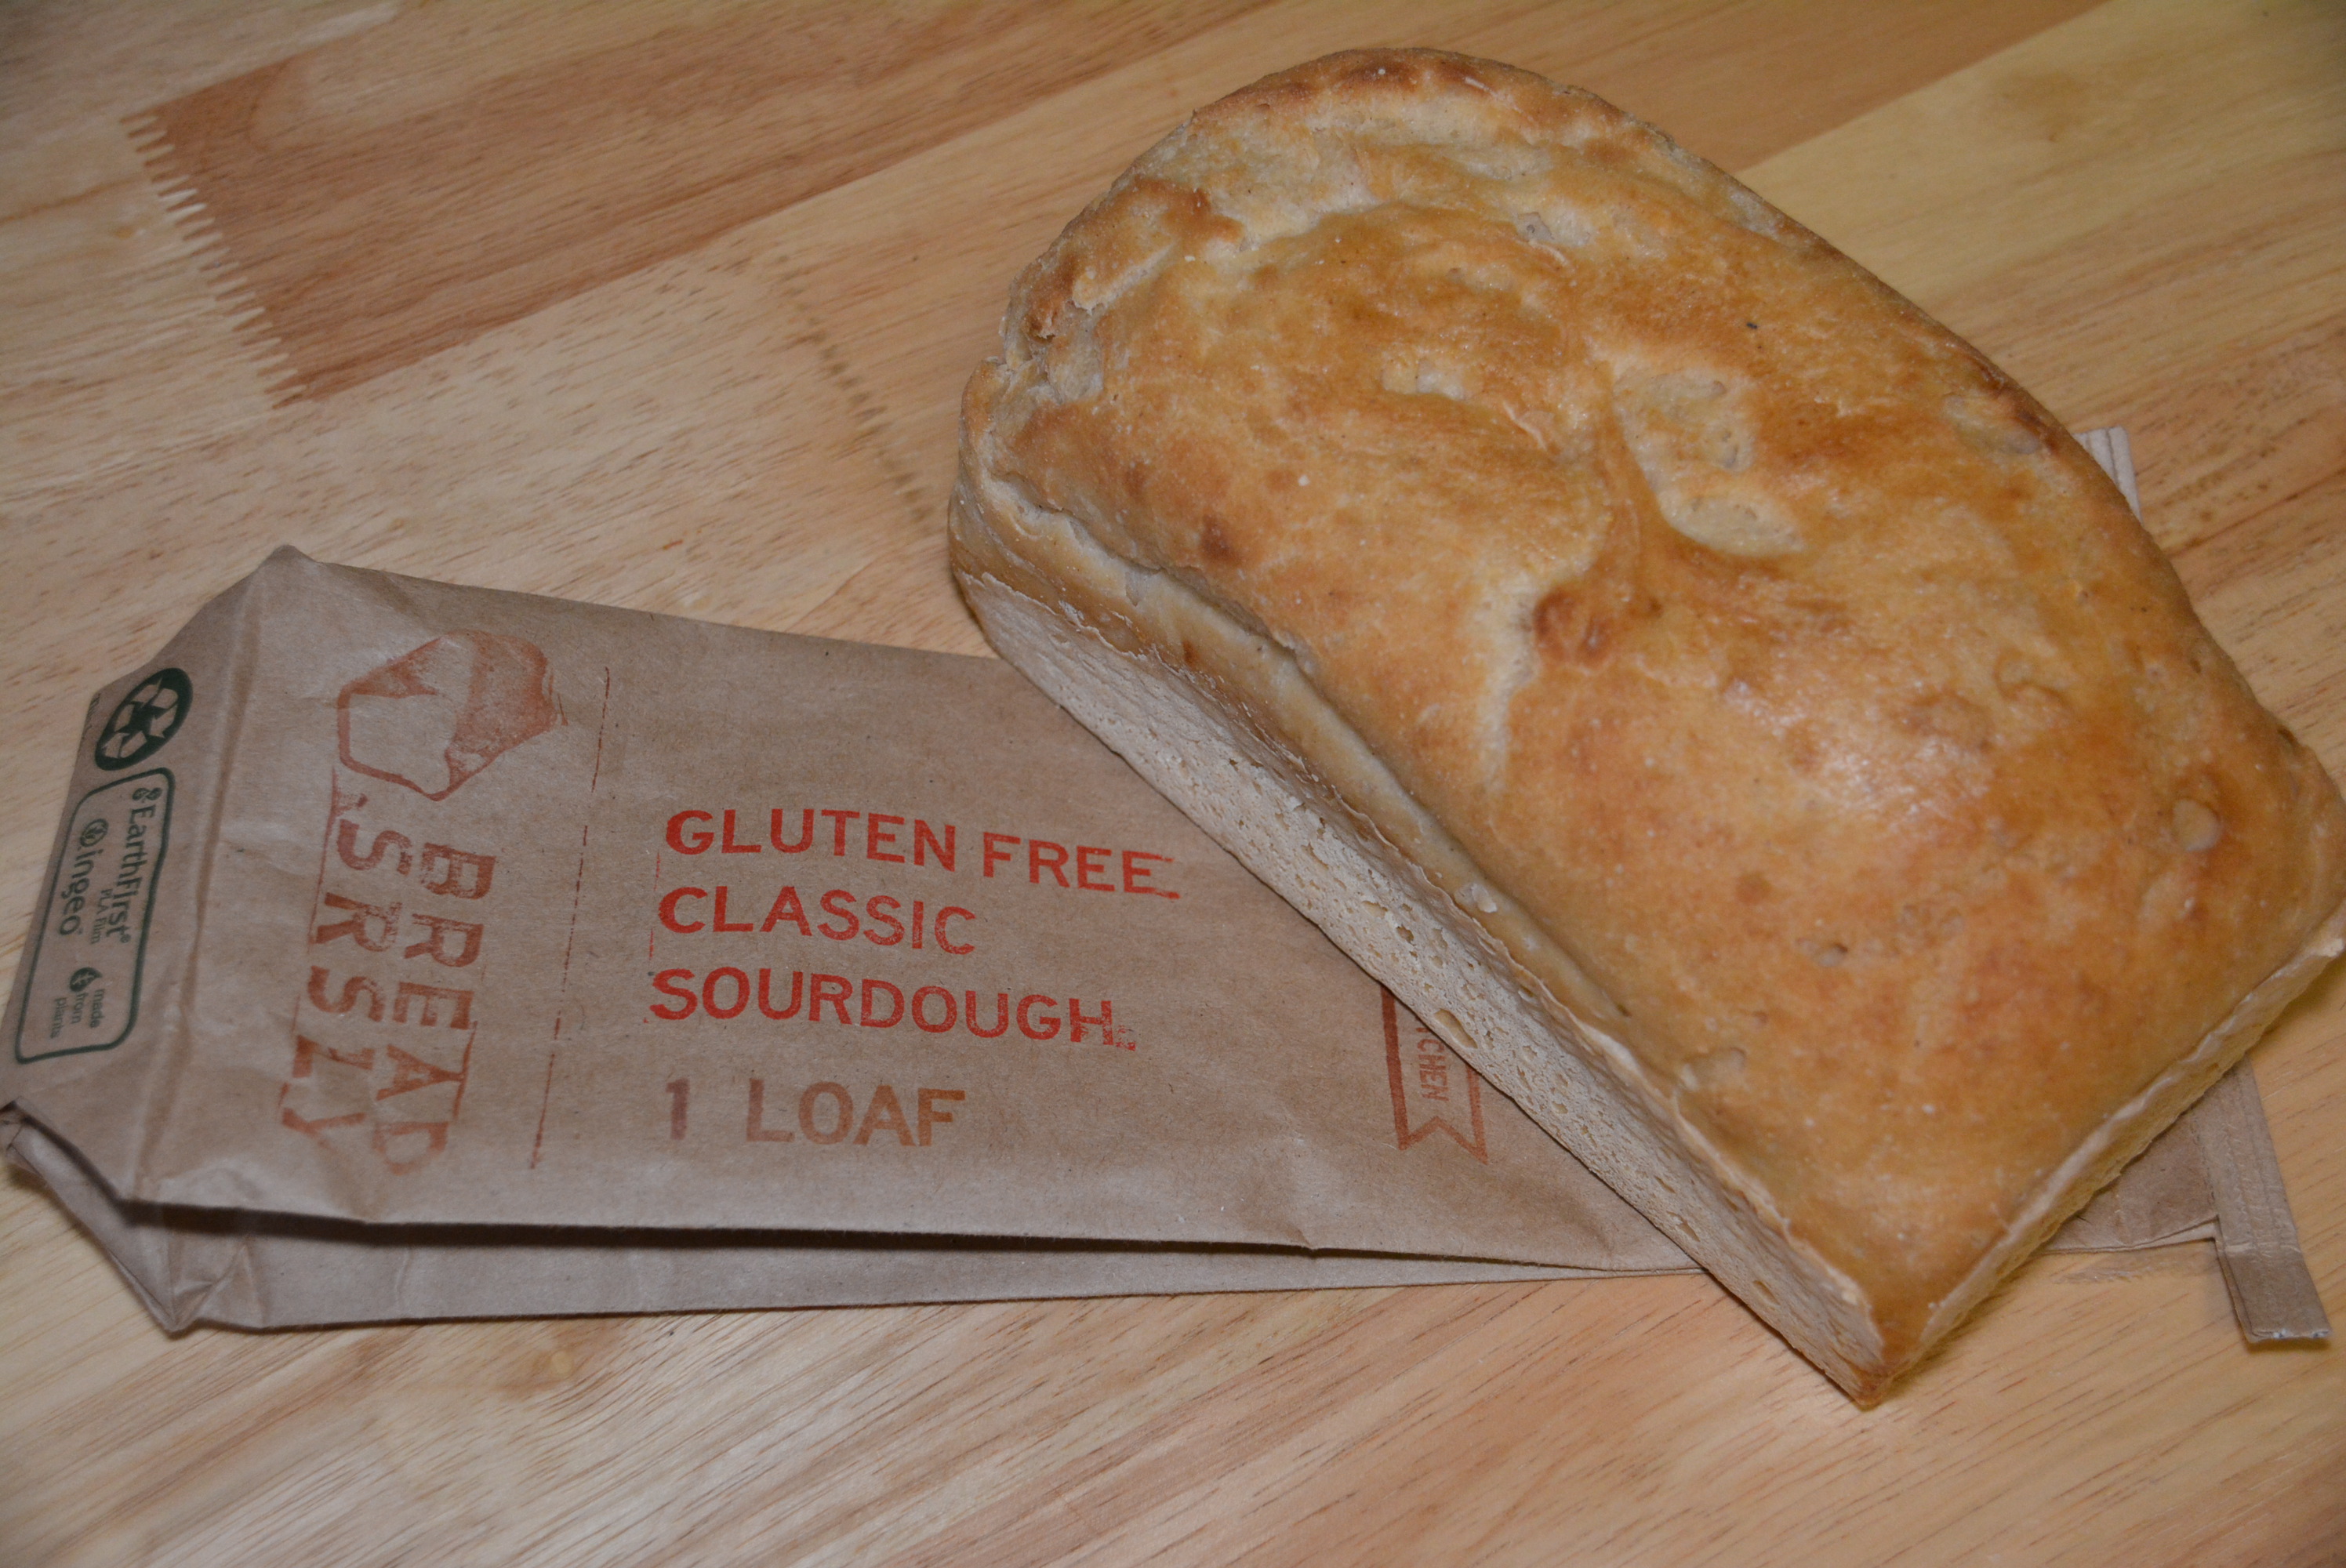
A little while ago I introduced you to this gluten free sourdough brand that I stumbled upon. They’re a San Francisco based company that created some authentic sourdough bread that’s gluten free! A small leap for mankind, sure, but a giant leap for the gluten free world. Those at Bread SRSLY sent me a few samples and I’ve had so much fun trying them out in every capacity that I could think of. Check out everything that I had to say about their products here but I thought I’d also share a little sneak peak of what I decided to do with them.
From these tasty, toasted tomato and mozzarella sandwiches on their sourdough sandwich rolls: To soup in a bread bowl made from a hollowed out half a loaf of bread: Each creation was just as delightful as the one before, but there’s one in particular that I haven’t shared with you yet that’s a little extra special. One of my all time favorite non-gluten free breakfast items is french toast. I remember for my birthday, my parents would always let each of us choose a restaurant that we’d like to have our birthday dinner at. One restaurant that never failed to appear for at least one of our birthdays during the year was Cracker Barrel, and not for their dinner menu but rather their breakfast selection. If you haven’t been, it’s probably for the best now seeing as though they aren’t very gluten free friendly at all but the days that I spent diving into their heaping plates of amazing french toast, hashbrown casserole, egg sandwiches, and cinnamon apples I look back fondly on and they just sing of family memories.
Much to my dismay, since my gluten days dining at Cracker Barrel I haven’t had the pleasure of tasting the wonderfulness of a french toast breakfast or dinner if you’re like my family and likes a breakfast kind of dinner. Don’t get me wrong, I’ve definitely given gluten free french toast a try, but the fragility and delicateness of gluten free bread just hasn’t held up to it’s construction. Until now that is. Thanks to Bread SRSLY and their gluten free sourdough bread, I’ve tasted french toast again! Nothing will quite meet the family friendly food memories that I have of Cracker Barrel’s finest dishes, like their french toast, but any recreation that won’t give me countless aches and pains I’m more than happy to enjoy in their place! So with Martha Stewart’s help and some twists and tweaks, grab your favorite gluten free sourdough bread and give my Gluten Free Sourdough French Toast a try.
Ingredients:
1 loaf gluten free sourdough, staler the better (I like Bread SRLY.)
6 large eggs
1 1/2 cups milk or light cream
2 tbsp pure vanilla extract
1/2 tsp ground cinnamon
a pinch of nutmeg
a pinch of salt
2 tbsp unsalted butter
pure maple syrup (gluten free) and additional butter for enjoying
Directions:
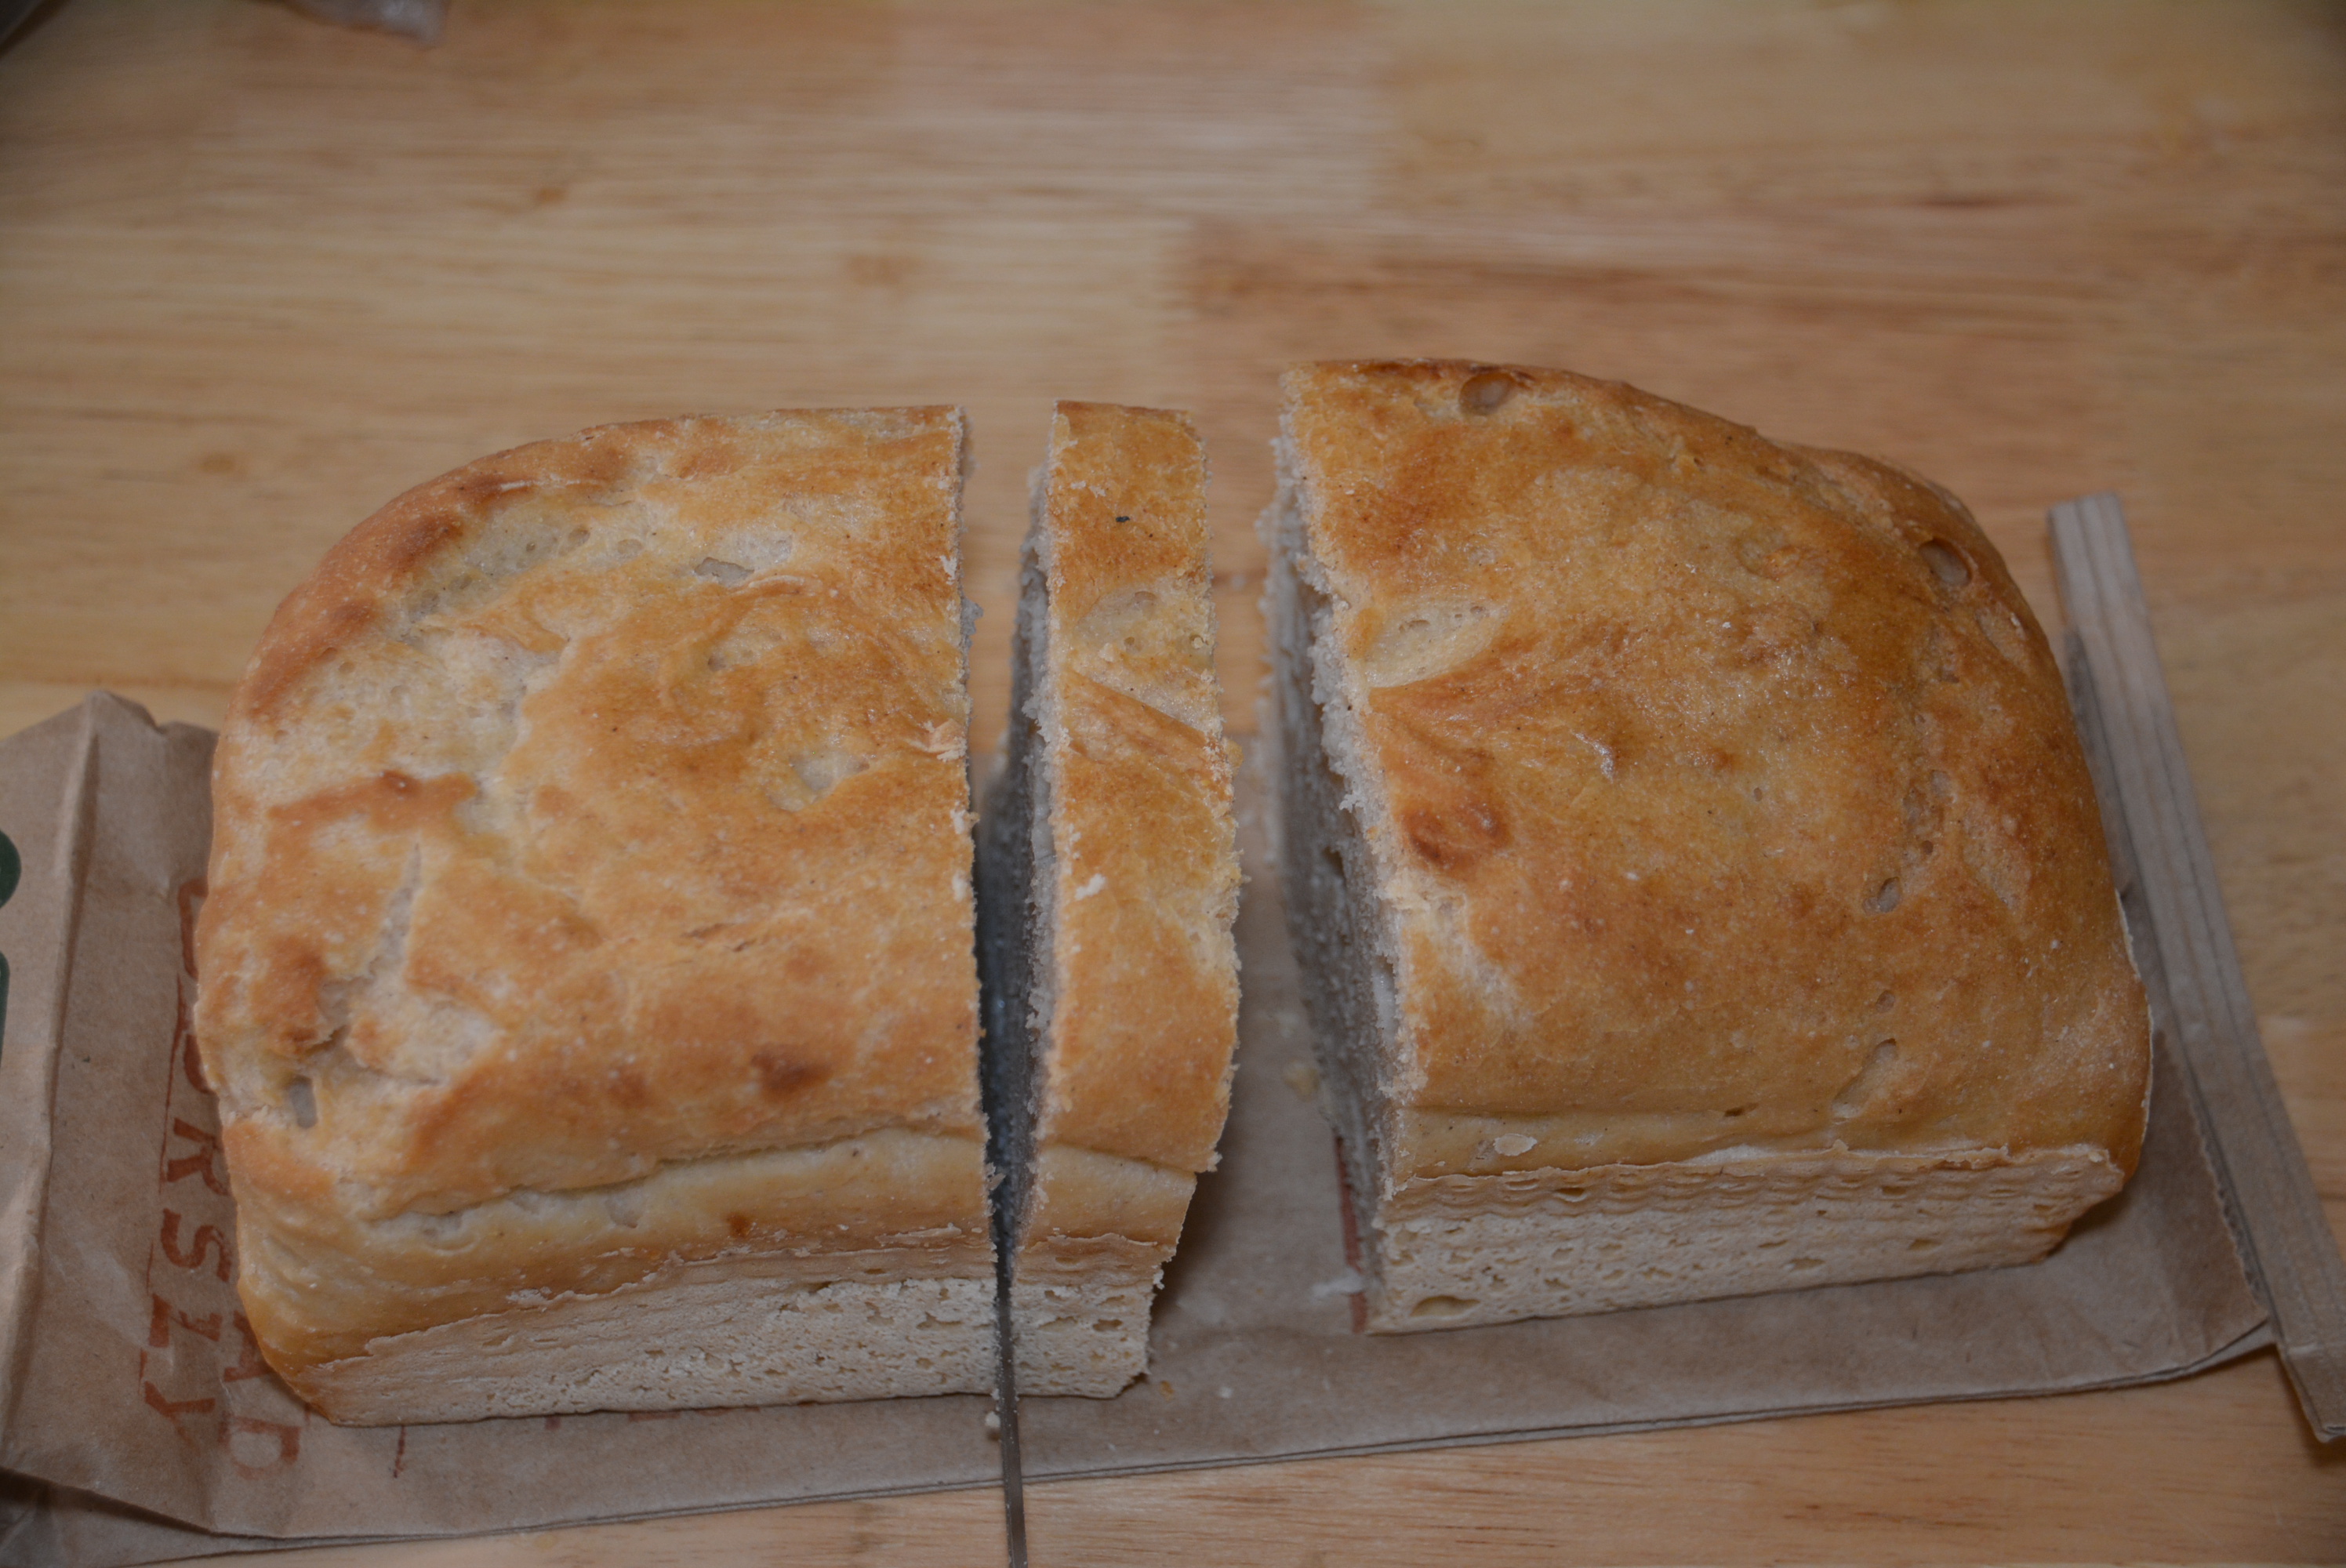
Cut 6 to 8, 1-inch slices of a loaf of gluten free sourdough bread and set aside.
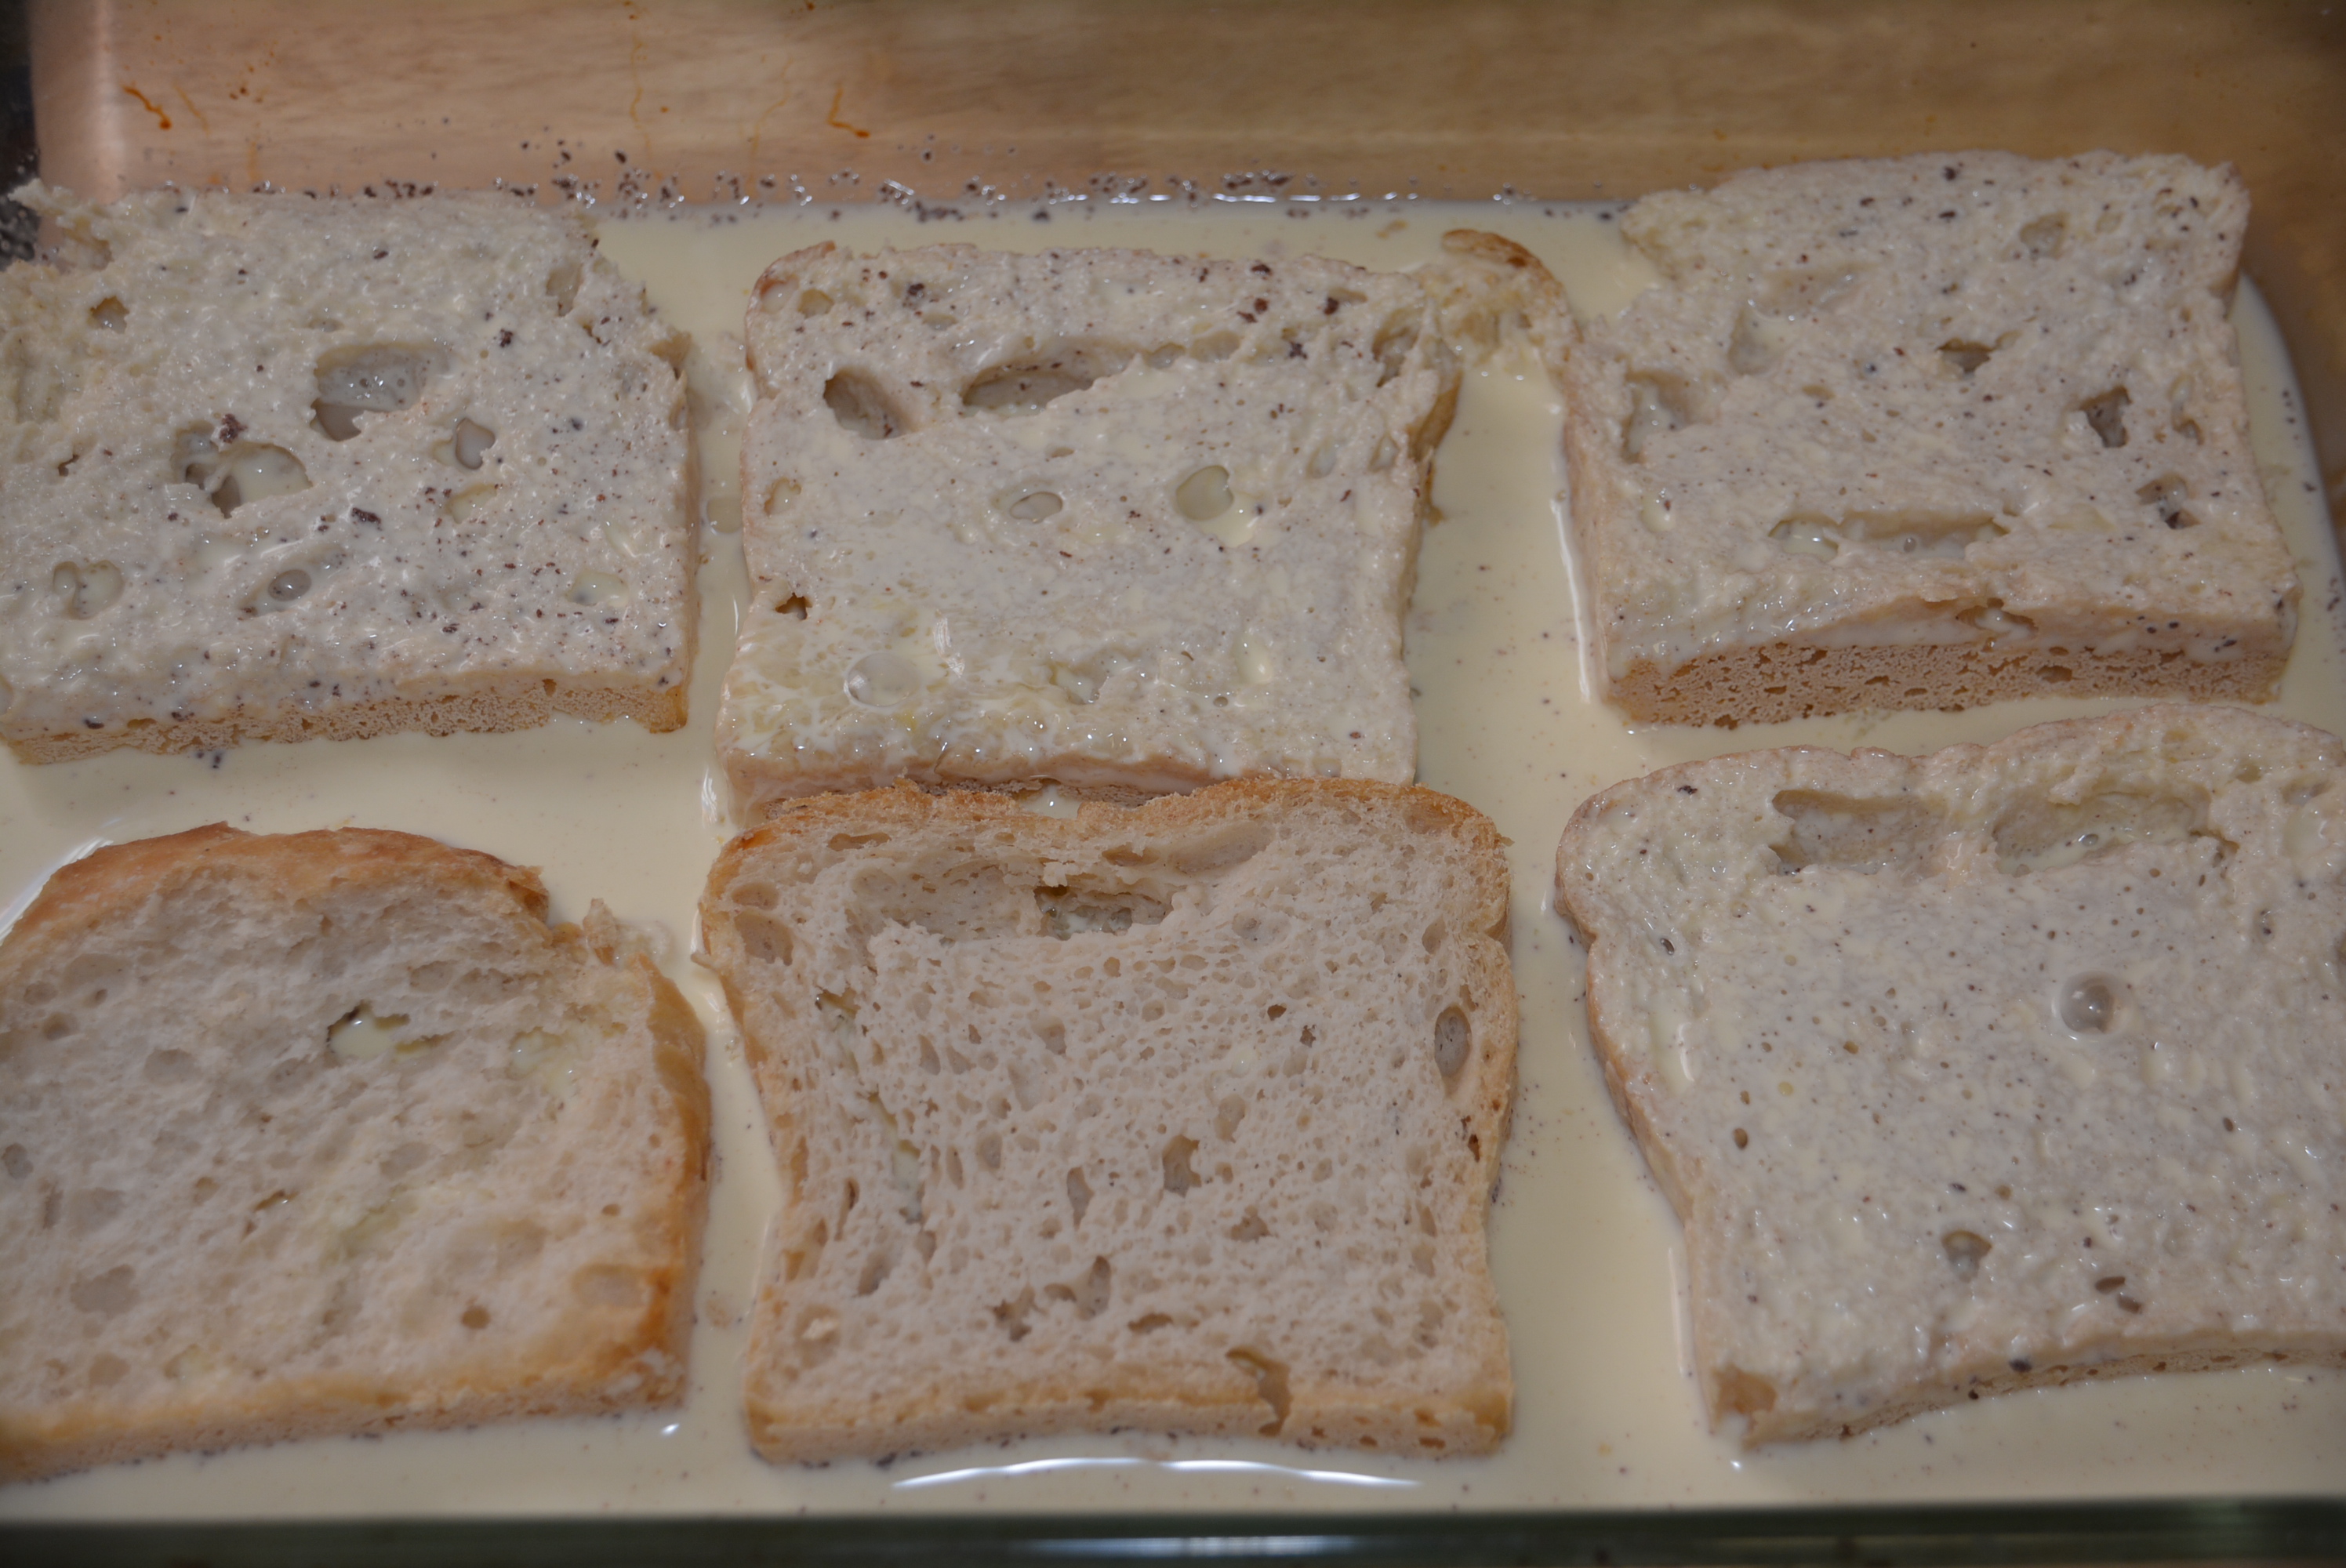
To a medium bowl, whisk together 6 eggs, 1 1/2 cups milk or light cream, 2 tbsp pure vanilla extract, 1/2 tsp ground cinnamon, a pinch of nutmeg, and a pinch of salt.
Place slices of bread in a single layer in a shallow baking dish large enough to hold slices. I used a 9 x 13 dish that was large enough to fit 6 slices. When the first 6 slices are finished soaking, just add remaining slices to dish or to a smaller dish with the mixture for their soaking.
Pour egg/milk mixture over the bread and soak for 10 minutes.
After first 10 minutes, carefully turn slices over and soak an additional 10 minutes until slices are soaked through.
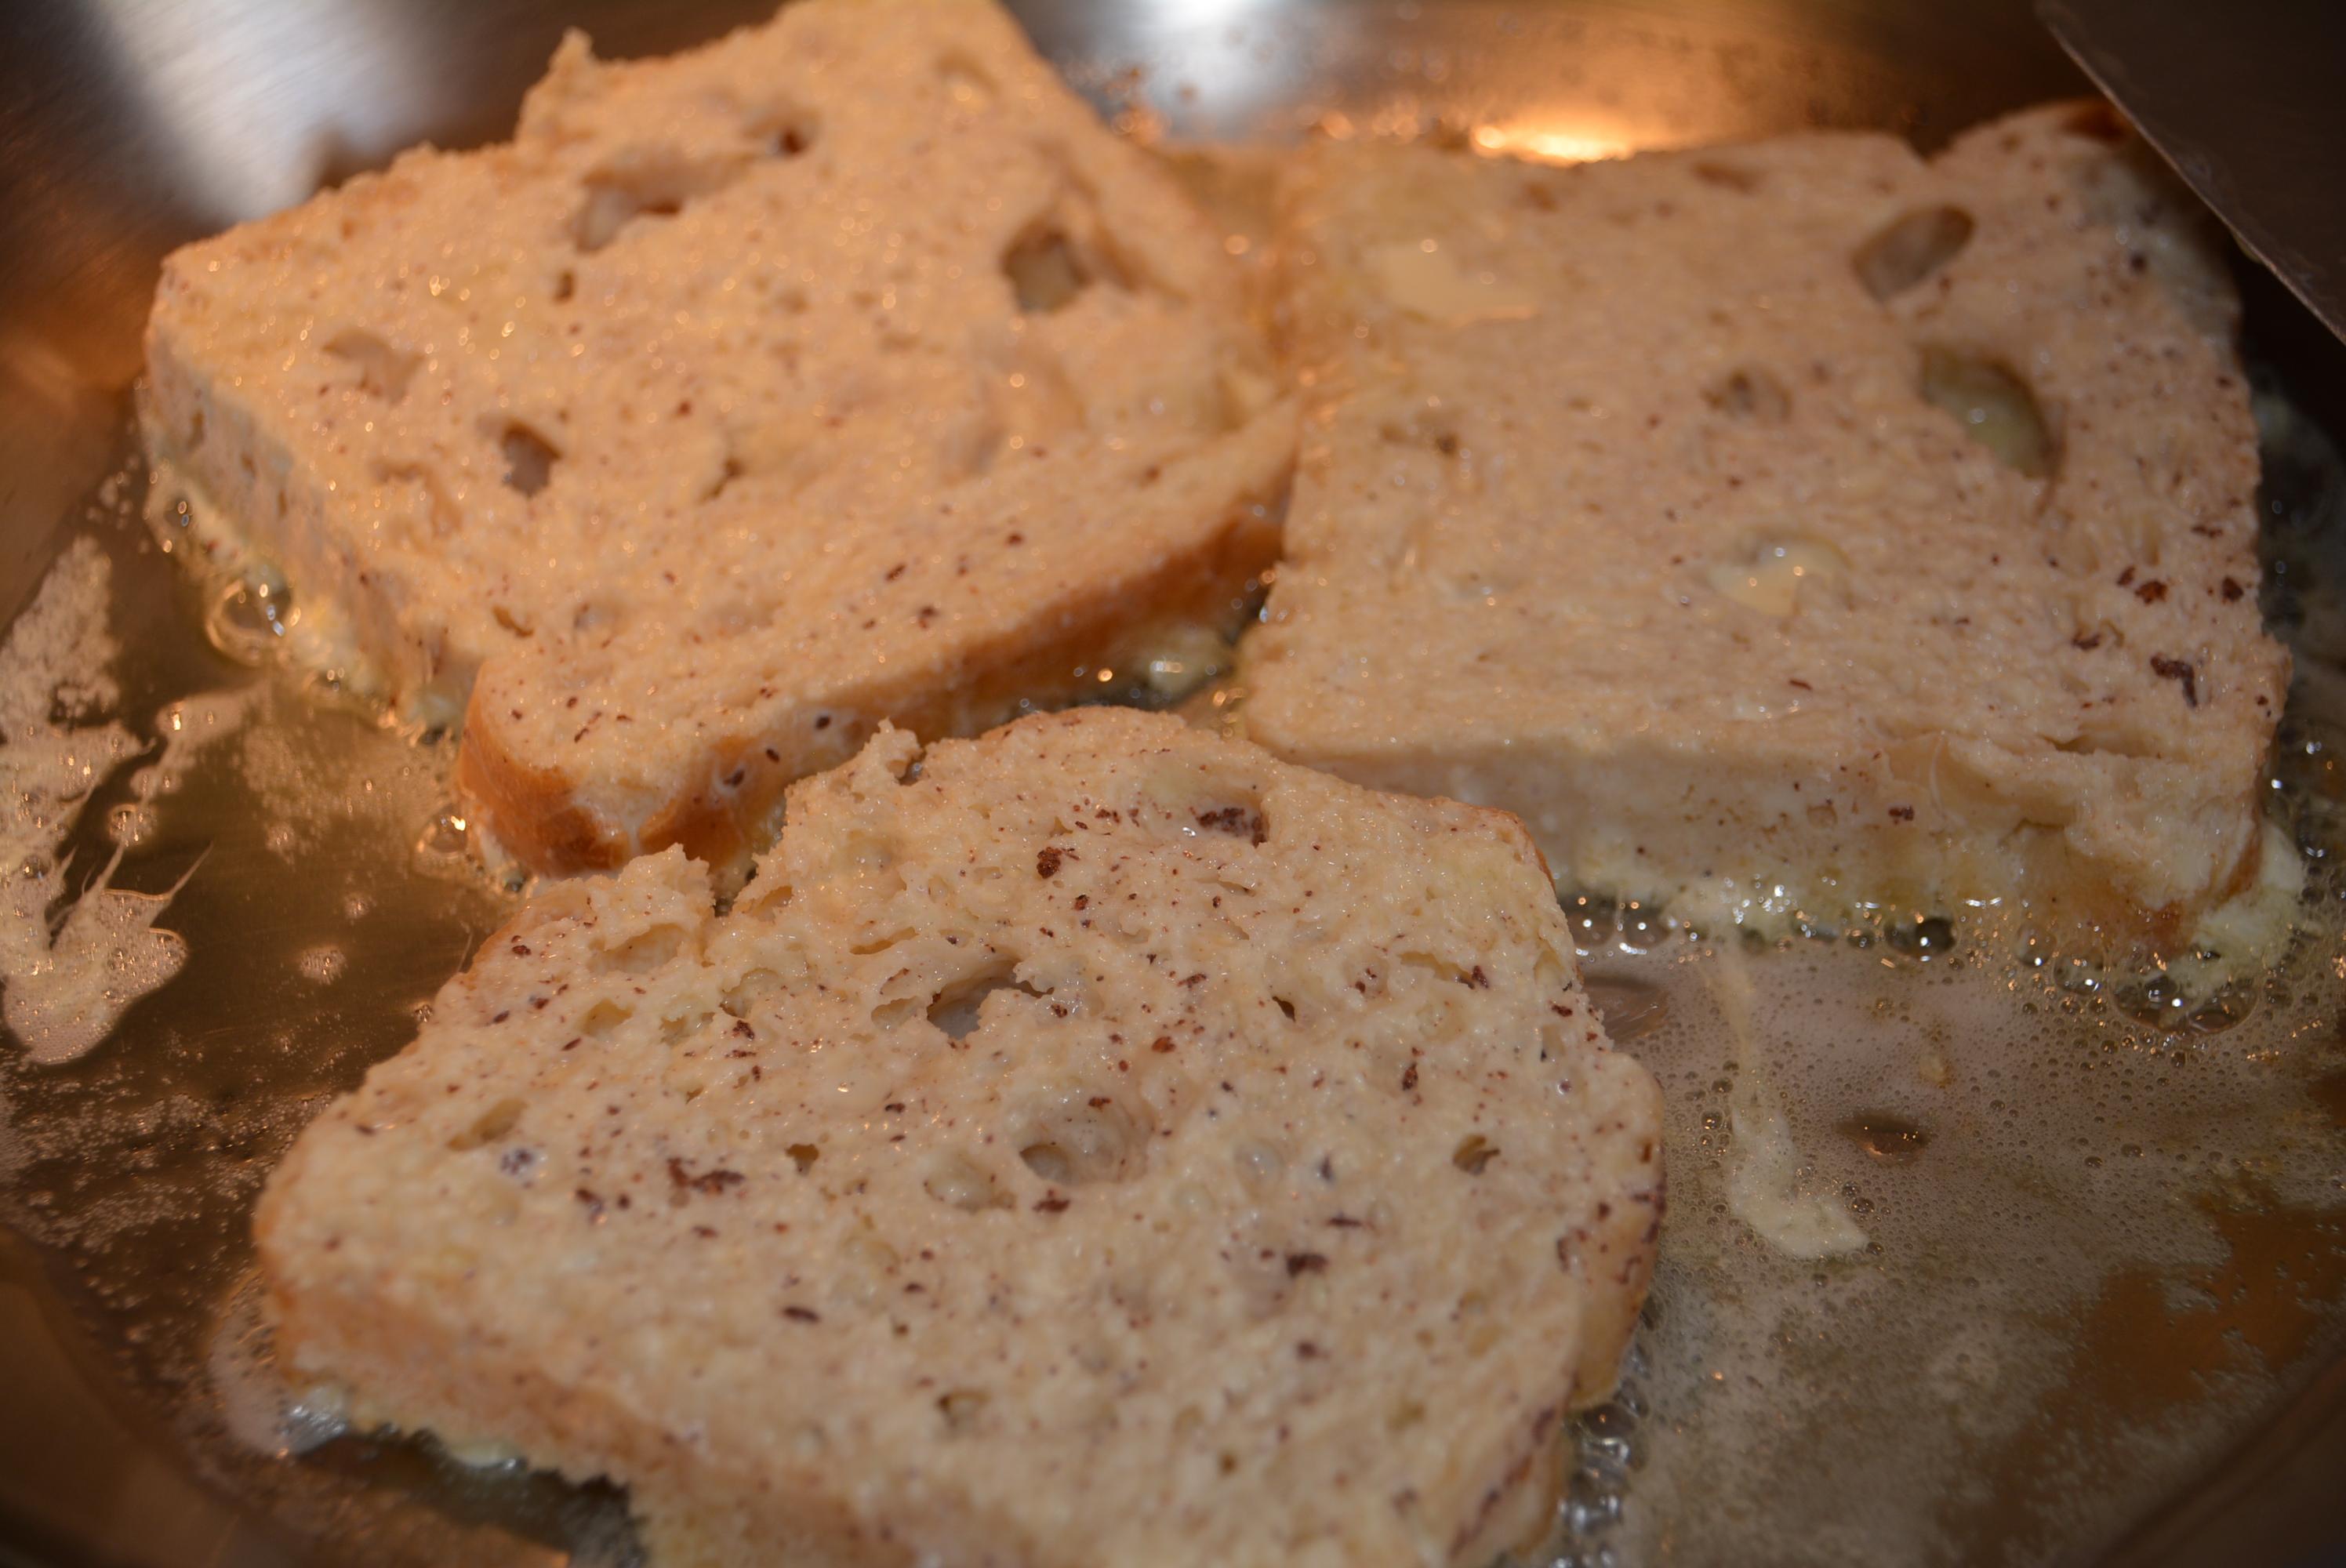
Heat 2 tbsp butter in a large skillet over medium heat.
To the warmed skillet, cook 3 slices of bread until golden brown on each side (about 2-3 minutes each side).
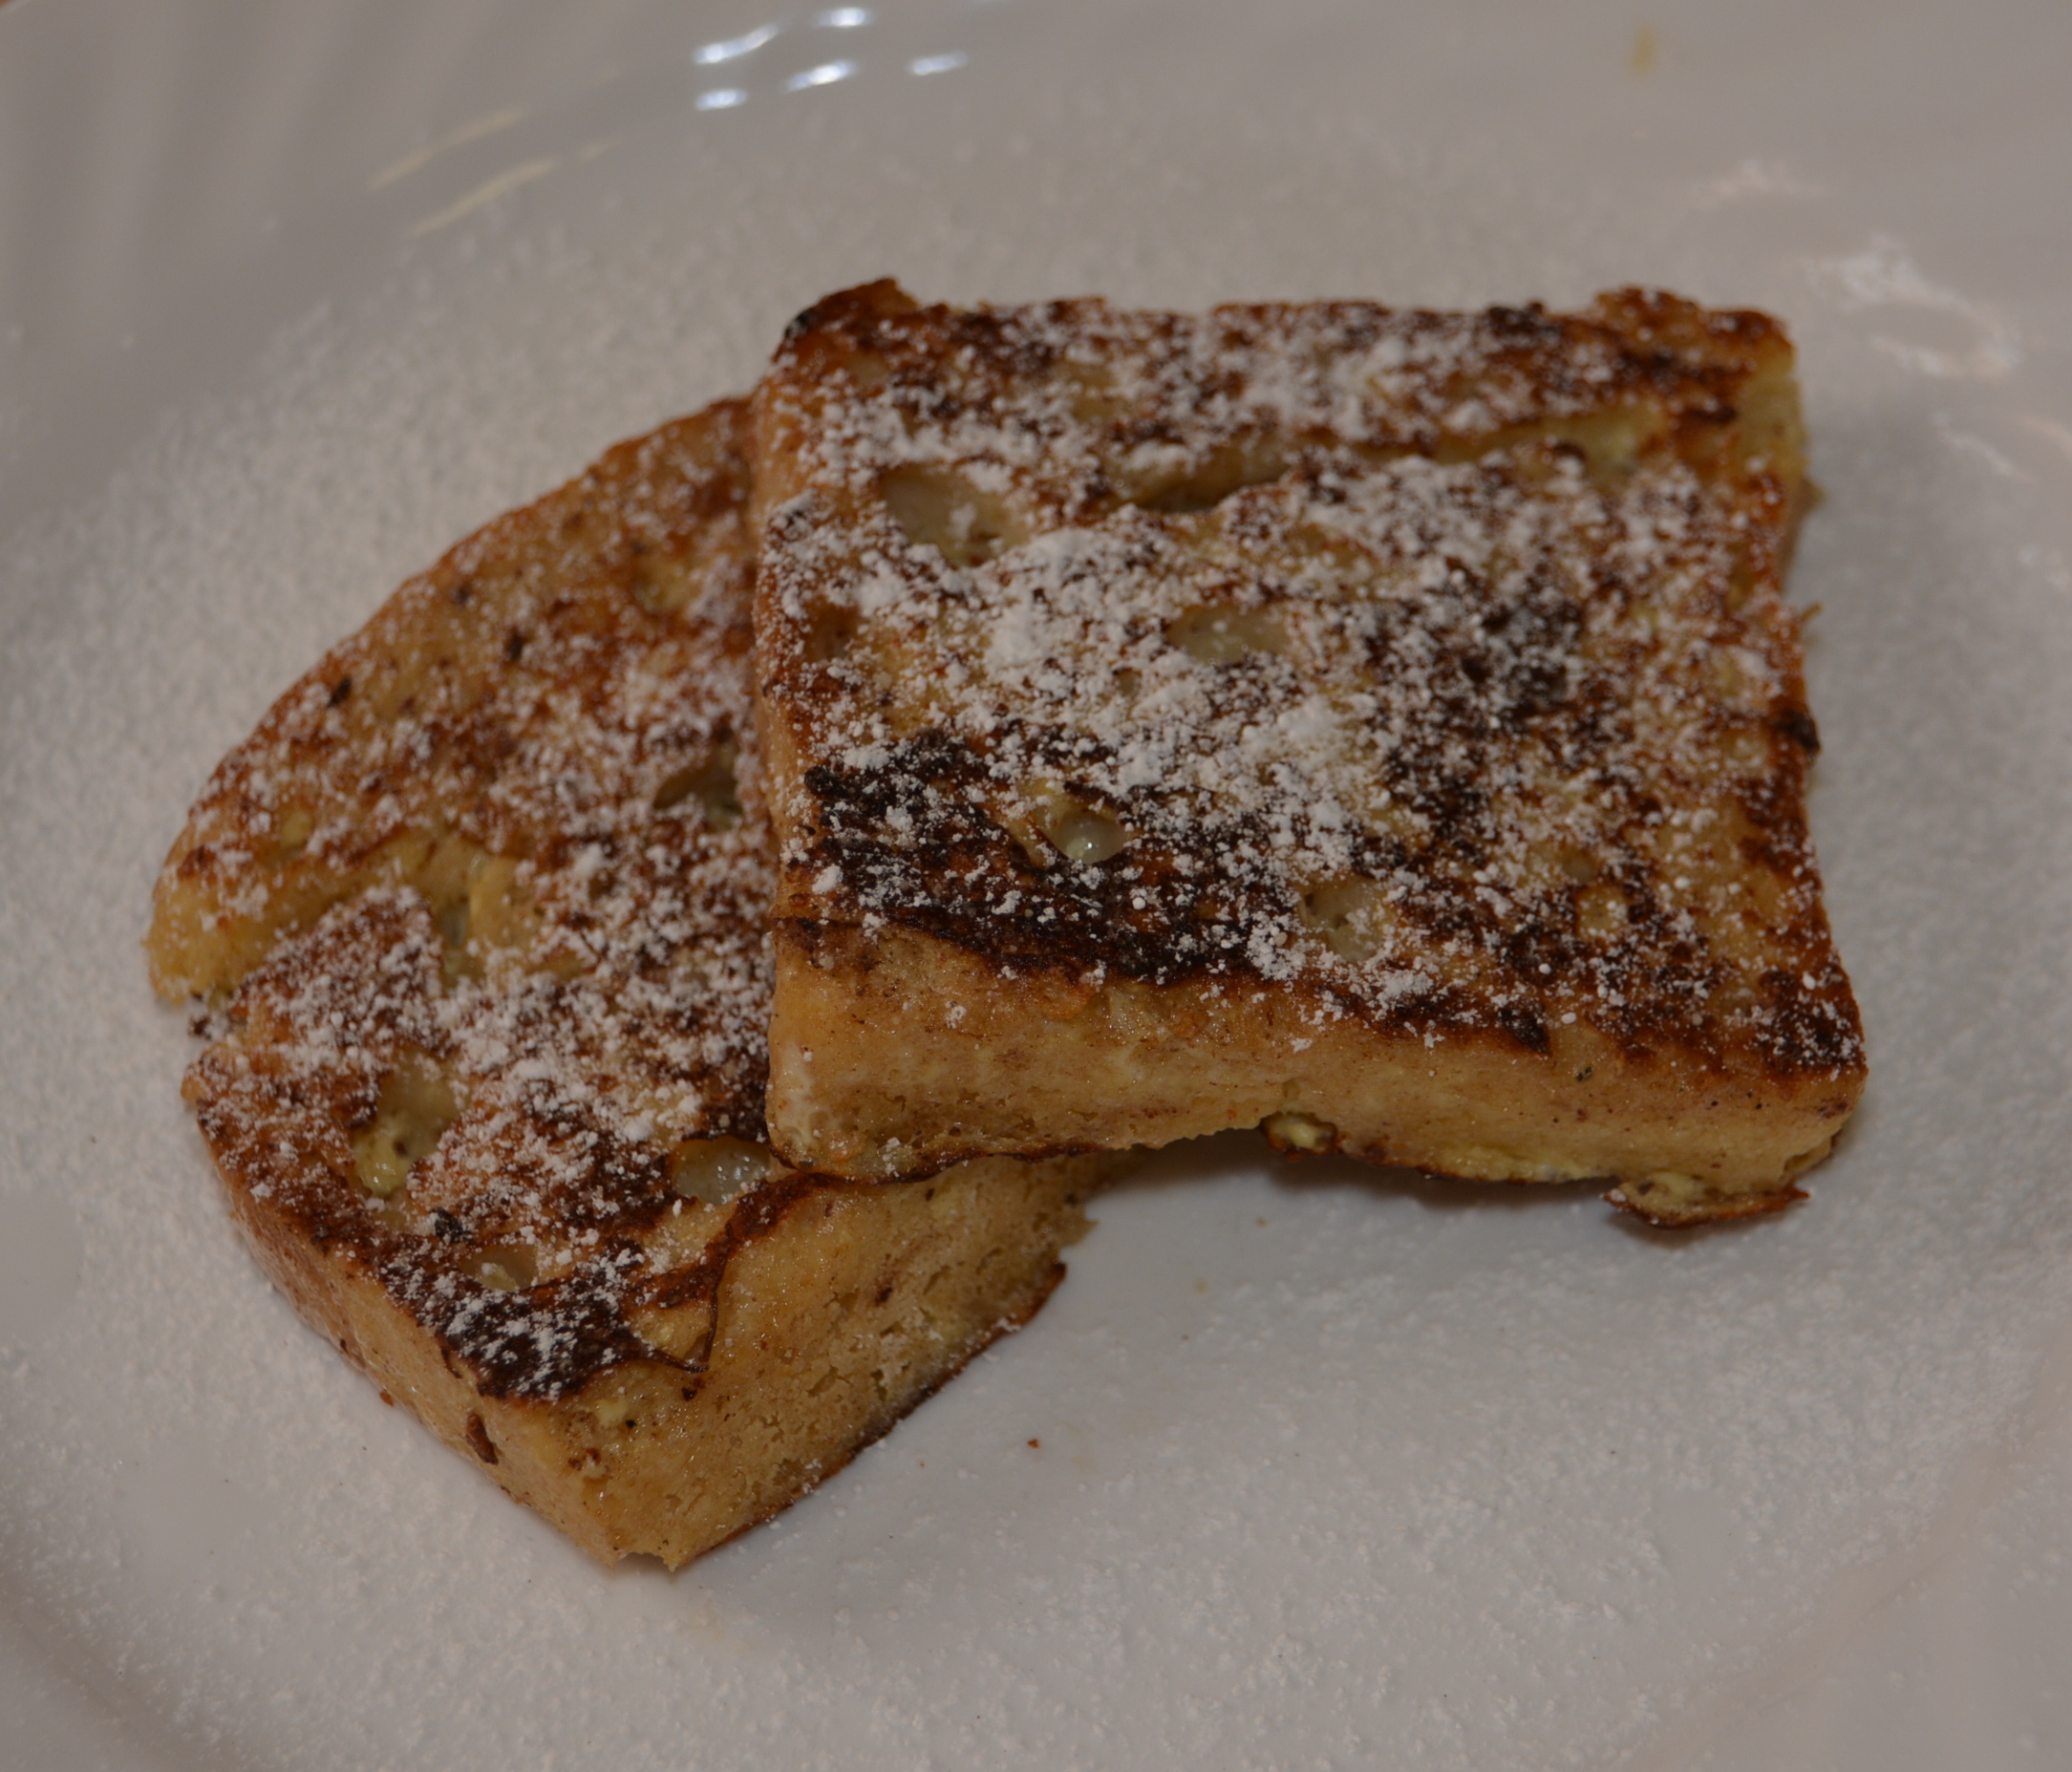
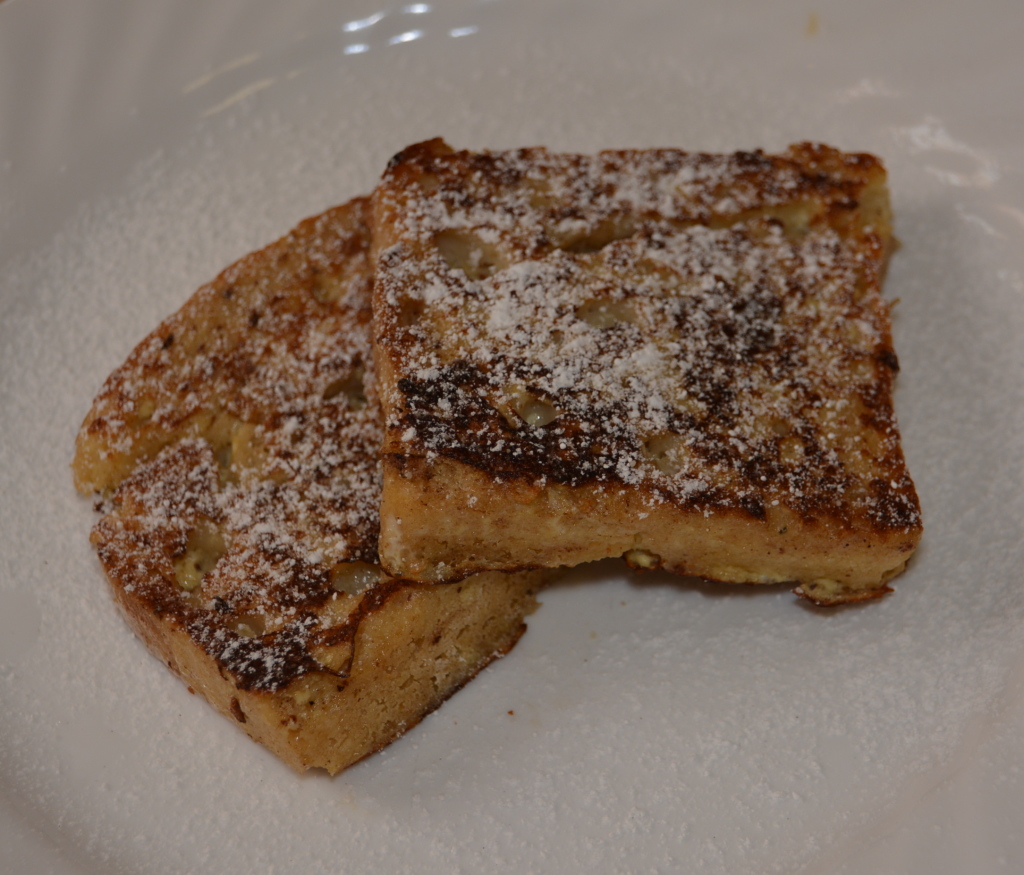
Once all slices of bread have been cooked, serve with melted butter, warmed pure maple syrup, and a little powdered sugar too if you’d like! Another little tip, pair your french toast with some fresh fruit, berries or bananas!
Gluten Free Sourdough French Toast
And voila! There you have it, some gluten free french toast courtesy of the perfect gluten free sourdough bread. I love the crispy cinnamon flavored, egg coated crust on the outside and soft and warm inside, all smothered in some amazing pure maple syrup. I have to say, adding the dusting of powdered sugar on top was the icing on the cake for me though. In the past, my french toast was simple, just topping it with syrup, but now, the added decadence is warmly welcomed and very well enjoyed by this mommy. And it makes it so pretty too!
So if you’re in the mood for a little breakfast for dinner or breakfast for breakfast, dig up some sturdy gluten free sourdough and dabble away with this gluten free french toast recipe. I know I’ll definitely be ordering myself some Bread SRSLY’s gluten free sourdough and throwing this together again soon, maybe for a breakfast dinner or maybe for a special holiday breakfast.
pure maple syrup (gluten free) and additional butter for enjoying
Instructions
Cut 6 to 8, 1-inch slices of a loaf of gluten free sourdough bread and set aside.
To a medium bowl, whisk together 6 eggs, 1 1/2 cups milk or light cream, 2 tbsp pure vanilla extract, 1/2 tsp ground cinnamon, a pinch of nutmeg, and a pinch of salt.
Place slices of bread in a single layer in a shallow baking dish large enough to hold slices. I used a 9 x 13 dish that was large enough to fit 6 slices. When the first 6 slices are finished soaking, just add remaining slices to dish or to a smaller dish with the mixture for their soaking.
Pour egg/milk mixture over the bread and soak for 10 minutes.
After first 10 minutes, carefully turn slices over and soak an additional 10 minutes until slices are soaked through.
Heat 2 tbsp butter in a large skillet over medium heat.
To the warmed skillet, cook 3 slices of bread until golden brown on each side (about 2-3 minutes each side).
Once all slices of bread have been cooked, serve with melted butter, warmed pure maple syrup, and a little powdered sugar too if you'd like!
By Gluten Free Mom To Be
Adapted from Martha Stewart Living
Adapted from Martha Stewart Living
Gluten Free Mom To Be http://www.glutenfreemomtobe.com/
Anytime Dan and I eat out I’m always on the lookout for new dishes that I can recreate easily at home. Without the recipes, I can’t replicate very many verbatim but using the same core ingredients I can get pretty close on my own. Early in September we attended my father-in-law’s birthday dinner at a restaurant nearby. The menu offered tons of different dishes, many of which weren’t gluten free for one reason or another but one in particular was right up my alley and I knew would be a dish that I’d try on my own later on. A plate full of roasted red peppers topped with steaming melted sharp provolone cheese was placed at our table and couldn’t have looked more appetizing. One taste and I was hooked, this dish was next on my list of at home recreations.
First up was roasting red peppers, a task I’d never done on my own despite my love for roasted red peppers themselves. To be honest, red peppers are quite expensive so to spare myself the extra money and job itself, buying the jarred version is much easier. But for this dish, it was freshly cooked roasted red peppers all the way and I’m telling you these couldn’t have been easier to do. Once the red peppers were underway, putting together the rest of this dish was so simple. This is a perfect addition to any meal or dinner party, making a great appetizer or side dish. My husband and little one enjoyed these just as much as I did, which means that these Gluten Free Roasted Red Peppers With Provolone Cheese will definitely be appearing again at a future dinner or maybe upcoming holiday meal?
Note: This recipe is big enough for a family of three, so adjust as necessary for the number of people in your party.
Ingredients:
2 large red peppers
Shredded Sharp Provolone Cheese (Belgioioso is gluten free)
Oregano
Salt or Garlic Salt
Directions:
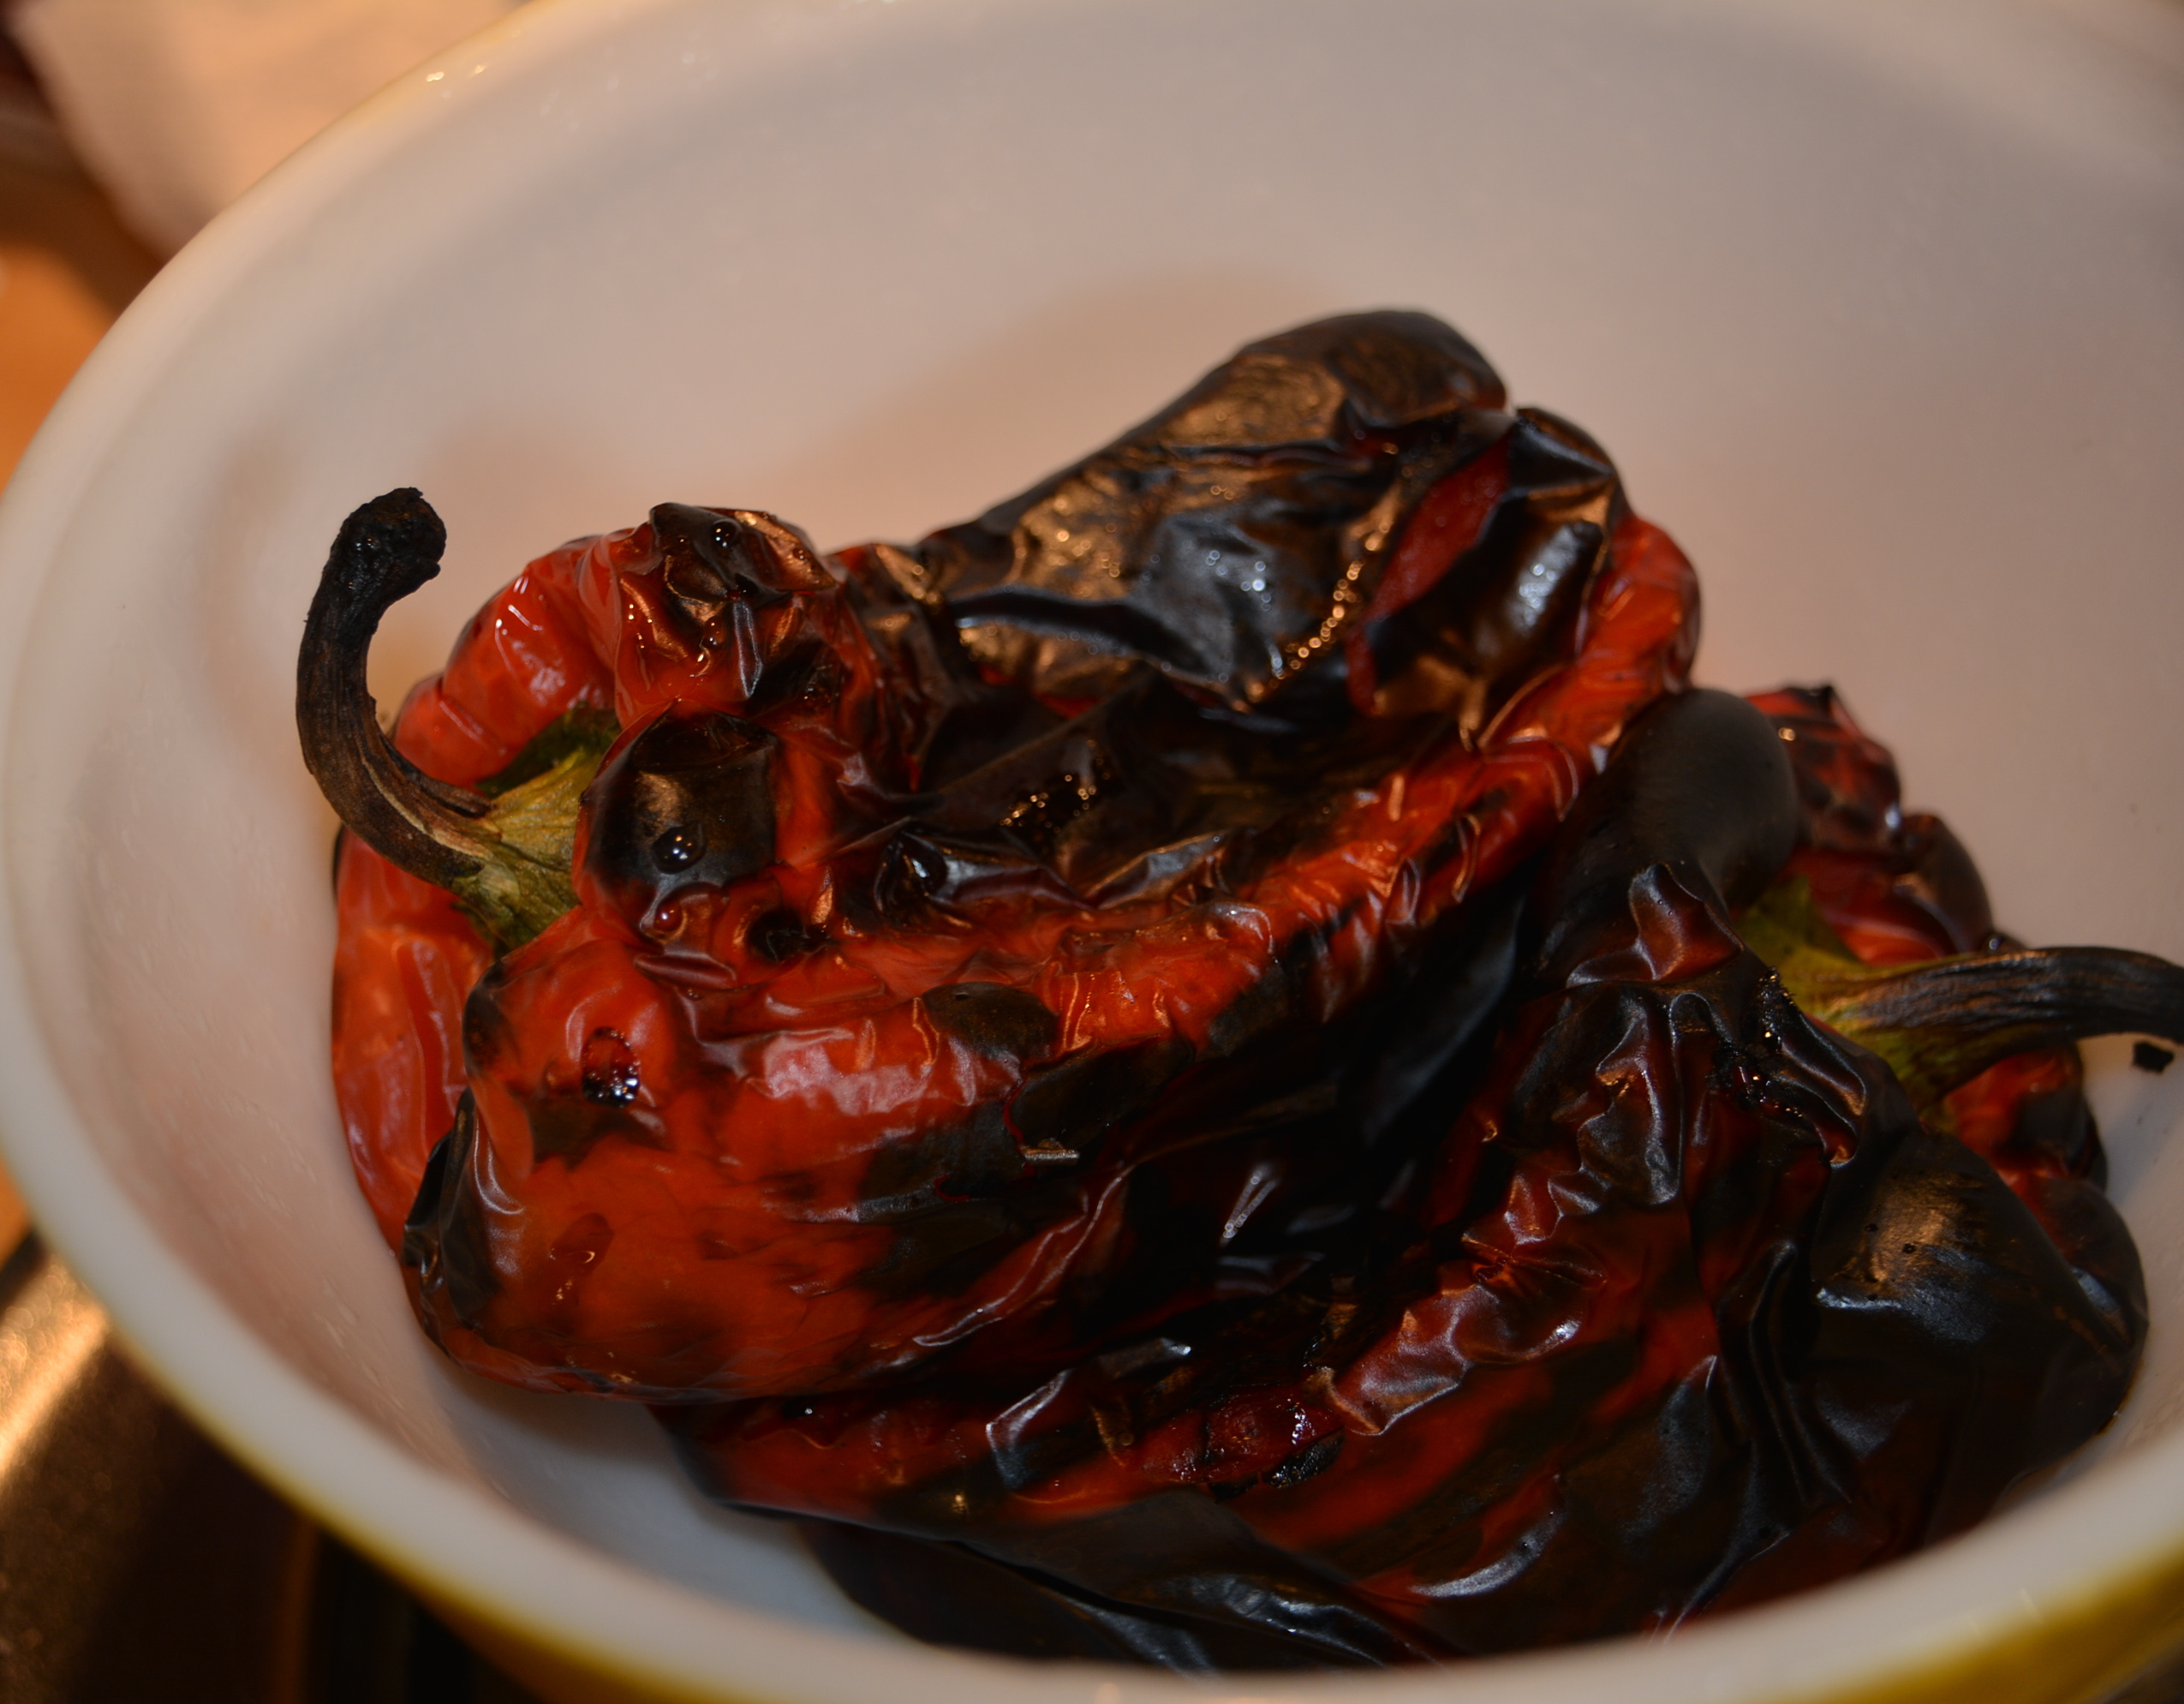
Wash and dry your red peppers before placing them on the hottest part of your grill for roasting.
Using tongs, turn your red peppers over periodically until all sides are black.
Once your red peppers are black, remove them from the grill and add them to a glass bowl, cover with saran wrap, and let them sit for 10 minutes, this loosens the skins so they can be removed easily.
Roast your red peppers on the grill until the skins turn black.
Meanwhile shred some sharp provolone cheese for sprinkling on top of your red peppers and turn on the oven to 350.
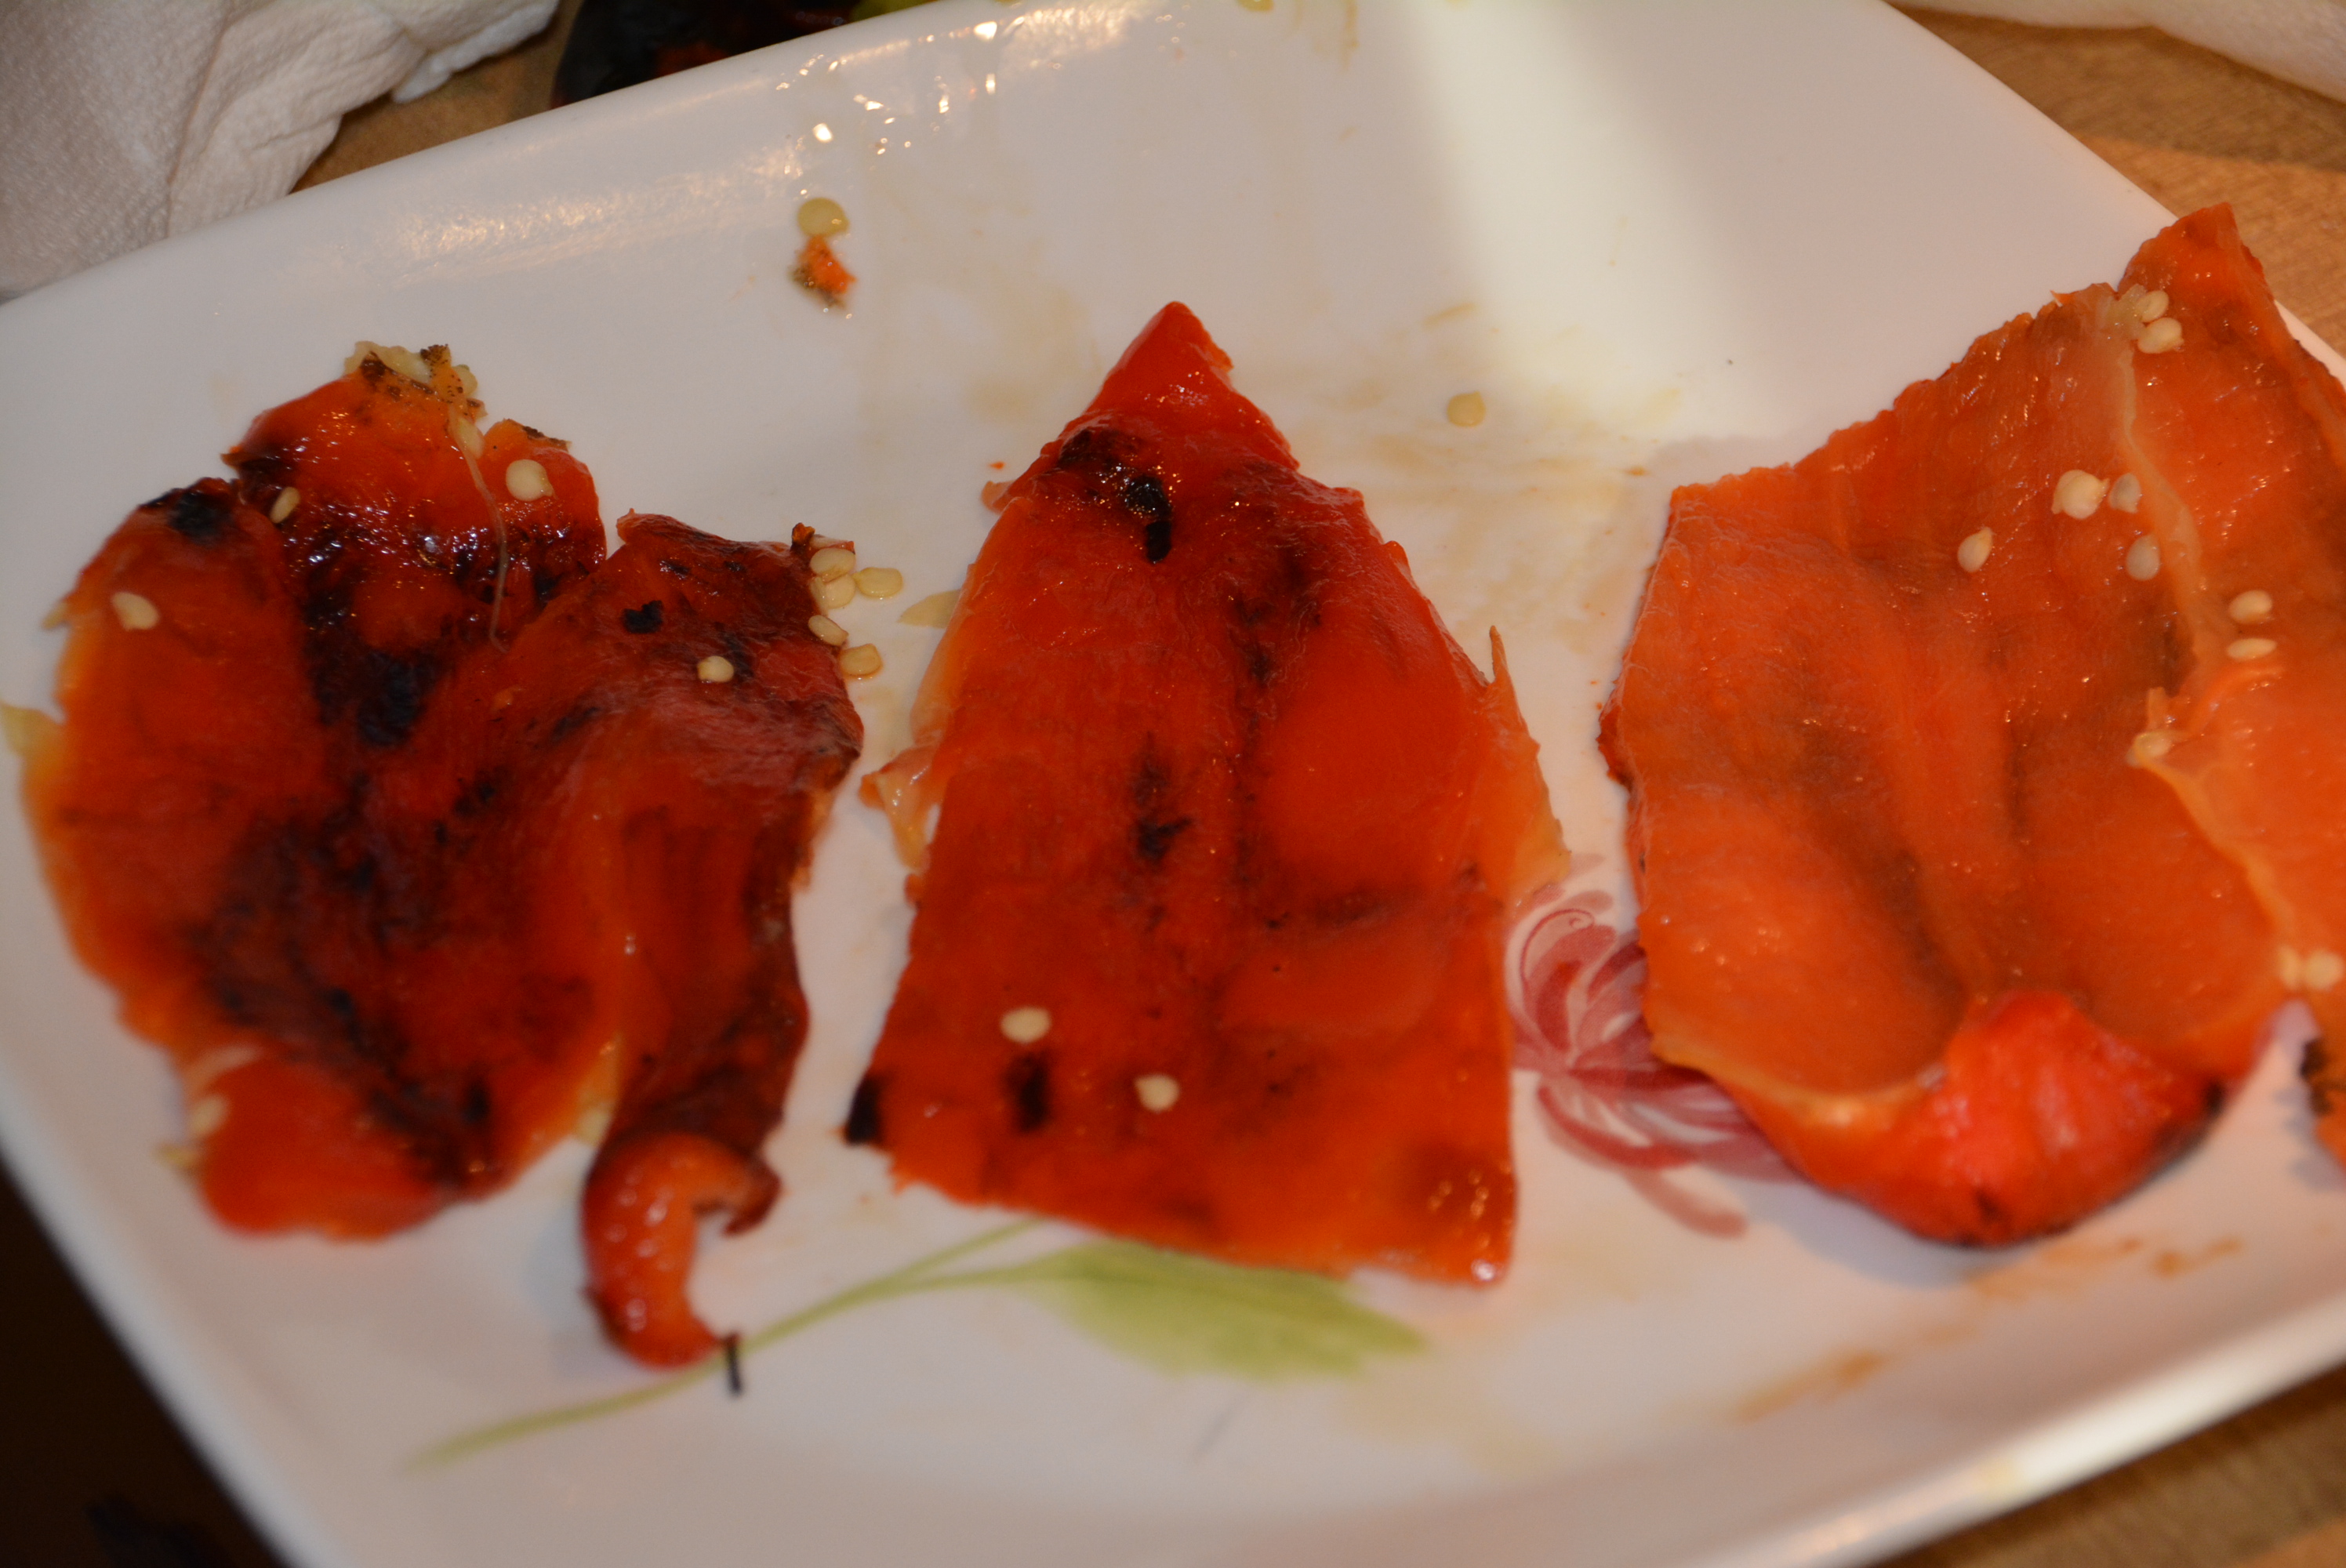
Once 10 minutes have passed, carefully remove your red peppers and begin to peel off the charred skin with your fingers. I cut off the tops and slice down one side to make this easier. Also be sure to remove the seeds inside too.
Remove charred skins and seeds.
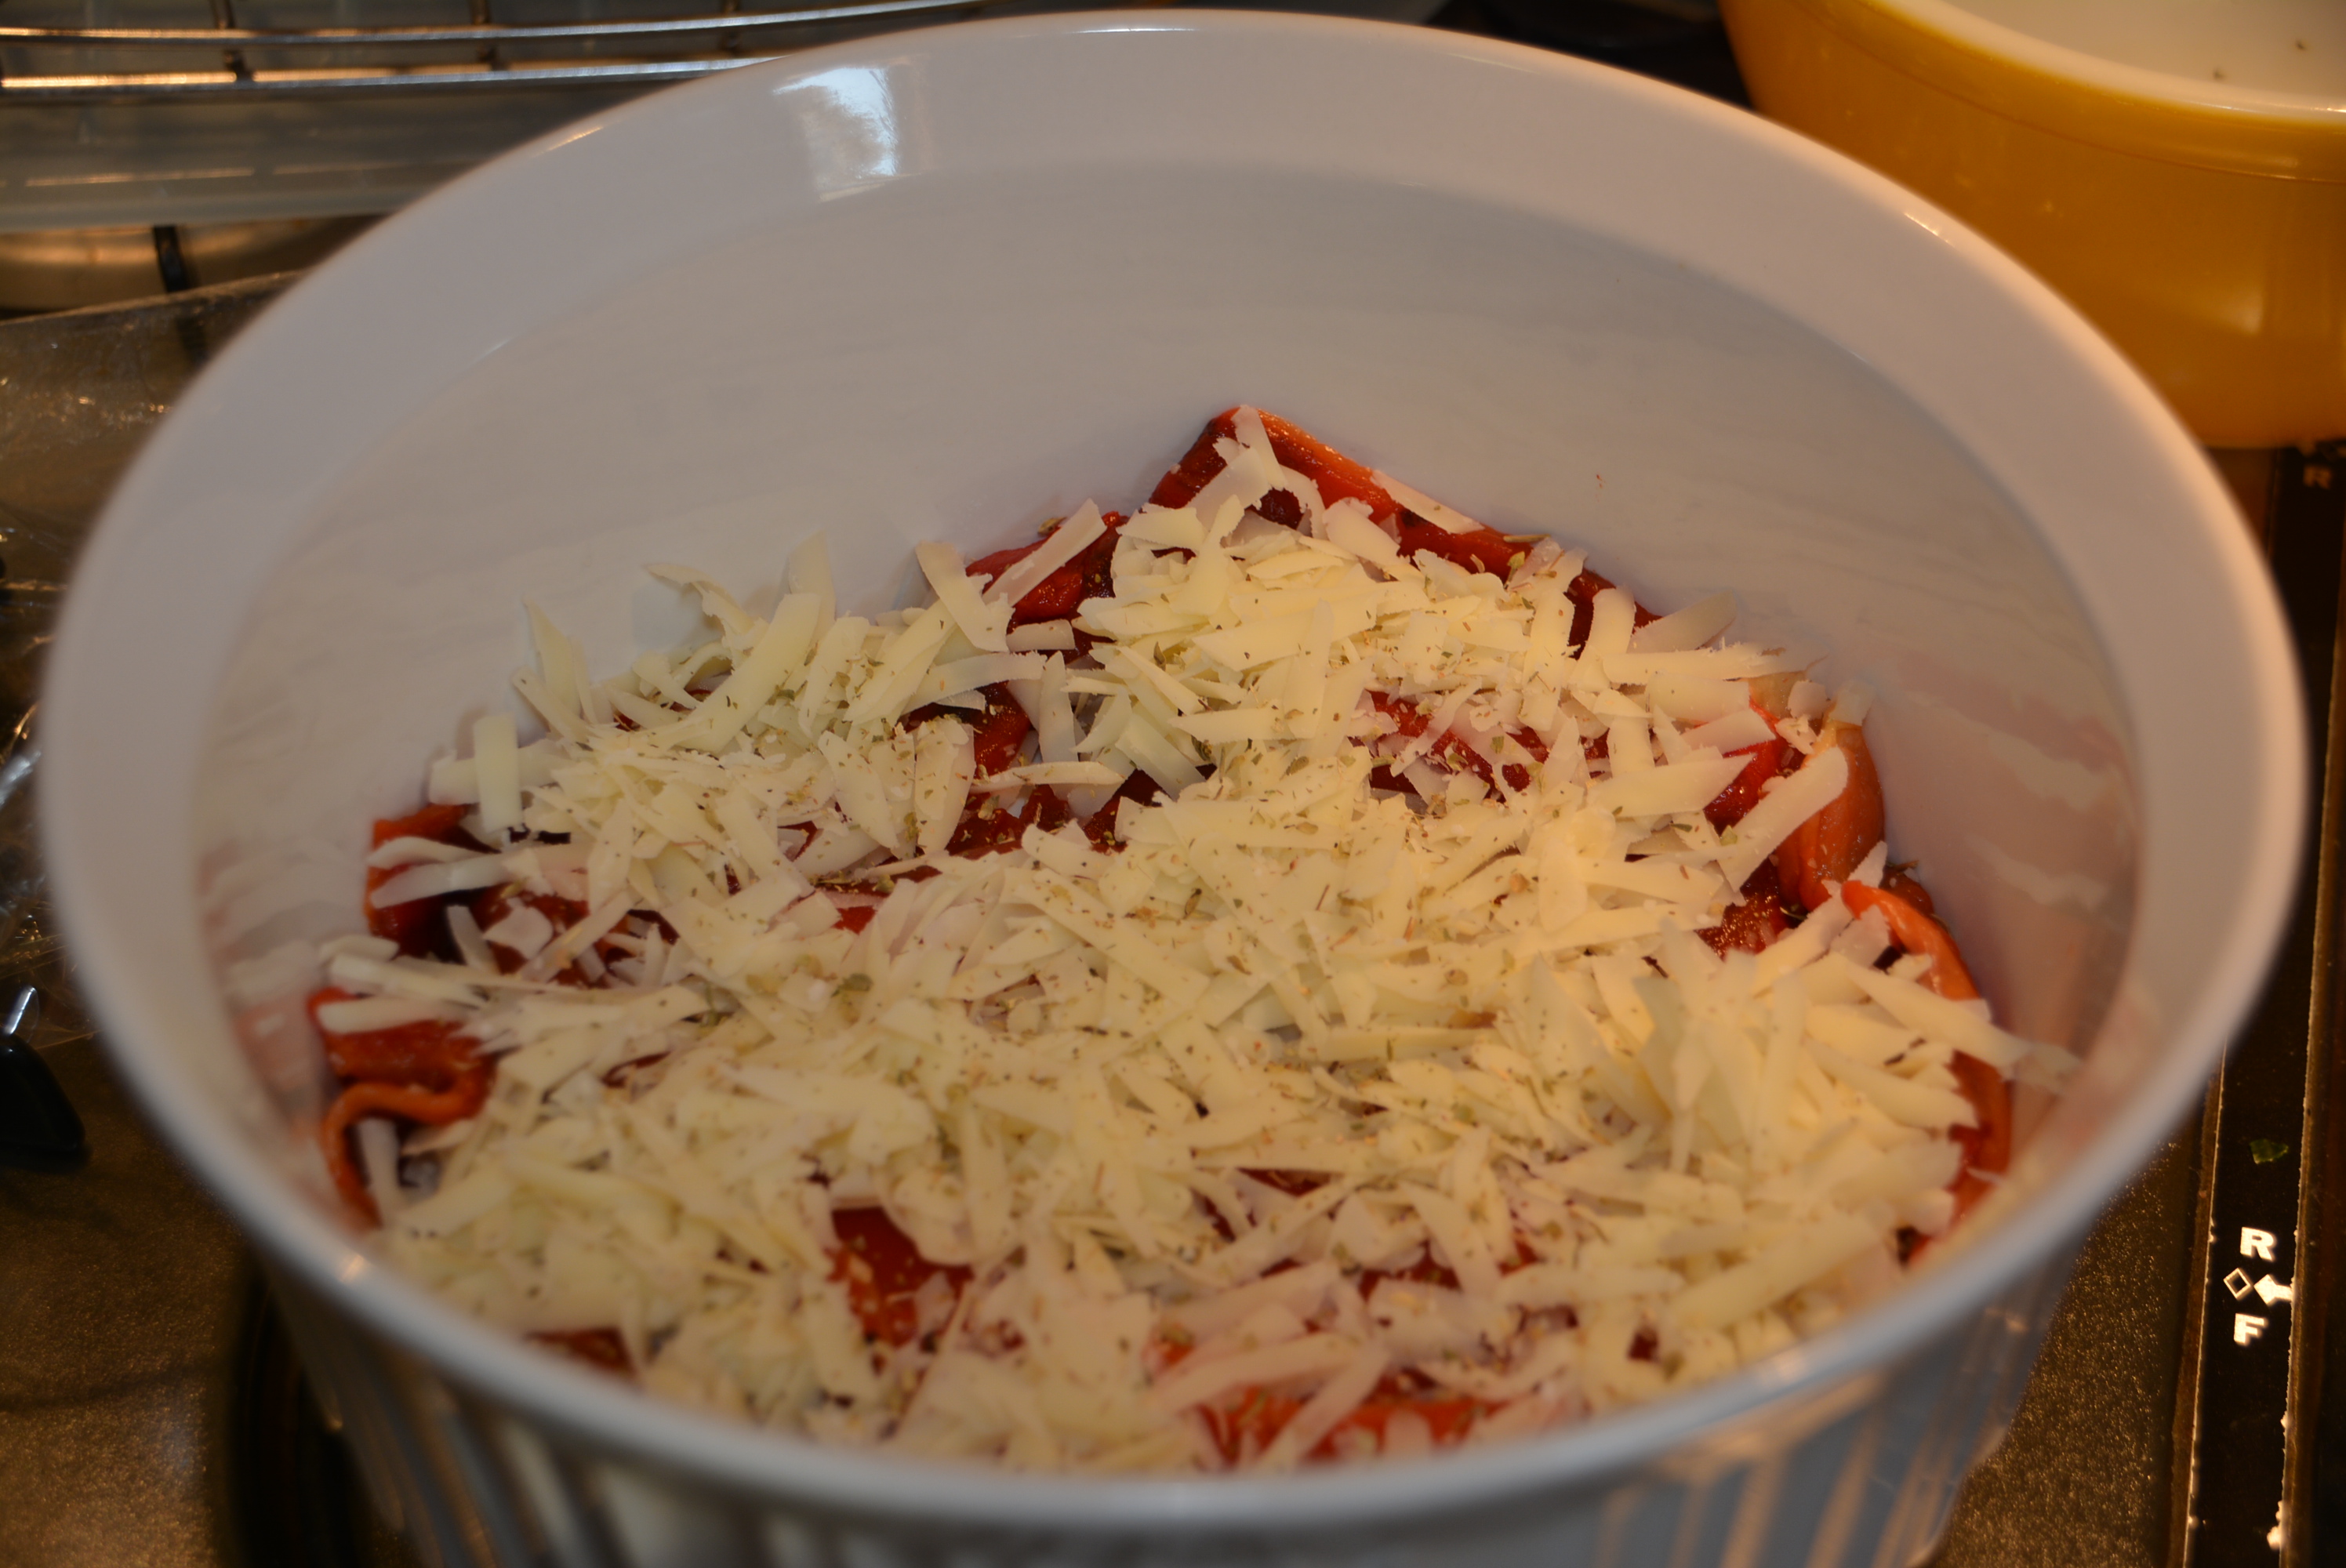
Once all skins and seeds have been removed, add your roasted red peppers to a baking dish. Feel free to leave your red peppers as whole slices or cut up into sections like I did, these sizes were just a little better for our little diner.
Sprinkle some sharp provolone cheese on top.
Sprinkle red peppers with shredded sharp provolone cheese.
Finish with some oregano and a little salt or garlic salt.
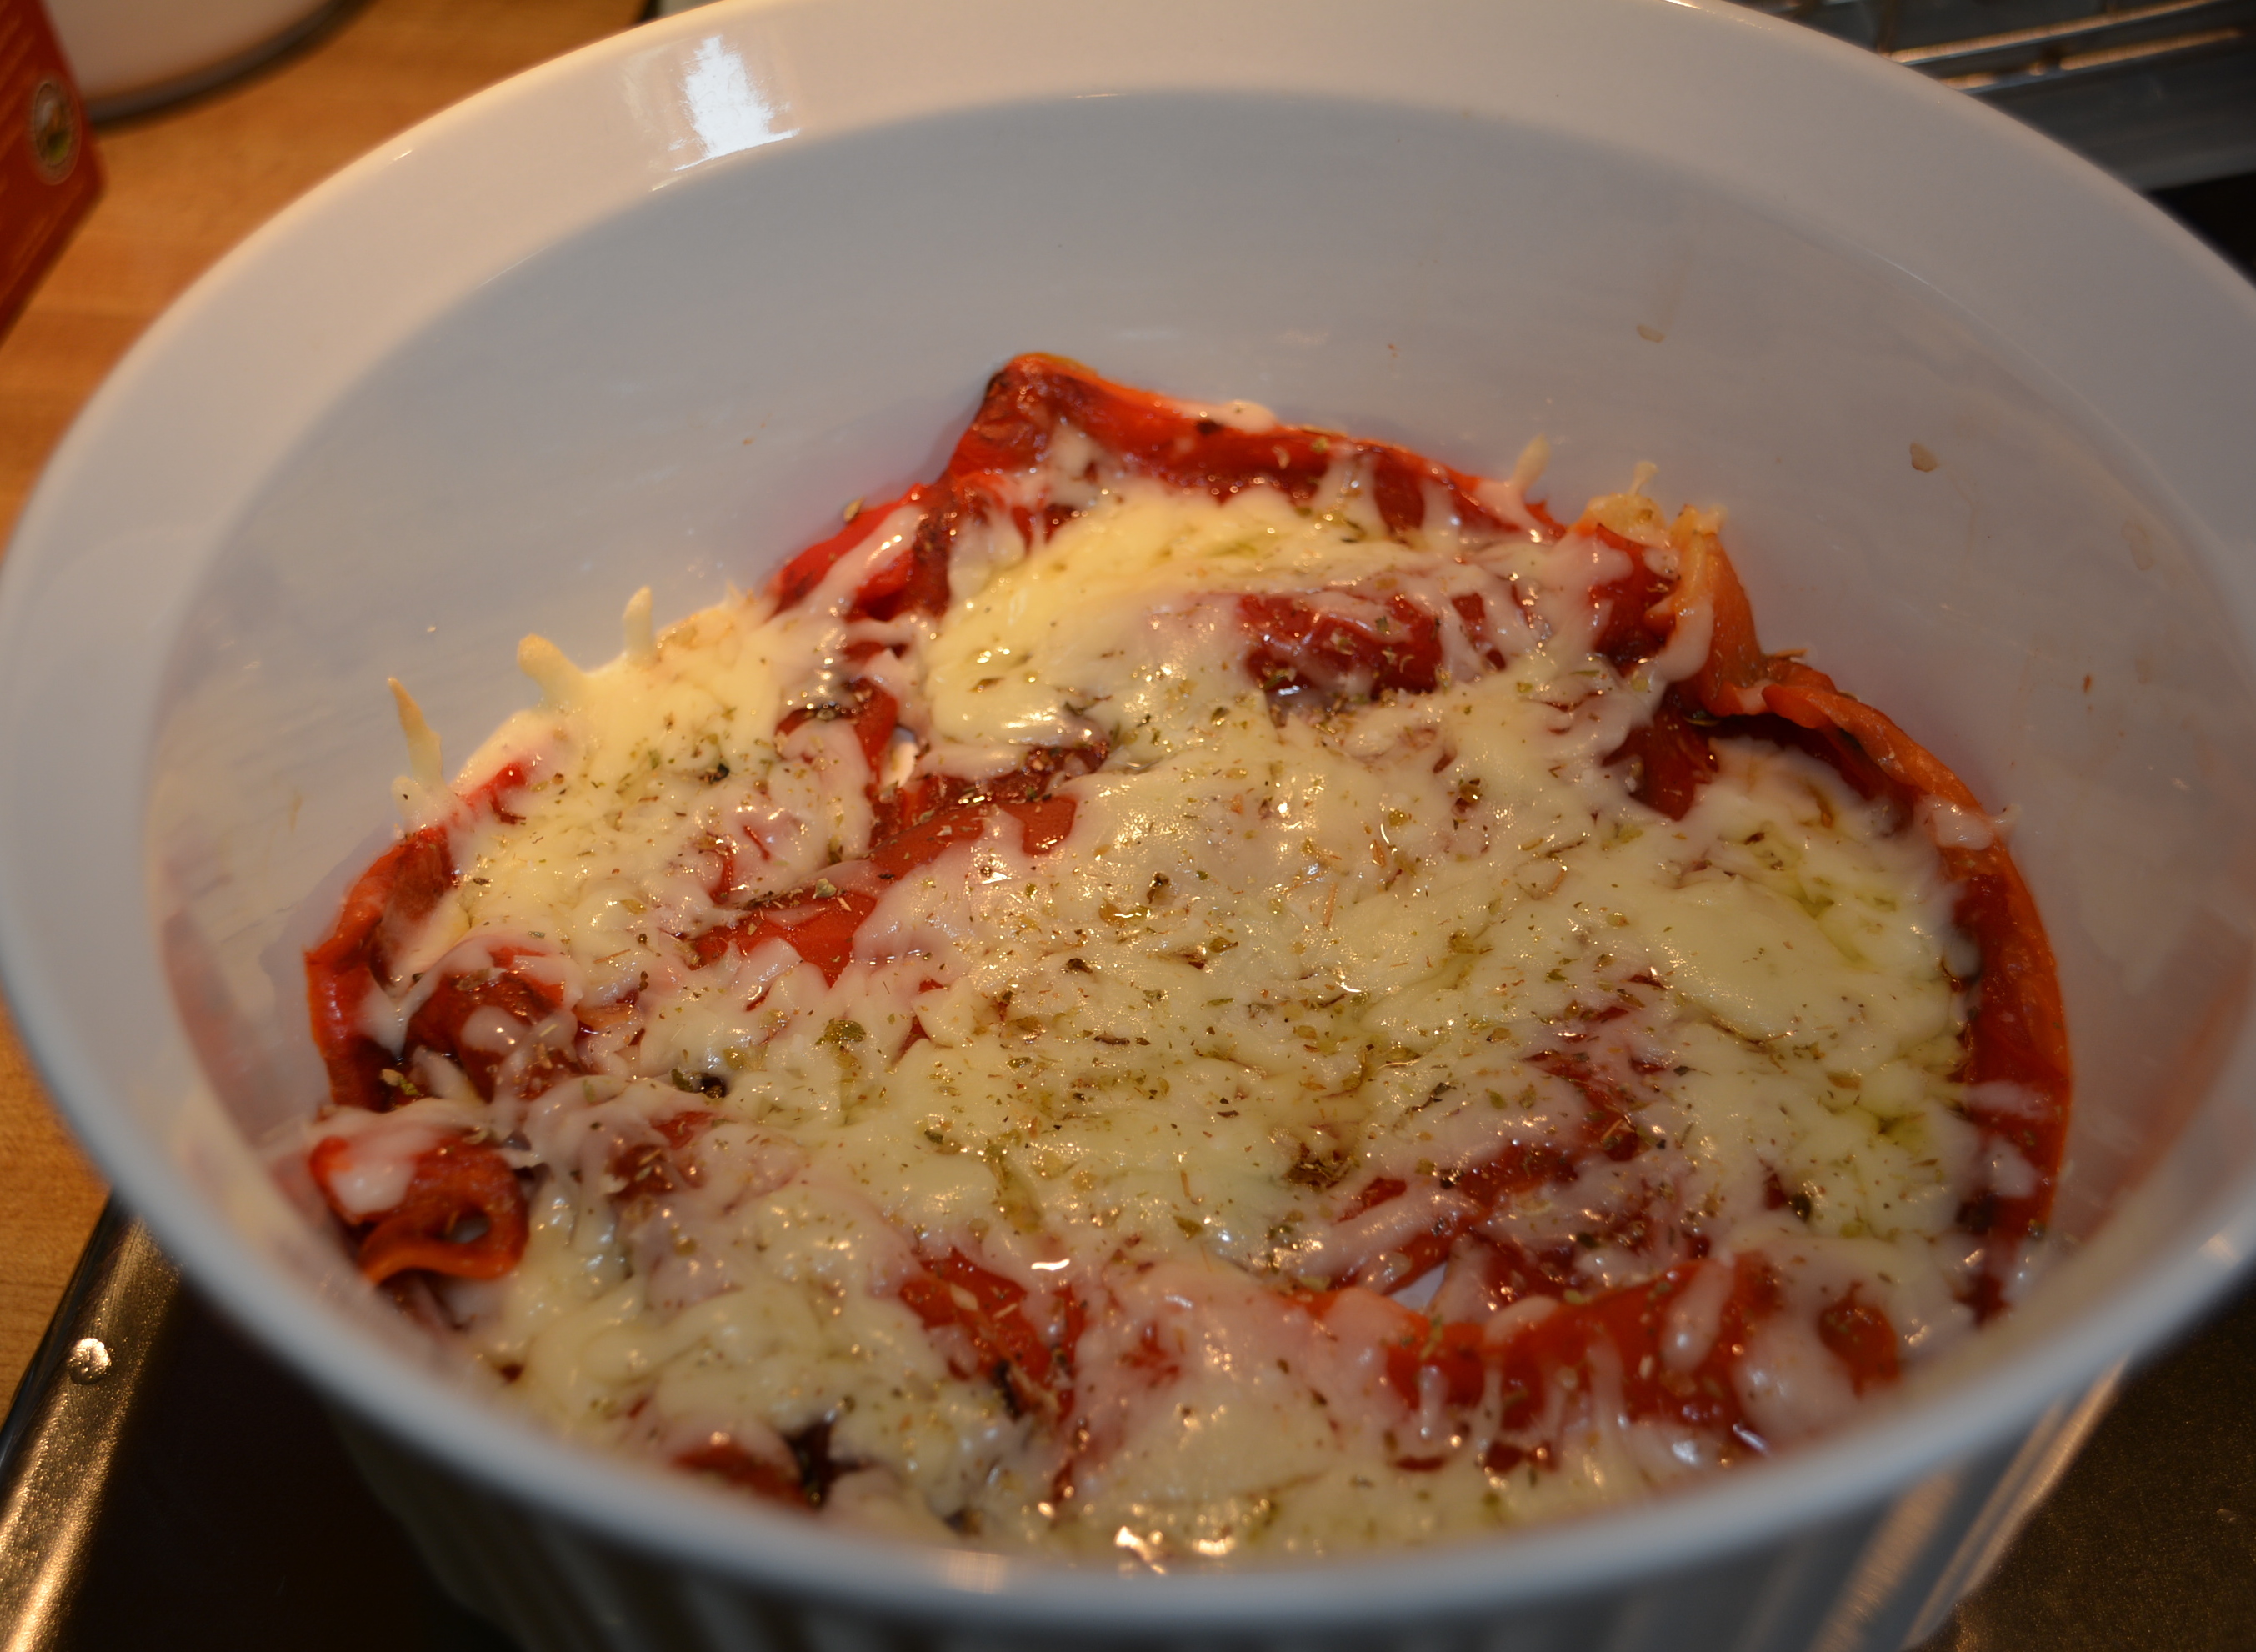
Cook your red peppers in the oven for about 10 minutes or until your cheese has melted.
Melt shredded sharp provolone cheese on top of red peppers.
Enjoy!
Enjoy!
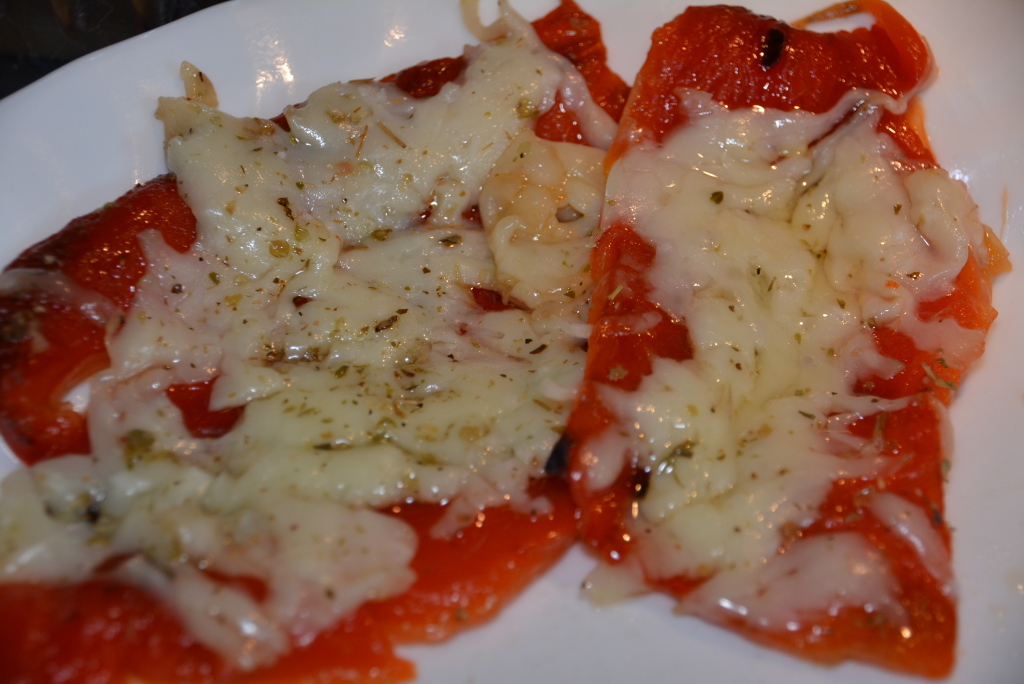
These were such a hit at that birthday dinner I knew that they would be a new family favorite at home too. The flavor of the freshly roasted red pepper mixed with the melted sharp provolone cheese was delicious! This dish is definitely a crowd pleaser not only in taste but also appearance, it looks beautifully tasty doesn’t it? This is such a winner that it may even make an appearance at our next holiday dinner!
Sincerely,
Lindsay
Gluten Free Roasted Red Peppers With Provolone Cheese
Shredded Sharp Provolone Cheese (Belgioioso is gluten free)
Oregano
Salt or Garlic Salt
Instructions
Wash and dry your red peppers before placing them on the hottest part of your grill for roasting.
Using tongs, turn your red peppers over periodically until all sides are black.
Once your red peppers are black, remove them from the grill and add them to a glass bowl, cover with saran wrap, and let them sit for 10 minutes, this loosens the skins so they can be removed easily.
Meanwhile shred some sharp provolone cheese for sprinkling on top of your red peppers and turn on the oven to 350.
Once 10 minutes have passed, carefully remove your red peppers and begin to peel off the charred skin with your fingers. I cut off the tops and slice down one side to make this easier. Also be sure to remove the seeds inside too.
Once all skins and seeds have been removed, add your roasted red peppers to a baking dish. Feel free to leave your red peppers as whole pieces or slice up into sections like I did, these were just a better size for our little diner.
Sprinkle some sharp provolone cheese on top.
Finish with some oregano and a little salt or garlic salt.
Cook your red peppers in the oven for about 10 minutes or until your cheese has melted.
Enjoy!
By Gluten Free Mom To Be
Gluten Free Mom To Be http://www.glutenfreemomtobe.com/
A huge pot of simmering sauce and meatballs filled the house with the most delicious smells on a Sunday; it’s like it was yesterday how vivid that food memory is for me, probably because sauce and meatballs were a family staple growing up. In retrospect, it’s kind of funny how that’s one of my most prominent food memories from my childhood, especially since my pickiness as a little girl kept me from ever eating the meatballs. They looked delicious of course, but to be honest, I refused to touch anything with ground beef, the texture was a huge deterrent for me. My poor parents, I must have really been a joy to cook for when I was younger! Thank goodness the gluten free challenge came later.
Now that I’ve become a tad bit more experimental with food I’ve really grown to enjoy ground beef, which is a huge relief to my husband who LOVES hamburgers, tacos, meatballs, and beyond. And while I wish that I had at least tried the meatballs that my parents spent all Sunday working on, I’ve now found my own meatball recipe, gluten free of course, that makes our Meatball Sundays just as memorably fragrant. Since I have no way of telling if they’re just as tasty as our family’s version, you can be sure that I put my parents to the taste test and I’m happy to report that these have received their stamp of approval, which means a lot in my book.
Seeing as I come from the wonderful Italian family tradition of not writing recipes down, it was tough finding a place to begin to come up with a gluten free meatball recipe. I wanted something authentically Italian and full of flavor, but full of flavors that would fit my picky palette. You probably all know by now how much my family loves Carmine’s. Each and every dish that we’ve gotten there has been divine and we’re so fortunate that they offer a cookbook with all of their recipes. The Christmas shortly after my gluten free diagnosis I spotted this cookbook at my local BJs and thought it would be a great gift for my husband, especially since at that point we thought we’d never be able to actually dine there again. Since then I’ve created gluten free versions of a few of the recipes from the cookbook, mainly their meatballs. Their recipe gave me a great place to start, and with some changes here and there I’ve really made it my own. I’ve created a family recipe that we’ll enjoy for years to come and will hopefully give my little girl a familiar food memory too! Check out my Carmine’s inspired recipe for Gluten Free Meatballs For The Family!
1 cup Grated Parmesan/Romano cheese, I sometimes use Colonna brand
3 tbsp Parsley
2 tbsp Basil
1 tbsp Salt
1/2 tsp Ground Black Pepper
1 heaping tsp Chopped Garlic
10-12 cups Marinara Sauce, I like to use Tutturosso tomato sauce to start and season from there
Ingredients for Tomato Sauce:
3 (28) oz cans Tuttorosso Tomato Sauce
3 tsp dried basil for tomato sauce
3 tsp dried oregano for tomato sauce
3 tsp dried parsley for tomato sauce
6 tbsp minced garlic for tomato sauce
6 tbsp olive oil for tomato sauce
Directions:
To a small mixing bowl, tear 4 slices of gluten free bread, without their crusts, into small pieces. Then add 1 cup of skim milk to the bread and allow to sit for 5-7 minutes or until all of the milk has nearly absorbed.
Meanwhile, add two eggs to a large mixing bowl and whisk.
Using your hands, mix in 1 1/2 lb lean ground beef with your eggs
Continue mixing with your hands and add 1/2 cup gluten free bread crumbs, 3 tbsp parsley, 2 tbsp basil, 1 tbsp salt, 1 heaping tsp chopped garlic, and 1/2 tsp ground black pepper.
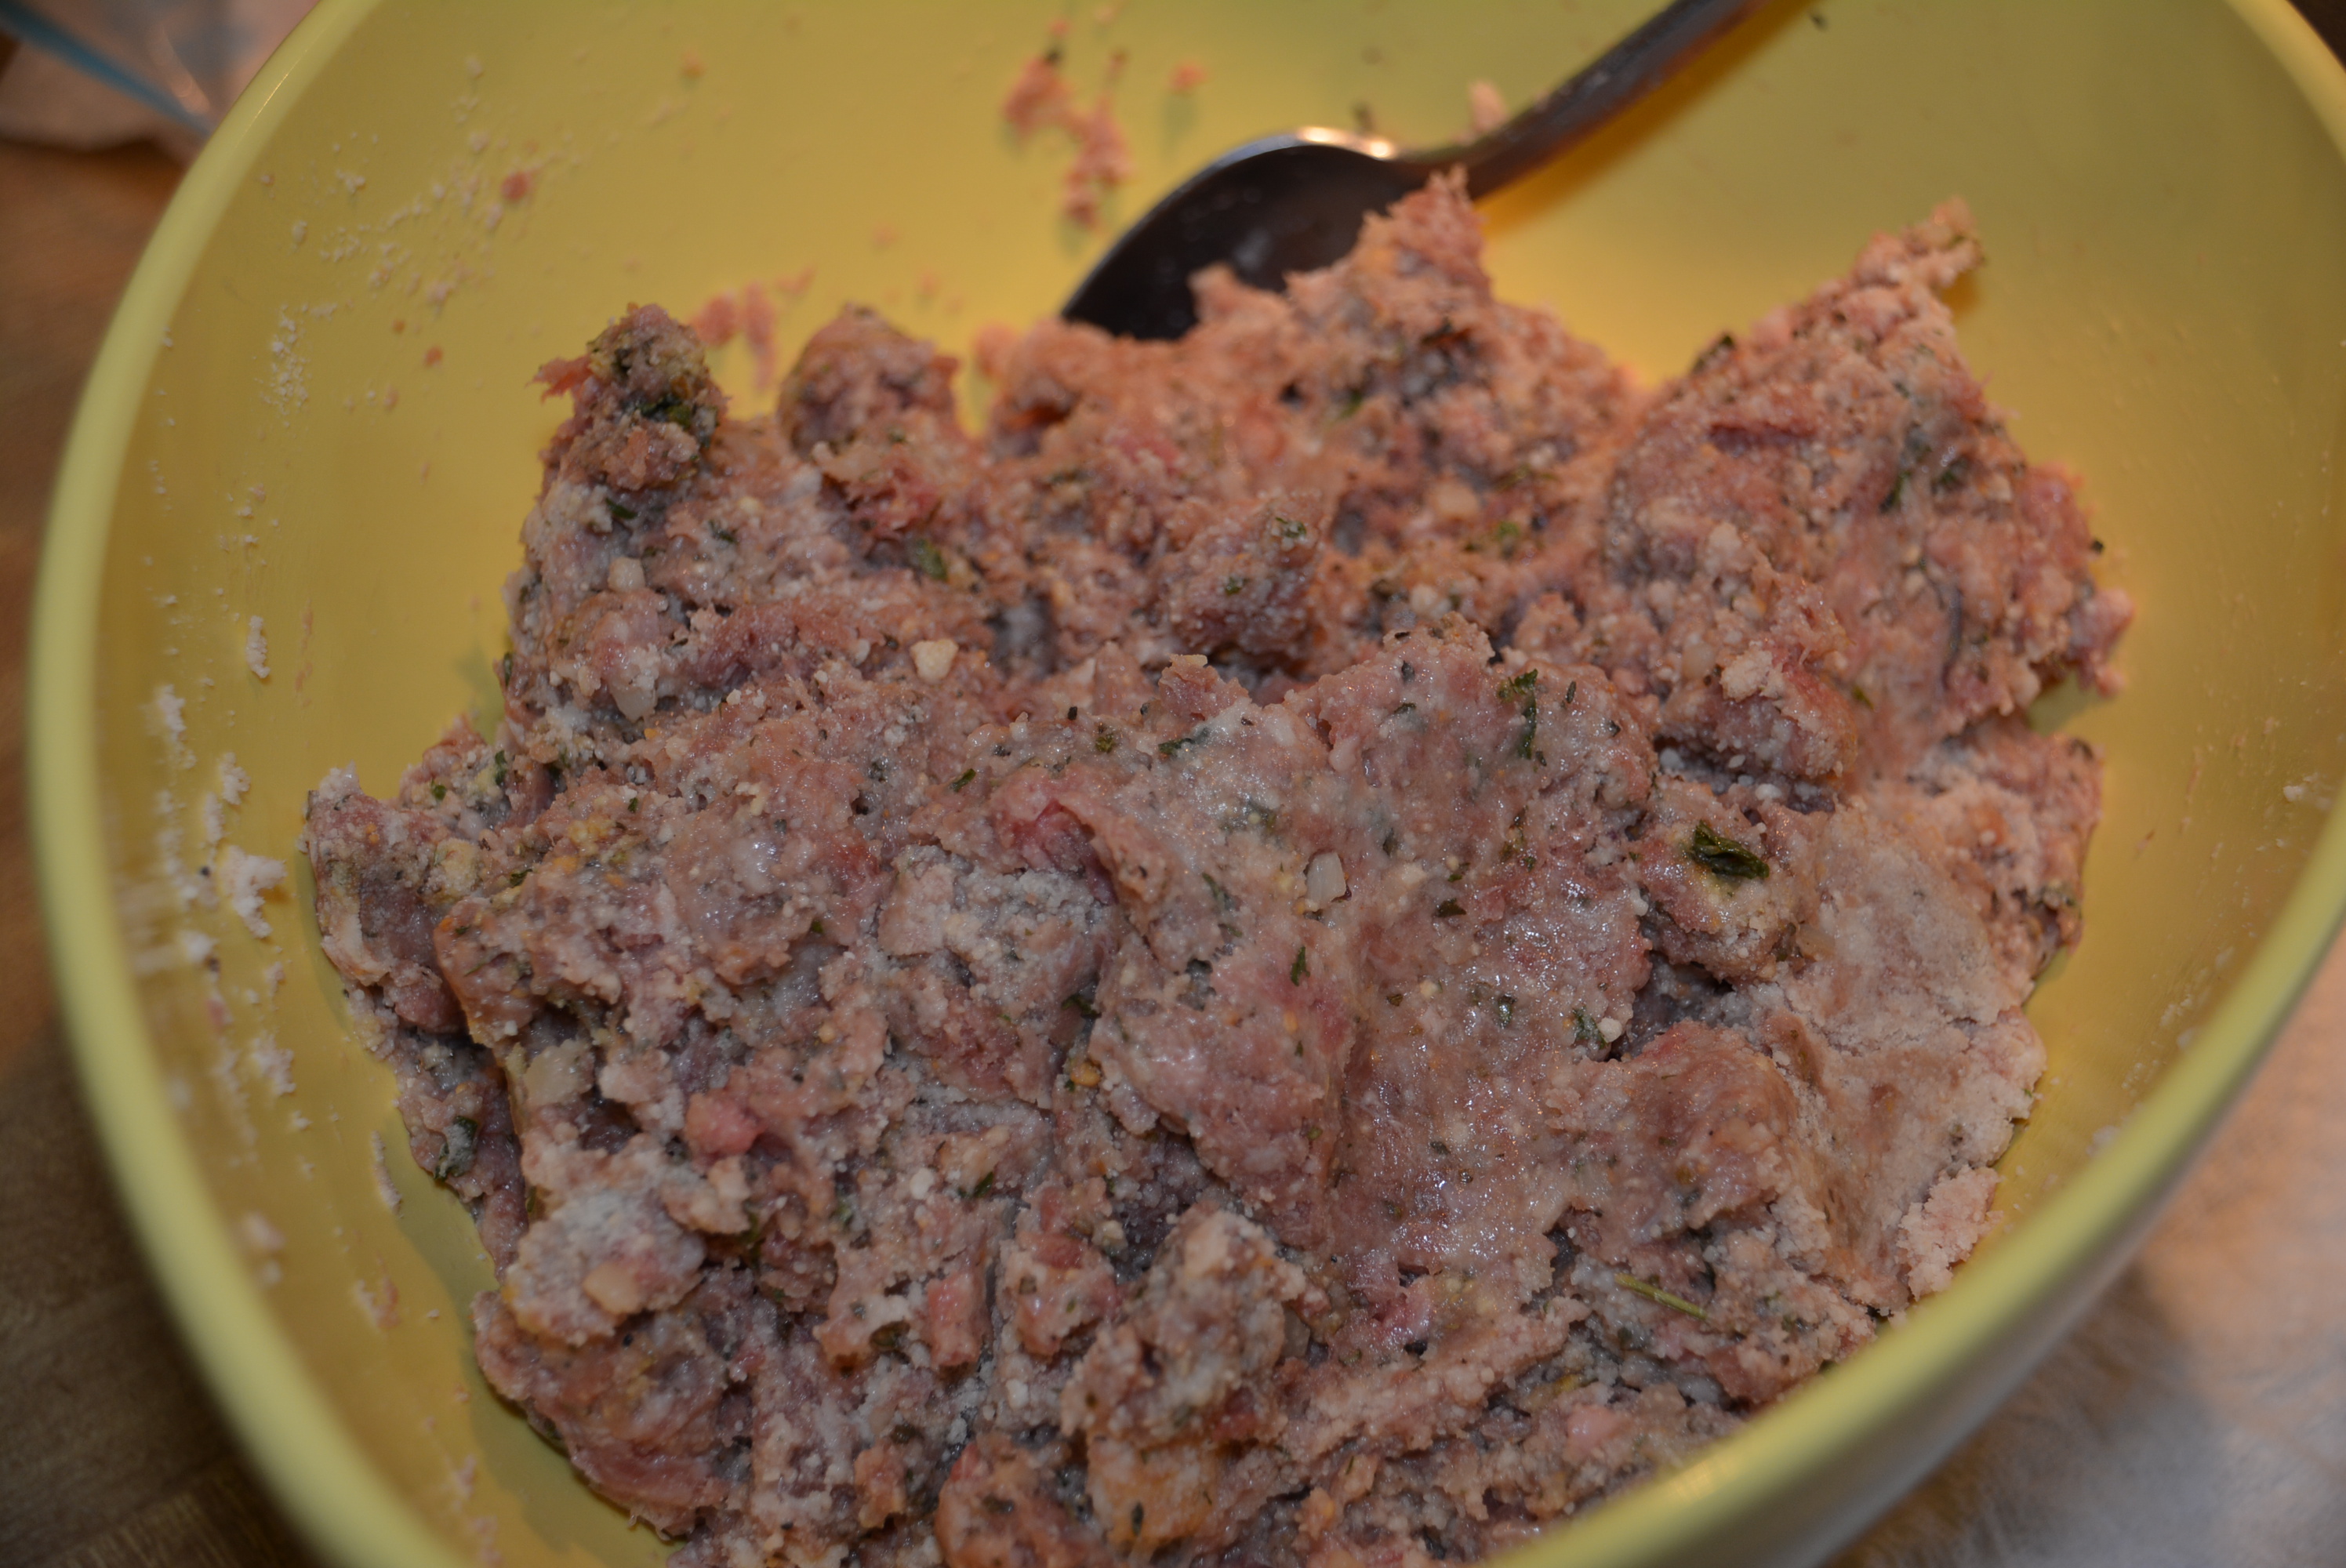
Once you’ve added your seasonings to your ground beef, add in your softened bread and mix with your hands.
Finally, mix in 1 cup grated parmesan/romano cheese.
Mixed ground beef, spices, bread crumbs, and cheese.
Cover your bowl with saran wrap and refrigerate for about 45 minutes or until meat mixture has firmed up a bit.
Preheat oven to 350 degrees.
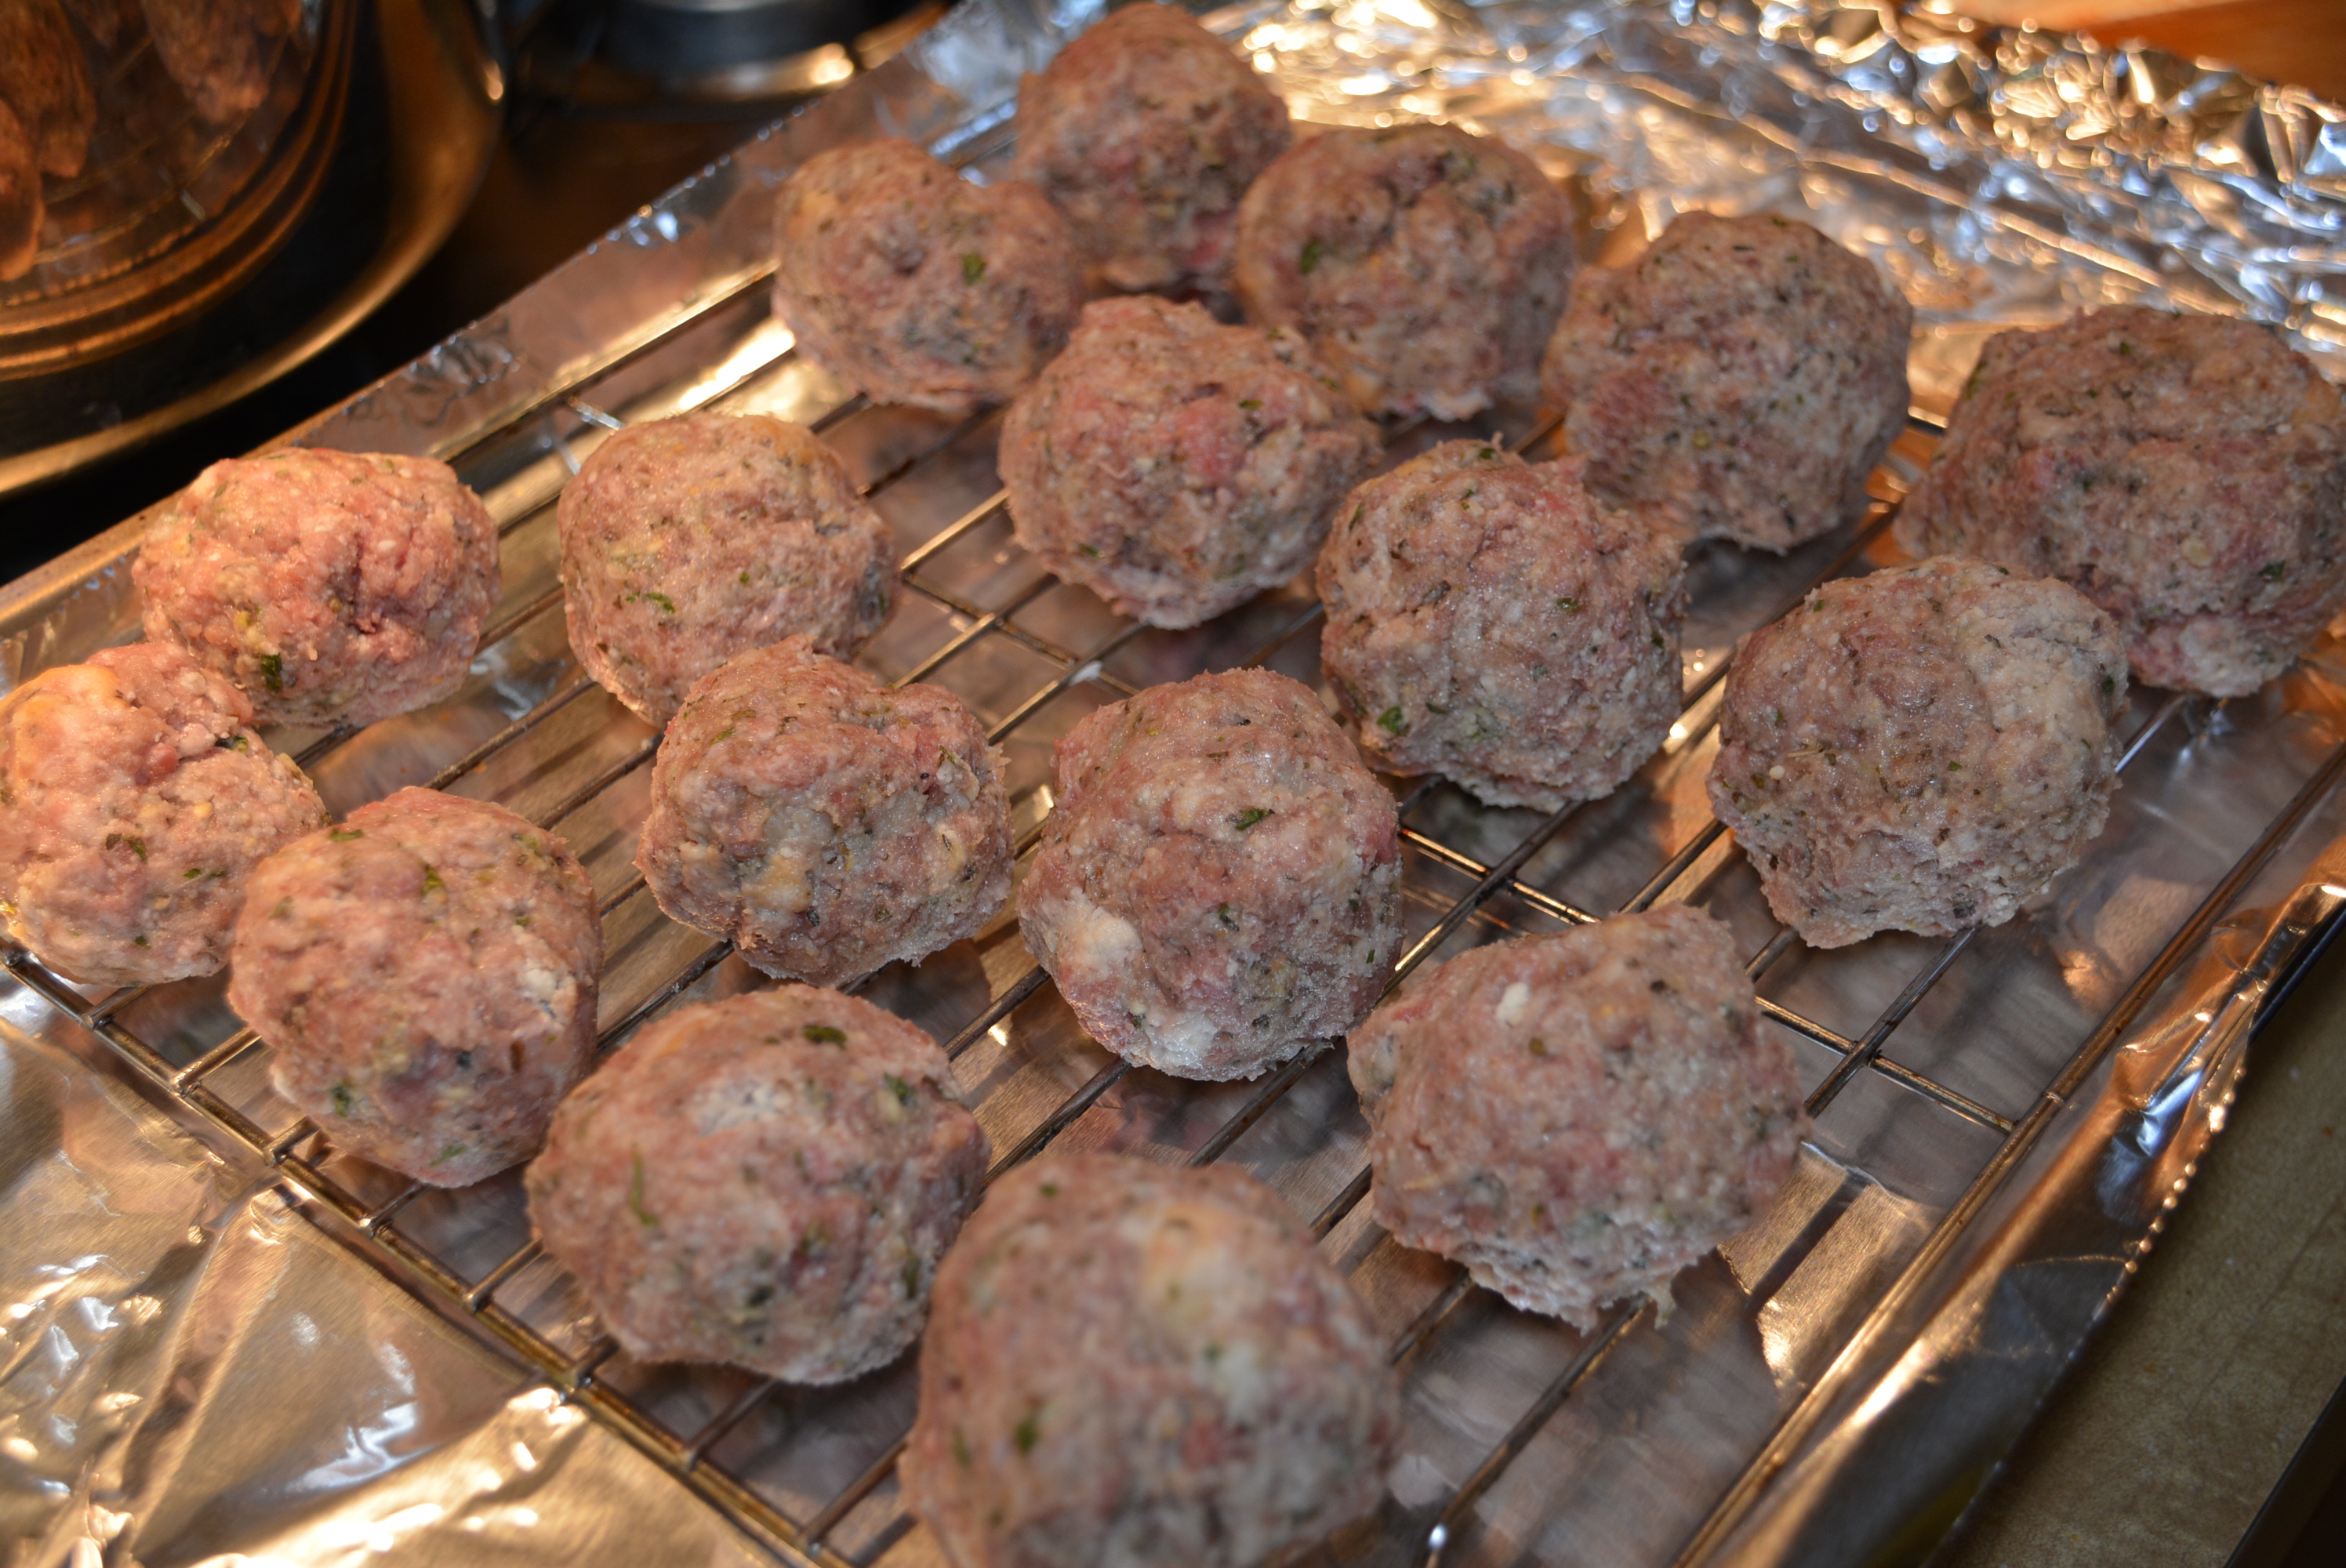
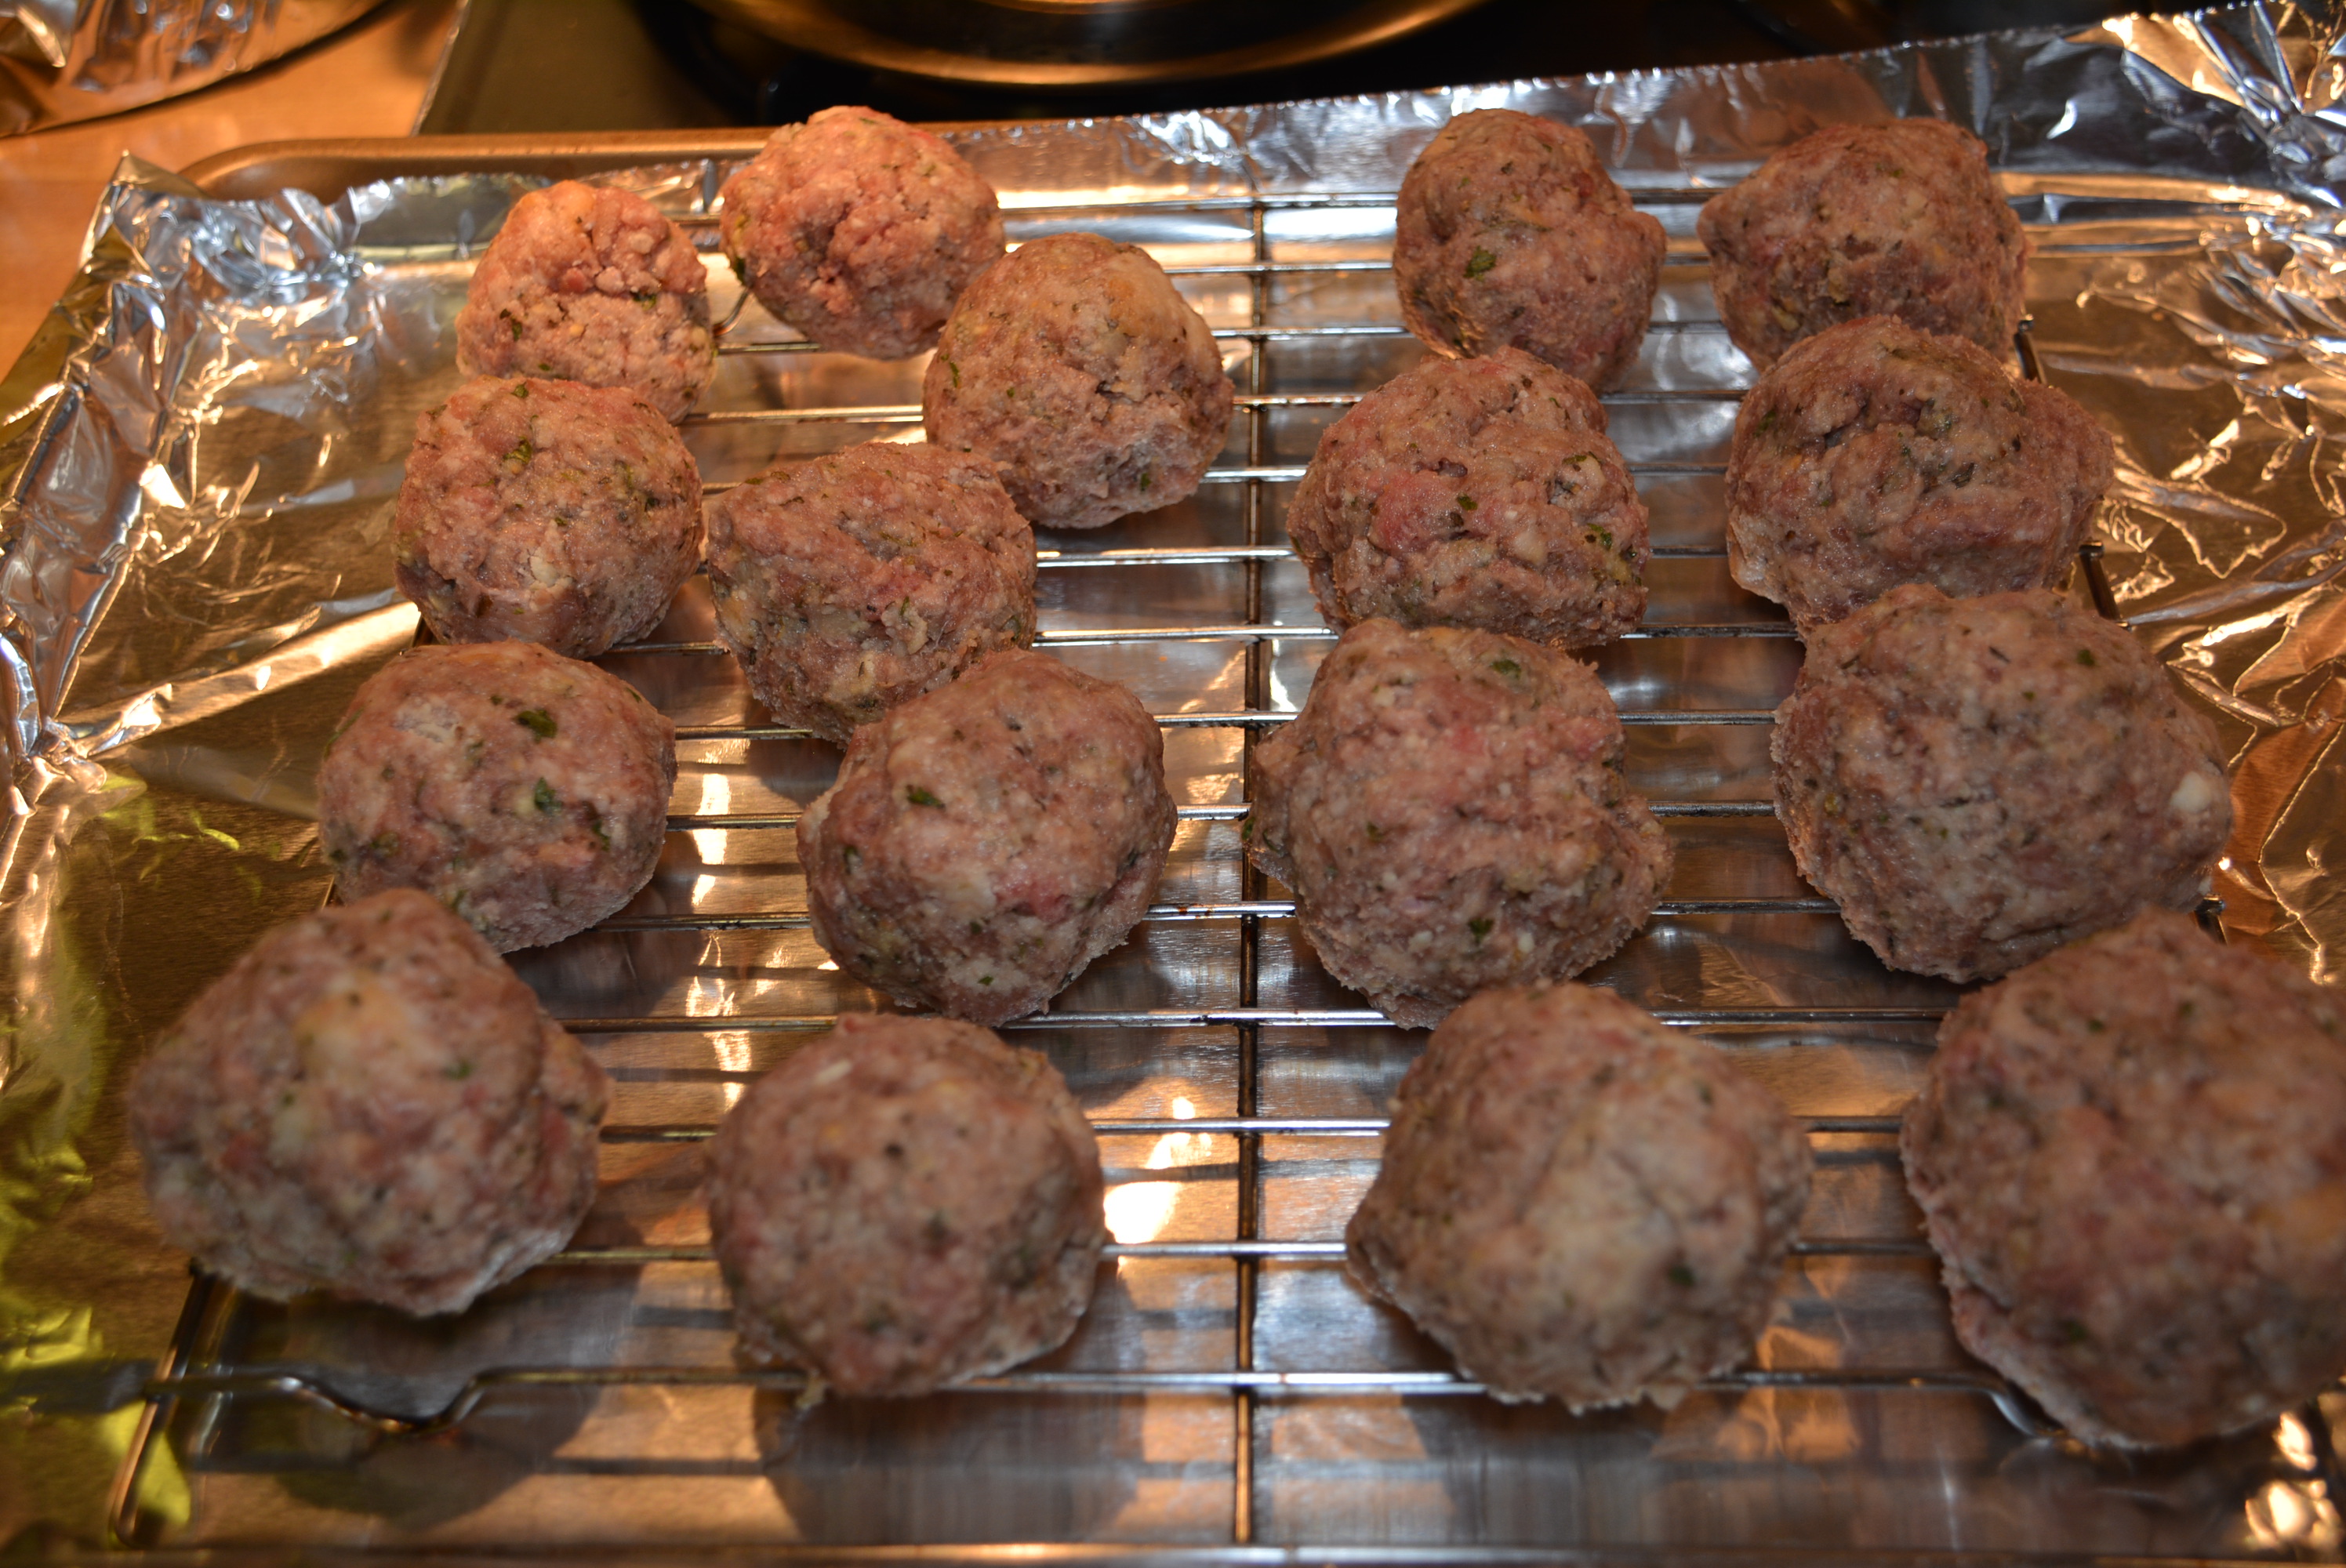
Once chilled, using a tablespoon or ice cream scoop, roll out small meatballs between the palms of your hands to about the size of a golf ball.
Roll your ground beef mixture into meatballs.
Add the meatballs to a plate and refrigerate for an additional 10 minutes to firm up.
Once firmed, carefully add your meatballs to a slotted baking sheet or those cookie drying racks on top of deeper baking sheets so they don’t bake in all of their fat. Make sure you spray these with a non-stick spray.
Golf ball sized meatballs.
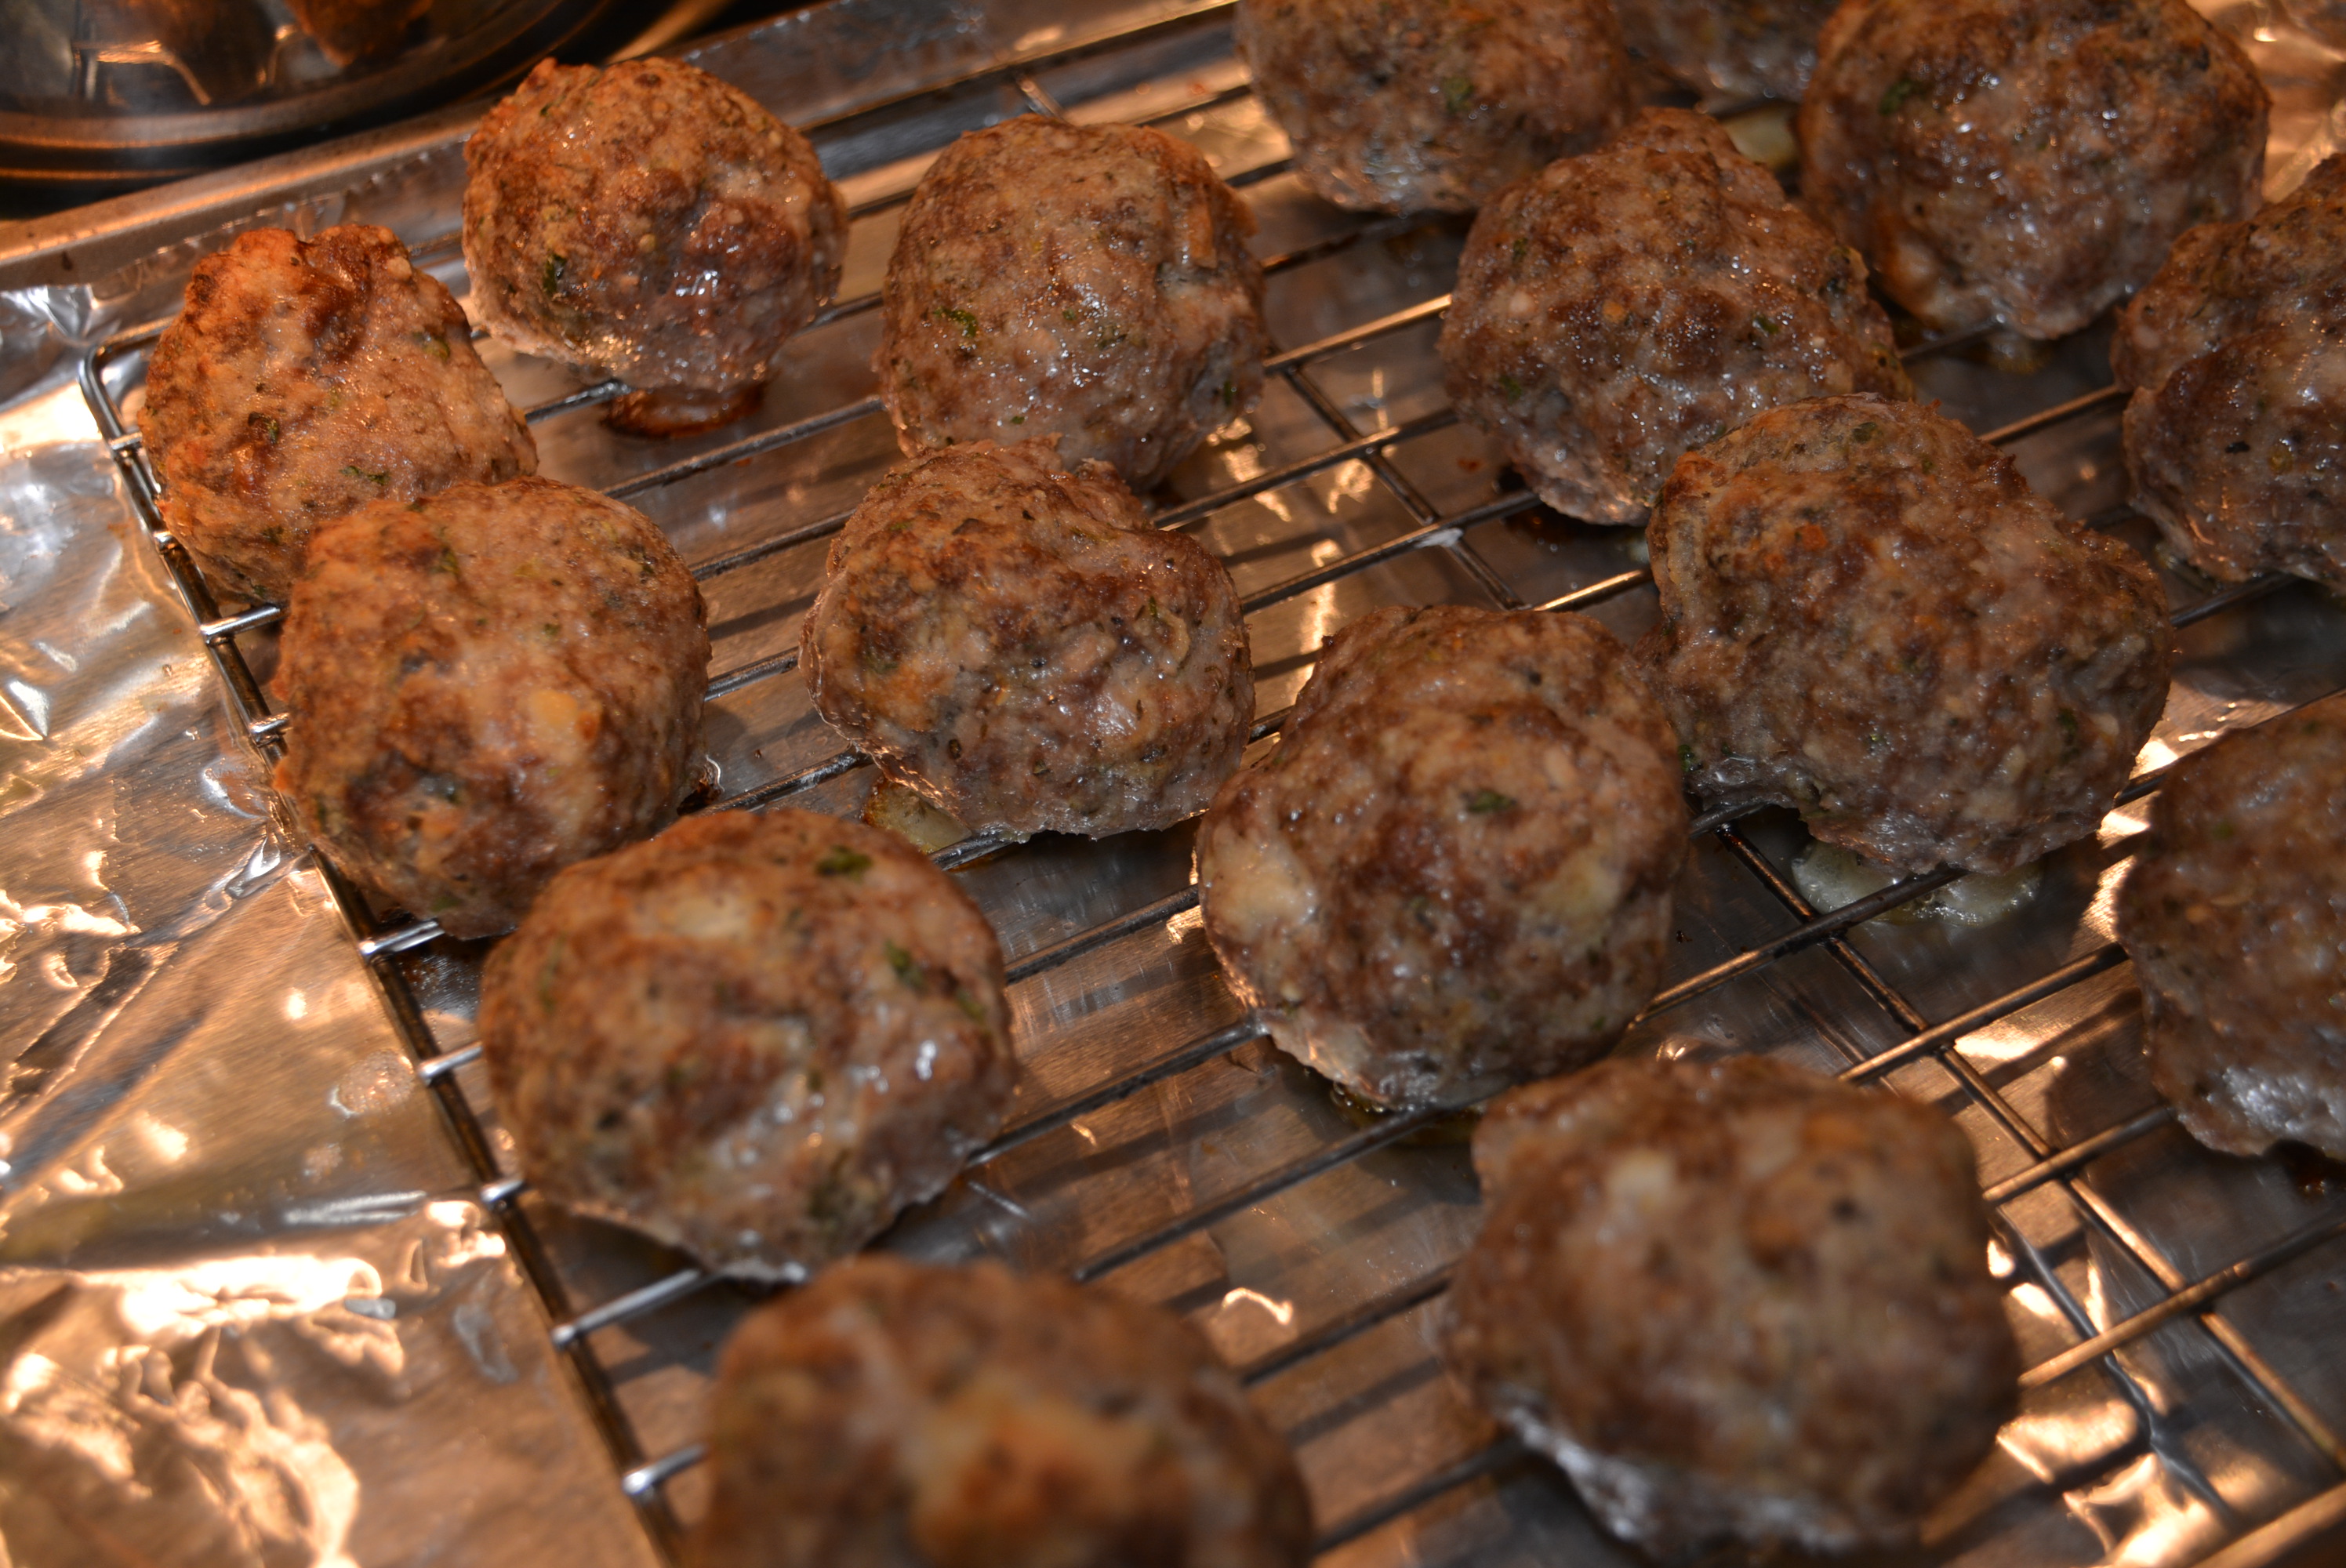
Bake meatballs for about 30 minutes until they’ve browned. I always check the largest one by cutting down the middle and making sure it’s browned all the way through.
While your meatballs are cooking, prepare and heat your tomato sauce. Feel free to use your go to recipe, favorite jarred tomato sauce, or my tomato sauce recipe that I added to this post.
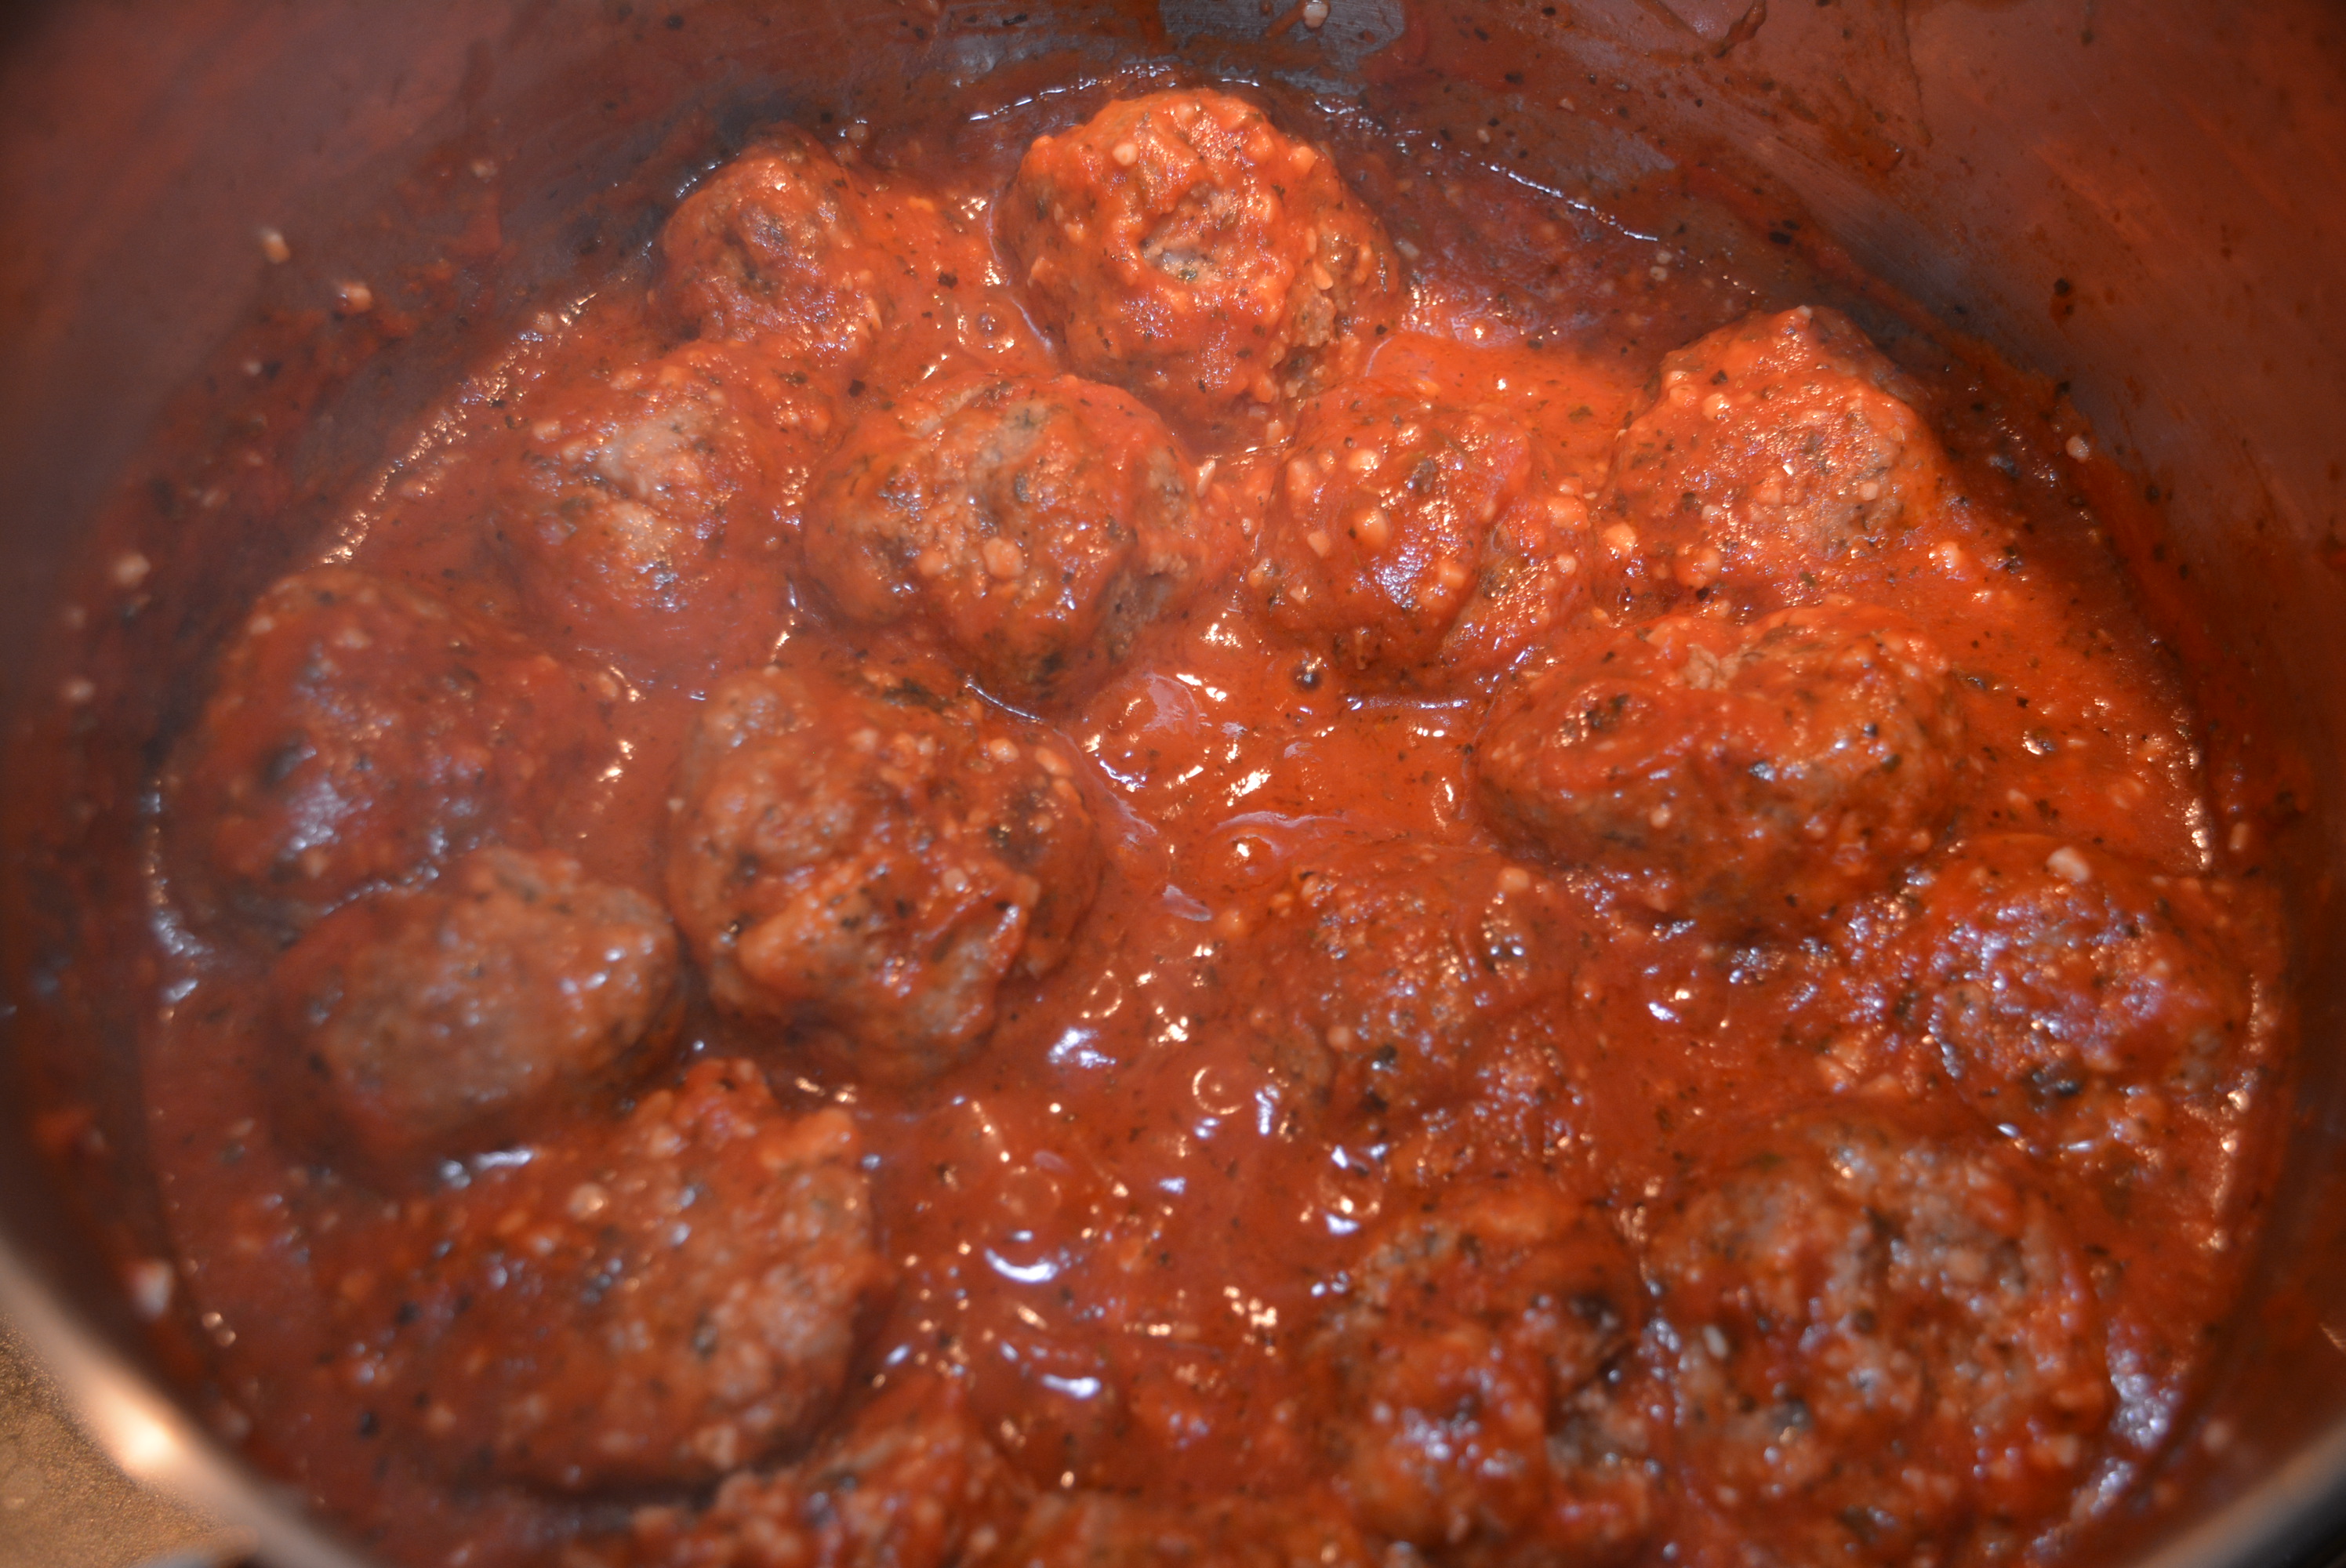
Once your meatballs have finished, using tongs, carefully remove them from the baking sheet and add them to your sauce.
Browned Gluten Free Meatballs
Carefully cover your meatballs with sauce and heat on low for an additional 20-30 minutes uncovered to allow the flavors of the sauce and meat to intermingle.
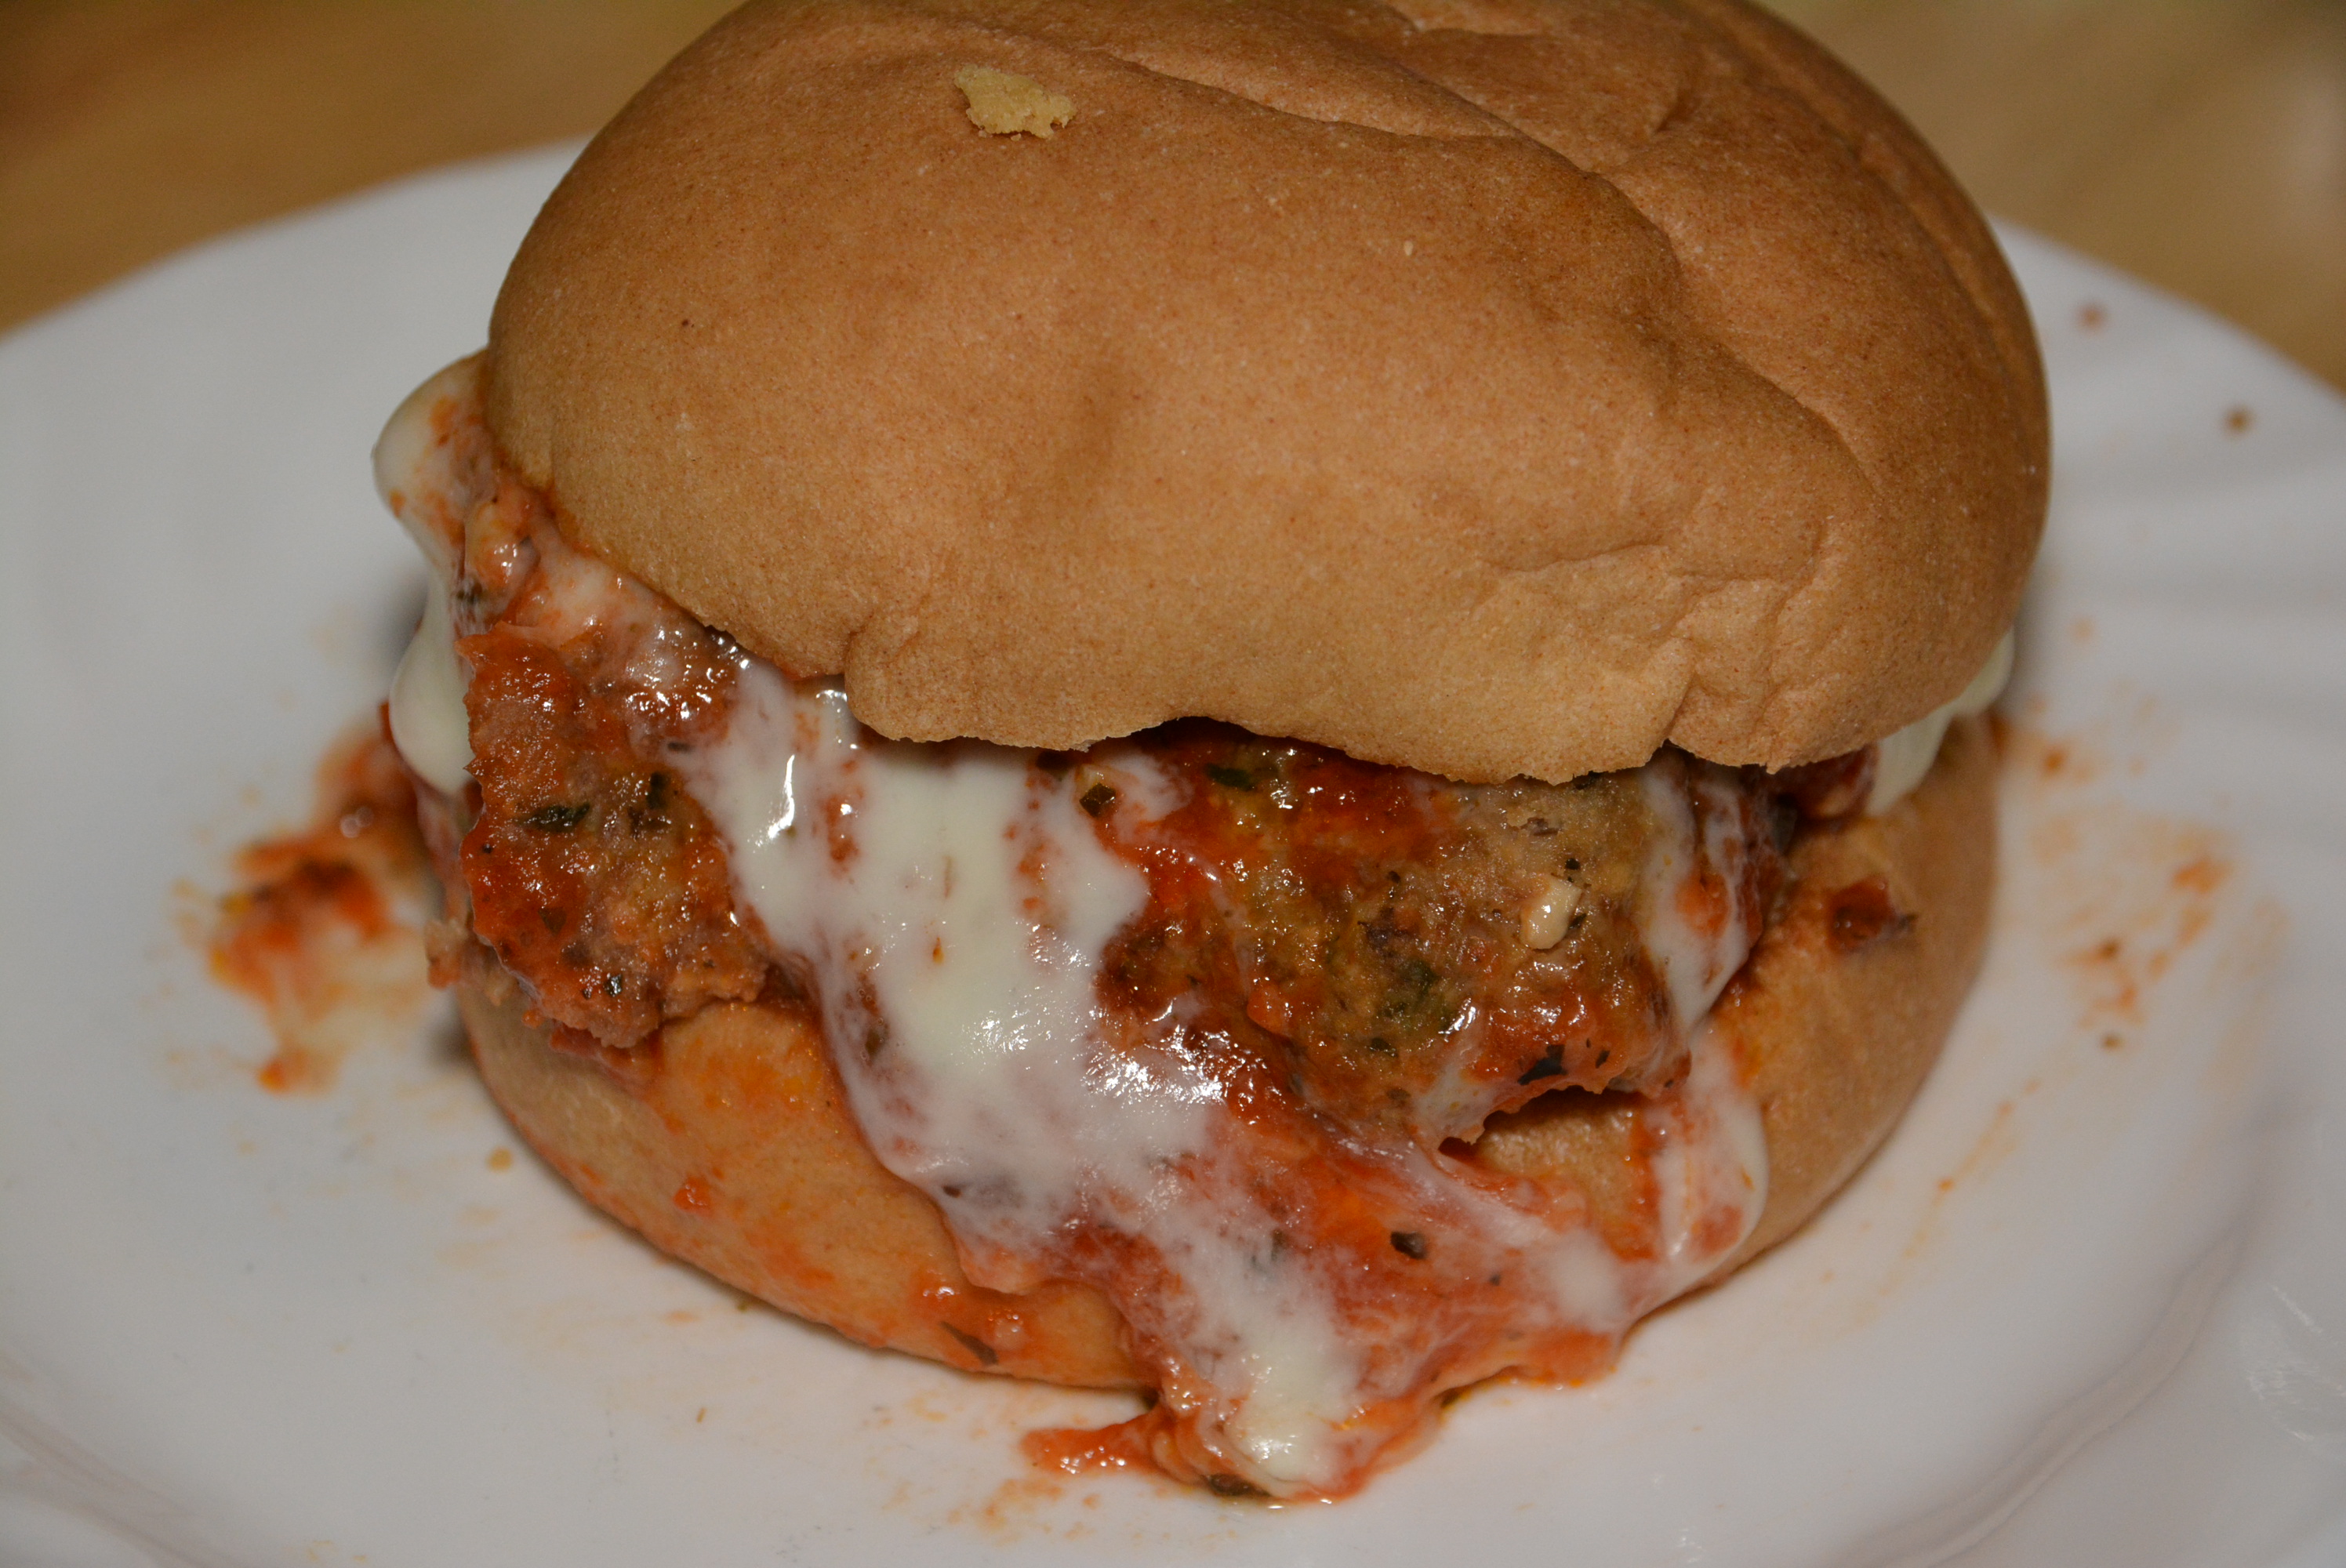
Gluten Free Meatballs ready to top spaghetti or make a perfect sandwich!
Serve your meatballs on gluten free spaghetti or with some toasted gluten free baguettes and melted provolone cheese!
Gluten Free Meatball Sandwich
As the chilly fall days are rolling in, these meatballs are going to make so many appearances in our house. Just the other day I made these for some meatball sandwiches and they were mouthwatering, a little messy, but delicious nonetheless. I just toasted up some gluten free bread while my meatballs were simmering with the sauce, I prefer a baguette but only had these dinner rolls, but they were a great substitute. Then I added a few meatballs and sauce to the roll and melted some mozzarella or provolone cheese on top. It was such a tasty dinner, and hit the spot for a warm and nostalgic meal. And for lunch the next day, we were lucky enough to enjoy nice warm bowls of meatballs too!
Depending on how many you’ll have dining with you, you can adjust this recipe as needed. Without any changes, it usually makes about 30-35 meatballs, depending on how large you make them. For a big family dinner I’ll follow the recipe exactly, but for our family of three I usually half the recipe which makes plenty of meatballs for firsts, seconds, and not to mention leftovers too. We always have enough meatballs for leftover lunch or dinner the next day. I just add them, with the sauce too, to a tightly closed plastic container and rewarm them in a sauce pan or microwave. Be creative too for your leftover meatballs, I’ve even used our extra meatballs for lasagna, and I must say they were a perfect addition!
So just because you’re gluten free, doesn’t mean your weekly Italian family dinner has to be missing meatballs. Throw these together and serve them by themselves, on rolls, or on your favorite gluten free spaghetti and enjoy!
Sincerely,
Lindsay
TIP: I’ve also made these dairy free too just by omitting the cheese, or adding a diary free grated cheese, and they came out just as flavorful and delicious!
Carmine's Inspired Gluten Free Meatballs For The Family
1/2 cup Seasoned Gluten Free Bread Crumbs, I like Schar and then I make my own Seasoned Gluten Free Bread Crumbs by adding the breadcrumbs to the container first, then adding about one heaping tablespoon of dried basil, oregano, parsley, garlic powder, and garlic salt, capping the container, and shaking them to mix!
4 slices Gluten Free Bread, no crusts
1 cup Milk
1 cup Grated Parmesan/Romano Cheese, I sometimes use Colonna brand
3 tbsp Parsley
2 tbsp Basil
1 tbsp Salt
1/2 tsp Ground Black Pepper
1 heaping tsp Chopped Garlic
10-12 cups Marinara Sauce, try my Tomato Sauce
Gluten Free Mom To Be Tomato Sauce
3 28 oz cans Tuttorosso Tomato Sauce
3 tsp dried basil for tomato sauce
3 tsp dried oregano for tomato sauce
3 tsp dried parsley for tomato sauce
6 tbsp minced garlic for tomato sauce
6 tbsp olive oil for tomato sauce
Add 6 tbsp olive oil and 6 tbsp minced garlic to sauce pan. Cook garlic on low-medium heat until slightly browned. Add 3 28 oz cans of tomato sauce (I like Tutturosso). Stir sauce and heat on low-medium. Add 3 tsp of dried basil, oregano, and parsley and stir to combine. Taste sauce and add a bit of garlic salt if you’d like. Heat sauce for about 20-25 minutes. Remove from heat and set sauce aside.
Instructions
To a small mixing bowl, tear 4 slices of gluten free bread, without their crusts, into small pieces. Then add 1 cup of skim milk to the bread and allow to sit for 5-7 minutes or until all of the milk has nearly absorbed.
Meanwhile, add two eggs to a large mixing bowl and whisk.
Using your hands, mix in 1 1/2 lb lean ground beef with your eggs
Continue mixing with your hands and add 1/2 cup gluten free bread crumbs, 3 tbsp parsley, 2 tbsp basil, 1 tbsp salt, 1 heaping tsp chopped garlic, and 1/2 tsp ground black pepper.
Once you've added your seasonings to your ground beef, add in your softened bread and mix with your hands.
Finally, mix in 1 cup grated parmesan/romano cheese.
Cover your bowl with saran wrap and refrigerate for about 45 minutes or until meat mixture has firmed up a bit.
Preheat oven to 350 degrees.
Once chilled, using a tablespoon or ice cream scoop, roll out small meatballs between the palms of your hands to about the size of a golf ball.
Add the meatballs to a plate and refrigerate for an additional 10 minutes to firm up.
Once firmed, carefully add your meatballs to a slotted baking sheet or those cookie drying racks on top of deeper baking sheets so they don't bake in all of their fat. Make sure you spray these with a non-stick spray.
Bake meatballs for about 30 minutes until they've browned. I always check the largest one by cutting down the middle and making sure it's browned all the way through.
While your meatballs are cooking, prepare and heat your tomato sauce. Feel free to use your go to recipe, favorite jarred tomato sauce, or my tomato sauce recipe that I added to this post.
Once your meatballs have finished, using tongs, carefully remove them from the baking sheet and add them to your sauce.
Carefully cover your meatballs with sauce and heat on low for an additional 20-30 minutes uncovered to allow the flavors of the sauce and meat to intermingle.
Serve your meatballs over gluten free spaghetti or with some toasted gluten free baguettes (or whatever gluten free bread you have on hand) and melted provolone cheese!
By Gluten Free Mom To Be
Adapted from Carmine's
Adapted from Carmine's
Gluten Free Mom To Be http://www.glutenfreemomtobe.com/
Growing up, I went on some pretty memorable family vacations, but one that really stands out is our cross country adventure. For a whole month one summer, my parents hitched a trailer to our suburban and drove us from New Jersey out to California and back again. We saw so much of the countryside traveling this way and got to stop at some pretty cool places too like Mount Rushmore, Yellowstone National Park, Alcatraz, Muir Woods, and the Grand Canyon. Not to mention visiting some quirky sights too like the Corn Palace, a place made entirely of corn, riding the trolley cars, and walking the crooked street of San Francisco. It was a jam packed vacation that took us to places we may have never been to otherwise. Thanks to my parents I’m able to tell my little girl more about this country than I ever dreamed I could.
Some of my favorite times on our cross country vacation were spent in California where I met a whole other half of our family for the first time, where we went to Disneyland, and where we walked the streets of Los Angeles and San Francisco, taking in all of the sights, sounds, and tastes these cities had to offer. I still remember like it was yesterday, spending a morning seeing San Francisco’s Alcatraz and then walking along Fisherman’s Wharf, picking out a place for lunch. We decided on soups and/or sandwiches from a delicious restaurant nestled right in the wharf, offering authentic San Francisco sourdough. It was so chilly and windy, a perfect San Francisco day for soup and sourdough bread. I remember my mom and dad’s huge sourdough bread bowl, overflowing with piping hot soup inside, it was a sight to see for sure and apparently tasted even better than it looked. Never being a huge soup fan, I had a sandwich on sourdough bread and I can still taste the delicious flavor. The crust was so crunchy on the outside and the inside was light and filled with wholes, but chewy too, just how a perfect sourdough roll should be. Years later, and we haven’t been back to San Francisco but the flavors and textures of that lunch have not been forgotten.
Gluten Free Sourdough By Bread SRSLY
Since going gluten free, my diet has been left with many holes in it, without gluten free substitutions to fill them in. As the hype and popularity of this diet/lifestyle grows, there seems to be more and more unique gluten free options out there. We’re far from where I hope we’ll end up one day but just being able to find new items like this gluten free sourdough is really encouraging. Which brings me to the beauty of Twitter. I was blogging not too long ago and stumbled upon a gluten free sourdough bread company in San Francisco, Bread SRSLY. Just after one glimpse, I was instantly transported back to my family’s time in San Francisco and couldn’t help but crave a taste of that crispy on the outside, chewy on the inside sourdough bread. But would these gluten free rolls and loaves of bread compare to the ones that stood out in my memory? Well there was only one way to find out.
Happy delivery day in the Gluten Free Mom To Be’s house!
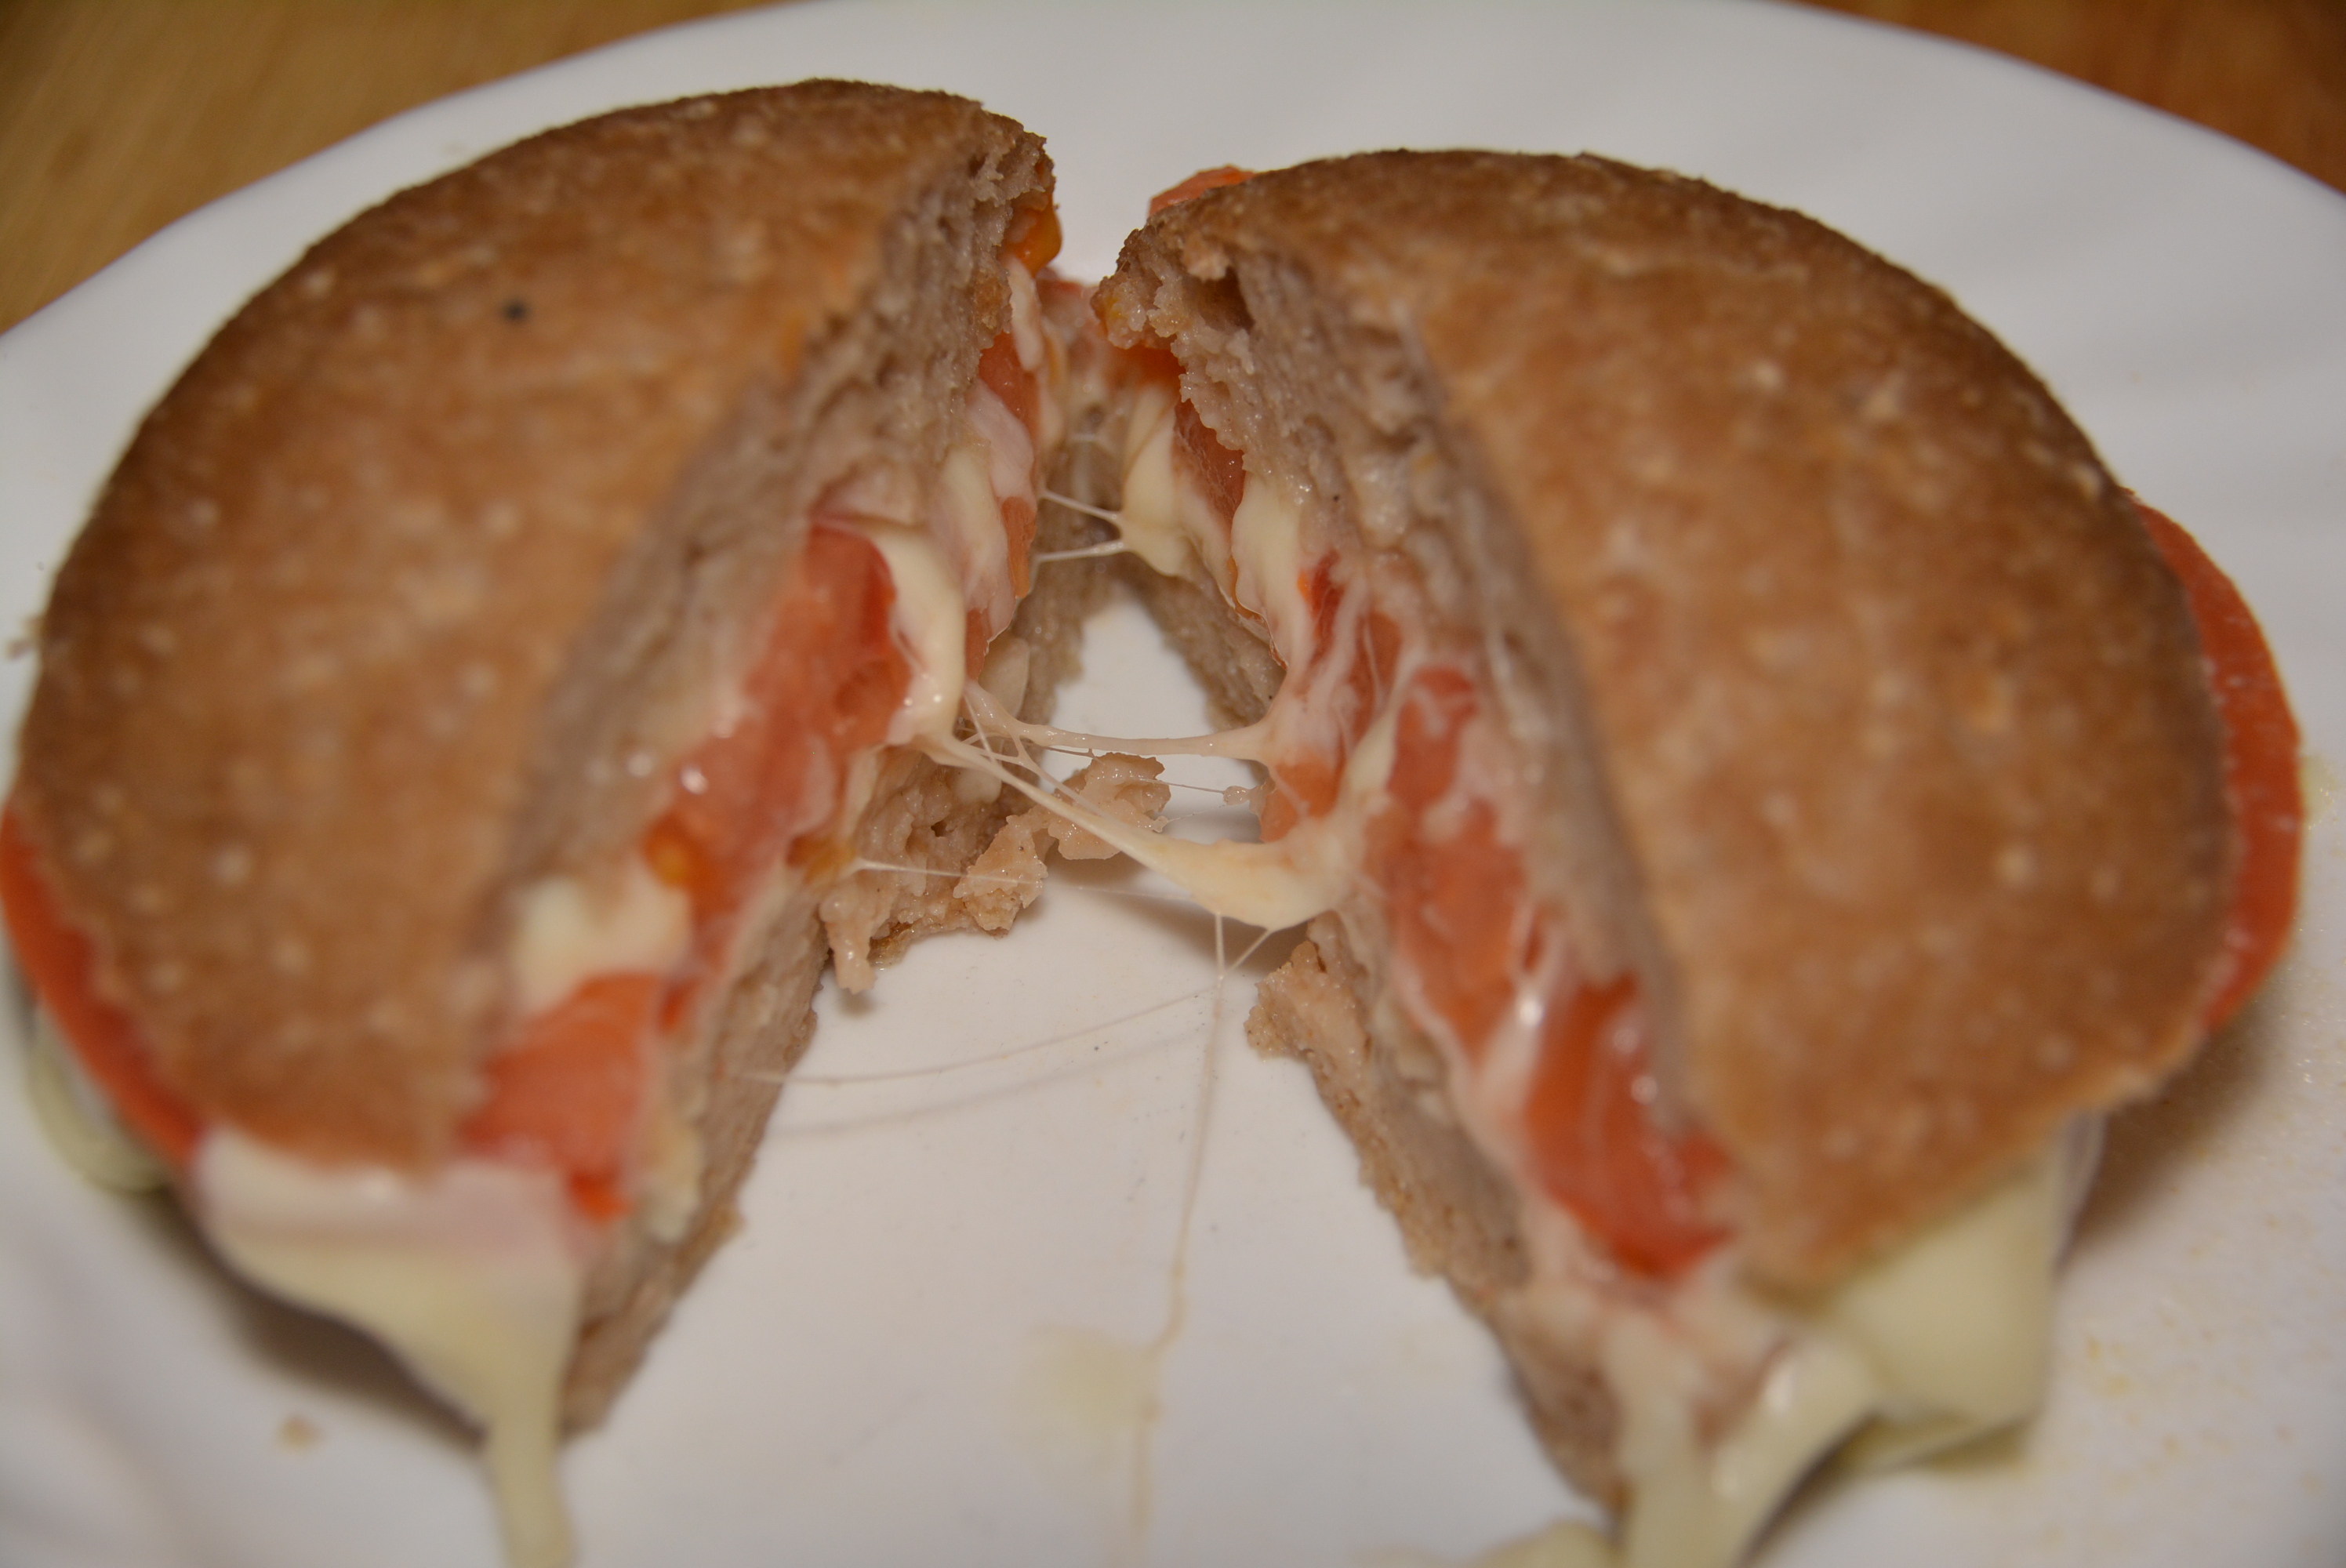
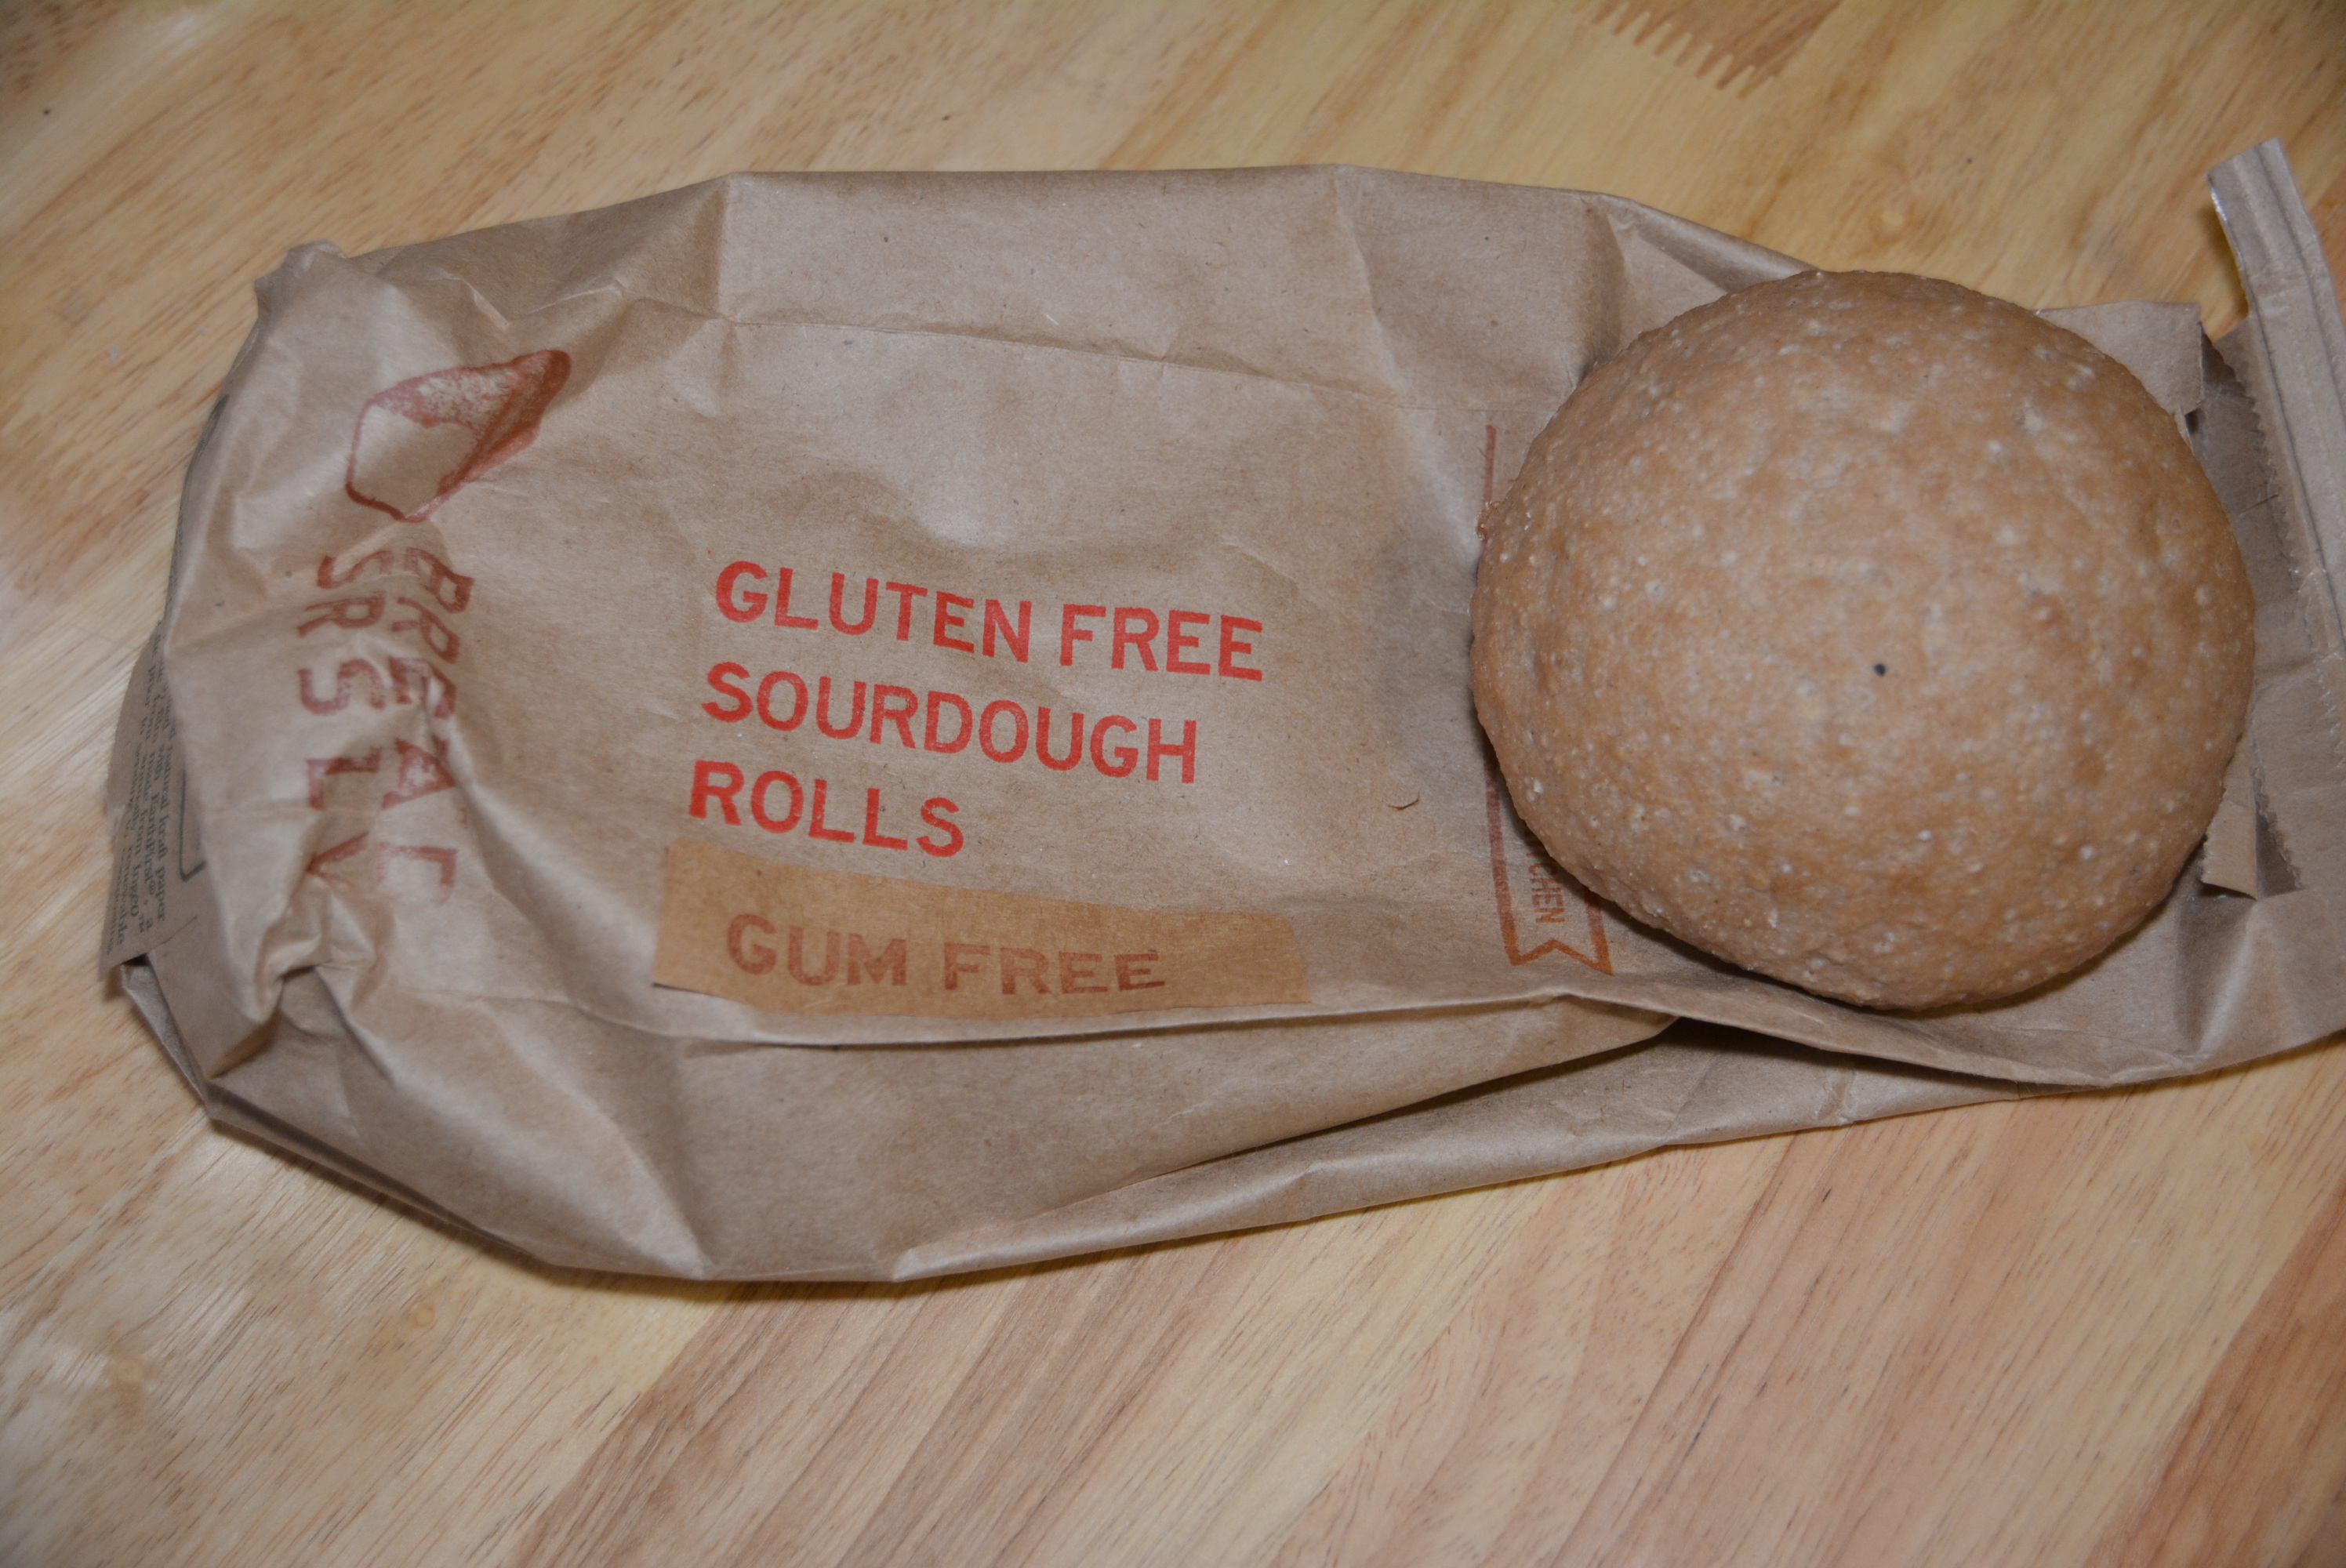
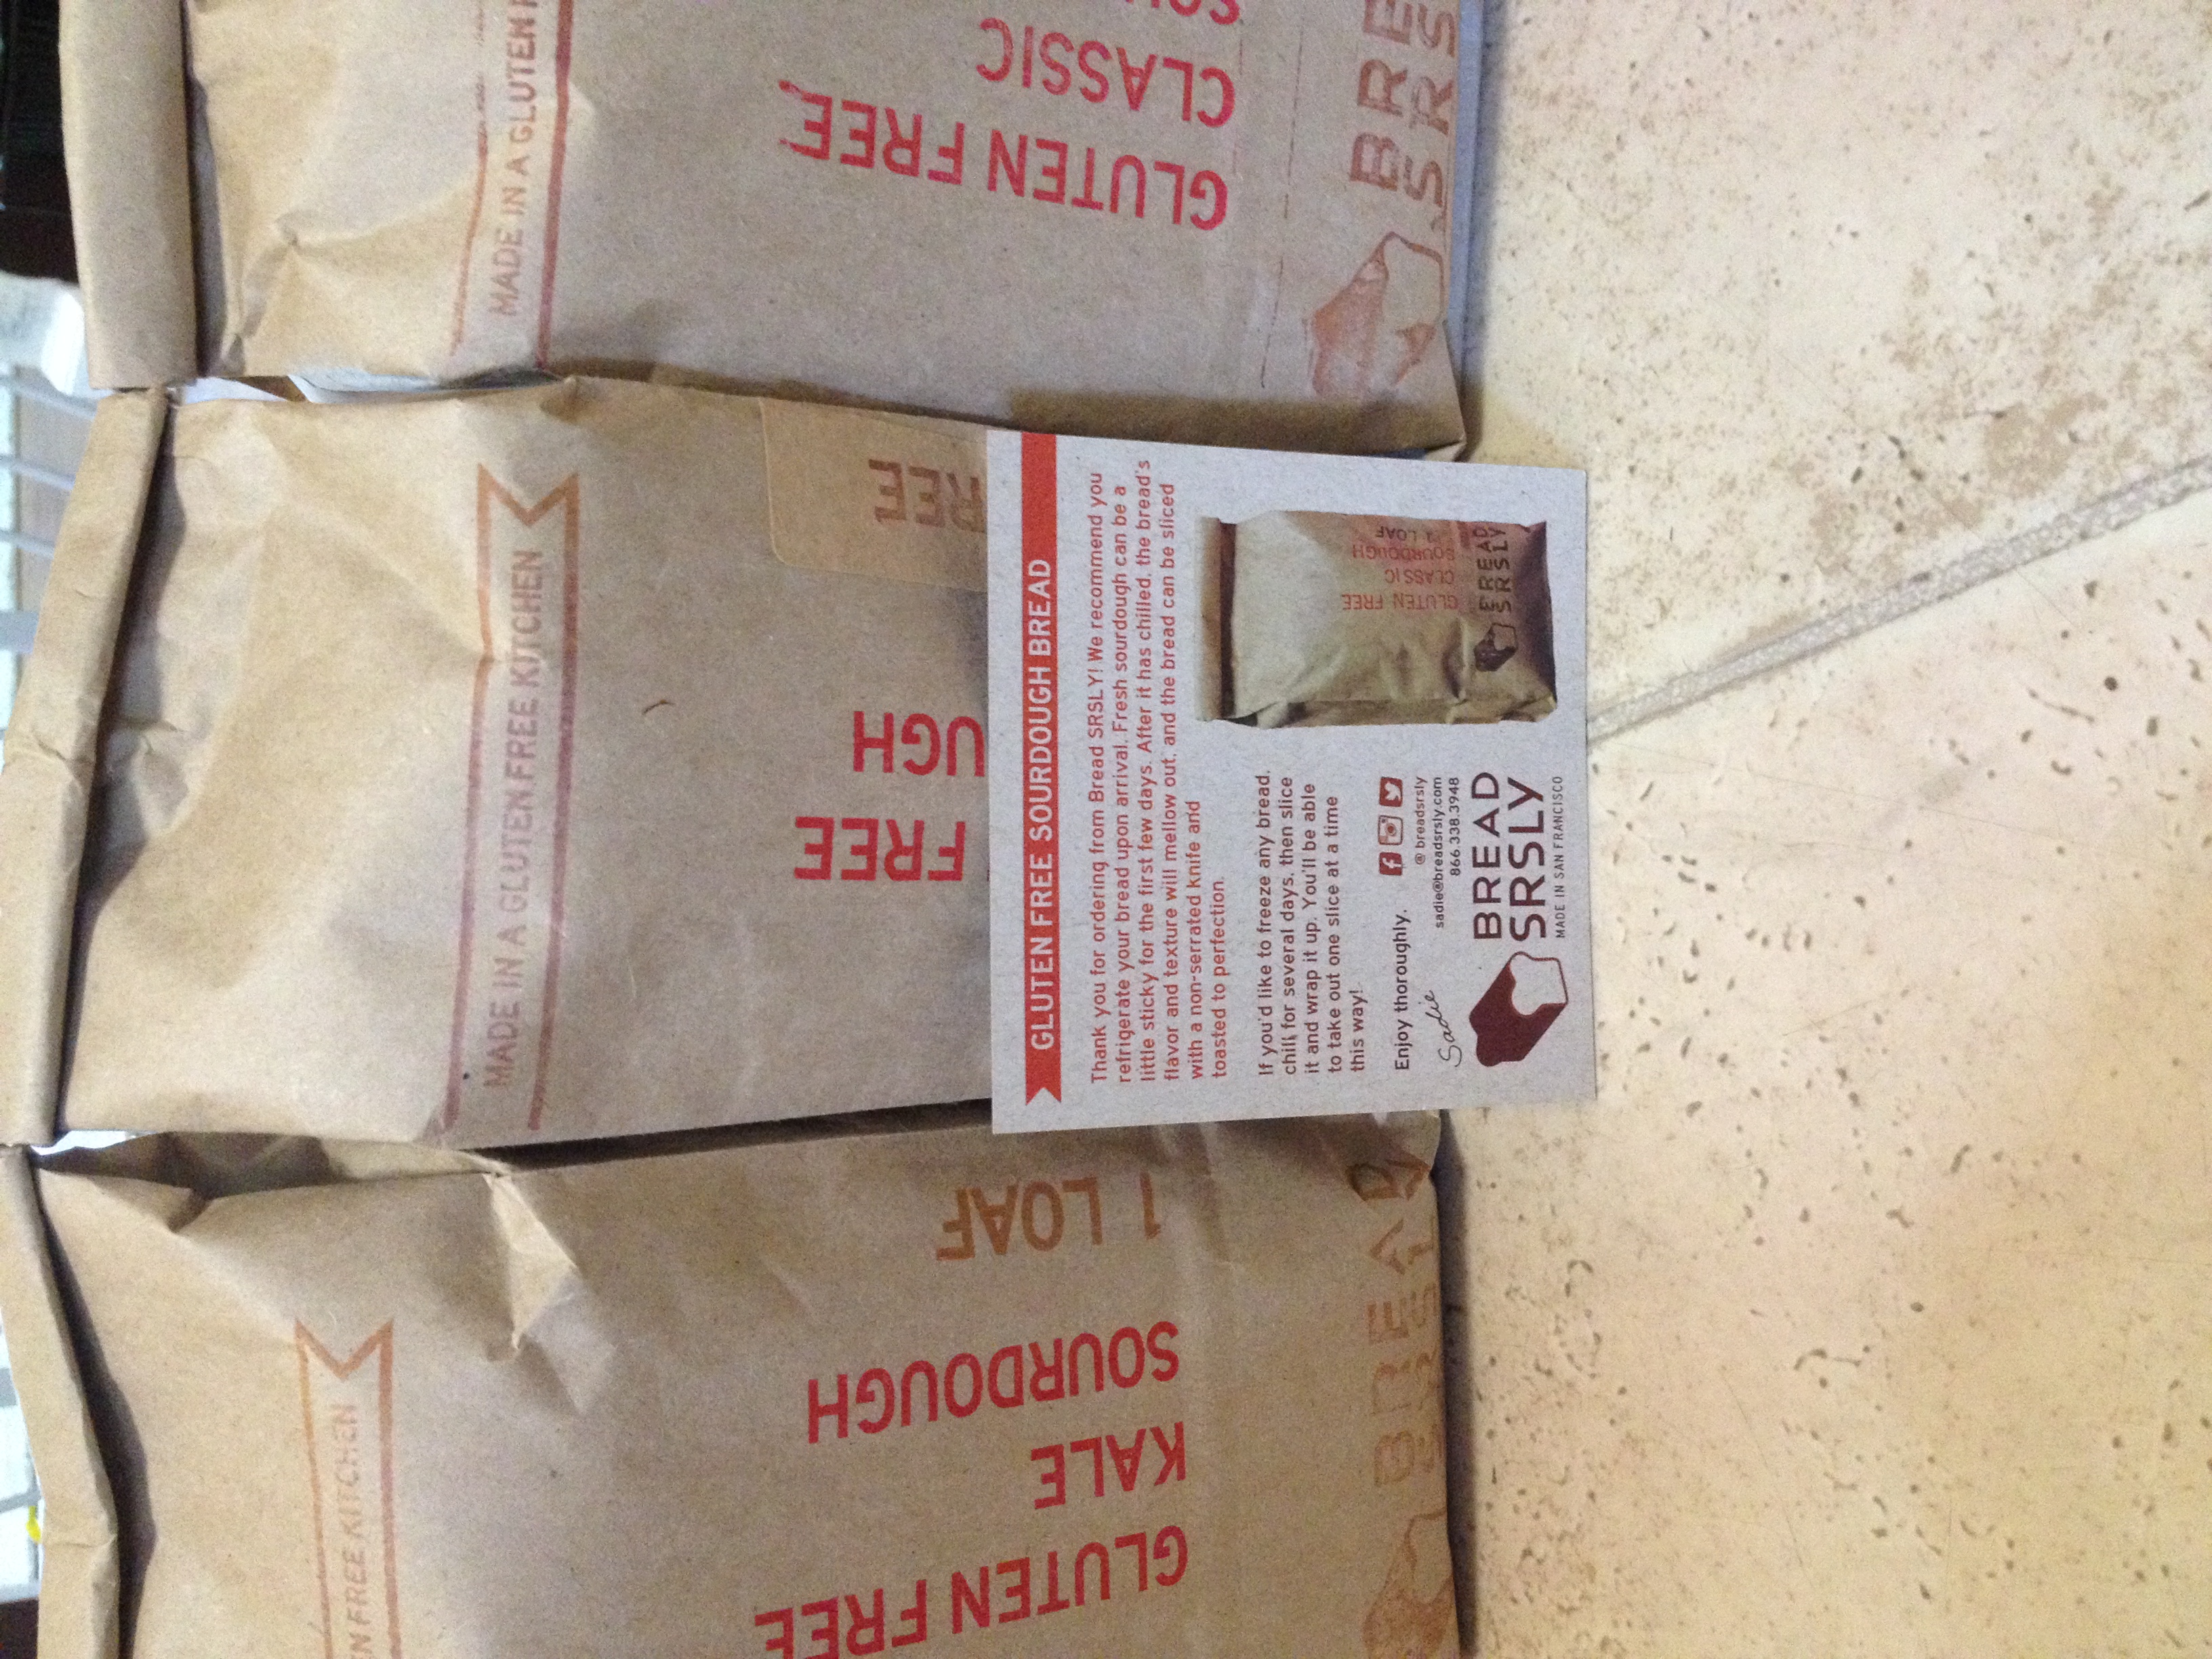
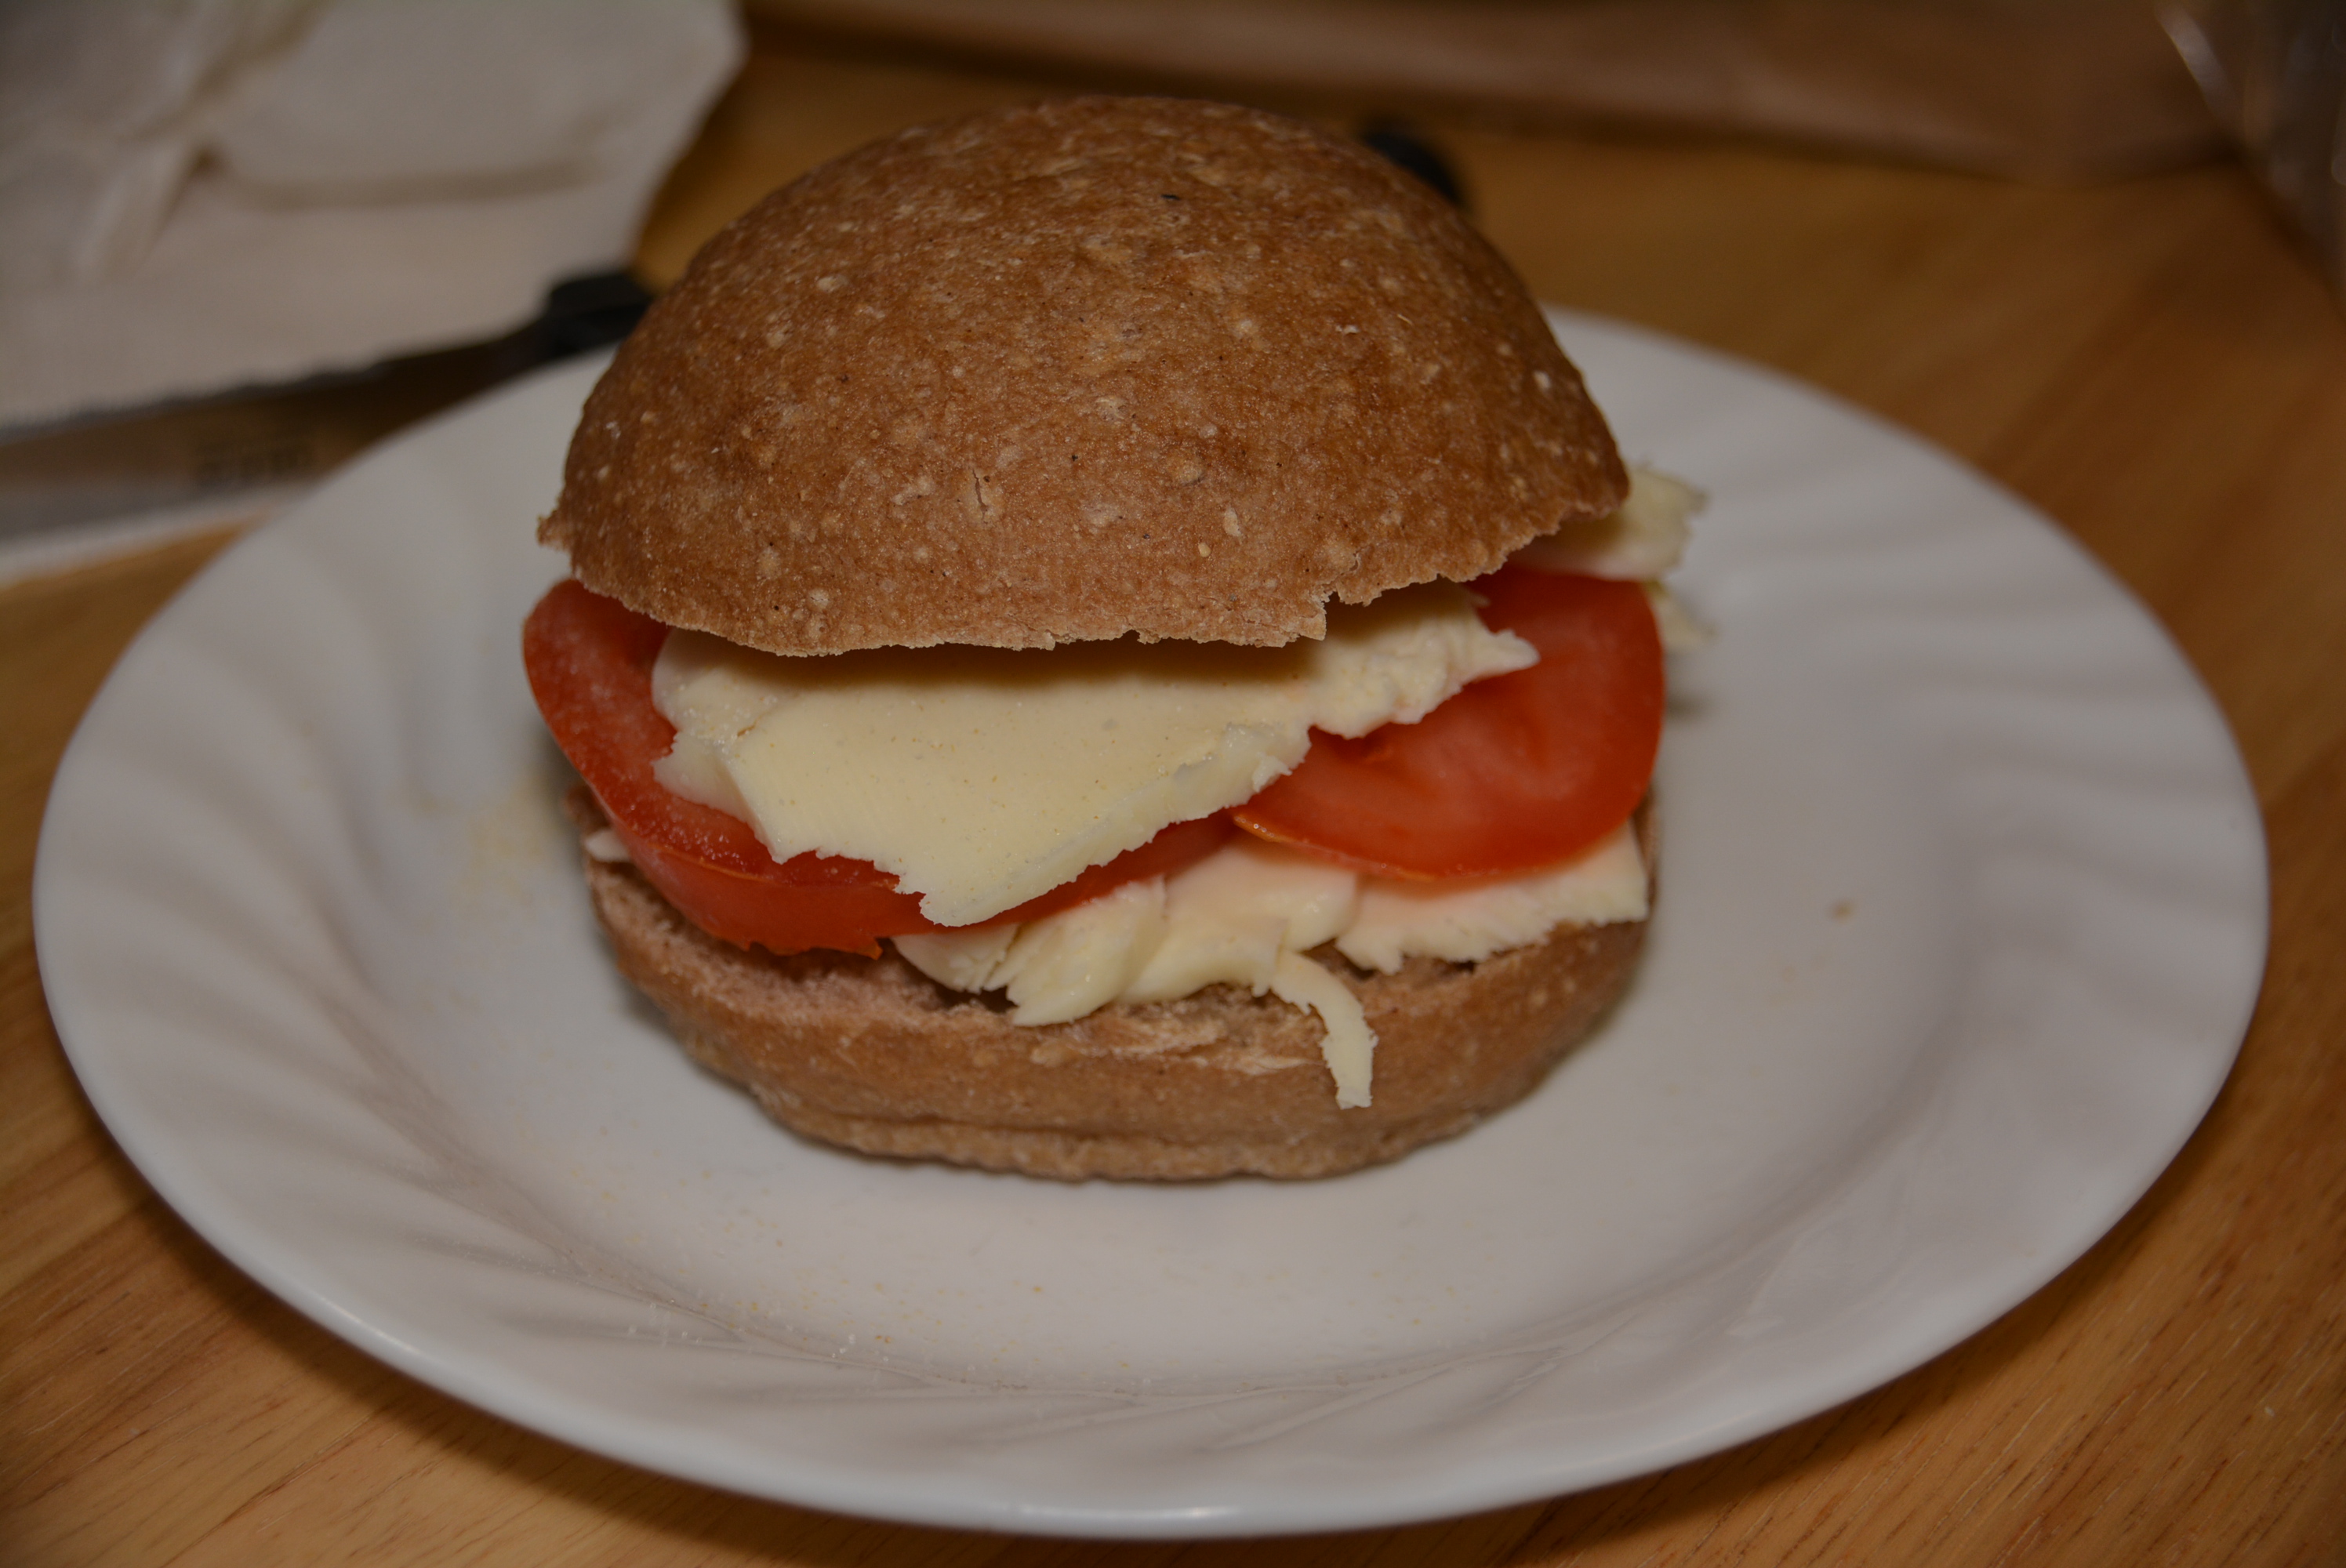
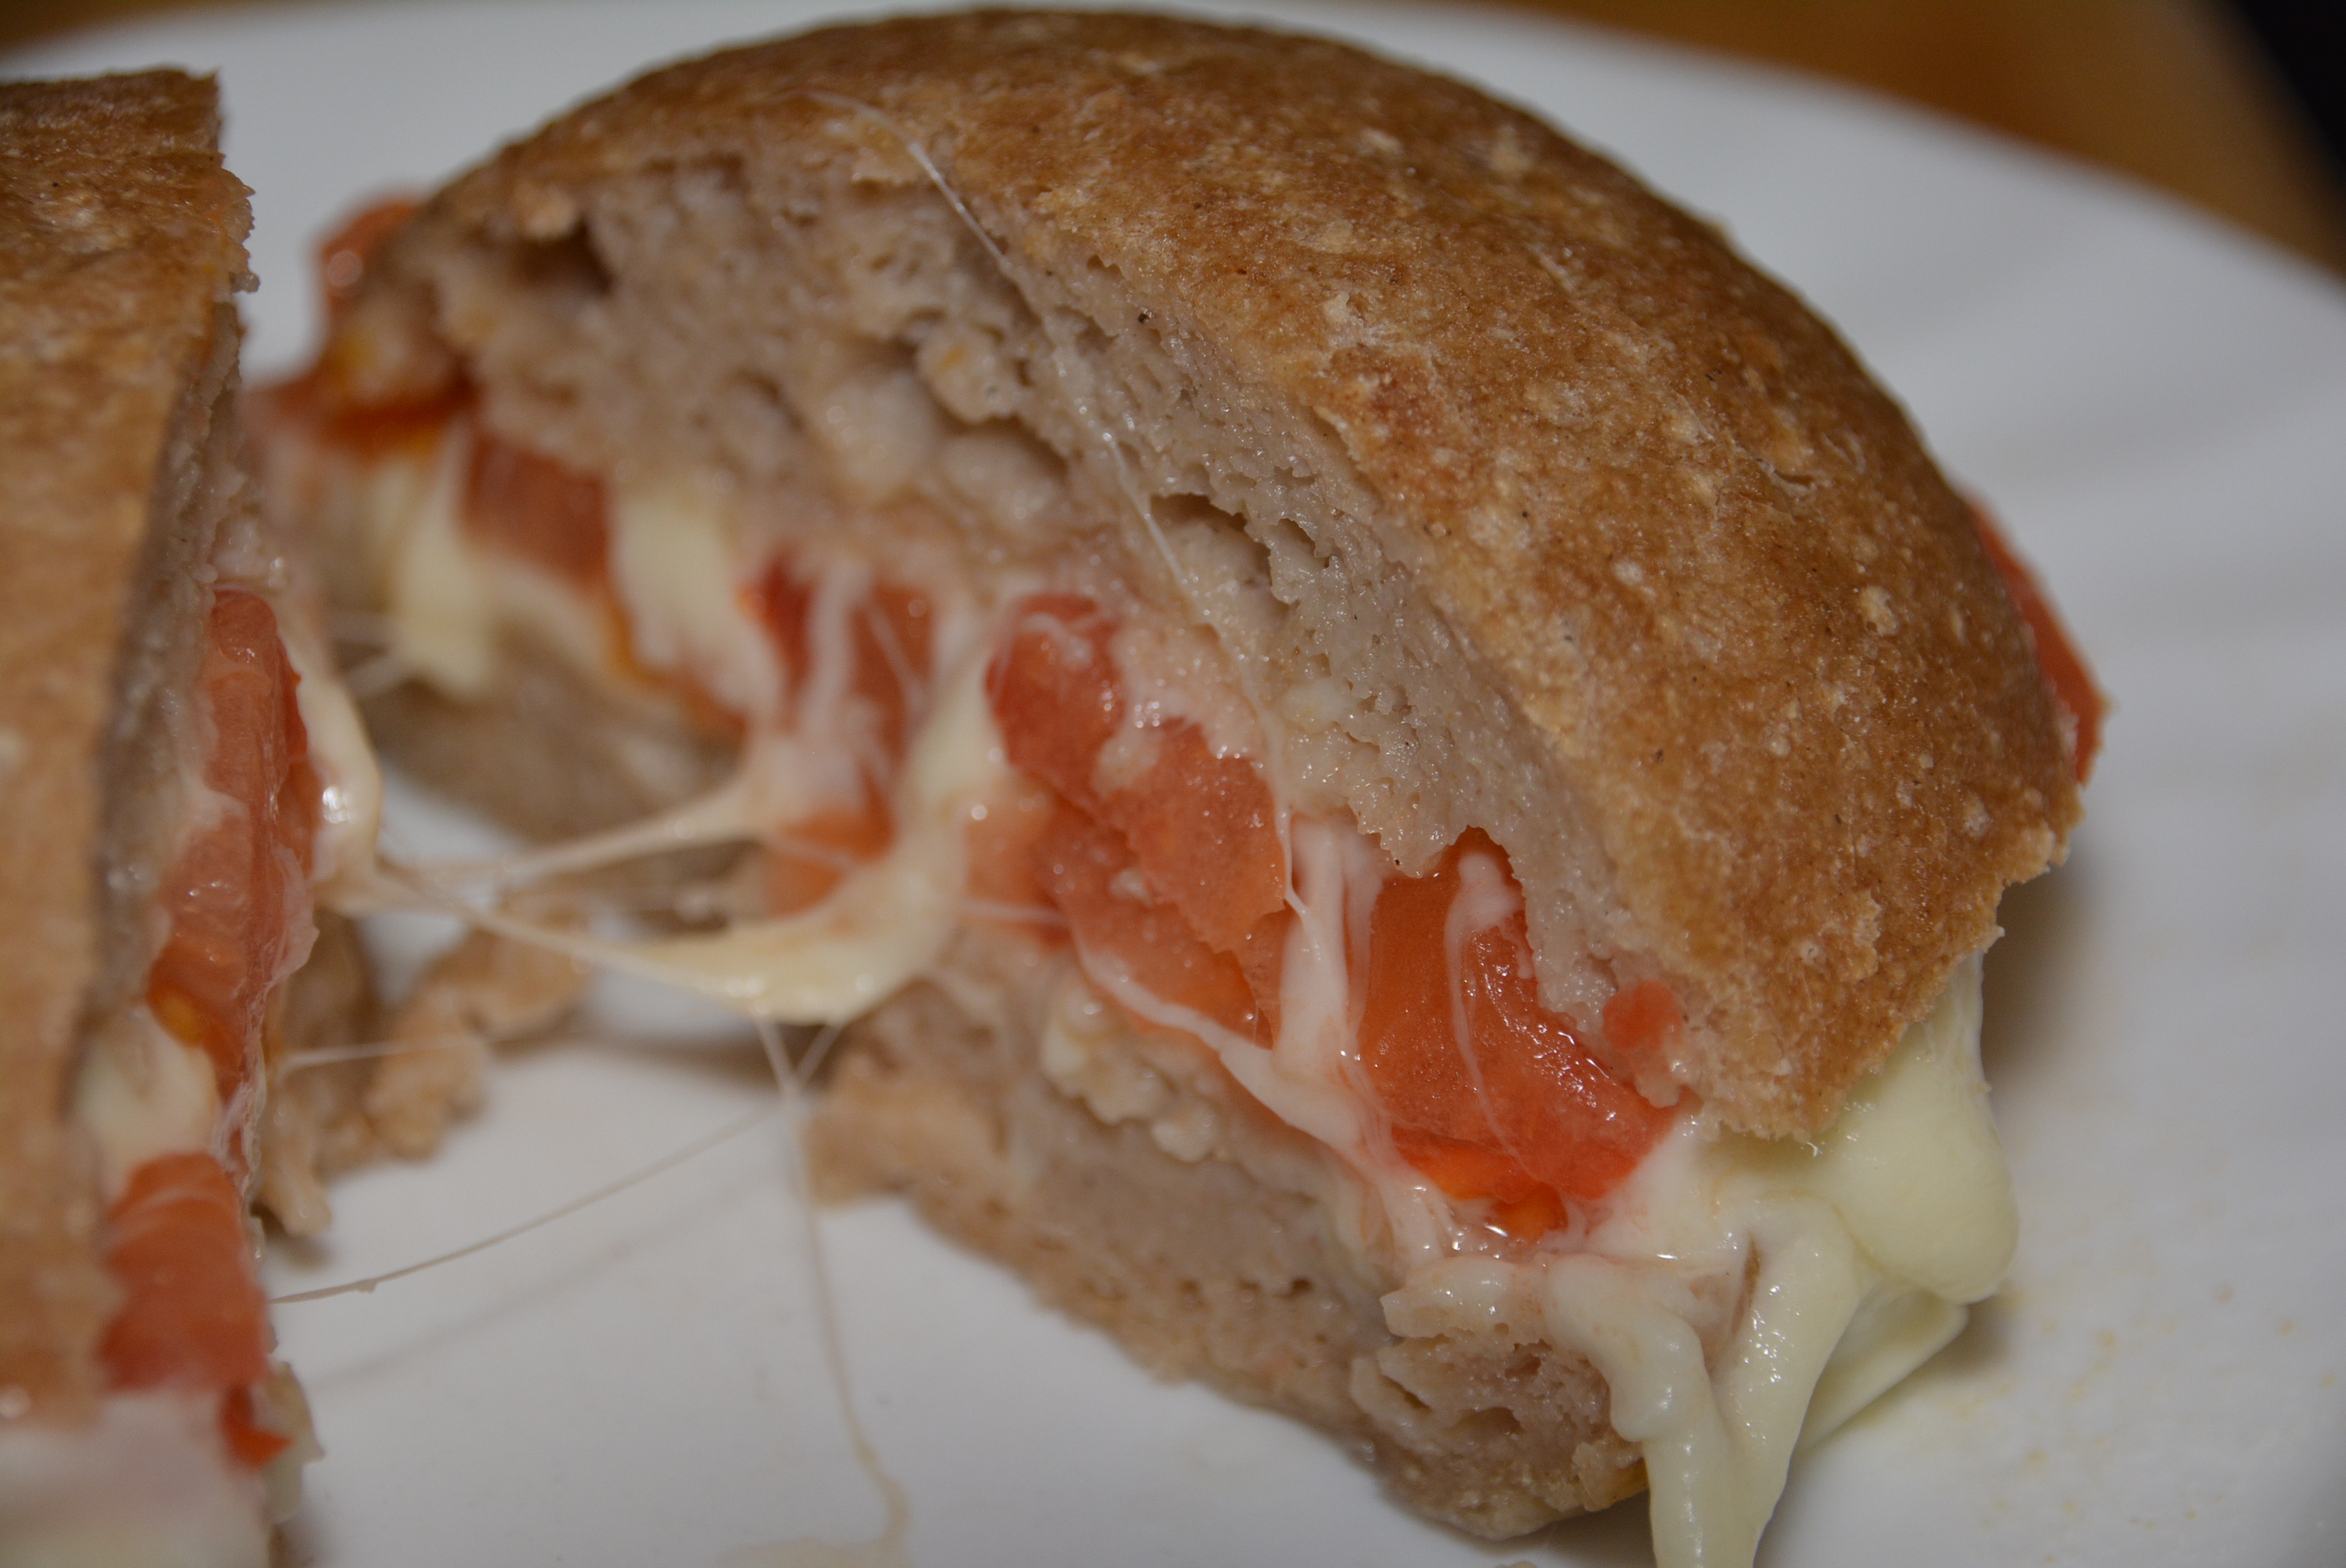
A little chat later, and the generous gluten free folks at Bread SRSLY in San Francisco were sending along a couple of samples of their gluten free sourdough bread. I couldn’t have been more excited for their arrival and thankfully didn’t have to wait too long. I opened the box like it was Christmas morning and found three brown paper packages of gluten free sourdough in a few varieties, including rolls, a loaf of regular bread, and a loaf of kale bread. I couldn’t wait to dive into one of them, so that day for lunch I decided on a warm sandwich of fresh mozzarella and sliced tomatoes between two halves of a sourdough roll.
Fresh Mozzarella, Sliced Tomatoes, And A Gluten Free Sourdough Roll
Looks tasty doesn’t it? Well, I’m happy to report that these rolls taste just as good as they look. After unrolling the top of the paper package you get a whiff of sourdough. The rolls are bit darker than your classic white sourdough rolls but texture and flavor are right on point. You can enjoy them with or without toasting, both ways they taste good. The crust on the outside is crispy and the inside is chewy and light, just like the sourdough deliciousness I enjoyed years ago. Of course you can enjoy these anyway you’d like, but I highly recommend heating up a couple of slices of mozzarella and tomatoes on a toasted gluten free sourdough roll. You end up with a warm, gluten free sandwich, with all of the fantastic flavor and texture of the sourdough roll, that would be perfect being served in Fisherman’s Wharf for a breezy and cool San Francisco day.
Gluten Free Sourdough Rolls By Bread SRSLY
Bread SRSLY has joined the ranks of companies that have seemed to accomplish the impossible. They’ve produced a gluten free product that is 100% unique to the gluten free world that resembles it’s regular version remarkably well. We all know that perfecting taste and texture of gluten free products, especially those in the bread family, is incredibly difficult but seems to be done flawlessly by some of these smaller companies. My favorite feature of these sourdough rolls is that you can taste the love that’s baked into them. You can just tell that so much thought, trial and error, and passion has been put into making a great product, which just makes them taste that much better.
Take a look at the Bread SRSLY site to see the entire list of gluten free products that they offer. And if you’re not in the Bay area it’s not a problem, neither am I, but I can still order some of their sourdough products on their site and get them sent right to my front door. These rolls are yet another fantastic addition to the gluten free world and one that I’ll add to my pantry whenever I can. Congratulations Bread SRSLY on your gluten free success!
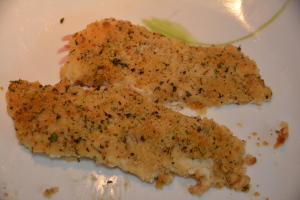
I’m personally not a huge meat eater, but I certainly have my favorite dishes with my go to proteins. Chicken definitely is at the top of the list and something that we eat very often in our house. It’s our go to protein for salads, stir frys, and baked dishes, either in pre-made, time saving form of Perdue’s Shortcuts and Gluten Free Tenders, which we love, or made from scratch by yours truly. I’ve posted plenty of dishes in the chicken department that’s for sure, which you can check out on the blog here, but who doesn’t like adding parmesan cheese and breadcrumbs to chicken.
I was food shopping one day and spotted one of those little pamphlets with recipe ideas by the Hellmann’s Mayonnaise and spotted one that was too good to pass up. Of course the recipe in the pamphlet was not gluten free,, so I tweaked it a little to work for our family and there you have it, deliciously moist and crunchy Gluten Free Breaded Parmesan Chicken. This recipe is fantastically easy with only four ingredients that certainly do chicken proud. Ready to try it yet? Without further ado, here’s Gluten Free Breaded Parmesan Chicken that has become a favorite in the Gluten Free Mom To Be’s house and will surely become one in yours as well.
Ingredients:
1/2 cup Hellmann’s Mayonnaise (Most varieties are gluten free which is stated on the label)
1/4 cup grated Parmesan cheese
1 1/2 lb skinless chicken breasts
Seasoned gluten free bread crumbs, about 4-5 tbsp (I season my own Schar bread crumbs like this, but you can also purchase already seasoned gluten free bread crumbs like Gillian’s too.)
Directions:
Preheat oven to 425 degrees.
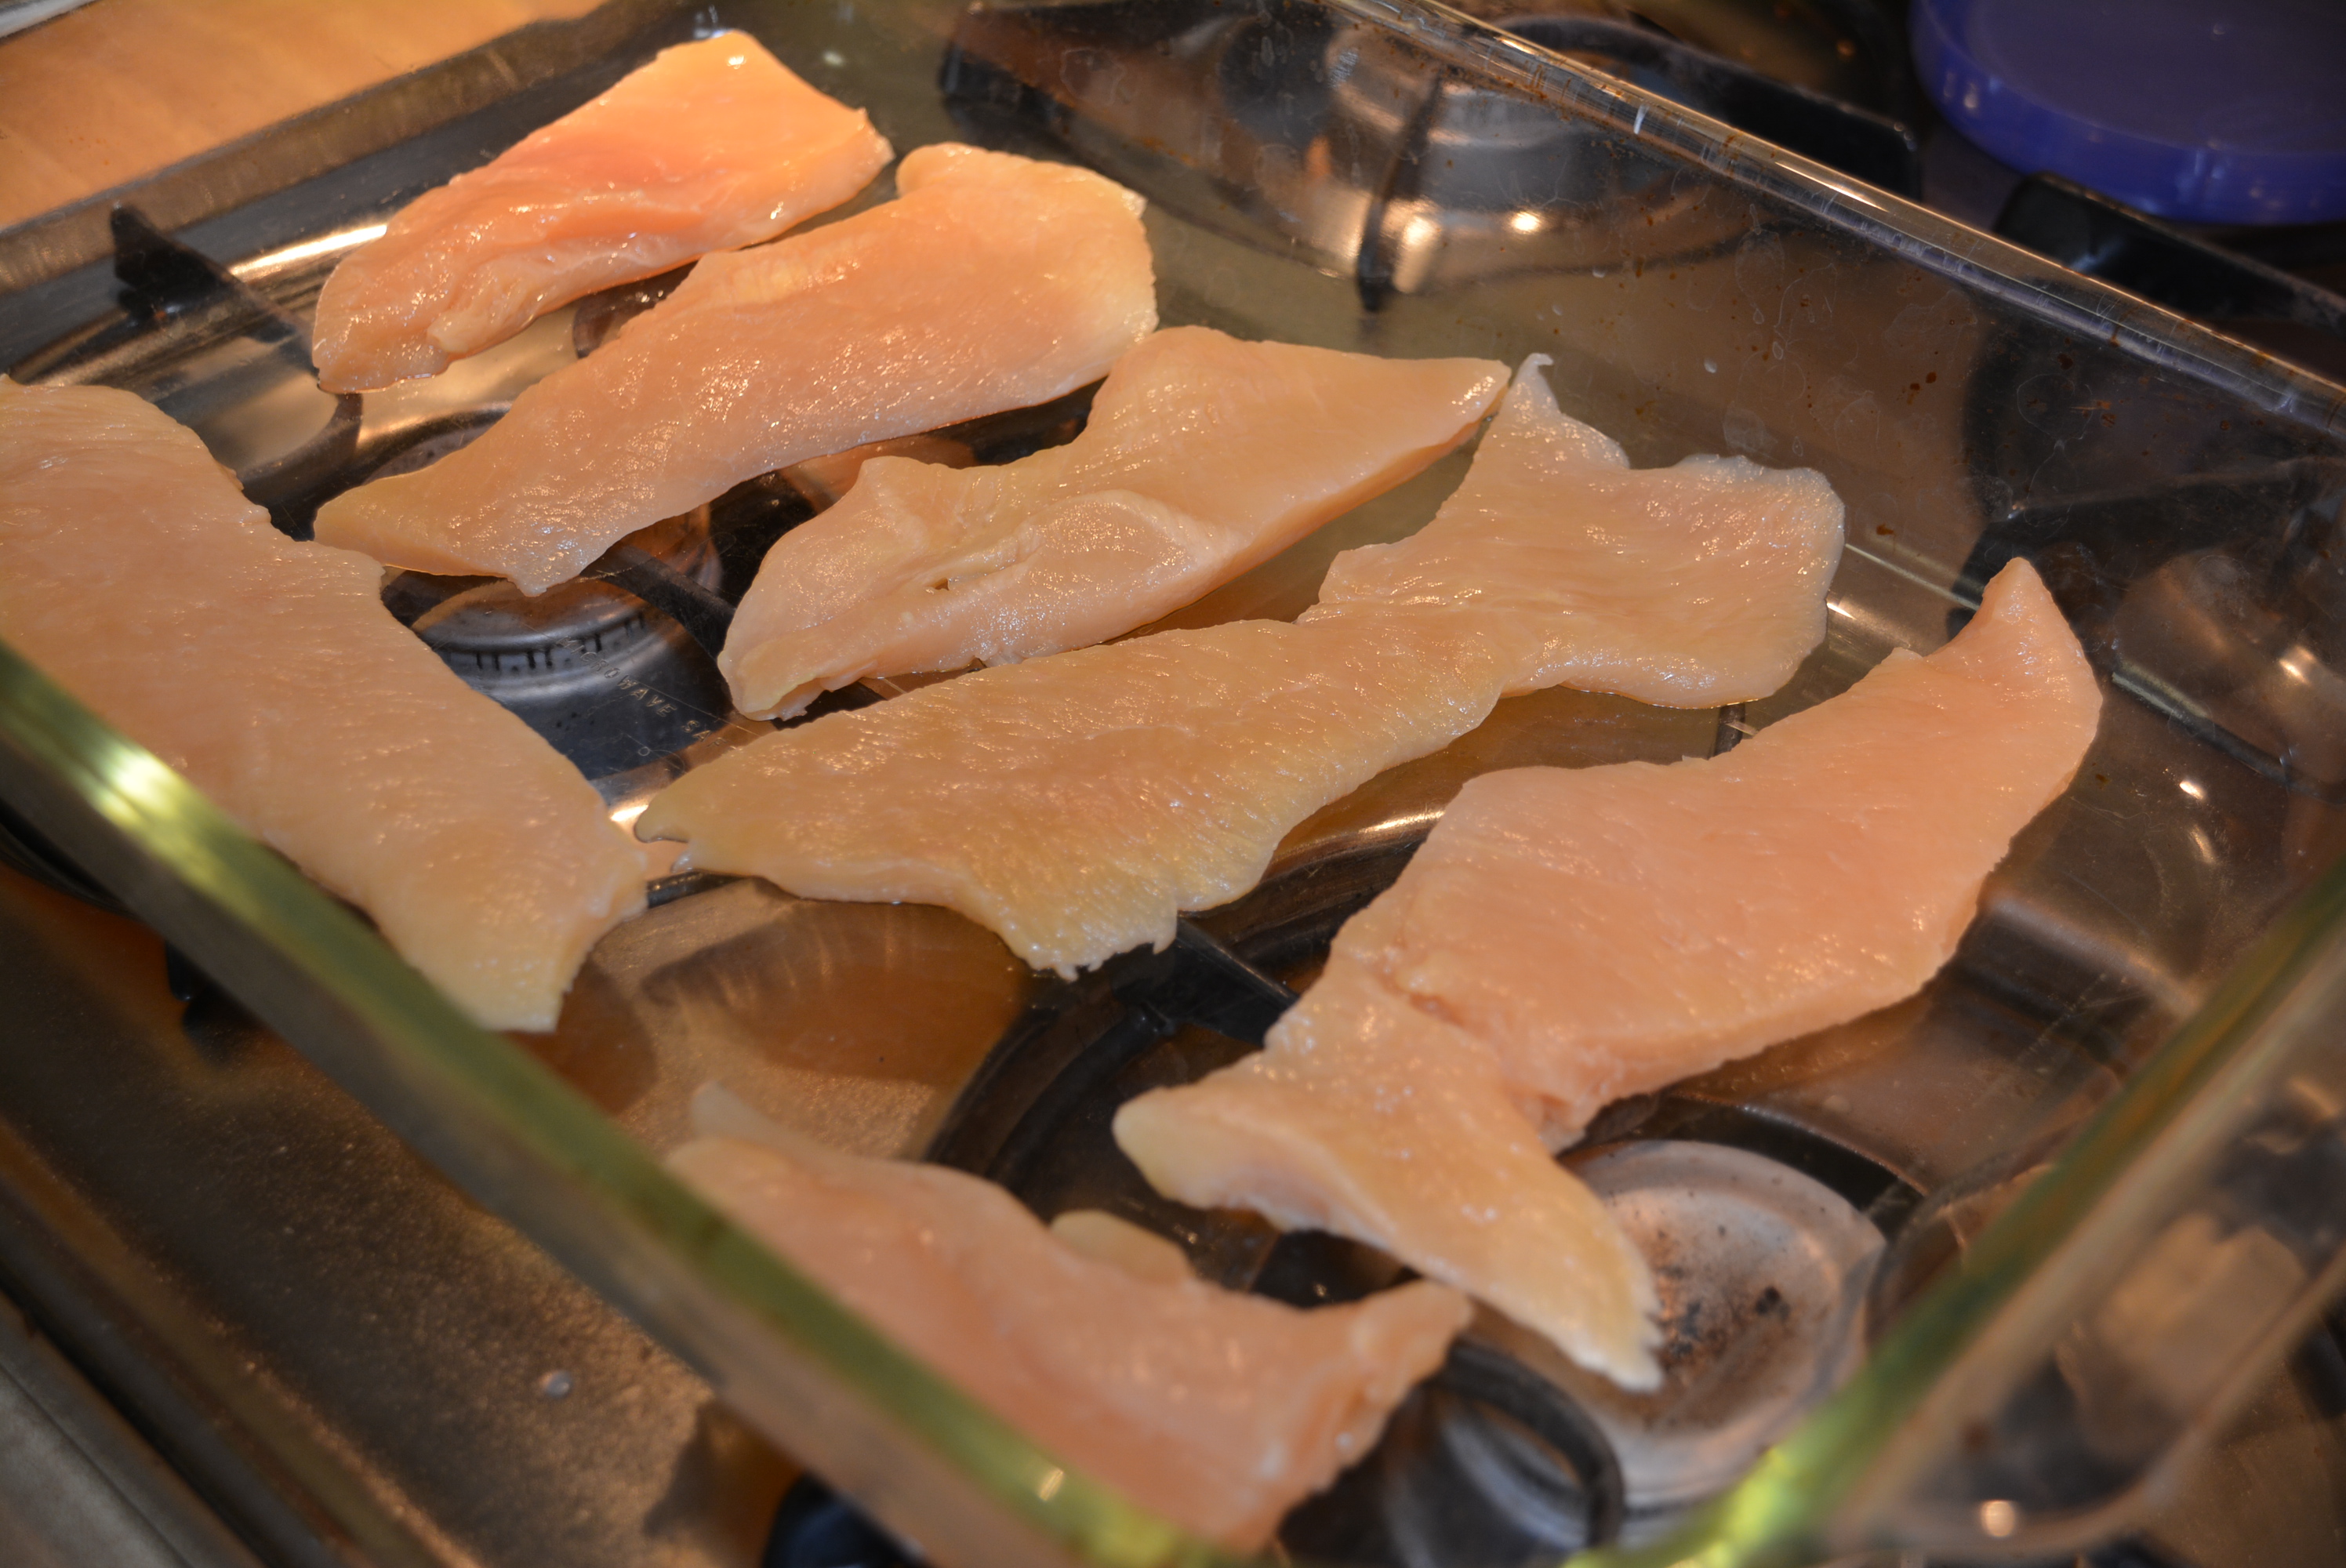
Clean and trim 1 1/2 lb skinless chicken breasts before adding them to a baking dish.
Clean and trim chicken breasts before adding them to your baking dish.
Combine 1/2 cup of any gluten free variety of Hellmann’s Mayonnaise and 1/4 cup grated Parmesan cheese (I do this right in my measuring cup, measuring the mayo first and guesstimating the parmesan cheese on top. Less dishes=happy mommy). As far as the mayo, I really like the Olive Oil version, but I usually use either the regular or light options, all of which state gluten free on the label.
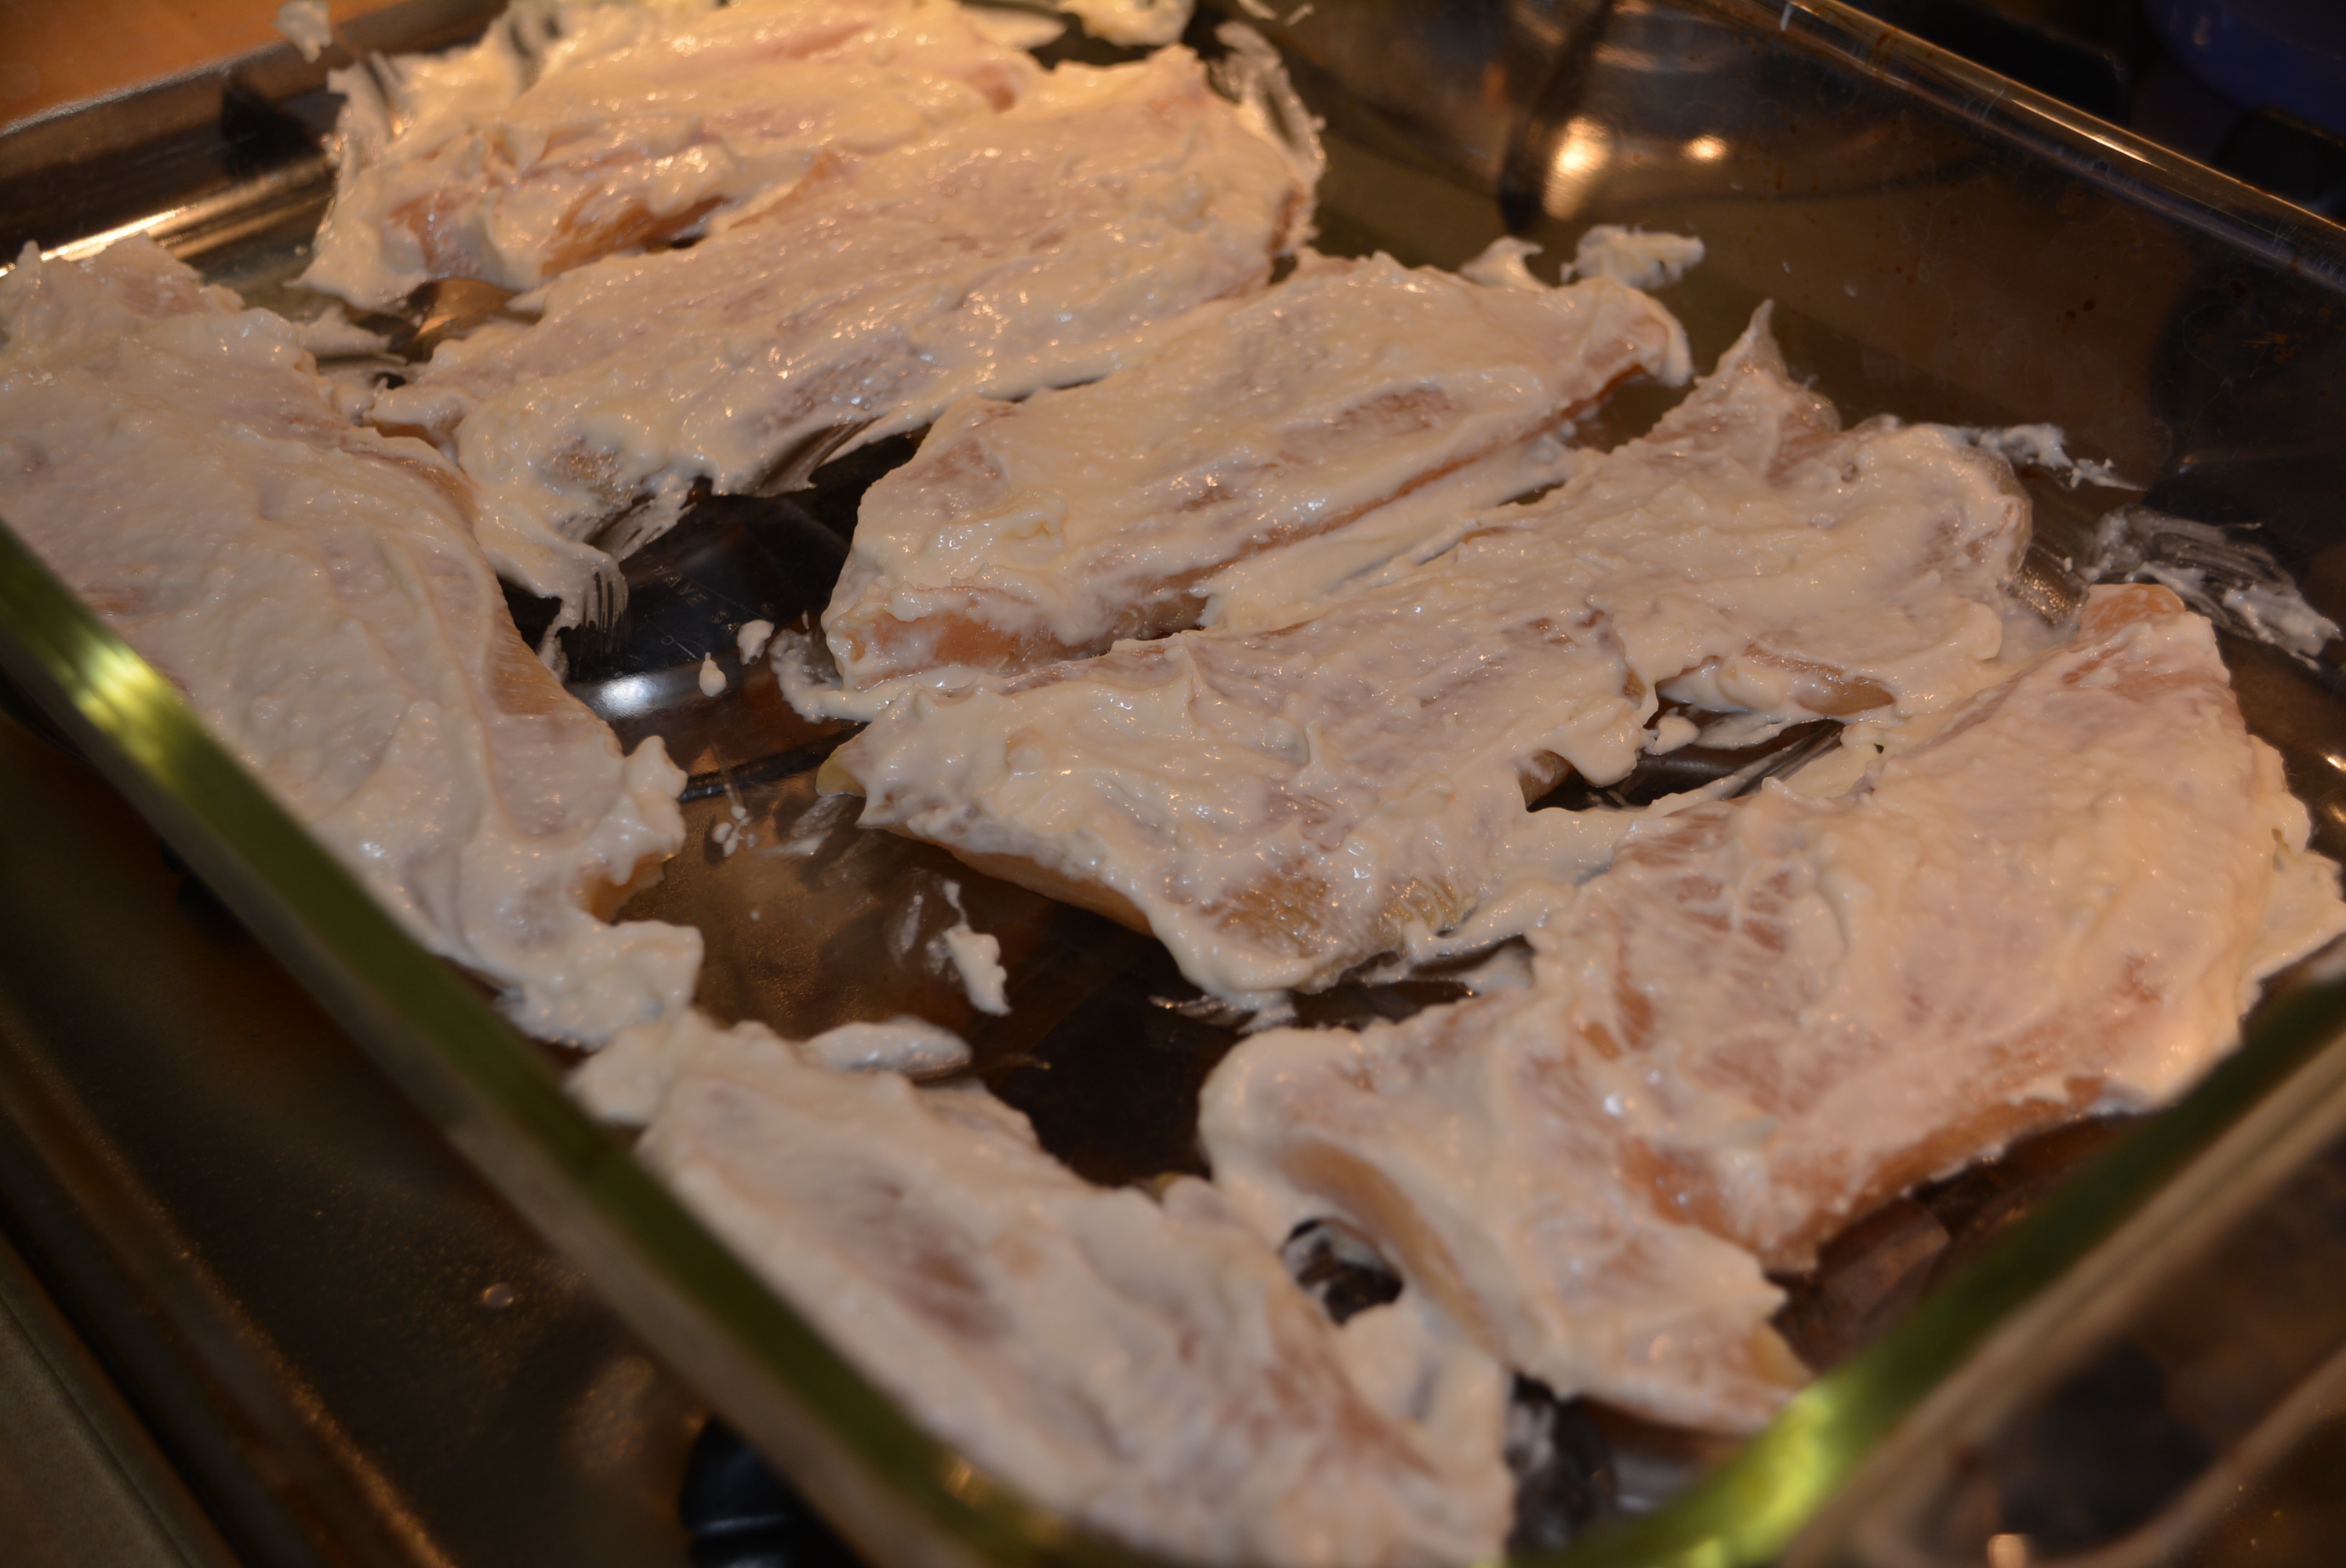
After mayo and cheese have been mixed together, spoon mixture on top of chicken breasts and spread evenly across each piece of chicken (I just use the back of the spoon for this part).
Add mayo/parmesan mixture to chicken and spread evenly across each piece.
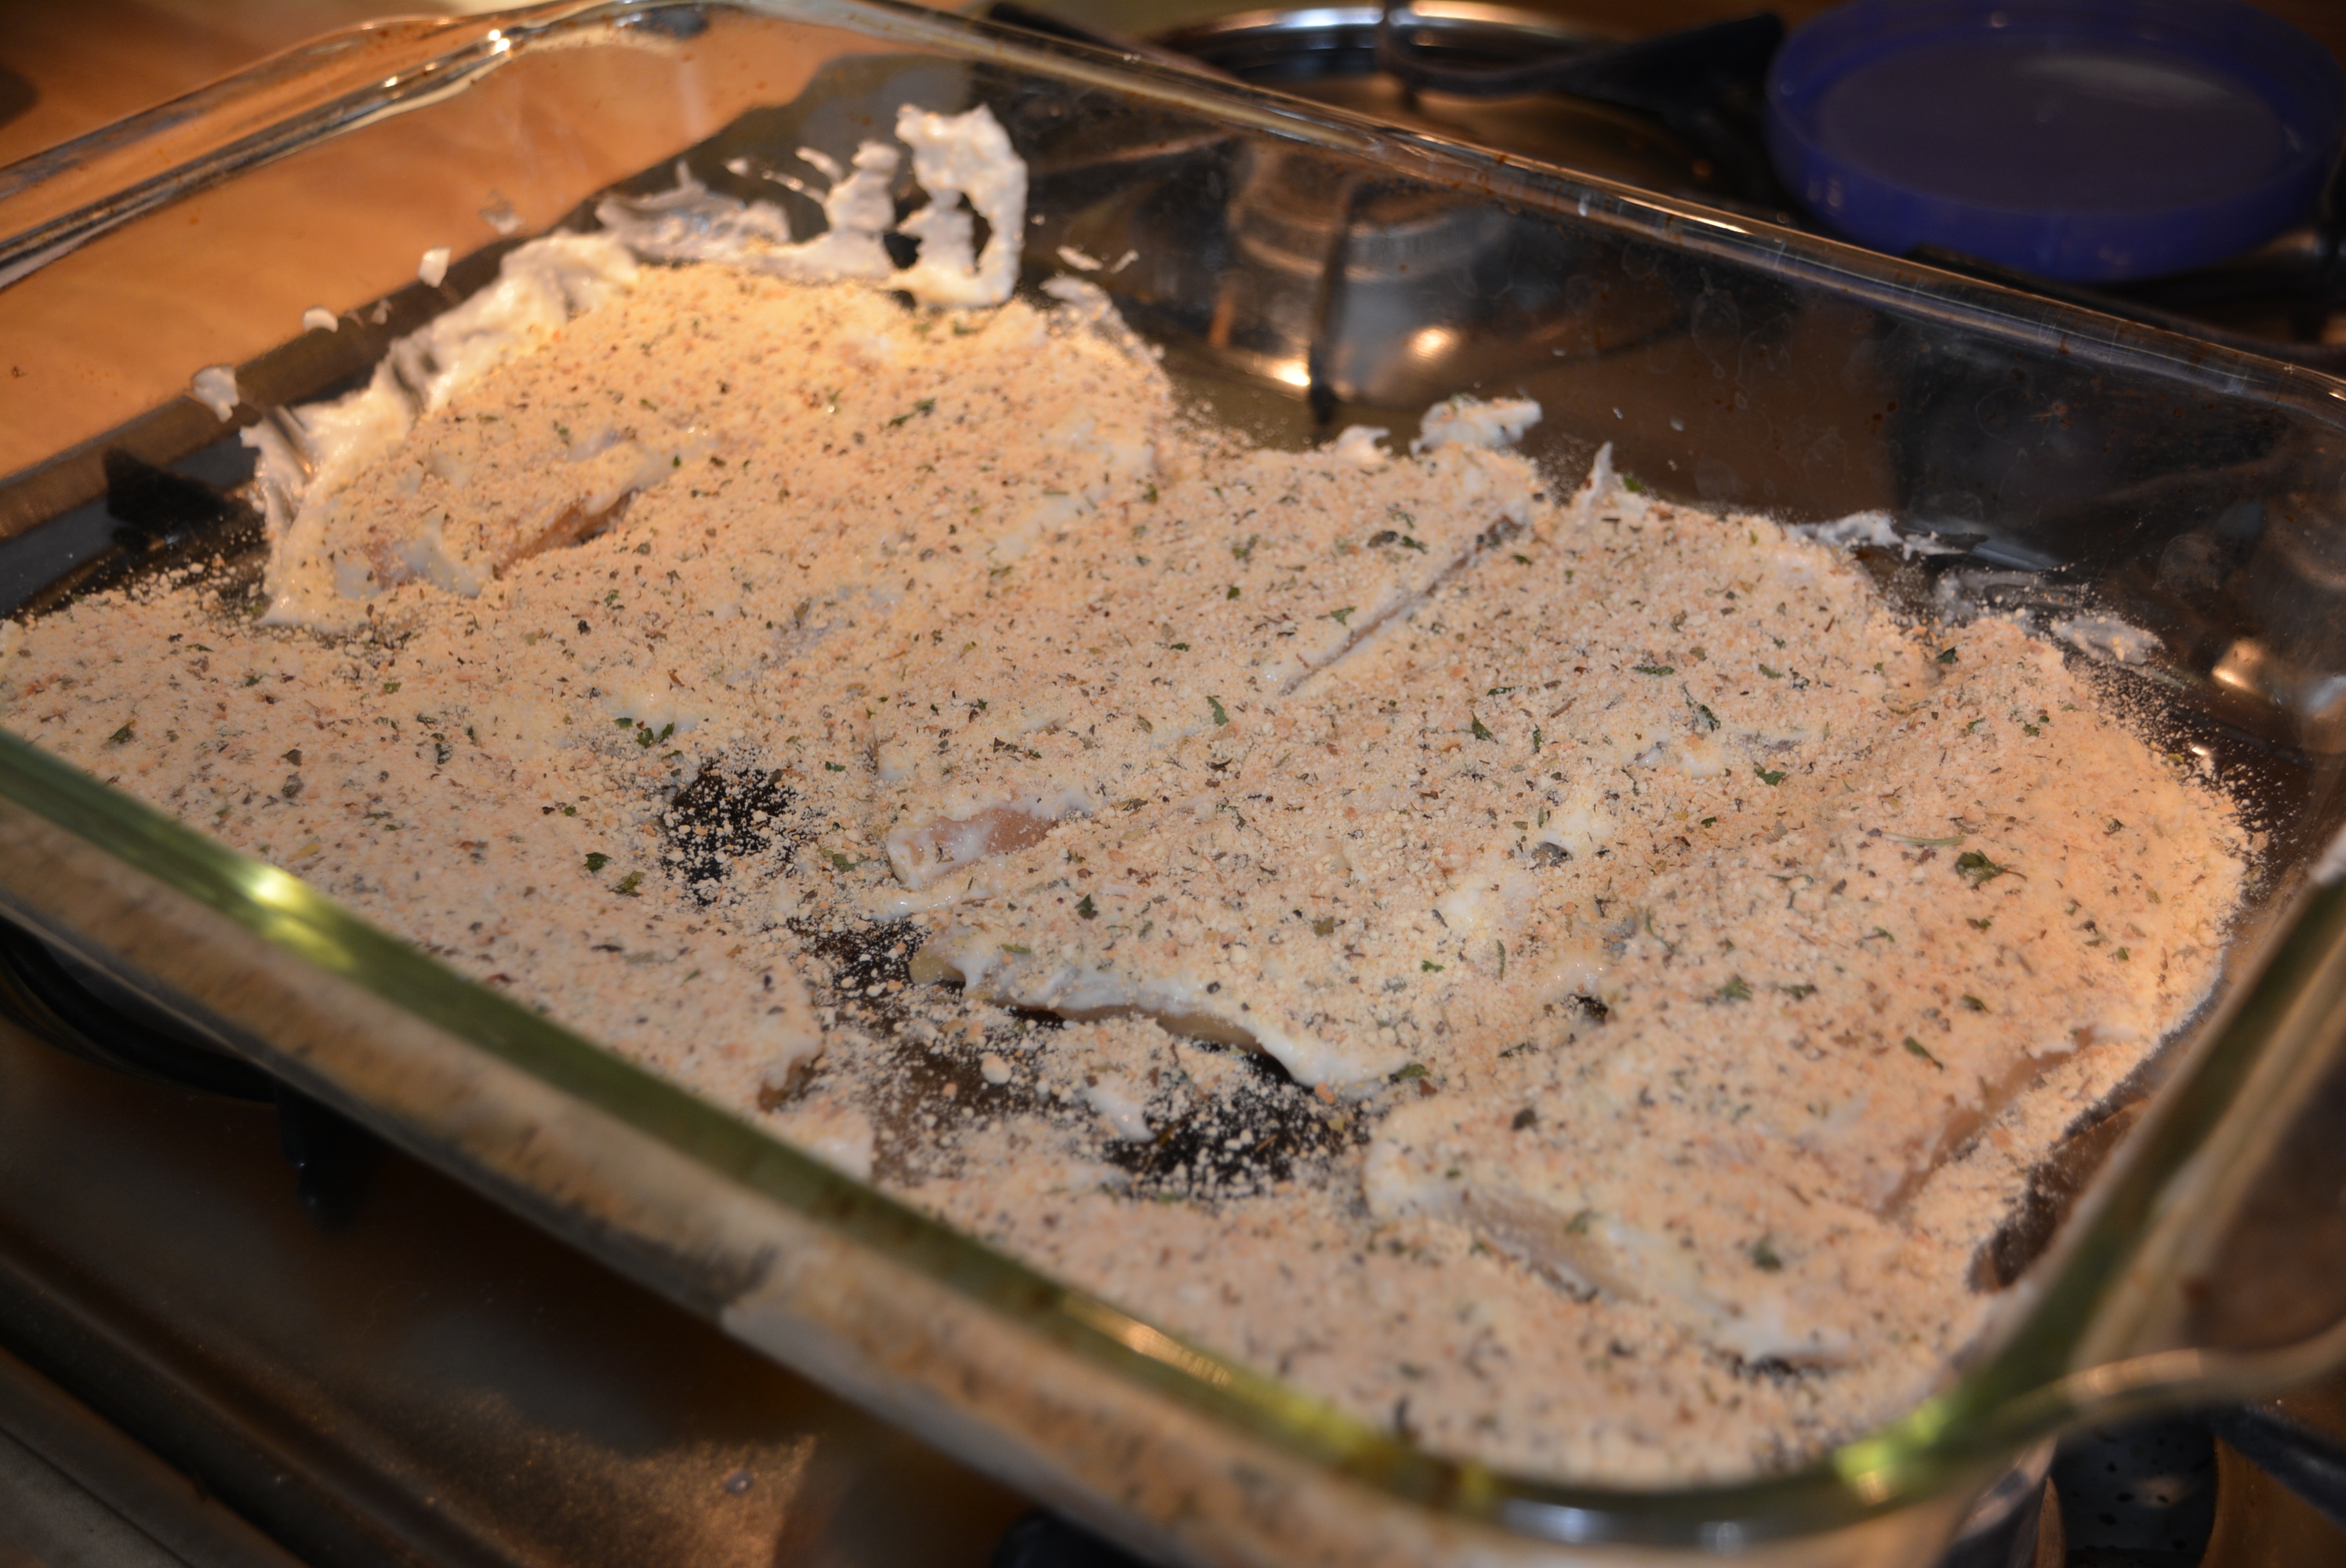
Once each piece has been coated with the mayo/parmesan mixture, sprinkle seasoned gluten free bread crumbs on top of chicken, making sure that all pieces are fully coated in bread crumbs.
Sprinkle tops of chicken with seasoned gluten free bread crumbs.
Bake chicken for about 20 minutes at 425 degrees until chicken is cooked all the way through.
Gluten Free Breaded Parmesan Chicken
Enjoy!
Easy right? Just four ingredients, 10 minutes of prep, and 20 minutes to bake and you have a tasty and healthy dinner on the table. And let me promise you, it’s just as tasty as it looks. The bread crumbs on the outside crisp up just a little while the inside of the chicken gets really flavorful and juicy. A favorite for us for sure! Thanks so much to Hellmann’s for this idea because this makes some amazing gluten free chicken!
1/2 cup Hellmann's Mayonnaise (Most varieties are gluten free which is stated on the label)
1/4 cup grated Parmesan cheese
1 1/2 lb skinless chicken breasts
Seasoned gluten free bread crumbs, about 4-5 tbsp (I season my own Schar bread crumbs, but you can also purchase already seasoned gluten free bread crumbs like Gillian's too.)
Instructions
Preheat oven to 425 degrees.
Clean and trim 1 1/2 lb skinless chicken breasts before adding them to a baking dish.
Combine 1/2 cup of any gluten free variety of Hellmann's Mayonnaise and 1/4 cup grated Parmesan cheese (I do this right in my measuring cup, measuring the mayo first and guesstimating the parmesan cheese on top. Less dishes=happy mommy). As far as the mayo, I really like the Olive Oil version, but I usually use either the regular or light options, all of which state gluten free on the label.
After mayo and cheese have been mixed together, spoon mixture on top of chicken breasts and spread evenly across each piece of chicken (I just use the back of the spoon for this part.
Once each piece has been coated with the mayo/parmesan mixture, sprinkle seasoned gluten free bread crumbs on top of chicken, making sure that all pieces are fully coated in bread crumbs.
Bake chicken for about 20 minutes at 425 degrees until chicken is cooked all the way through.
Enjoy!
By Gluten Free Mom To Be
Adapted from Hellmann's
Adapted from Hellmann's
Gluten Free Mom To Be http://www.glutenfreemomtobe.com/
Do you LOVE the gluten free Chex varieties as much as I do? They are by far the best gluten free cereal I’ve had to date. From rice and corn to honey nut, chocolate, and vanilla, each is as tasty as the one before, and that’s only some of the flavors that they offer. Any and all of them make a perfect bowl of cereal for breakfast, okay lunch and dinner too if you’re like me and can eat breakfast at any meal of the day.
A little creative twist that I’ve been using Chex for ever since my early days of gluten free living are making Chex treats, a little remake of the childhood favorite Rice Kristpie treats. I remember when Gluten Free Rice Krispies first appeared on the gluten free scene at a steep $5.99 a box; the sight of them took me back to being a kid and I couldn’t wait to pour a bowl of the snap, crackle, and pop deliciousness or better yet, make those marshmallowy treats. After just one bite though, I was sorely disappointed in the yucky flavor and after taste. They just weren’t my cup of tea and didn’t live up to their regular predecessor.
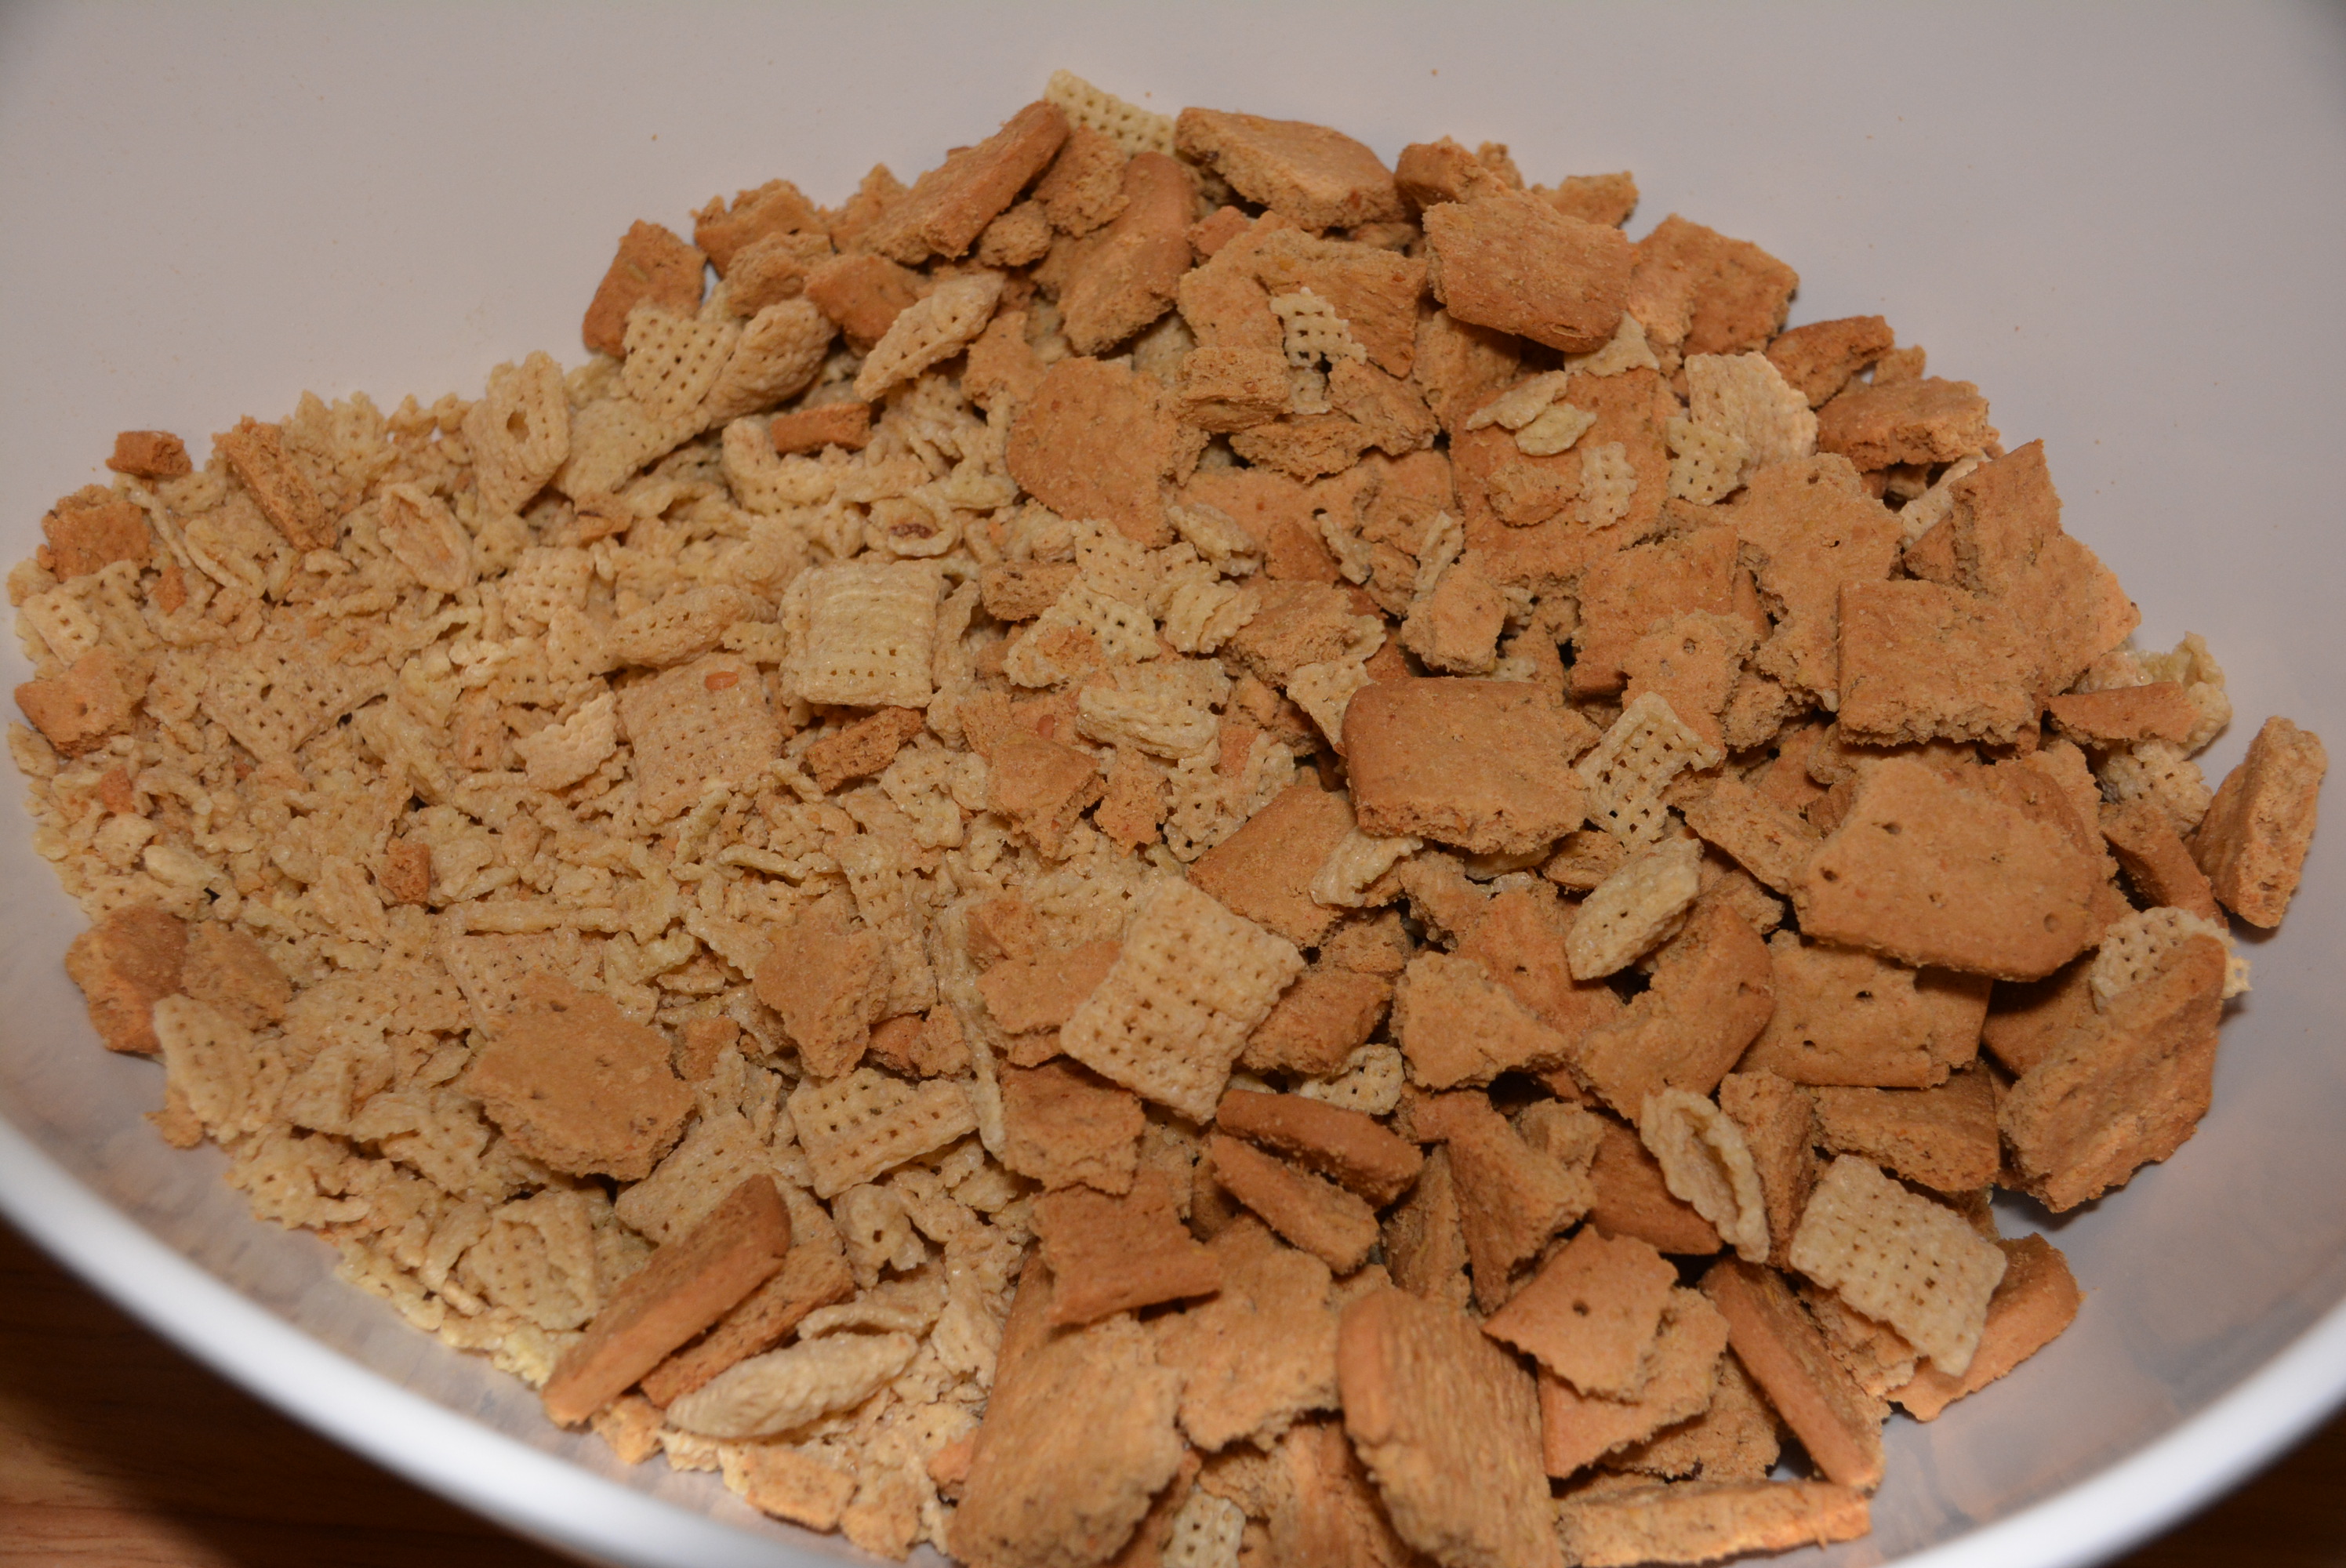
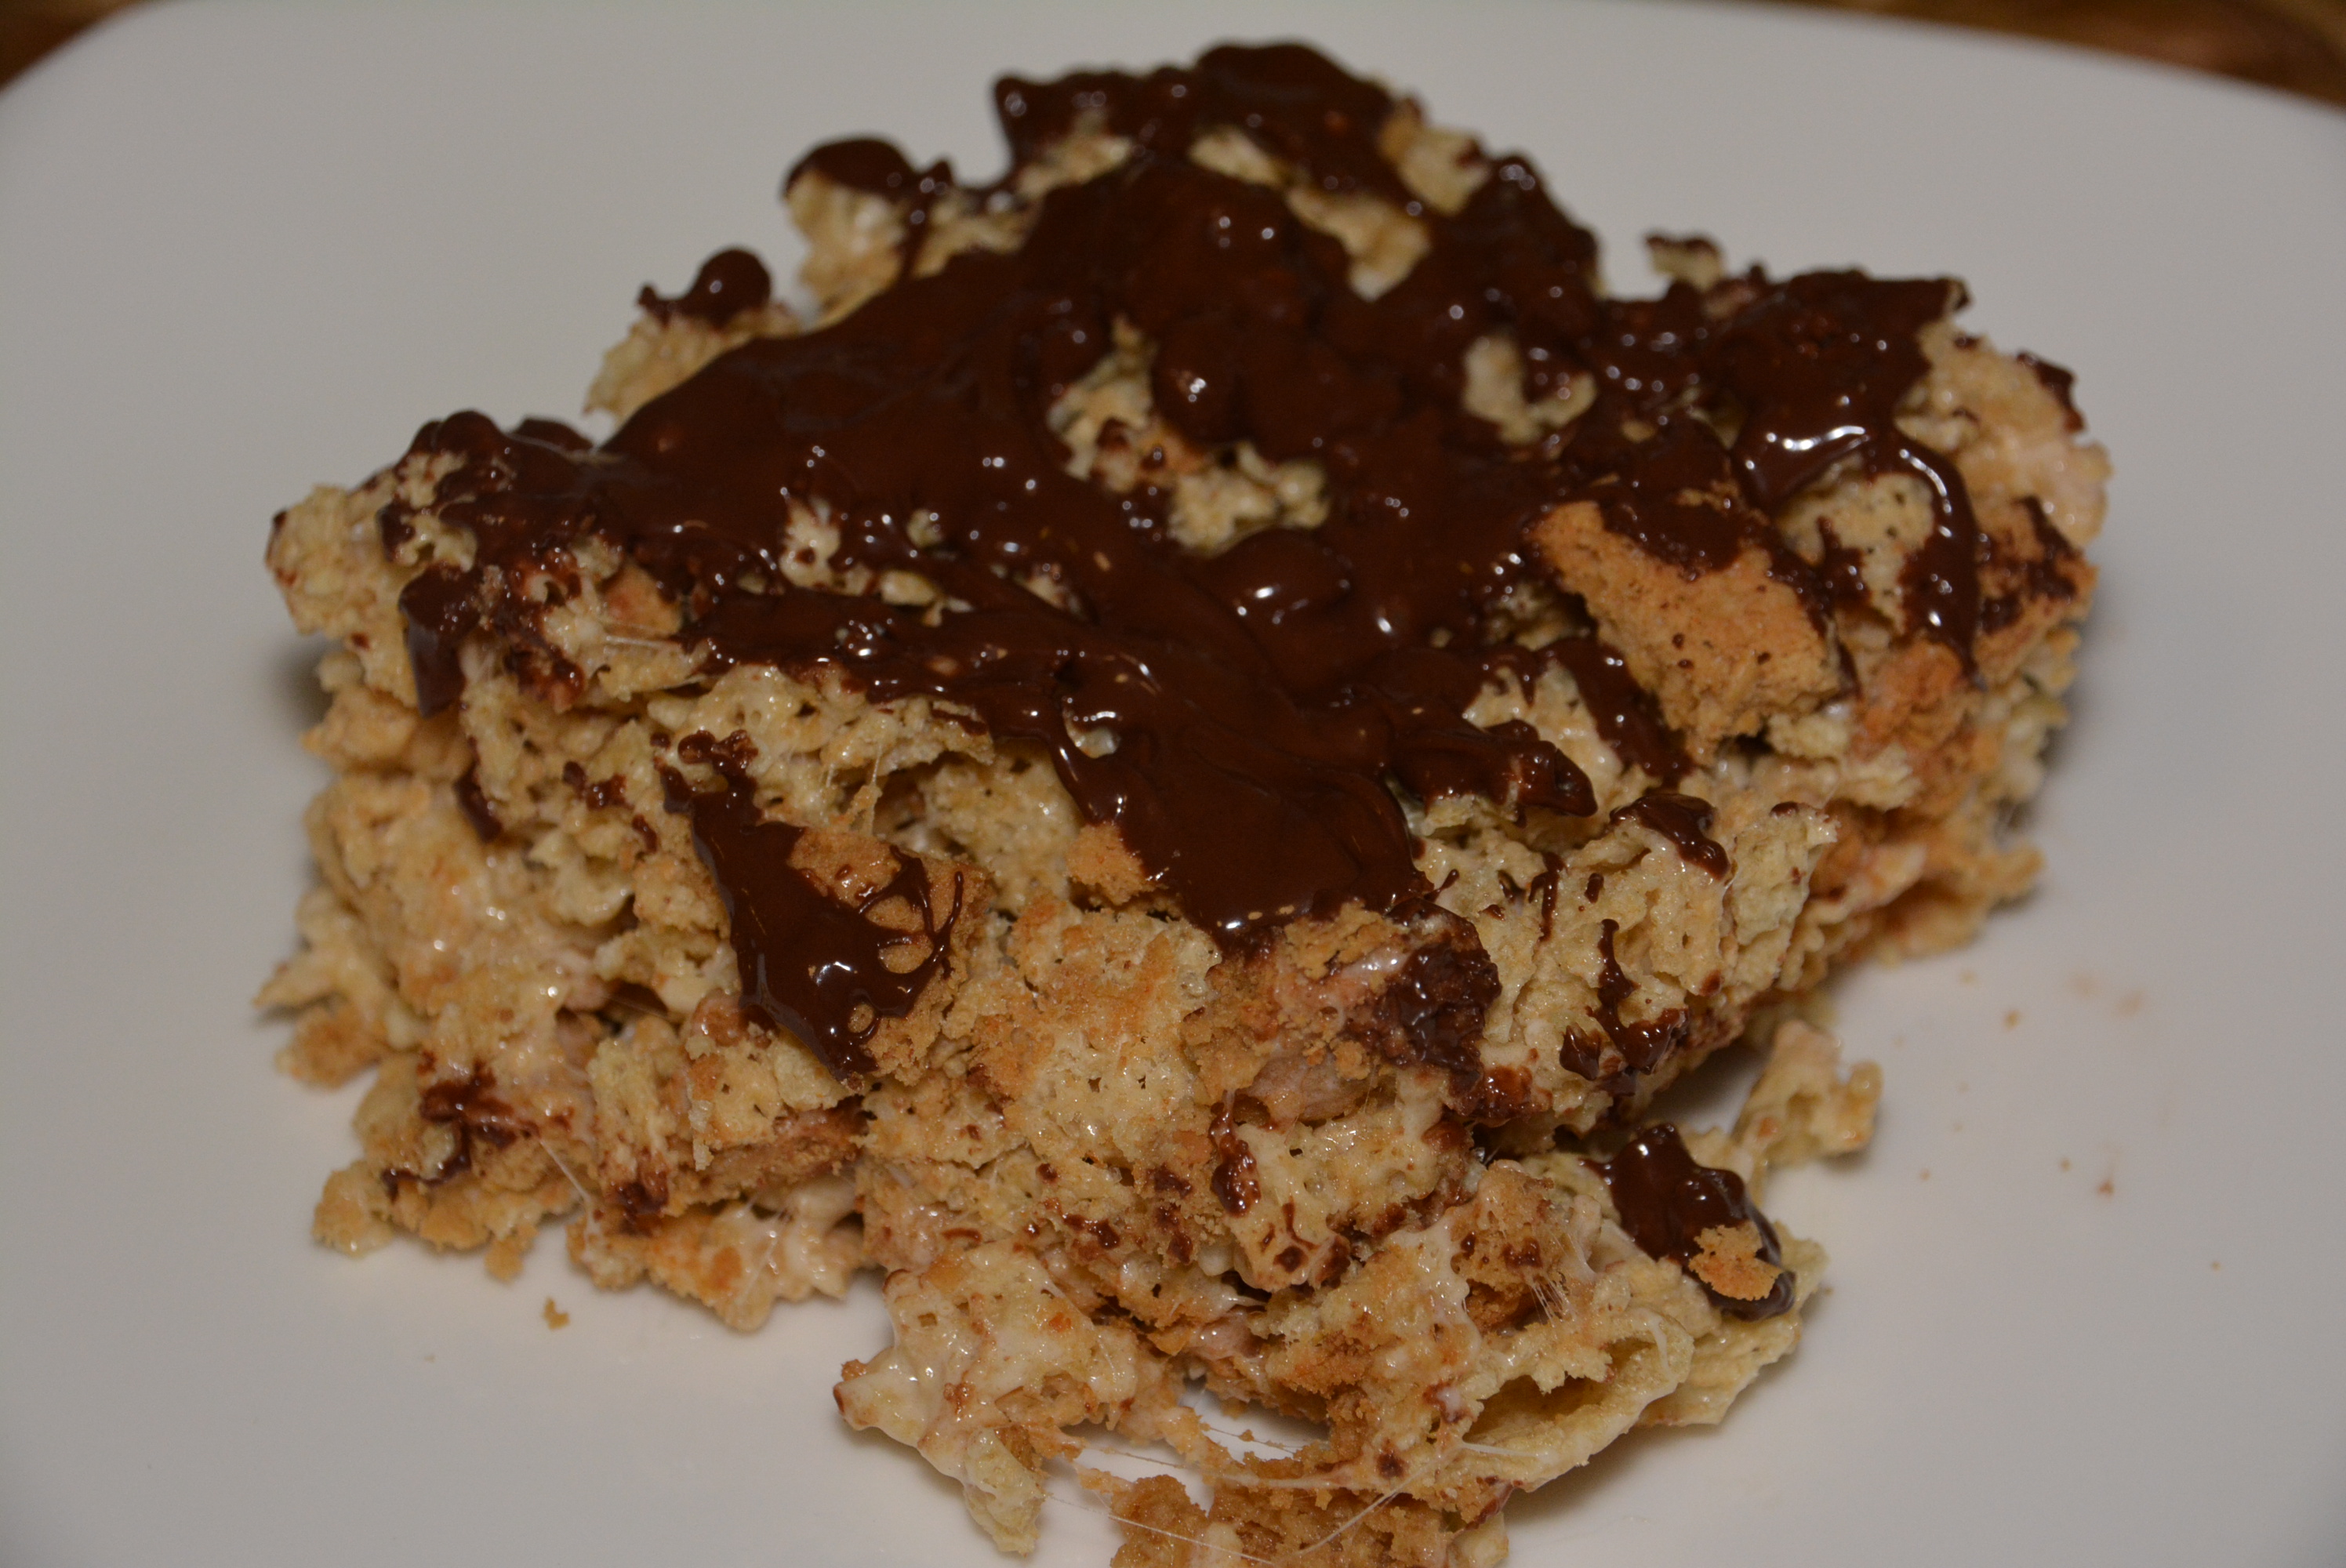
Now with that nagging obsession for a rice cereal treat, it dawned on me to use my favorite Chex cereals. Hence the birth of my go to birthday party, picnic, holiday, or just because Chex treats. The regular version of Rice Chex and marshmallow have graced many an event in our family over the past few years but with the release of so many different Chex flavors, I can’t help but put a spin on my traditional dessert. With summer coming to an end, I decided to make a summery Chex treat that can be enjoyed year round. As an alternative to my Chocolate Peanut Butter and Strawberry And Vanilla versions that appeared this summer, I decided to take one of the most classic summer treats and make it in Chex form. May I introduce you to the Gluten Free S’more Chex Treat; a marshmallowy square of Schar honeygrams and rice Chex, coated with a marshmallowy sauce, and drizzled with melted milk chocolate.
Ingredients:
1 1/2 boxes of Schar Honeygrams (each box is about 5 oz)
10 oz Rice Chex (about 3/4 of a 12.8 oz box of Chex)
10 oz bag mini marshmallows
4 tbsp butter (I use Smart Balance or Land O’Lakes)
3/4 cup milk chocolate chocolate chips (Hershey’s is gluten free)
Non-stick cooking spray (I use Smart Balance)
Directions:
Spray 9″ x 13″ baking dish with non-stick cooking spray.
Add 3/4 of a 12.8 oz box of Rice Chex to a large mixing bowl. I like to crush them a bit while they are still in their bag so you have some rice krispie size pieces mixed with some whole Chex still floating around.
Next, chop or crumble 1 1/2 packages of Schar Honeygram crackers. Make sure you have big enough pieces throughout to really give you that s’more feeling.
Add your crumbled graham cracker pieces to the large mixing bowl of cereal and mix together.
Rice chex mixed with honeygram cookies.
Melt 4 tbsp of gluten free butter in a microwave safe bowl (about 30-60 sec).
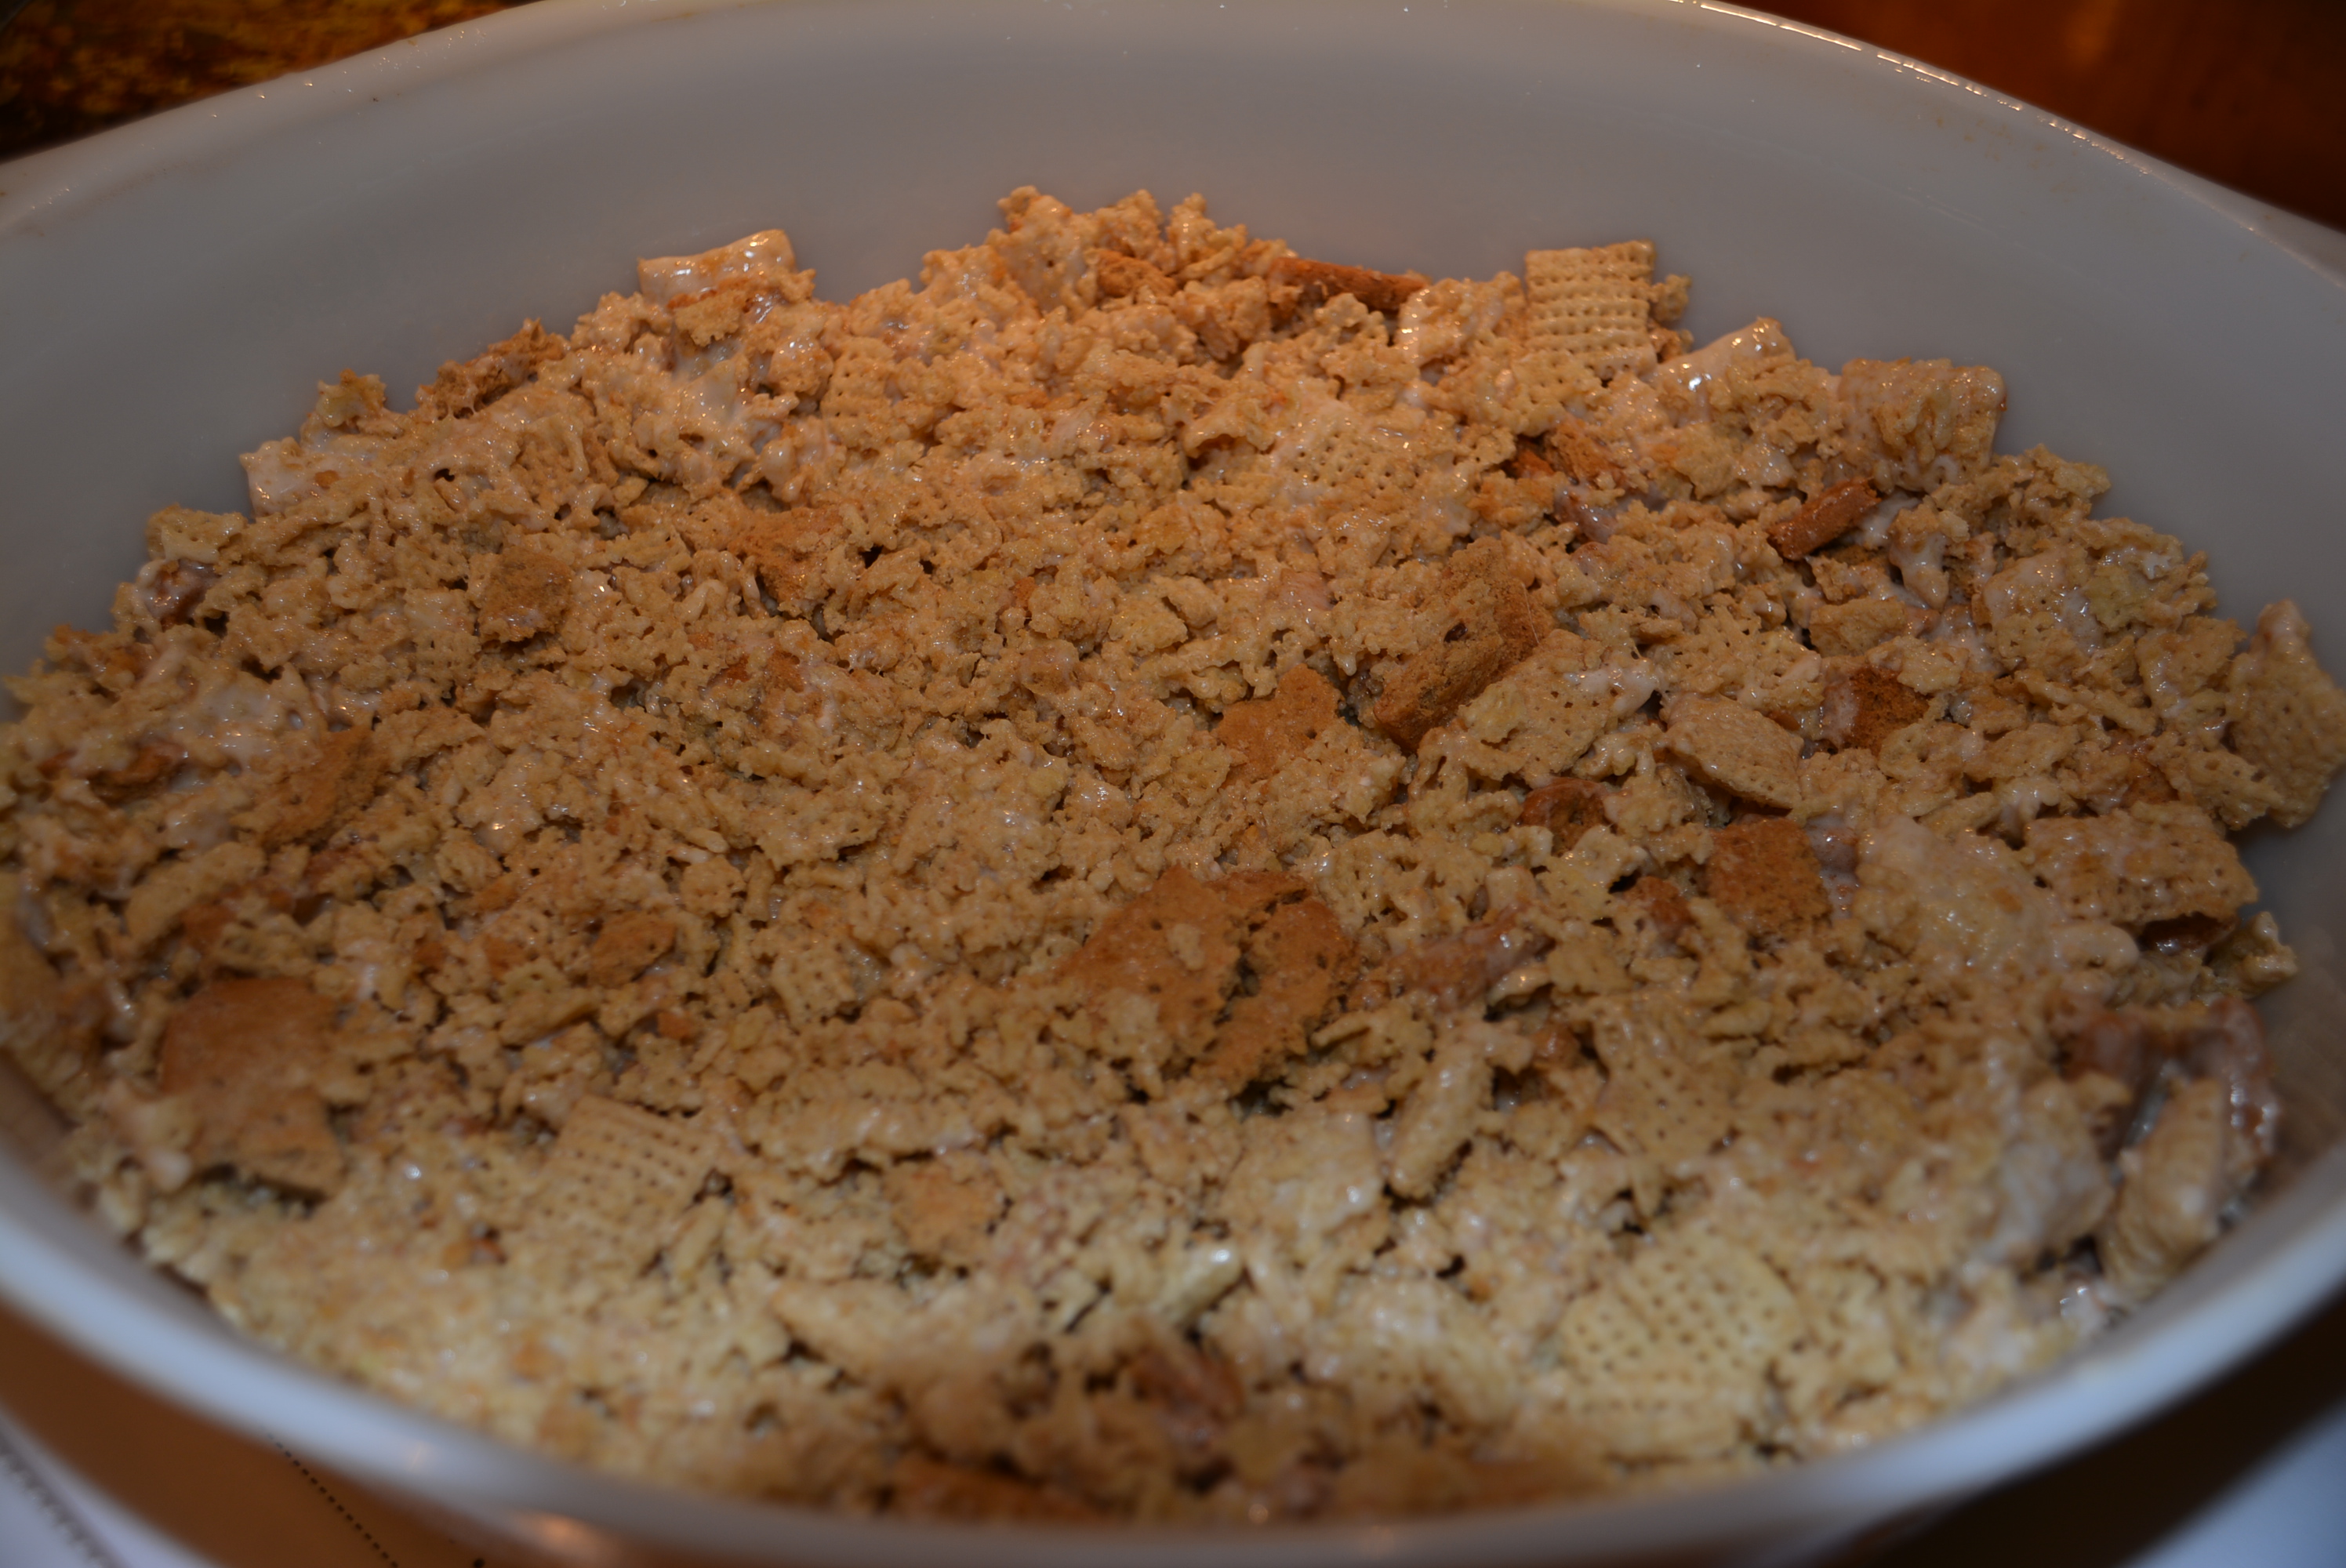
Add 10 oz bag of mini marshmallows to melted butter and stir to coat.
Melt marshmallows in microwave (about 1 – 1 1/2 minutes). Keep an eye on these in the microwave, as they do expand and can overflow the bowl easily.
Remove the bowl from the microwave and stir melted marshmallows until smooth.
Pour melted marshmallow onto crushed Chex and graham cracker mixture and stir to combine, making sure all cereal and cookies are coated with marshmallow. This is going to be very sticky; I like to use a spatula and spray it with a little non-stick spray when needed.
Scoop sticky marshmallow cereal/cookie mixture into baking dish and use a spatula or spoon sprayed with non-stick spray to press into an even layer.
Press marshmallow cereal/cookie mixture into baking dish.
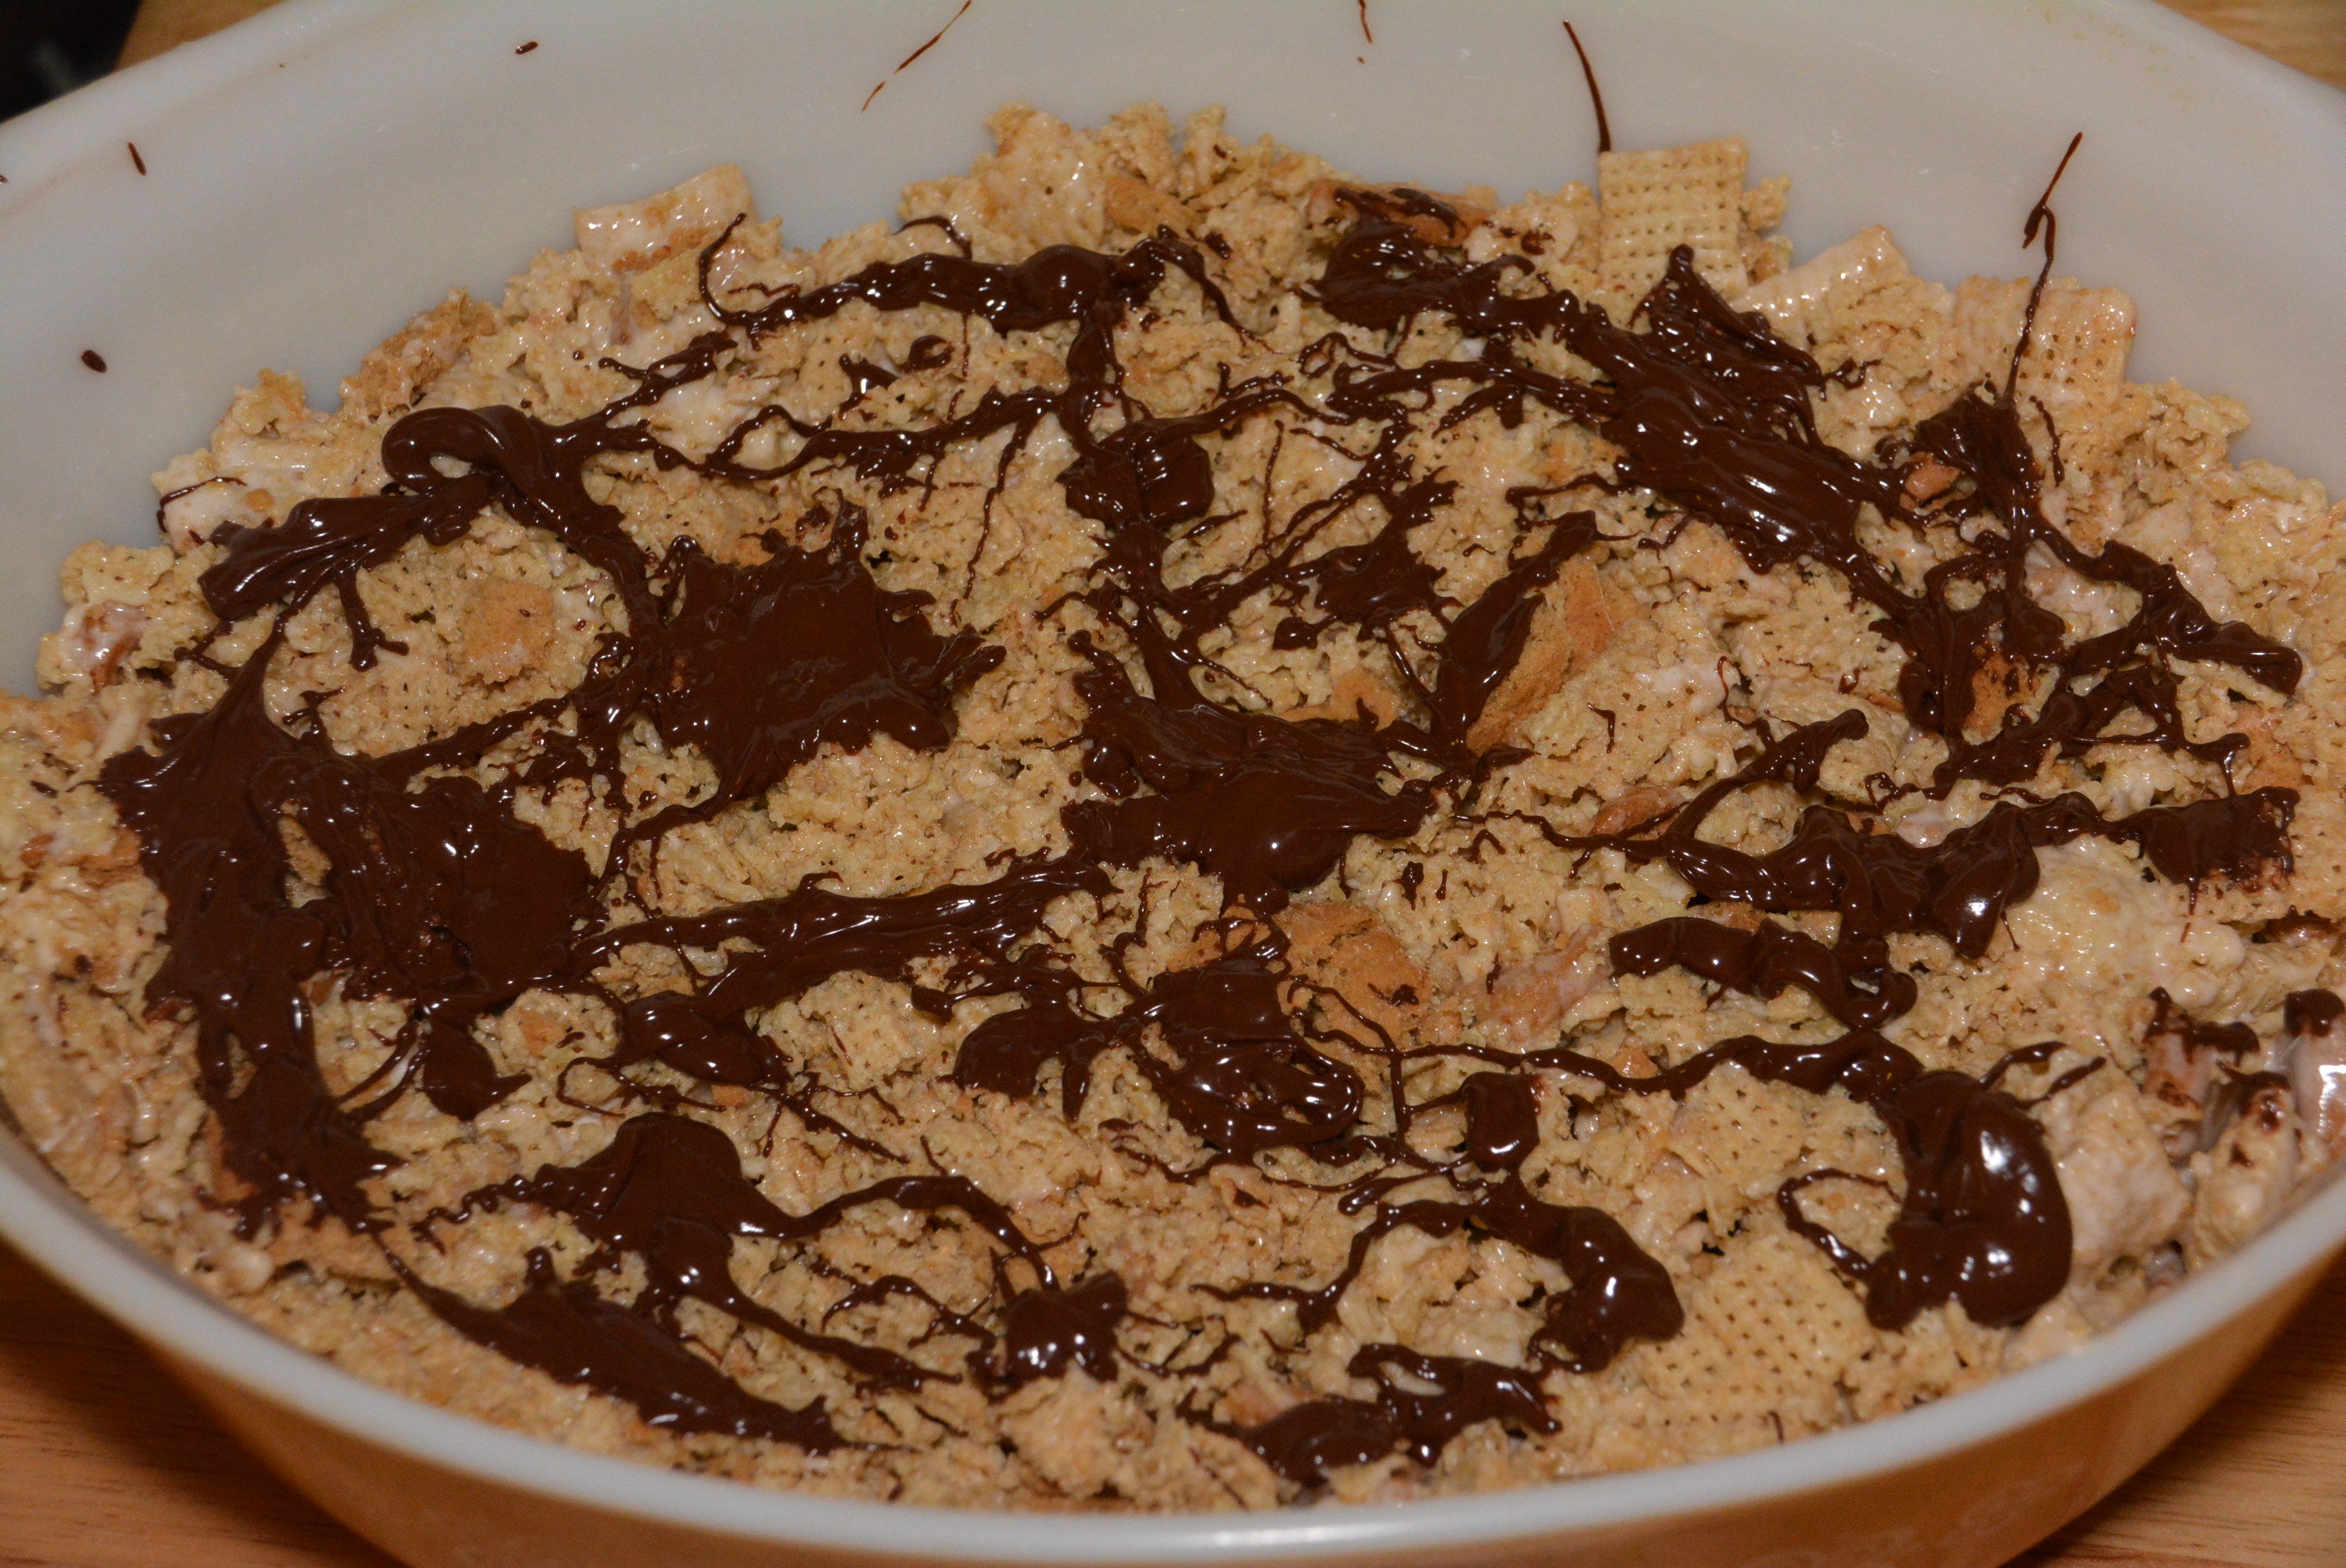
Melt 3/4 cup milk chocolate chocolate chips in a microwave safe bowl. Microwave chocolate chips in short intervals to prevent chocolate from burning. I like to microwave in 20 second intervals and stir after each.
Once all chocolate is melted, drizzle over rice treats.
Drizzle melted milk chocolate onto rice treats.
Allow mixture to cool and then use a knife (sprayed in non-stick spray) to cut into squares.
Enjoy!,
Gluten free graham crackers and rice cereal swirled together with melted marshmallow, all topped with a drizzle of sweet, melted milk chocolate. Just one bite and you’re instantly transported back to a warm summer night around the fire pit where you can hear the chatter of cicadas and smell the deliciousness of grilled favorites. This dessert combines two of my favorite sweet treats, a s’more and Chex treat, and creates a snack that can be enjoyed year round. They’re delicious and so incredibly easy to make! I hope you enjoy them as much as I do!
1 1/2 boxes of Schar Honeygrams (each box is about 5 oz)
10 oz Rice Chex (about 3/4 of a 12.8 oz box of Chex)
10 oz bag mini marshmallows
4 tbsp butter (I use Smart Balance or Land O’Lakes)
3/4 cup milk chocolate chocolate chips (Hershey's is gluten free)
Non-stick cooking spray (I use Smart Balance)
Instructions
Spray 9″ x 13″ baking dish with non-stick cooking spray.
Add 3/4 of a 12.8 oz box of Rice Chex to a large mixing bowl. I like to crush them a bit while they are still in their bag so you have some rice krispie size pieces mixed with some whole Chex still floating around.
Next, chop or crumble 1 1/2 packages of Schar Honeygram crackers. Make sure you have big enough pieces throughout to really give you that s'more feeling.
Add your crumbled graham cracker pieces to the large mixing bowl of cereal and mix together.
Melt 4 tbsp of gluten free butter in a microwave safe bowl (about 30-60 sec).
Add 10 oz bag of mini marshmallows to melted butter and stir to coat.
Melt marshmallows in microwave (about 1 – 1 1/2 minutes). Keep an eye on these in the microwave, as they do expand and can overflow the bowl easily.
Remove the bowl from the microwave and stir melted marshmallows until smooth.
Pour melted marshmallow onto crushed Chex and graham cracker mixture and stir to combine, making sure all cereal and cookies are coated with marshmallow. This is going to be very sticky; I like to use a spatula and spray it with a little non-stick spray when needed.
Scoop sticky marshmallow/cereal mixture into baking dish and use a spatula or spoon sprayed with non-stick spray to press into an even layer.
Melt 3/4 cup milk chocolate chocolate chips in a microwave safe bowl. Microwave chocolate chips in short intervals to prevent chocolate from burning. I like to microwave in 20 second intervals and stir after each.
Once all chocolate is melted, drizzle over rice treats.
Allow mixture to cool and then use a knife (sprayed in non-stick spray) to cut into squares.
Enjoy!
By Gluten Free Mom To Be
Gluten Free Mom To Be http://www.glutenfreemomtobe.com/
I’ll be honest, I’m one of those people that loves receiving mail, well the happy kinds, not bills and junk mail. Letters, cards, packages, it’s truly a lost art of communication but one that I love. I mean who doesn’t love coming home and finding a little brown package sitting on their doorstep, especially one with Canyon Bakehouse in the return address. I lugged little one, the diaper bag, and the brown box of gluten free love into the house and couldn’t wait to tear into it. A beautiful site laid before me in the form of three fresh loaves of gluten free focaccia.
It’s no mystery that I’ve fallen for Canyon Bakehouse’s Gluten Free Focaccia. In fact, for only $5 a loaf, you would certainly be able to find a loaf at all times in my cabinet if it were available at my local grocery store everyday. So every now and then I’ve been able to enjoy the specialness of the gluten free focaccia. So far I’ve put together these Caprese and Spinach Artichoke Garlicky Focaccia Bites, adding two of my favorite appetizers to toasted garlic focaccia bread, which by the way my family and I loved. This time around with my box full of sample focaccia, I was craving a pizza. Yup, it was that time in the week for a homemade pizza and I figured why not use the focaccia for a pizza crust.
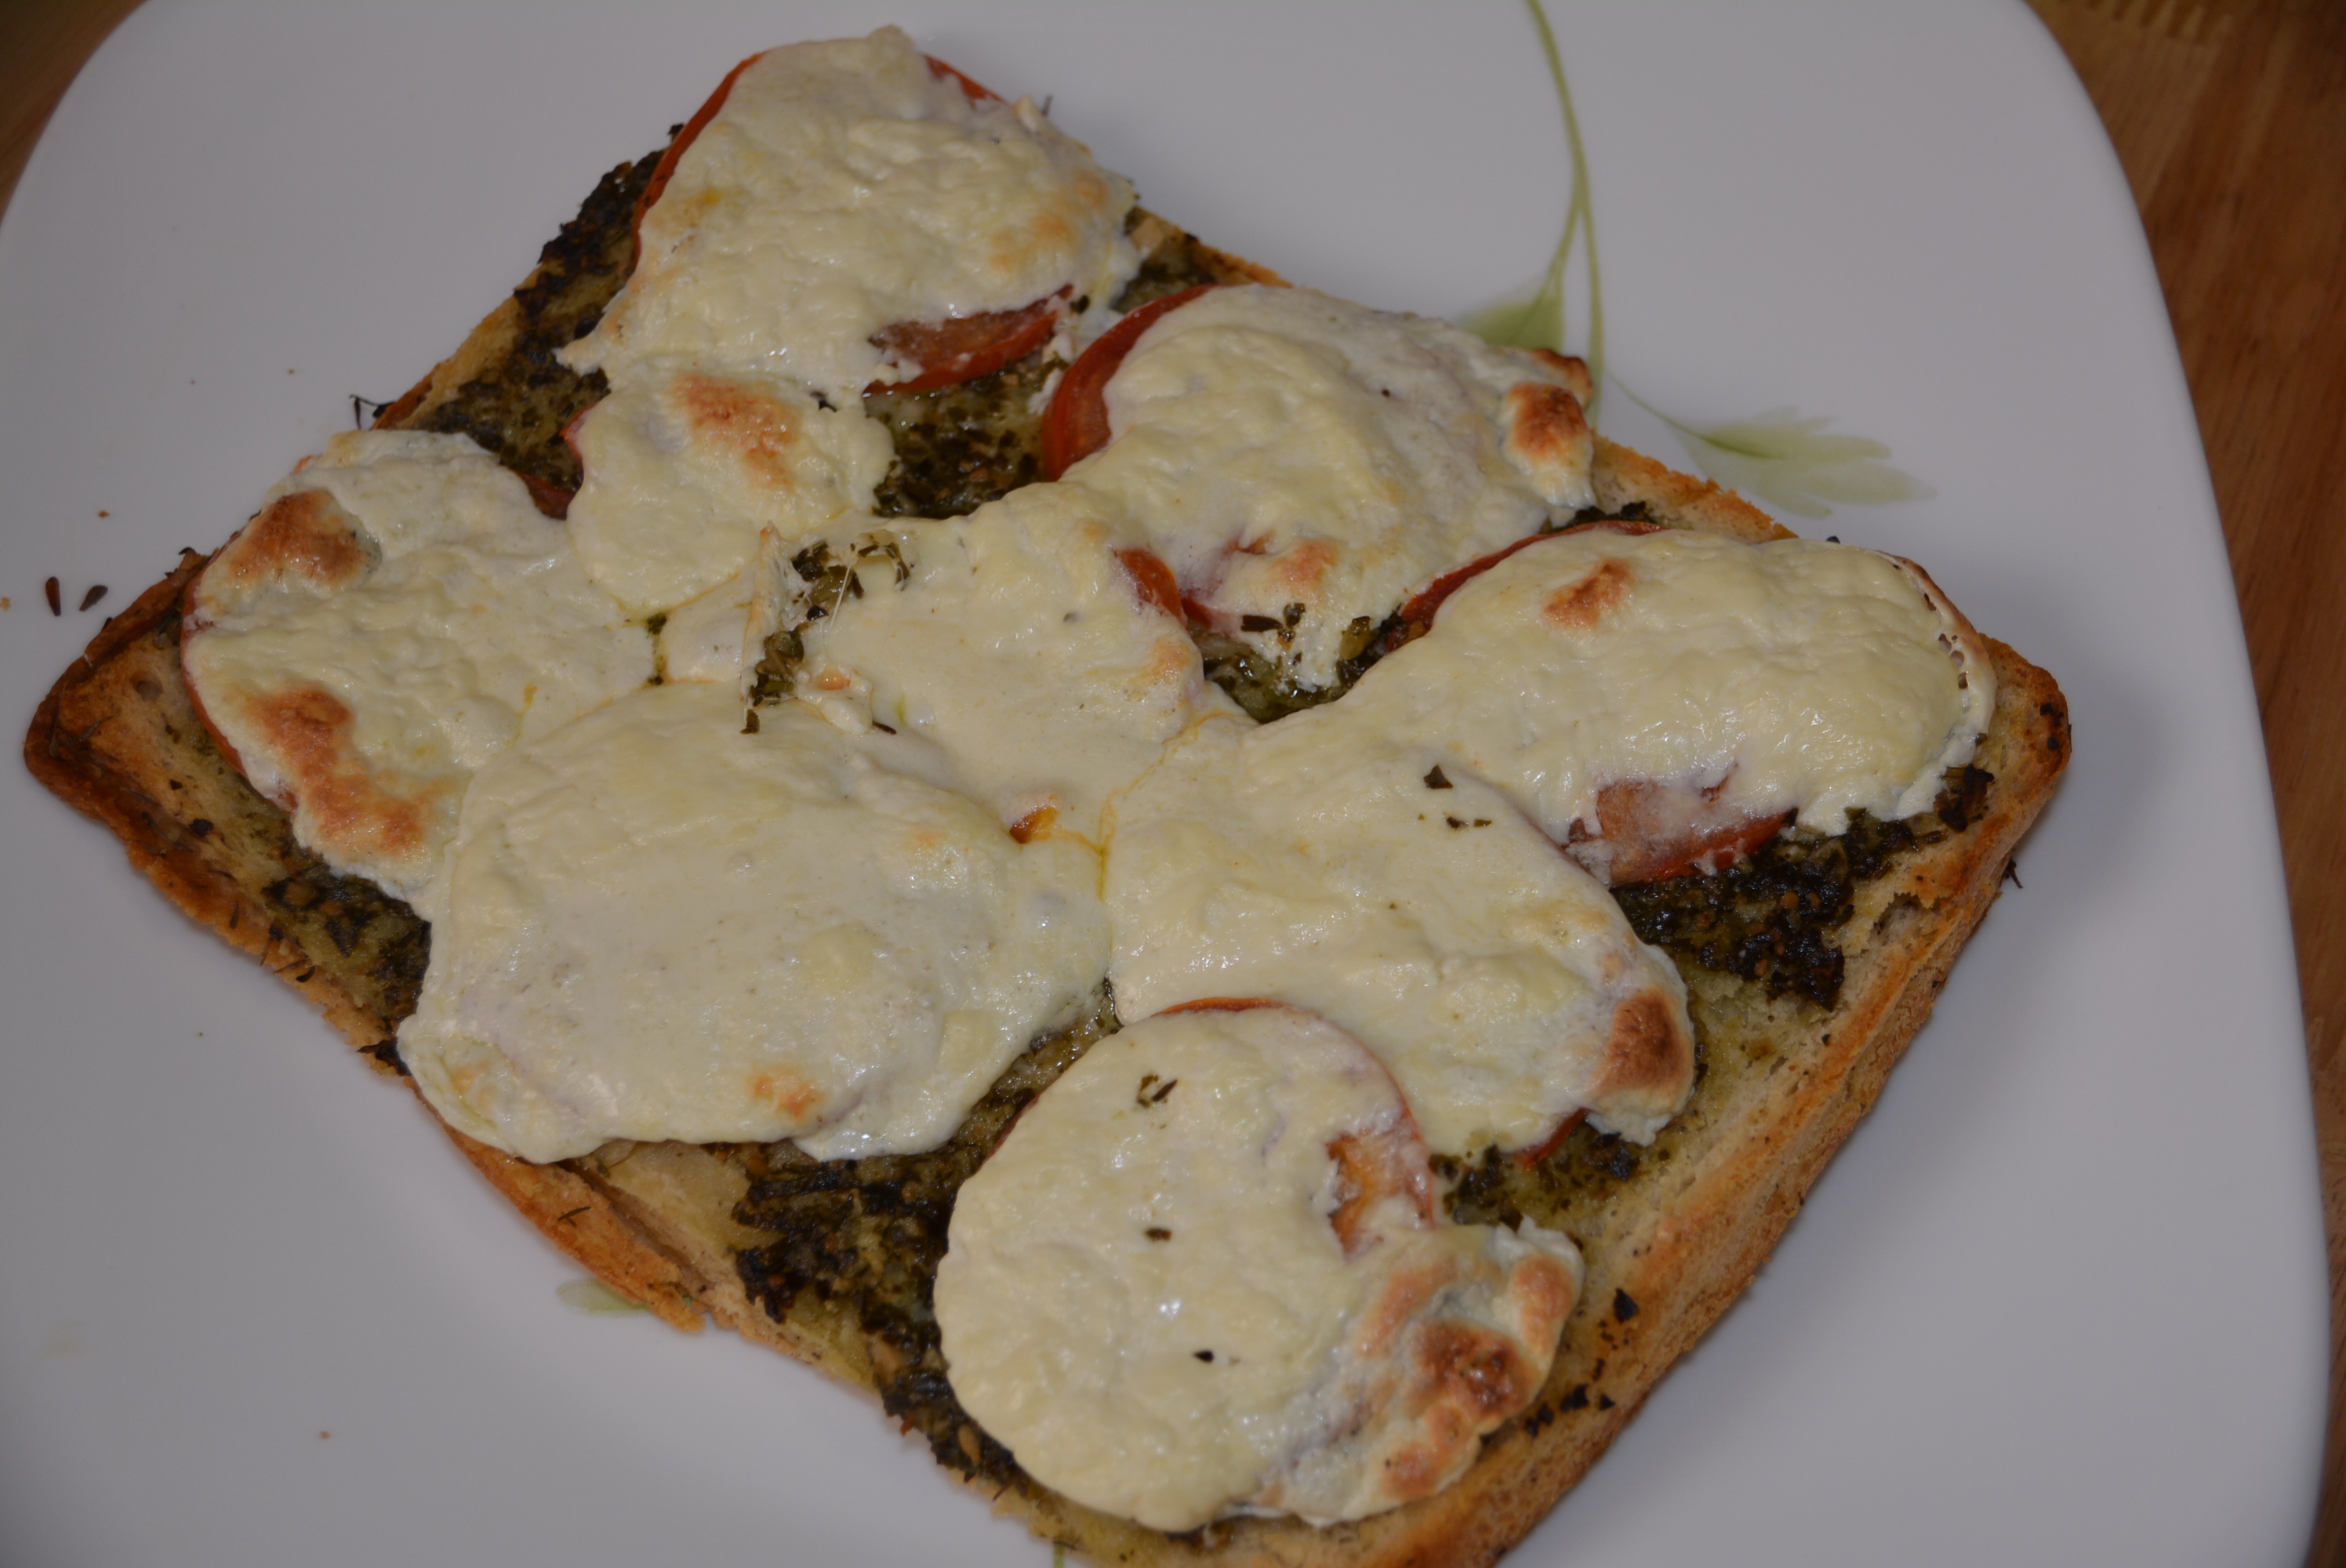
I am so glad that I tried this gluten free pizza out, the focaccia was a perfect substitute for your traditional crust, kind of like a deep dish pizza. But instead of my normal pizza toppings I decided to try out my gluten free burrata cheese that I snagged at our local Italian specialty store. I first was introduced to burrata cheese at Disney actually. Epcot’s Tutto Gusto makes this gluten free pasta pomodoro and tops it with a soft and creamy burrata cheese, it’s divine! Burrata is basically a creamy version of mozzarella, a little ball of fresh mozzarella that’s filled with a creamy center. With burrata cheese, focaccia, a fresh tomato from our garden, and pesto in hand, I decided to throw it all together for a clever new pizza. It was delicious and certainly a new family favorite! Need a sneak peak of the end result, here you go, a Burrata and Pesto Gluten Free Focaccia Pizza!
Burrata And Pesto Gluten Free Focaccia Pizza
Note: If you don’t have any or can’t get your hands on burrata cheese just use fresh mozzarella as a substitute, it’ll be equally as tasty.
Ingredients:
16 oz loaf of Canyon Bakehouse Rosemary and Thyme Focaccia
1/2 cup pesto sauce, fresh or jarred (My favorite gluten free jarred pesto is Wegman’s brand.)
8 oz gluten free Burrata cheese, fresh mozzarella with a creamy center (Lioni states gluten free on the label.)
1 large tomato, thinly sliced
salt and pepper to taste
Directions:
Preheat oven to 400 degrees.
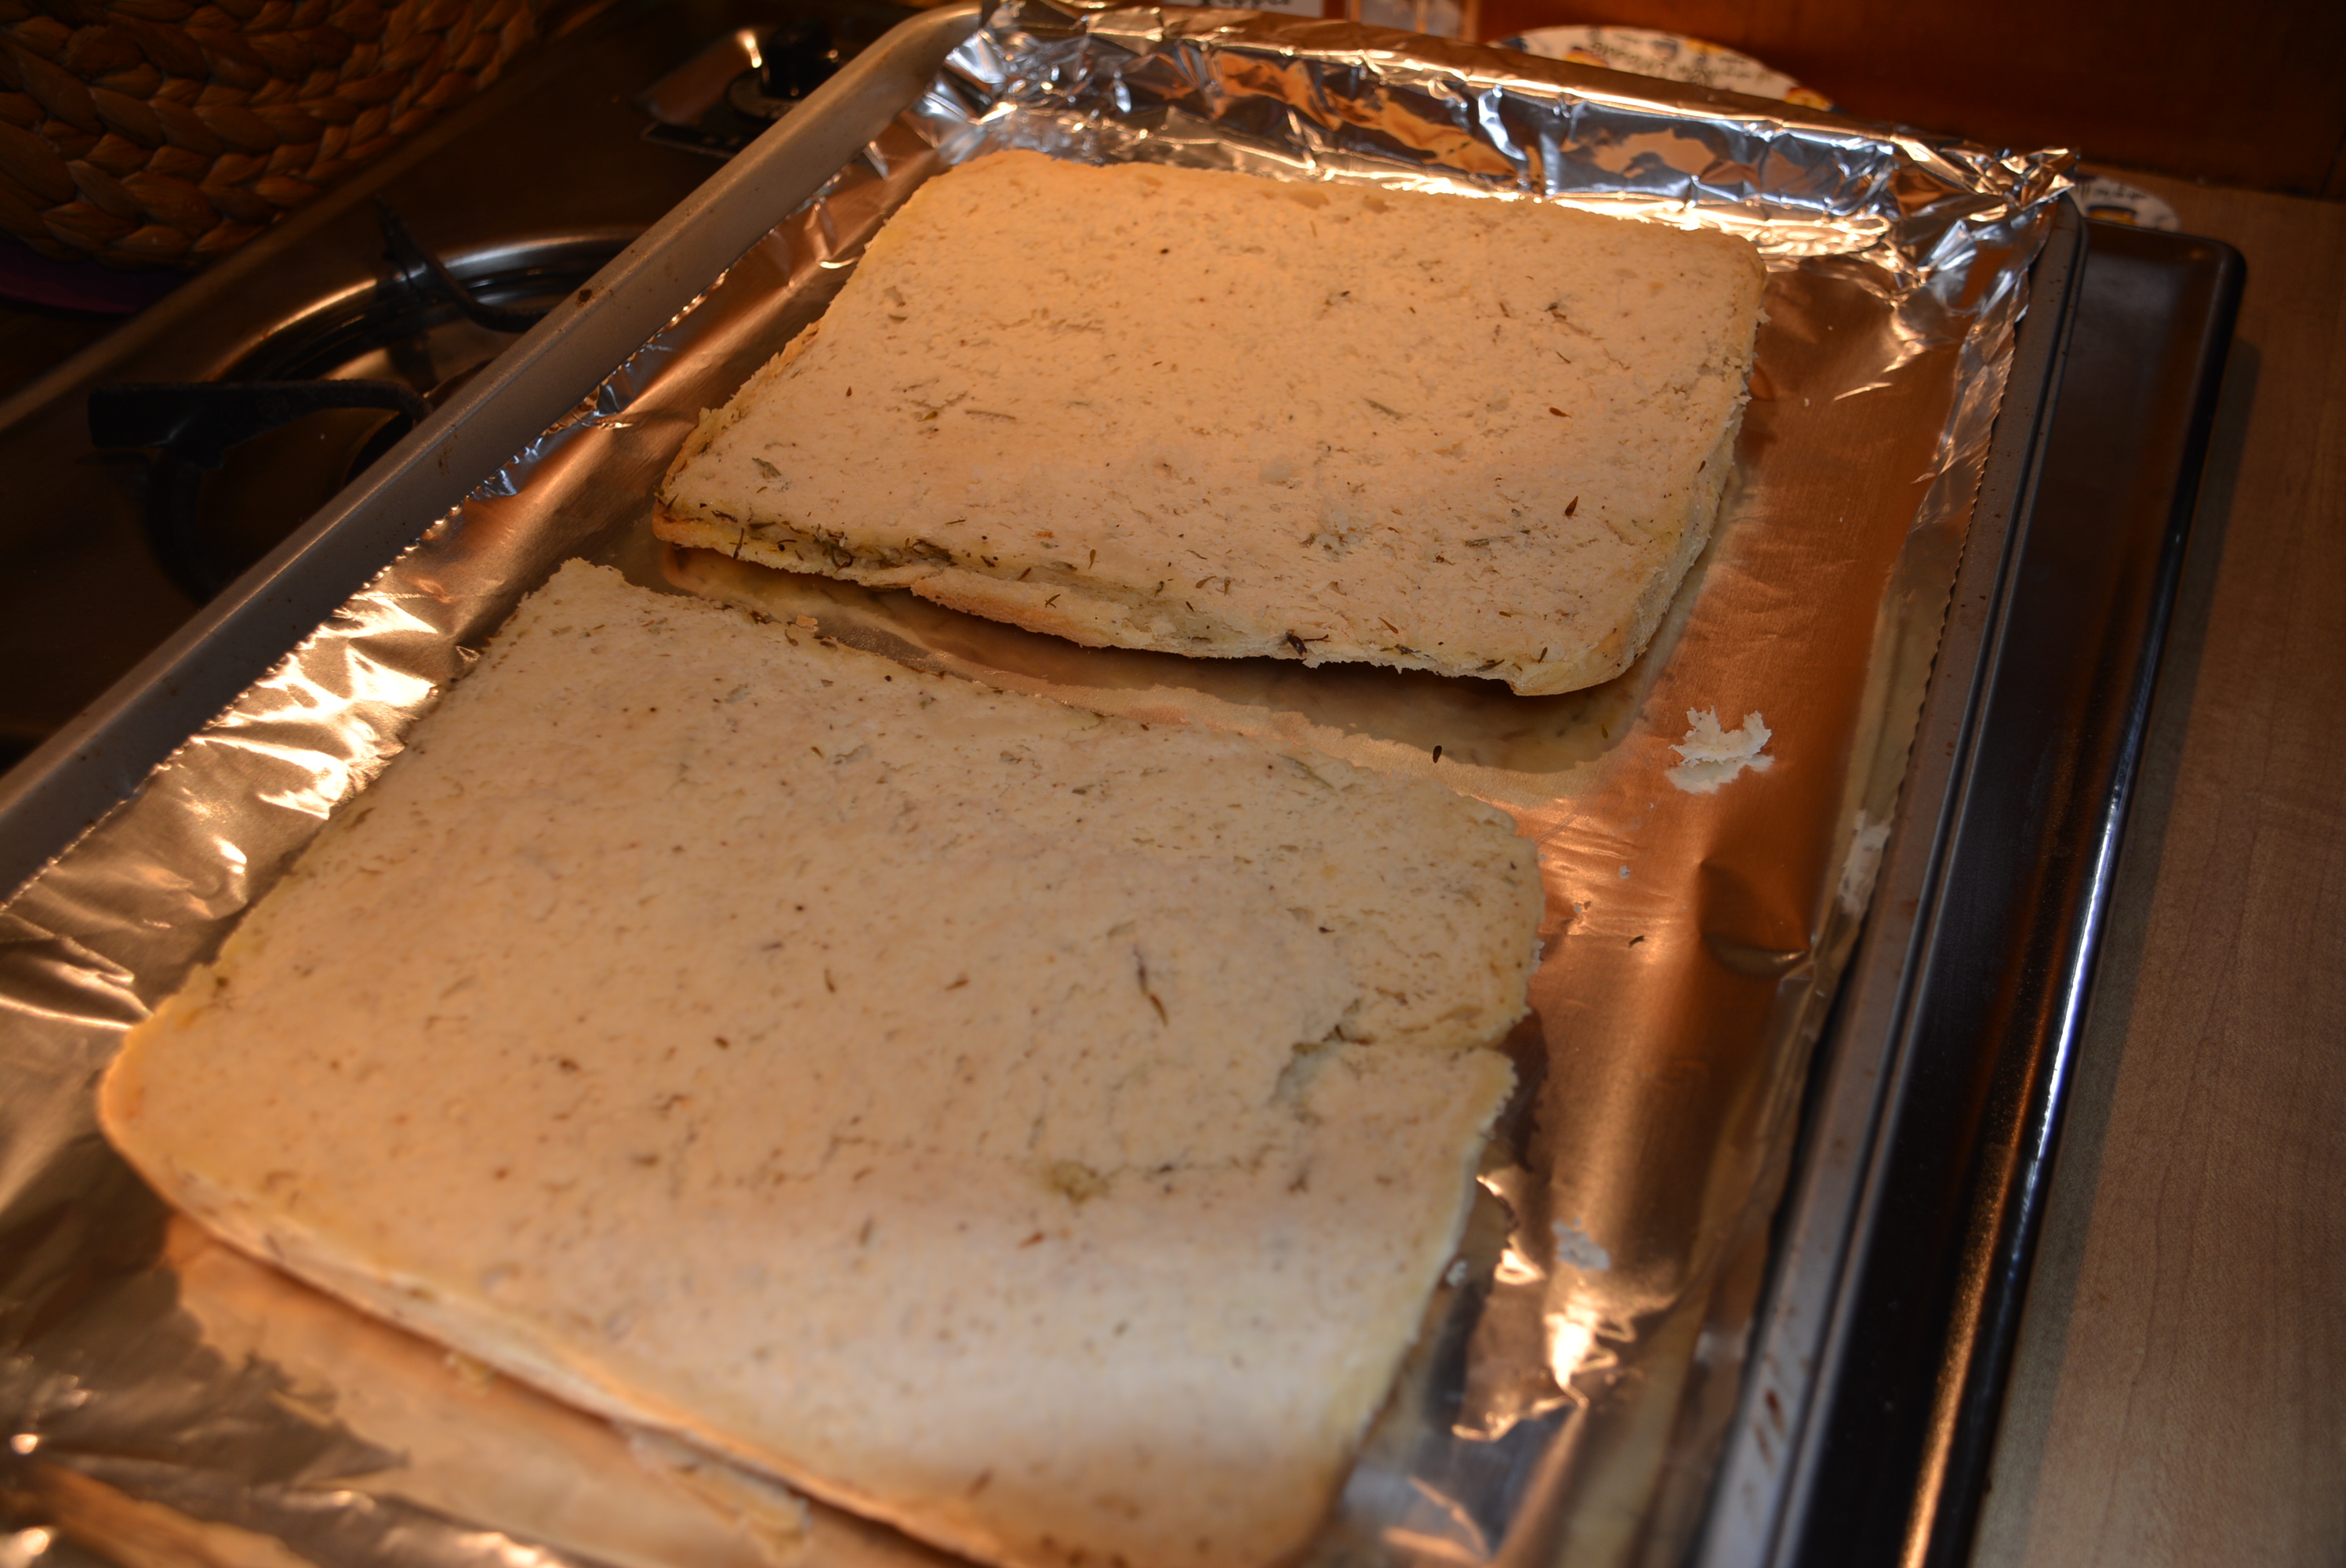
Cut your 16 oz loaf of Canyon Bakehouse focaccia lengthwise so you have two large halves of focaccia.
Focaccia loaf cut in half lengthwise.
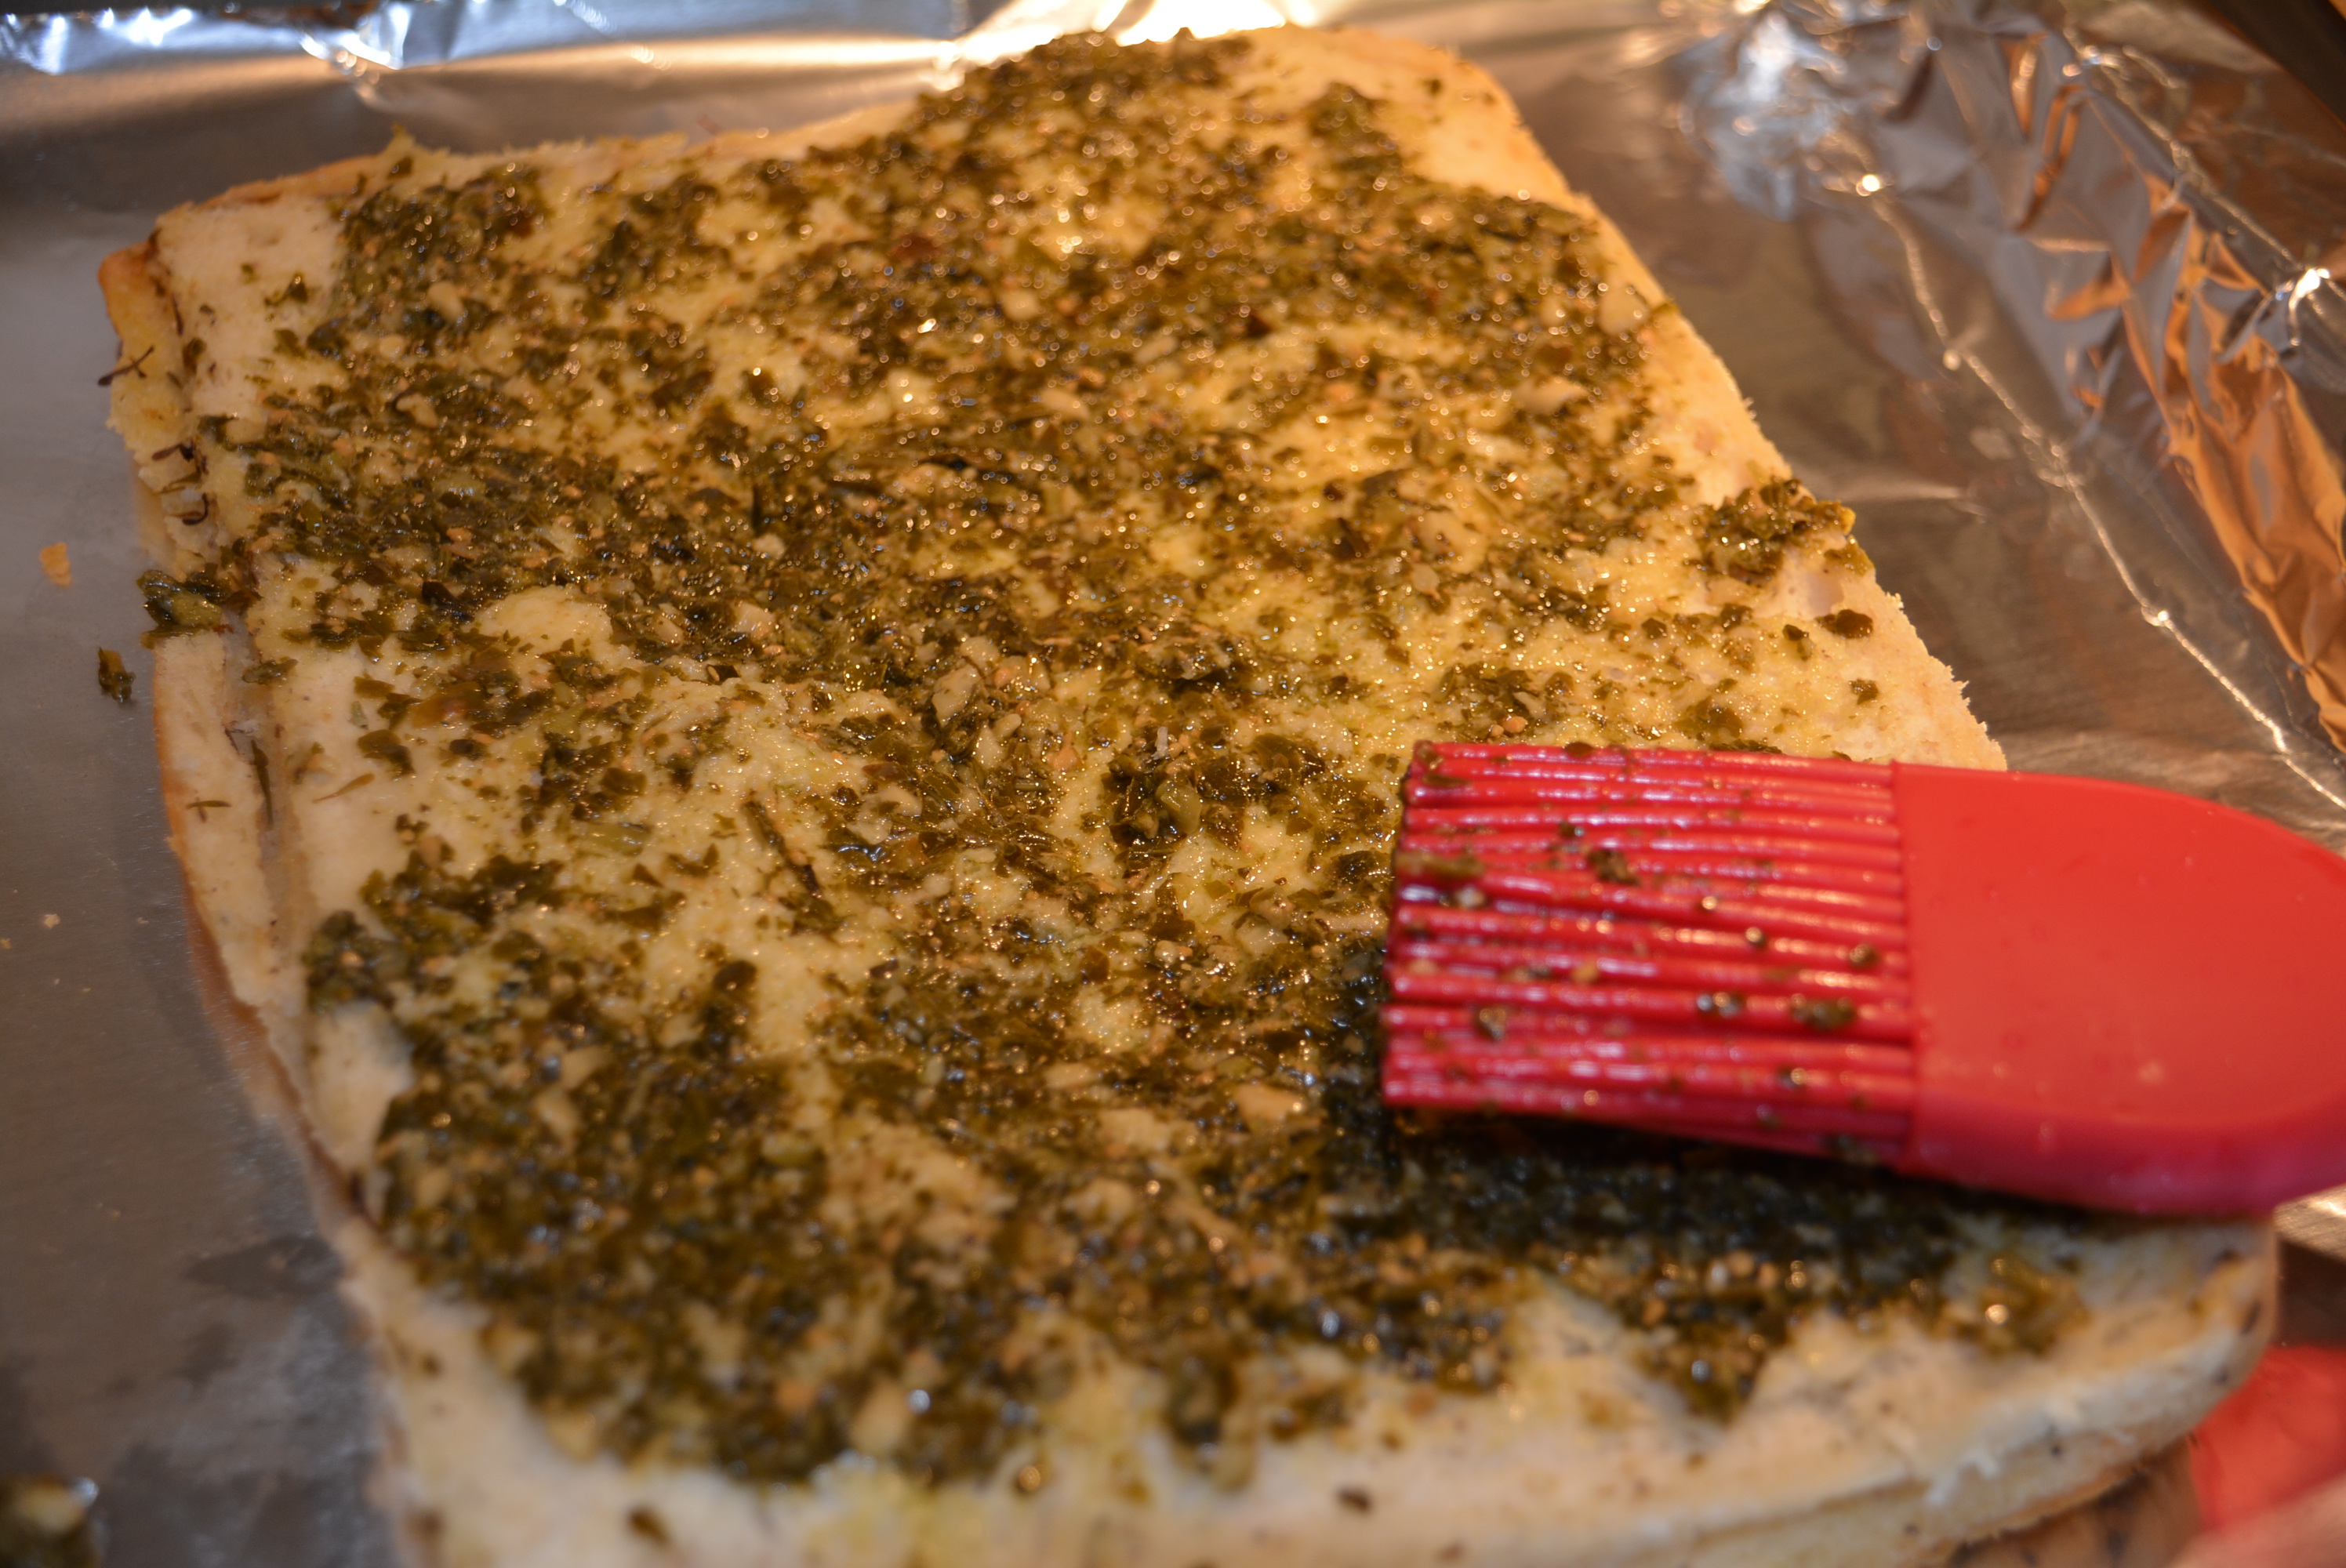
Add about a 1/4 cup of fresh or jarred gluten free pesto to each loaf and spread into a thin layer. I used a basting brush to make sure the layer was super thin just to give a hint of pesto flavor. Just make sure all of your loaf is covered, add a little extra if needed.
Thin layer of pesto sauce.
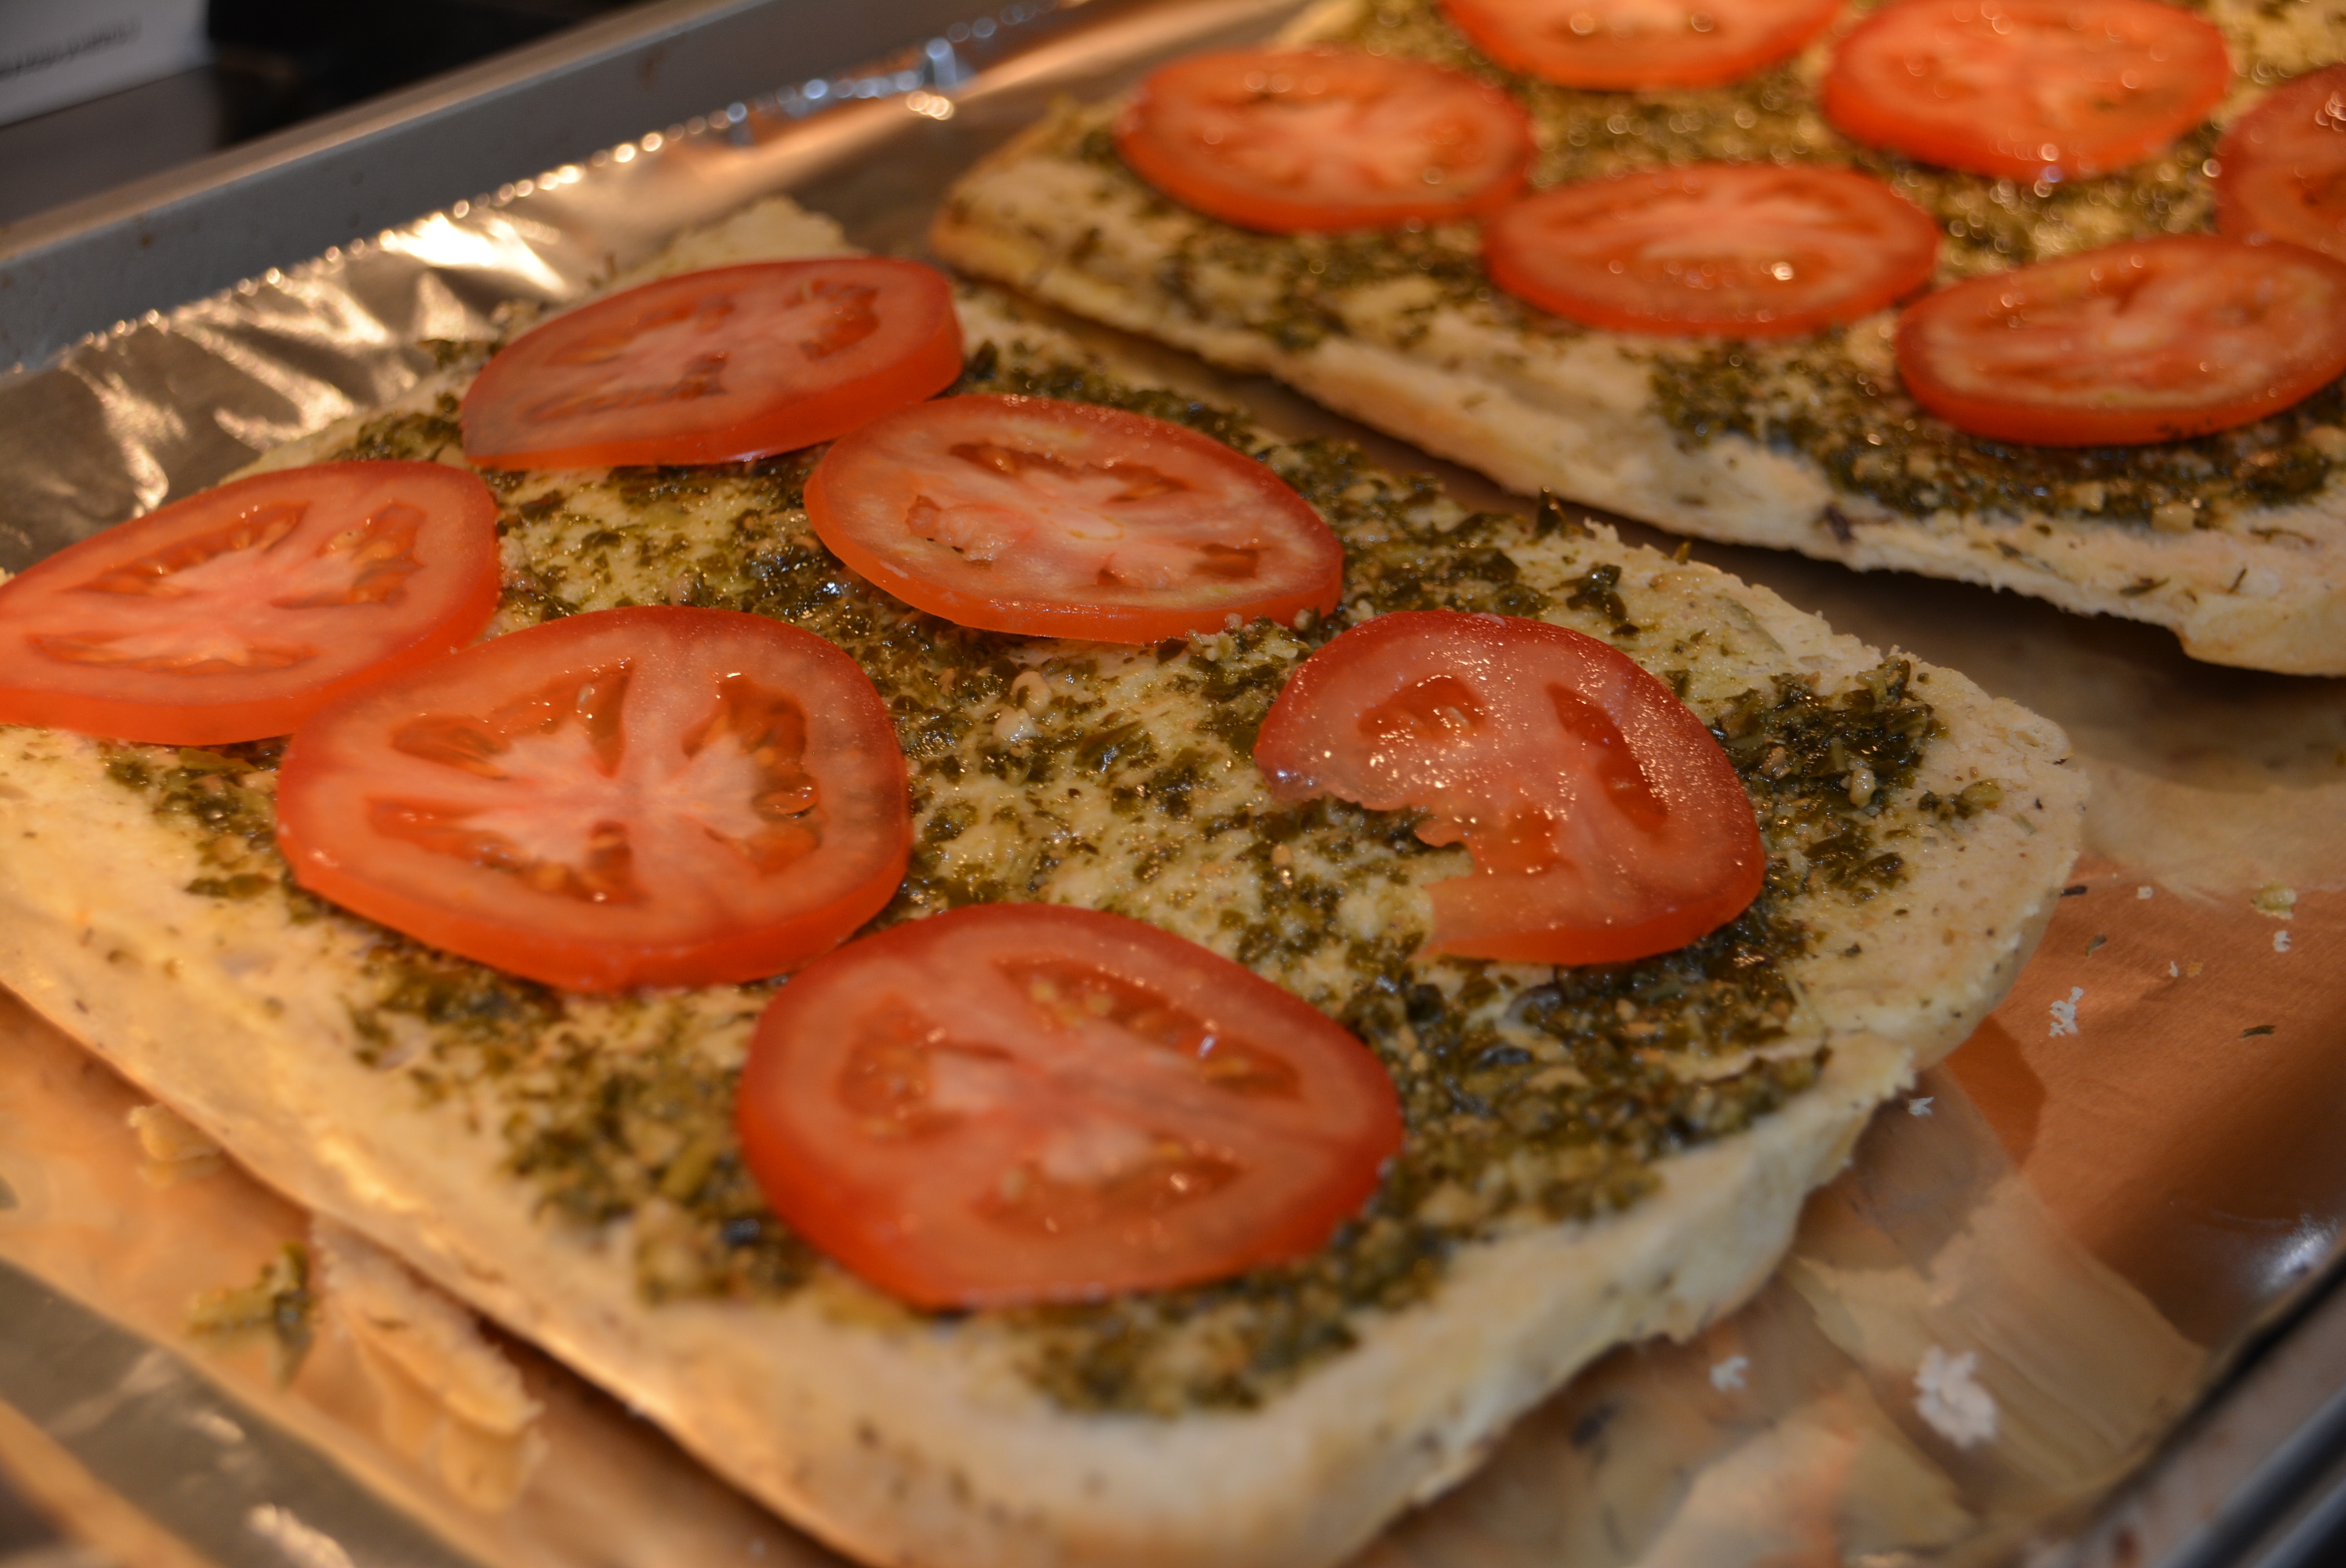
Slice 1 large tomato into thin slices and fill each half with tomato. I had a large plum tomato and had enough to add six whole slices to each and fill some gaps with the remaining tomato pieces.
Add tomato slices on top of pesto layer.
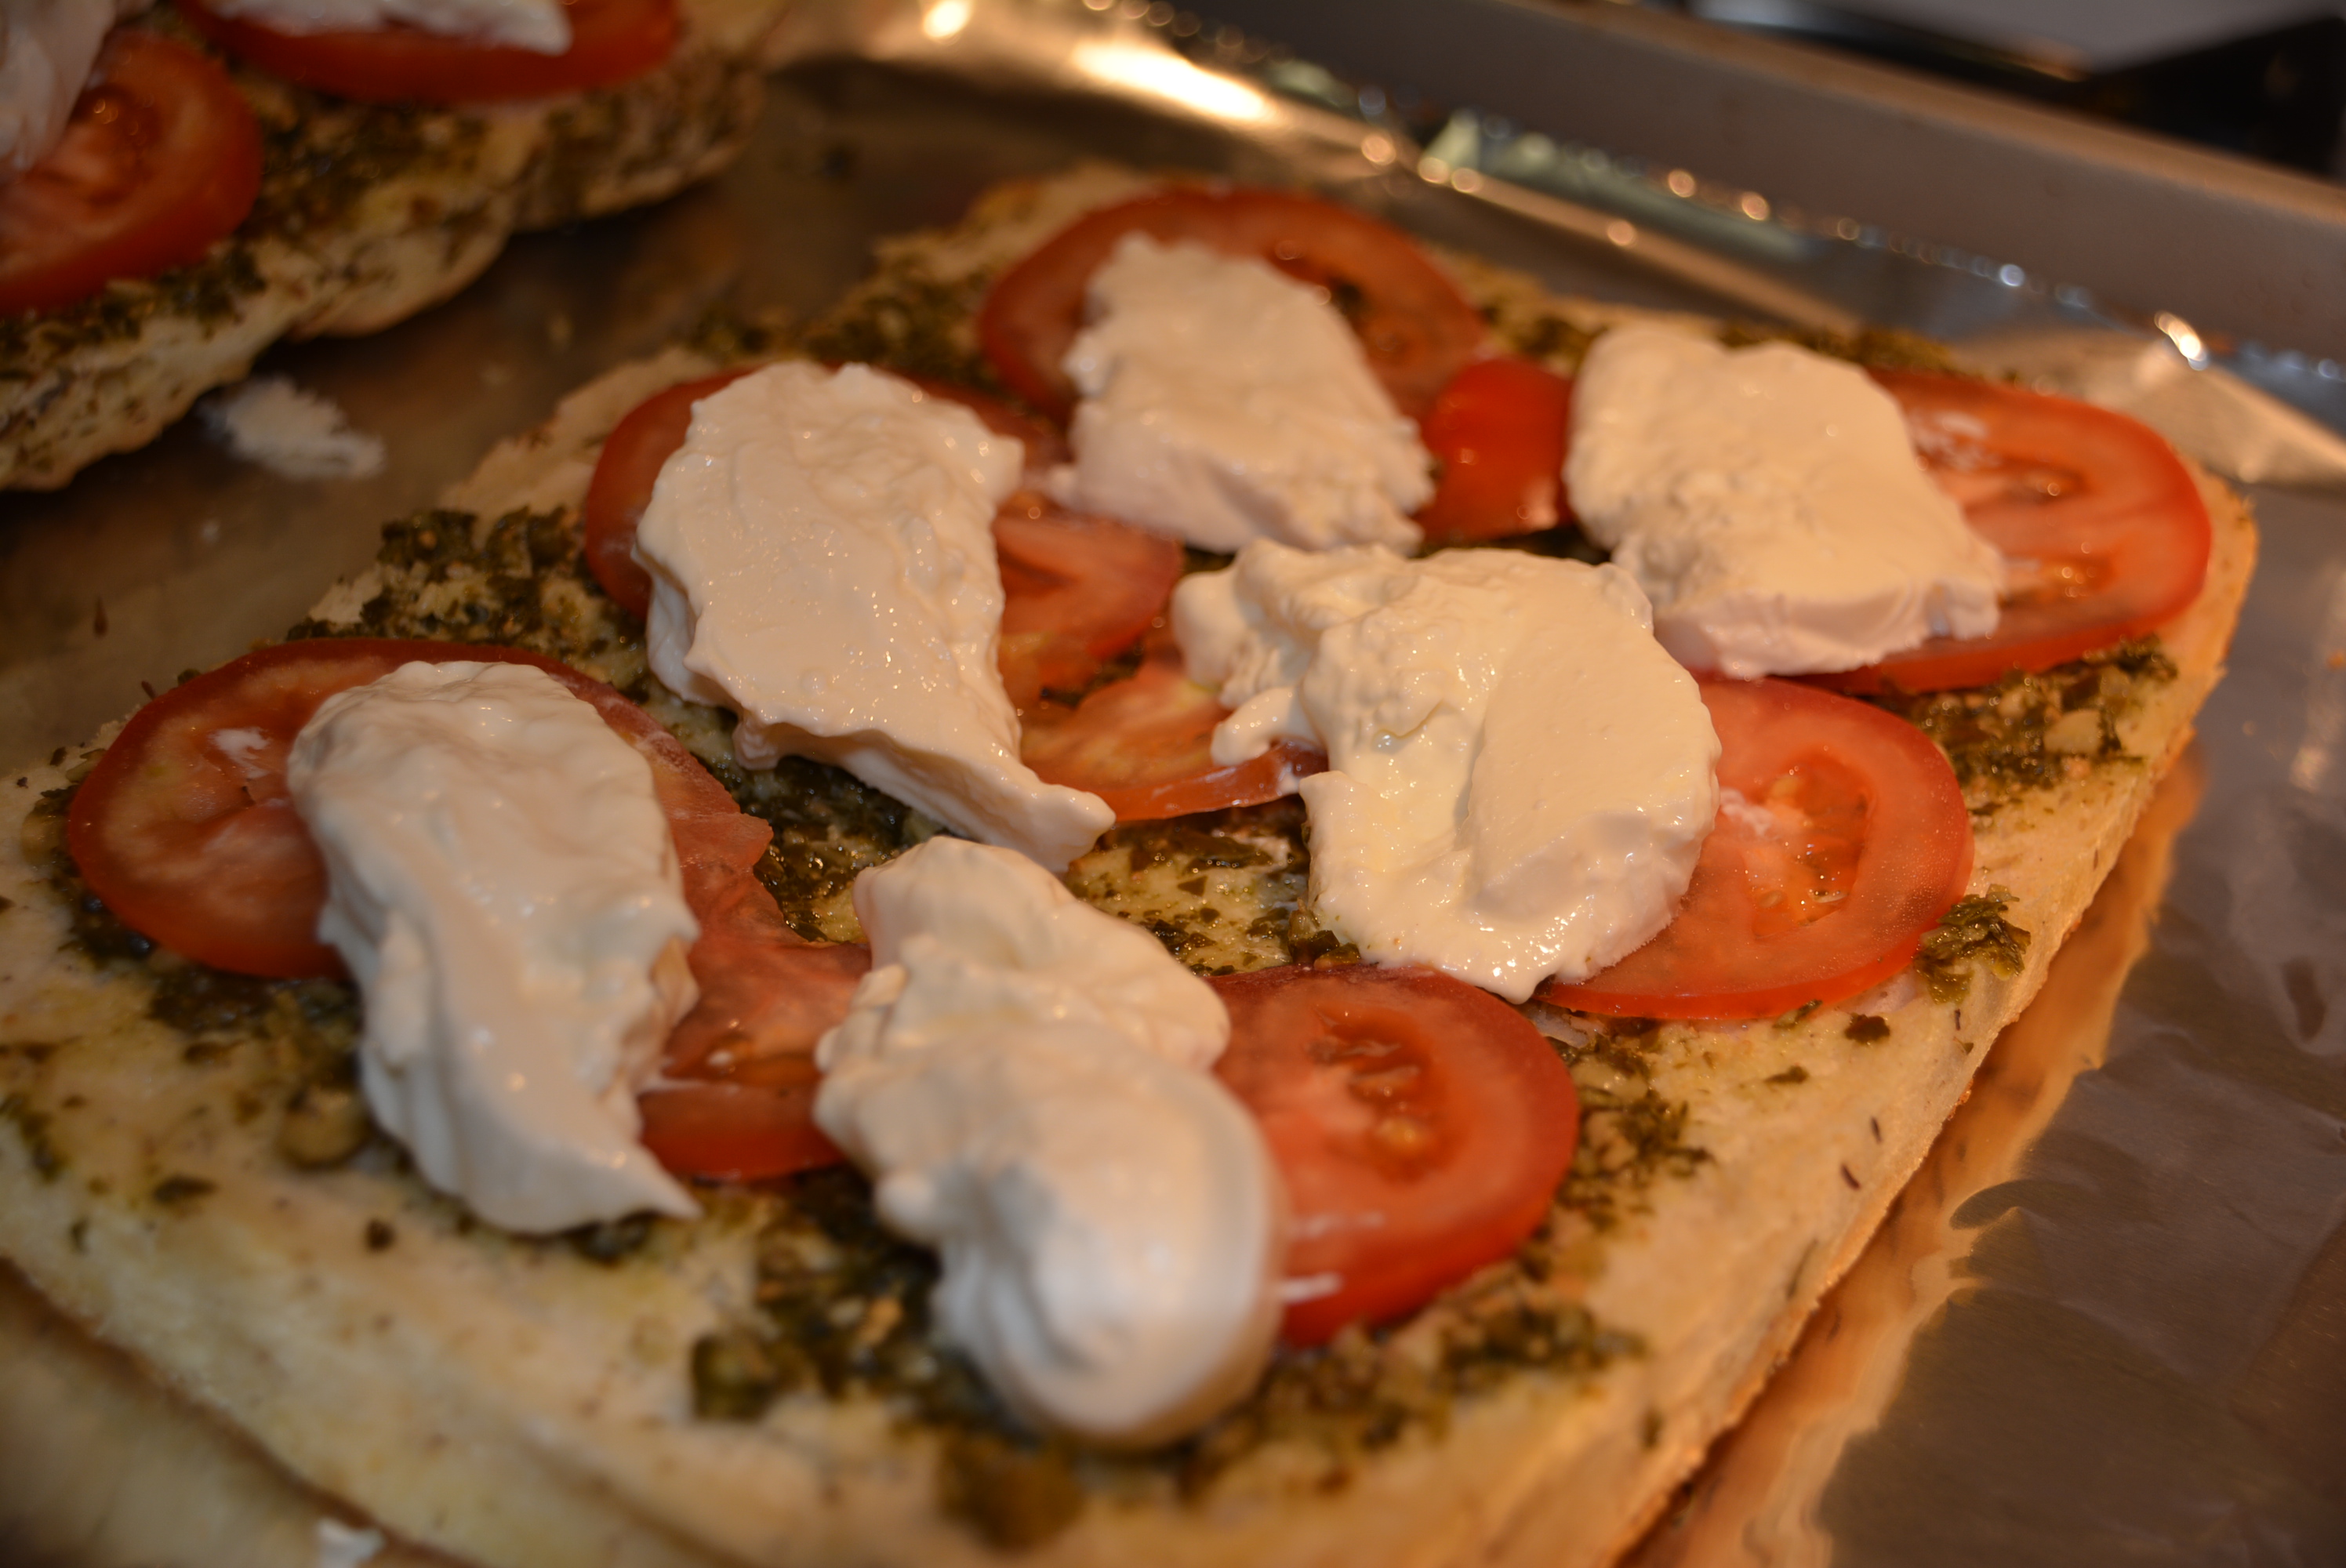
Top your focaccia pizzas with 8 oz gluten free burrata cheese (4 oz per half). The burrata cheese comes as a tight ball similar to fresh mozzarella. I sliced the mozzarella and added the cheese with the creamy center on top of each tomato slice.
Top with burrata cheese.
Before cooking, I dusted each half with a little bit of garlic salt.
Ready to cook!
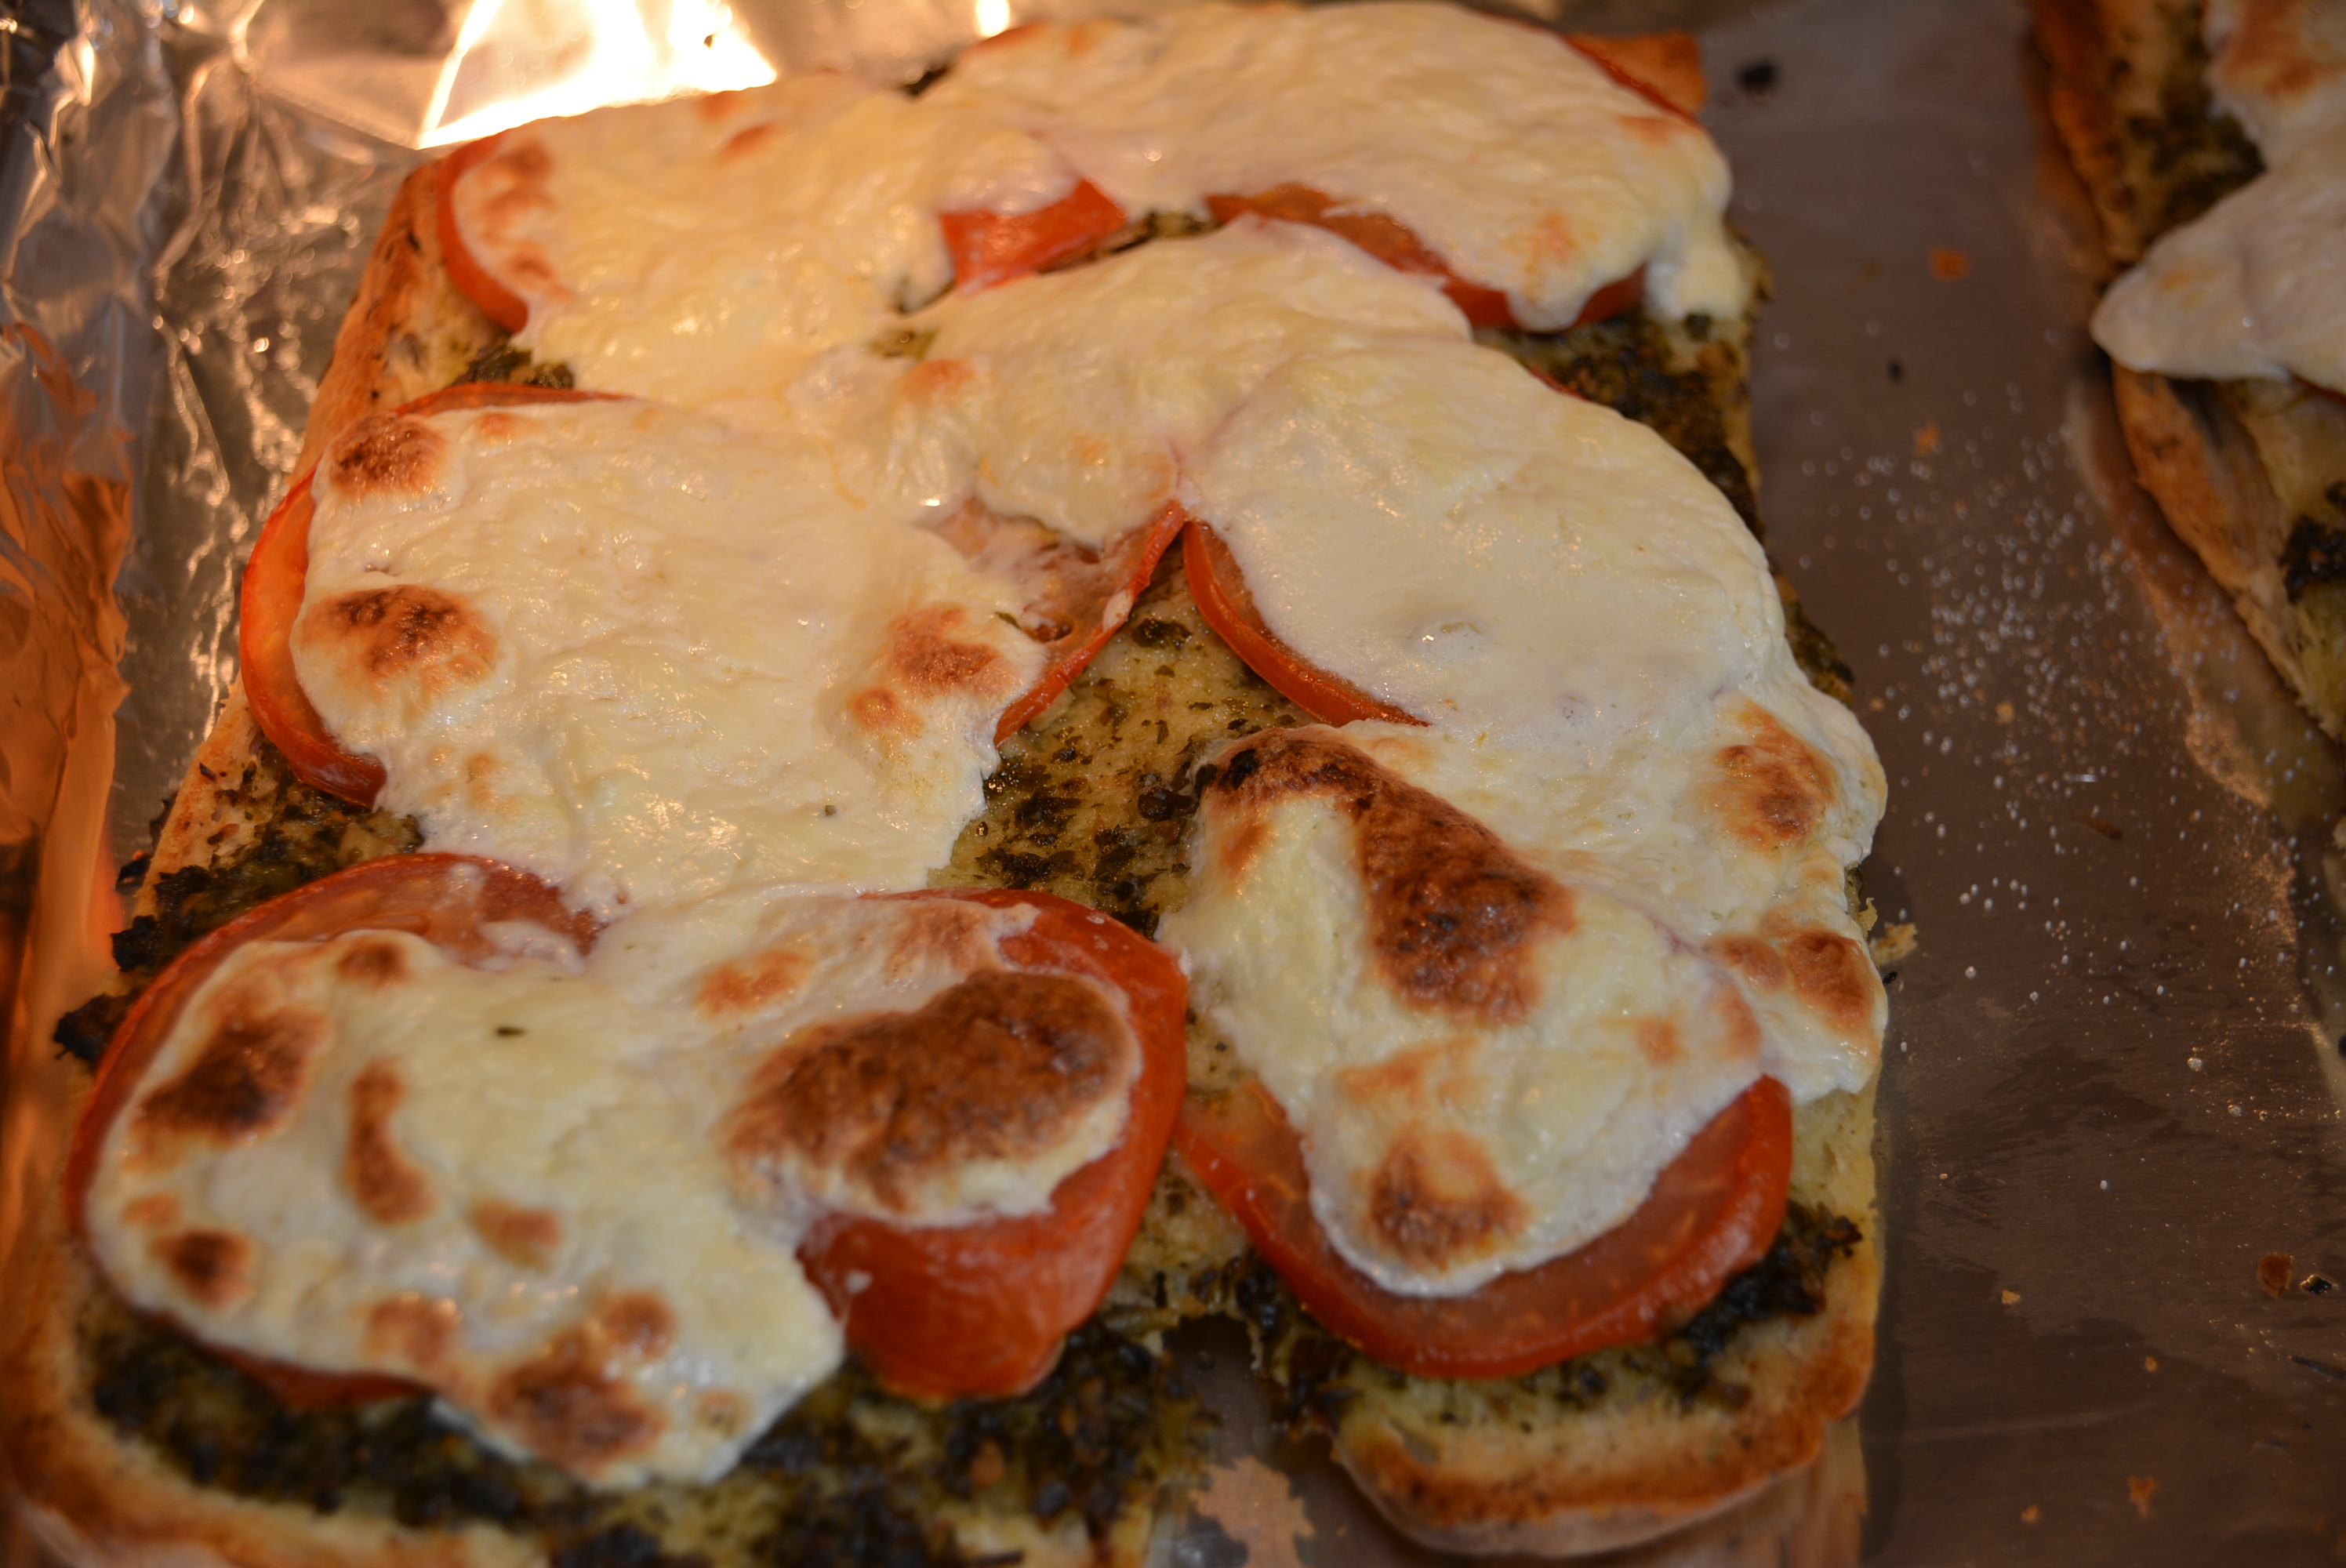
Cook pizzas for 20 minutes until cheese has melted and begun to brown.
Gluten free focaccia pizza anyone?
Let pizzas stand for 1-2 minutes and then slice with a pizza cutter into 6 squares, smaller pieces even if you’re using these for appetizers. Depending on your pesto sauce you may need to season with a little salt but this is optional. Enjoy!
This focaccia bread is an amazing alternative to your traditional gluten free pizza crust. It gives you a thicker crust, just like a deep dish pizza, that crisps up along the edges but keeps the soft and light texture inside. The combination of the pesto sauce and creamy burrata cheese is amazing and a great alternative to using red sauce and shredded mozzarella. You absolutely must try this, it makes for a perfect week night dinner or appetizer for a dinner party. Just make sure you grab enough slices for yourself because they will certainly go quickly. I was only lucky enough to grab a handful before my husband got his hands on the rest! Enjoy!
16 oz loaf of Canyon Bakehouse Rosemary and Thyme Focaccia
1/2 cup pesto sauce, fresh or jarred (My favorite gluten free jarred pesto is Wegman's brand.)
8 oz gluten free Burrata cheese, fresh mozzarella with a creamy center (Lioni states gluten free on the label.)
1 large tomato, thinly sliced
salt and pepper to taste
Instructions
Preheat oven to 400 degrees.
Cut your 16 oz loaf of Canyon Bakehouse focaccia lengthwise so you have two large halves of focaccia.
Add about a 1/4 cup of fresh or jarred gluten free pesto to each loaf and spread into a thin layer. I used a basting brush to make sure the layer was super thin just to give a hint of pesto flavor.
Slice 1 large tomato into thin slices and fill each half with tomato. I had a large plum tomato and had enough to add six whole slices to each and fill some gaps with the remaining tomato pieces.
Top your focaccia pizzas with 8 oz gluten free burrata cheese (4 oz per half). The burrata cheese comes as a tight ball similar to fresh mozzarella. I sliced the mozzarella and added the cheese with the creamy center on top of each tomato slice.
Before cooking, I dusted each half with a little bit of garlic salt.
Cook pizzas for 20 minutes until cheese has melted and begun to brown.
Let pizzas stand for 1-2 minutes and then slice with a pizza cutter into 6 squares, smaller pieces even if you're using these for appetizers. Depending on your pesto sauce you may need to season with a little salt but this is optional. Enjoy!
By Gluten Free Mom To Be
Gluten Free Mom To Be http://www.glutenfreemomtobe.com/