I have to admit, I’ve never been one to crave mac and cheese from a box. Don’t get me wrong I have most definitely eaten the legendary blue boxed Kraft Macaroni and Cheese on more than one occasion, but I’ve by far, preferred a warm, heaping plate of my mom’s homemade cheesy macaroni instead. I can still taste the warm tomato soup layered with cheese and pasta, delicious memories from years past. (more…)
Gluten Free Dinner
Did You Know That Perdue Offers Gluten Free Shortcuts? Grab Some Today, Save A Little Time And Save A Little Money Too!

In case you haven’t guessed it by now I am a huge fan of Perdue’s chicken products. It’s a tough world out there following a gluten free diet, so any brand that makes our lives a little bit easier makes me smile. Not only do I buy Perdue’s chicken breasts and tenders for all of my from scratch cooking but I’m also very pleased with their gluten free line of breaded chicken tenders as well as select shortcuts. They are perfect when you’re crunched for time and match with so many of my go to, quick dinner recipes. I’d also like to mention that I think these products were among my favorite dinner items during my pregnancy. They saved me from touching the forbidden raw chicken and an hour or so of prep time. Interested in trying some of these out? Make sure you print this Perdue Shortcut Coupon today to save on your next purchase! May I recommend the honey or grilled varieties that you can try in my Pesto, Chicken, and Tomato Pizza, Crispy Chicken Cobb Wrap, or my latest and favorite recipe Chicken, Broccoli, and Cheese Quesadilla.
Sincerely,
Lindsay
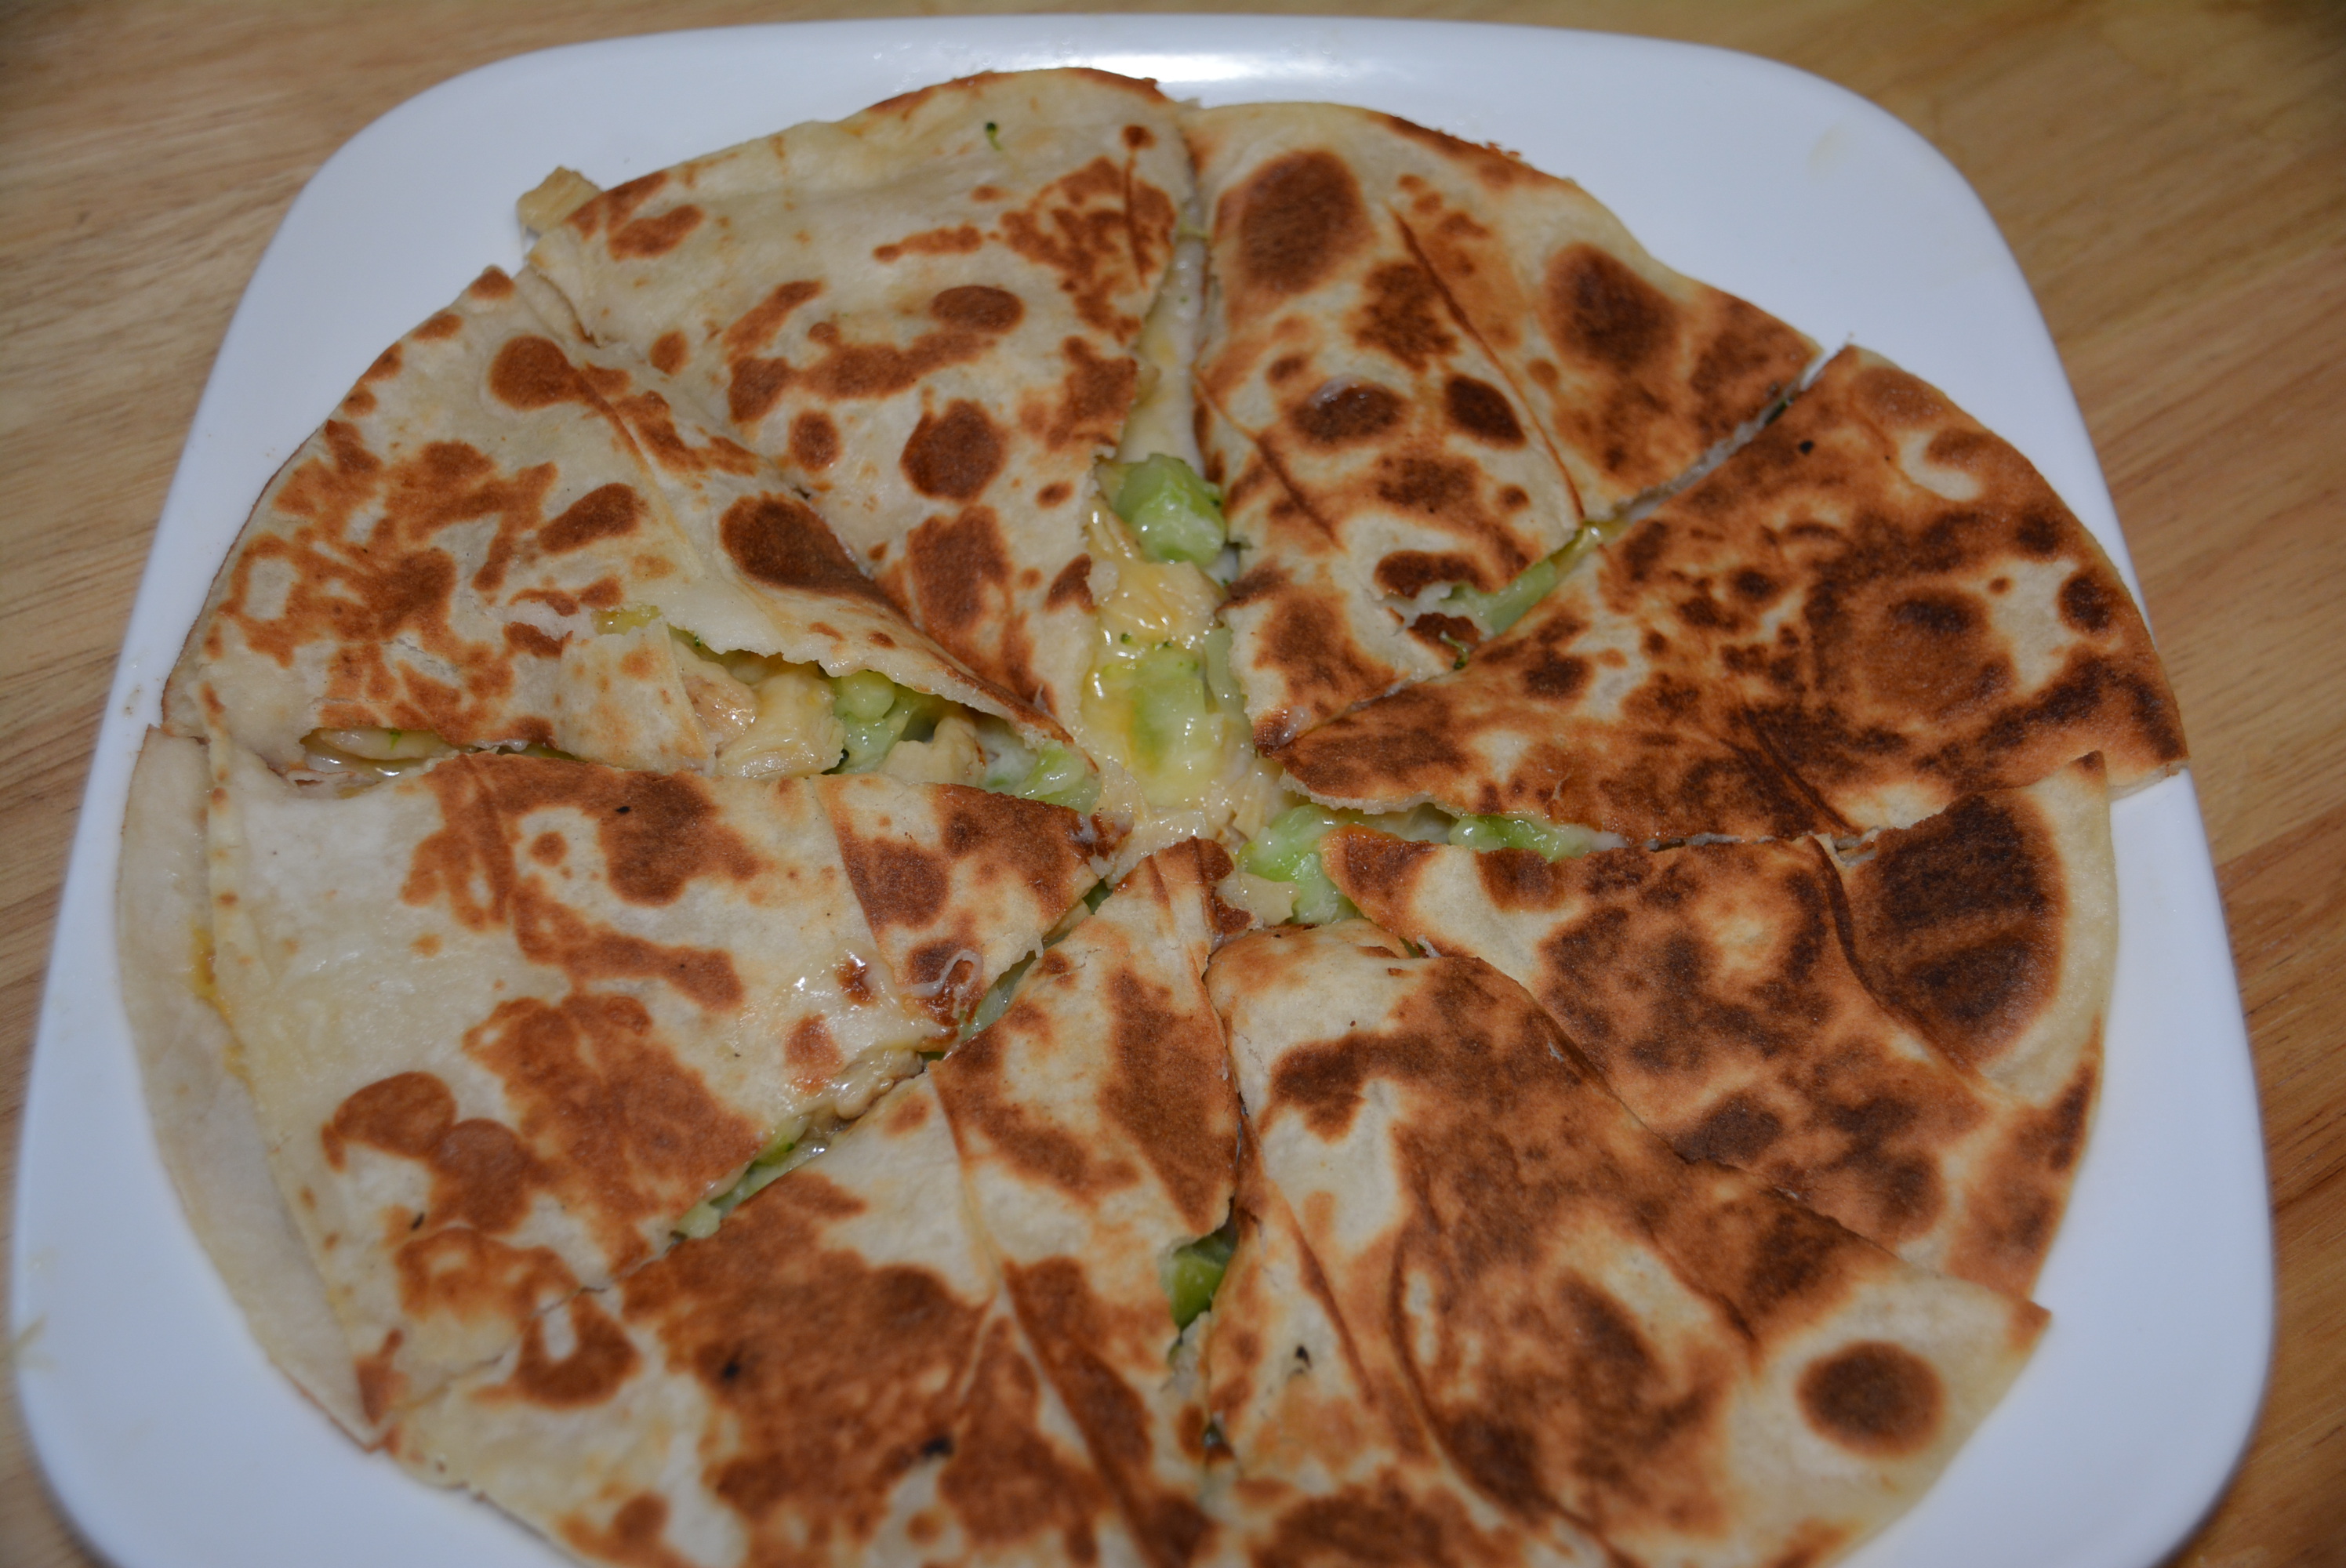
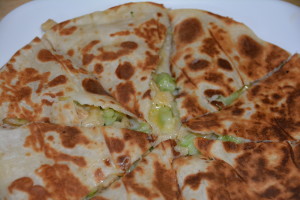
Gluten Free Chicken, Broccoli, And Cheese Quesadillas Using Udi’s Large Tortillas
Okay, so I received some samples of Udi’s new tortillas not too long ago and absolutely fell in love with them. I’ve been itching to get my hands on another package since then but haven’t had any luck finding them in my local grocery stores. Thankfully, I was wandering with little girl through one of my local health food stores the other day and spotted them, in all their gluten free glory, sitting in the freezer case. Since finding them was somewhat of a needle in a haystack scenario, I decided to snag a few packages while I had them in front of me, especially since they could be kept in the freezer for quite awhile. At $4.19 a piece they weren’t too terribly priced, but thankfully I remembered that I had Udi’s coupons sitting at the bottom of my diaper bag waiting for a moment like this to be used. And voila! Only ten minutes later and I’d saved $5 on four packages of gluten free Udi’s tortillas that were now nestled snugly in my backseat next to my little girl. Finding my favorite gluten free tortillas and saving some money on them too was a huge success for this mommy, ah the little things in life that’ll make you smile!
Well anyway, now with four packages in hand, I couldn’t wait to try out some new ways to enjoy these perfect gluten free tortillas. While I love using them to make wraps, especially my Crispy Chicken Cobb Wrap, I was really in the mood to do something warm, maybe either a panini or quesadilla. Seeing as I already had all of the ingredients for my type of quesadilla, we found a winner. Okay, so my type of quesadilla isn’t a traditional spicy version but rather it’s the perfect combo of ingredients for the Gluten Free Mom To Be. I just love the flavor and texture combination of the melted cheddar jack cheese, diced chicken, and chopped broccoli all enveloped in toasted tortillas. These are so delicious and make my mouth water just thinking about them.
Ingredients:
- 1 Package Large Udi’s Tortillas
- 1 cup diced, grilled chicken (I used 1 9 oz boxes Perdue Shortcuts.)
- 1 8 oz bag shredded cheddar jack cheese
- 1 cup chopped broccoli
- Butter to cook quesadilla (I used Smart Balance.)
- Salt and pepper to taste
Directions:
- Out of each Udi’s Large Tortilla package you’ll get 3 quesadillas so you’ll be repeating each of these steps three times.
- Spread a thin layer of butter on one side of each tortilla, making sure you cover the entire side of the tortilla.
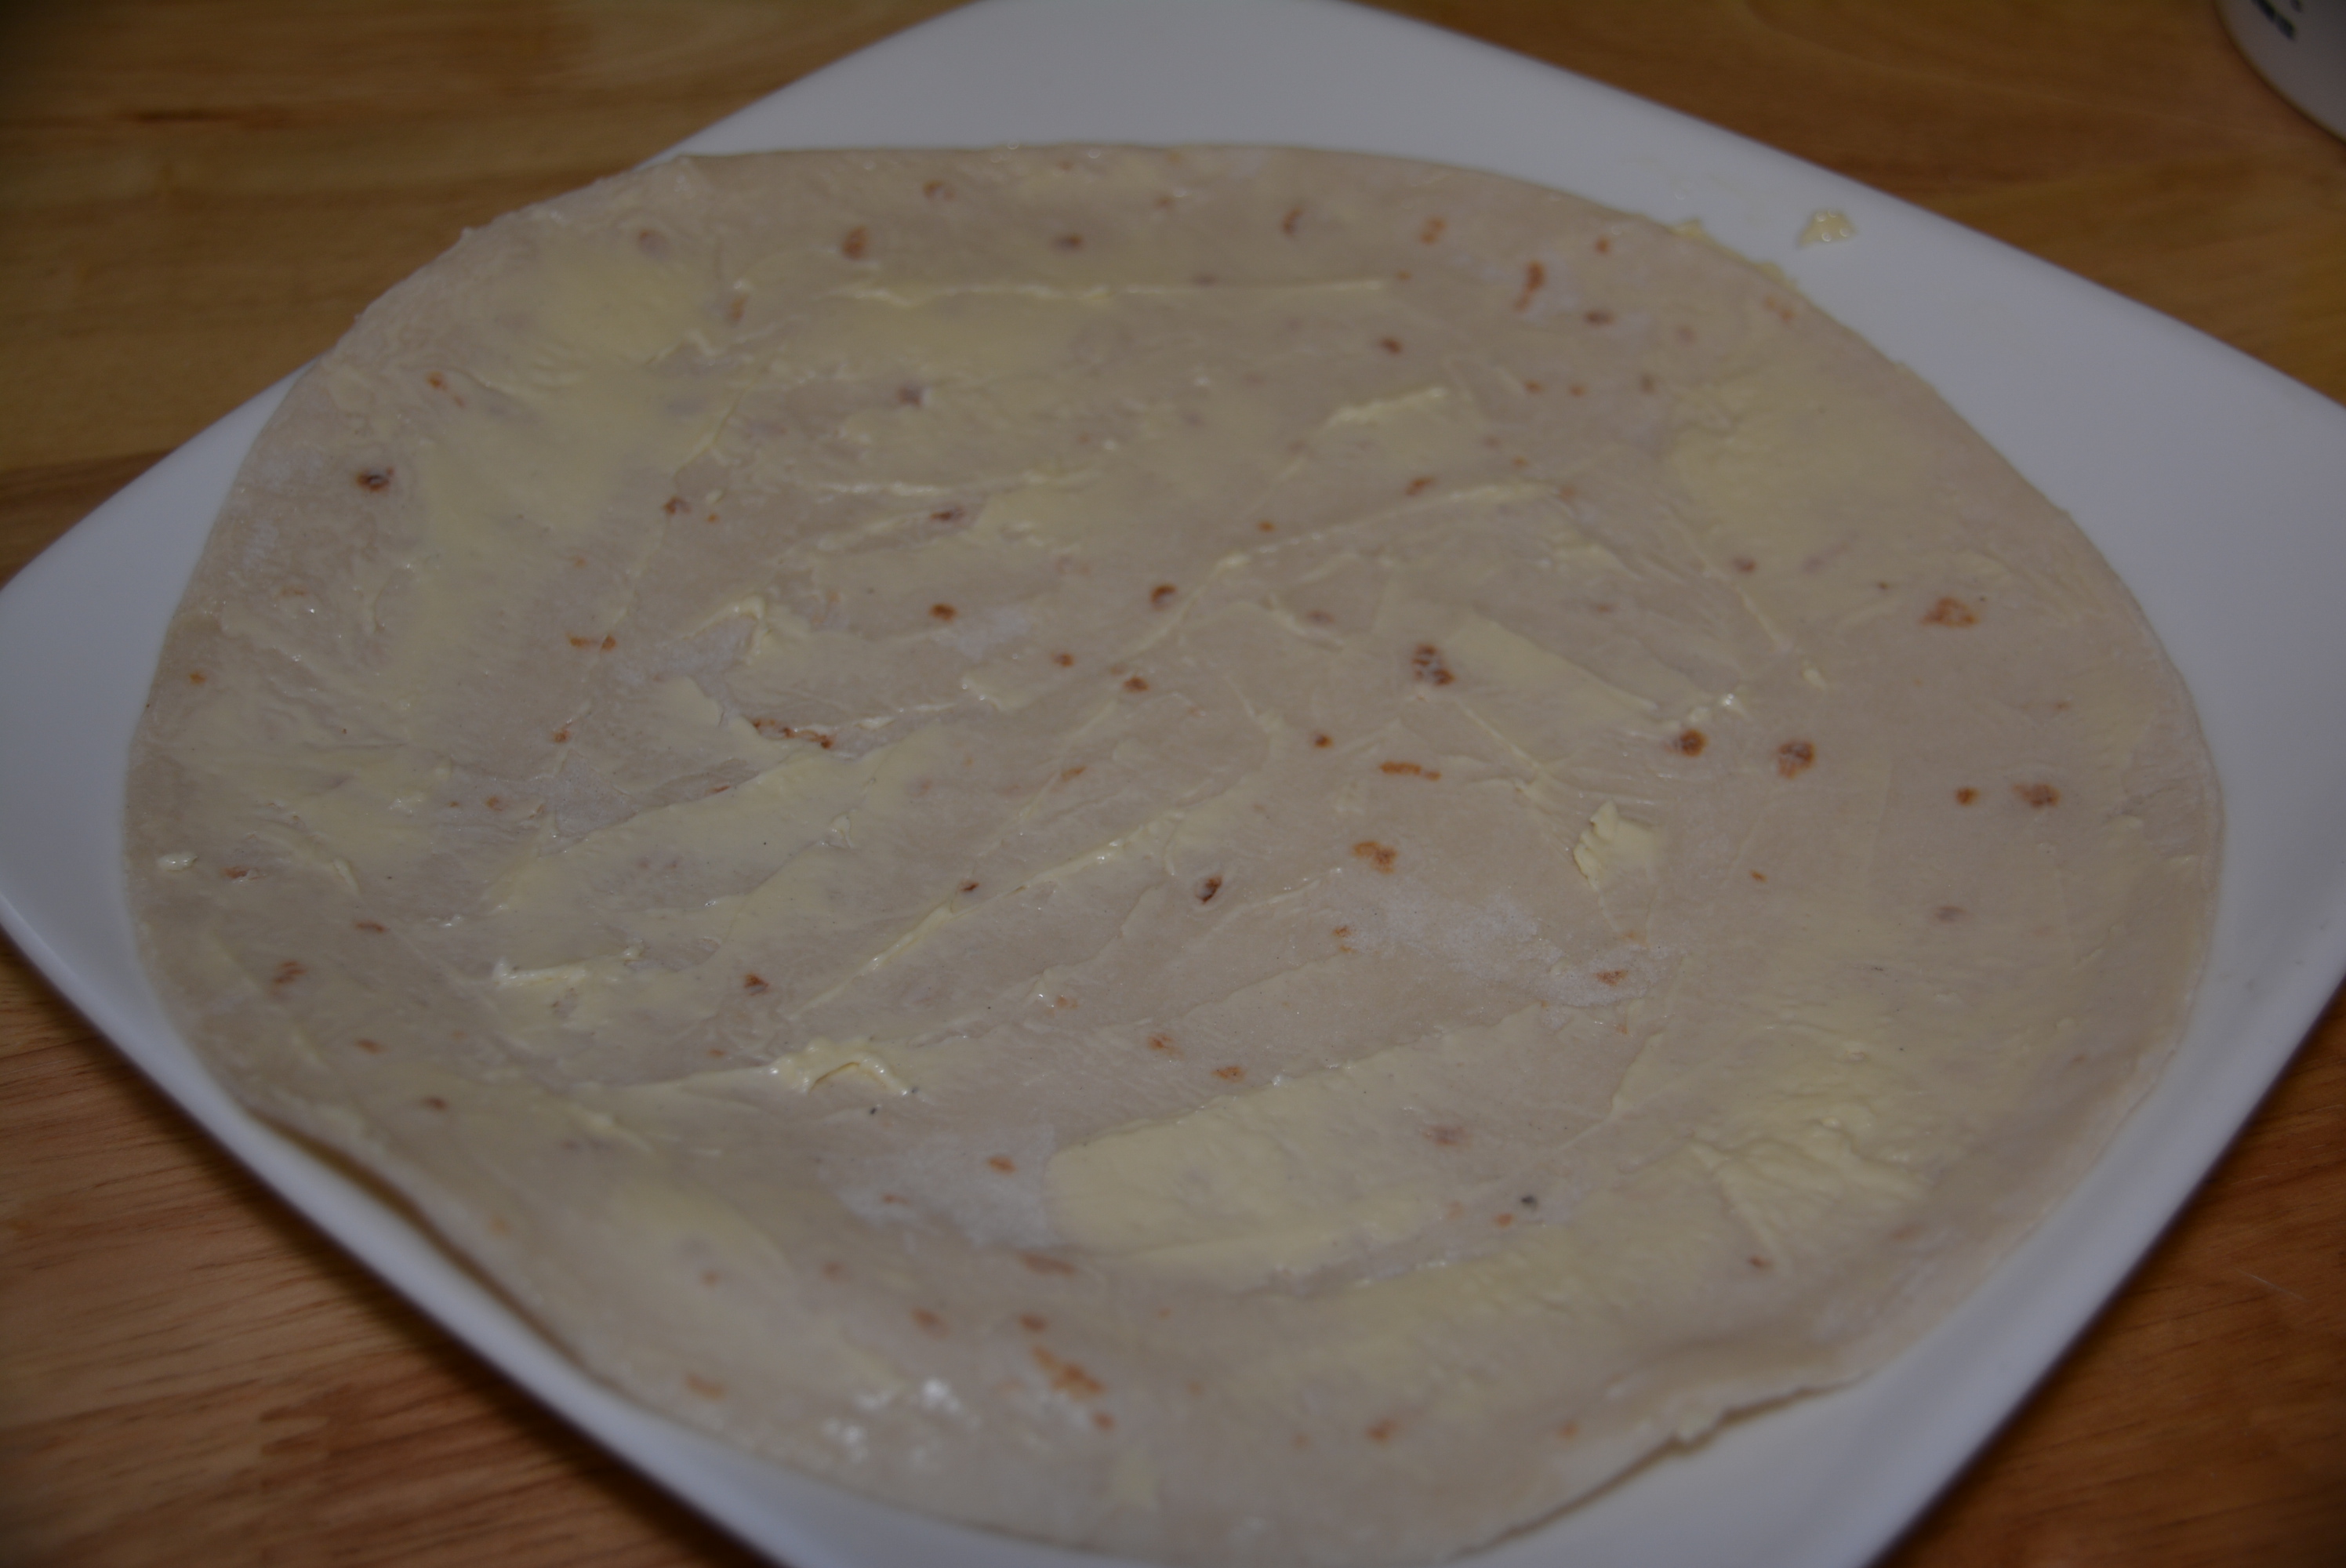
- Warm up skillet at medium heat.
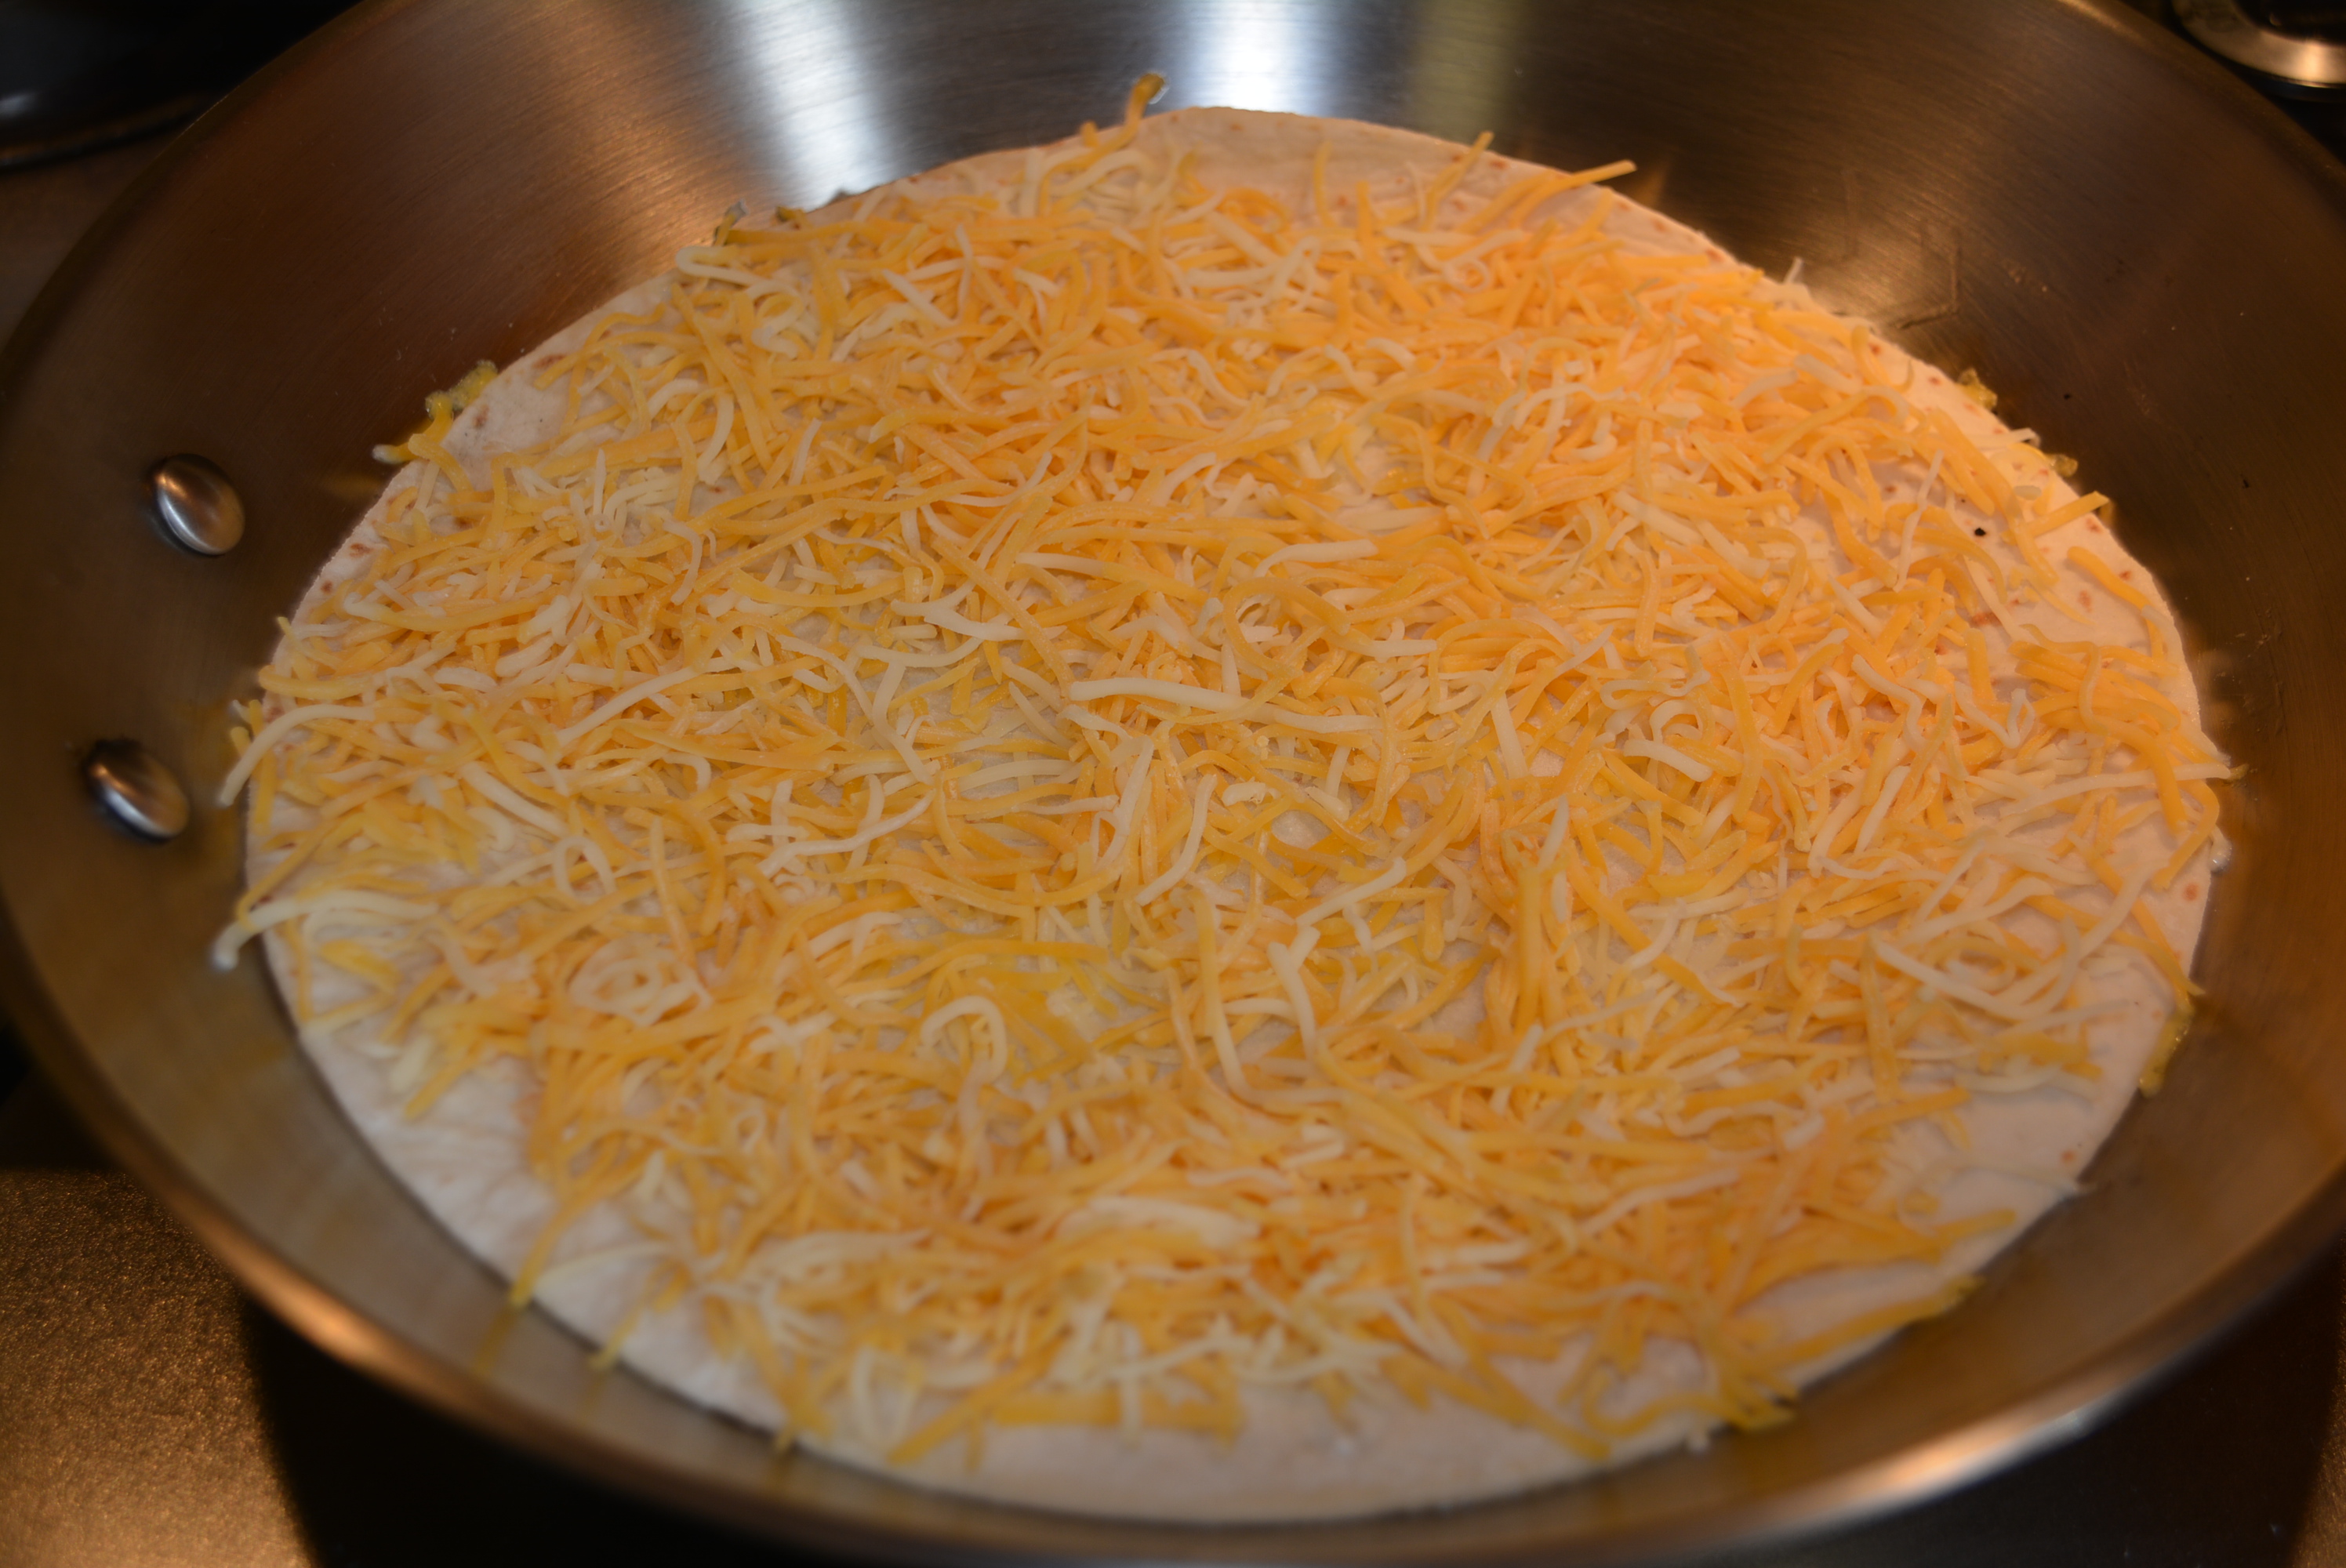
- Add your first buttered tortilla to a warmed skillet, butter side down. Next few steps involve assembling the quesadilla which I do in the skillet. It’s much easier to quickly and carefully assemble the quesadilla in the skillet than trying to move the assembled quesadilla from plate to skillet (this gets quite messy).
- To the top, spread a thin layer of shredded cheddar jack cheese (I’d say about 1/4 cup).
- Add about 1/3 cup diced chicken on top of cheese layer. When I’m in a rush, I use Perdue Shortcuts, either grilled or honey flavored. They’re so simple and easy to use and taste fantastic in this dish.
- Next, add about 1/3 cup chopped broccoli across chicken and cheese, making sure to spread evenly.
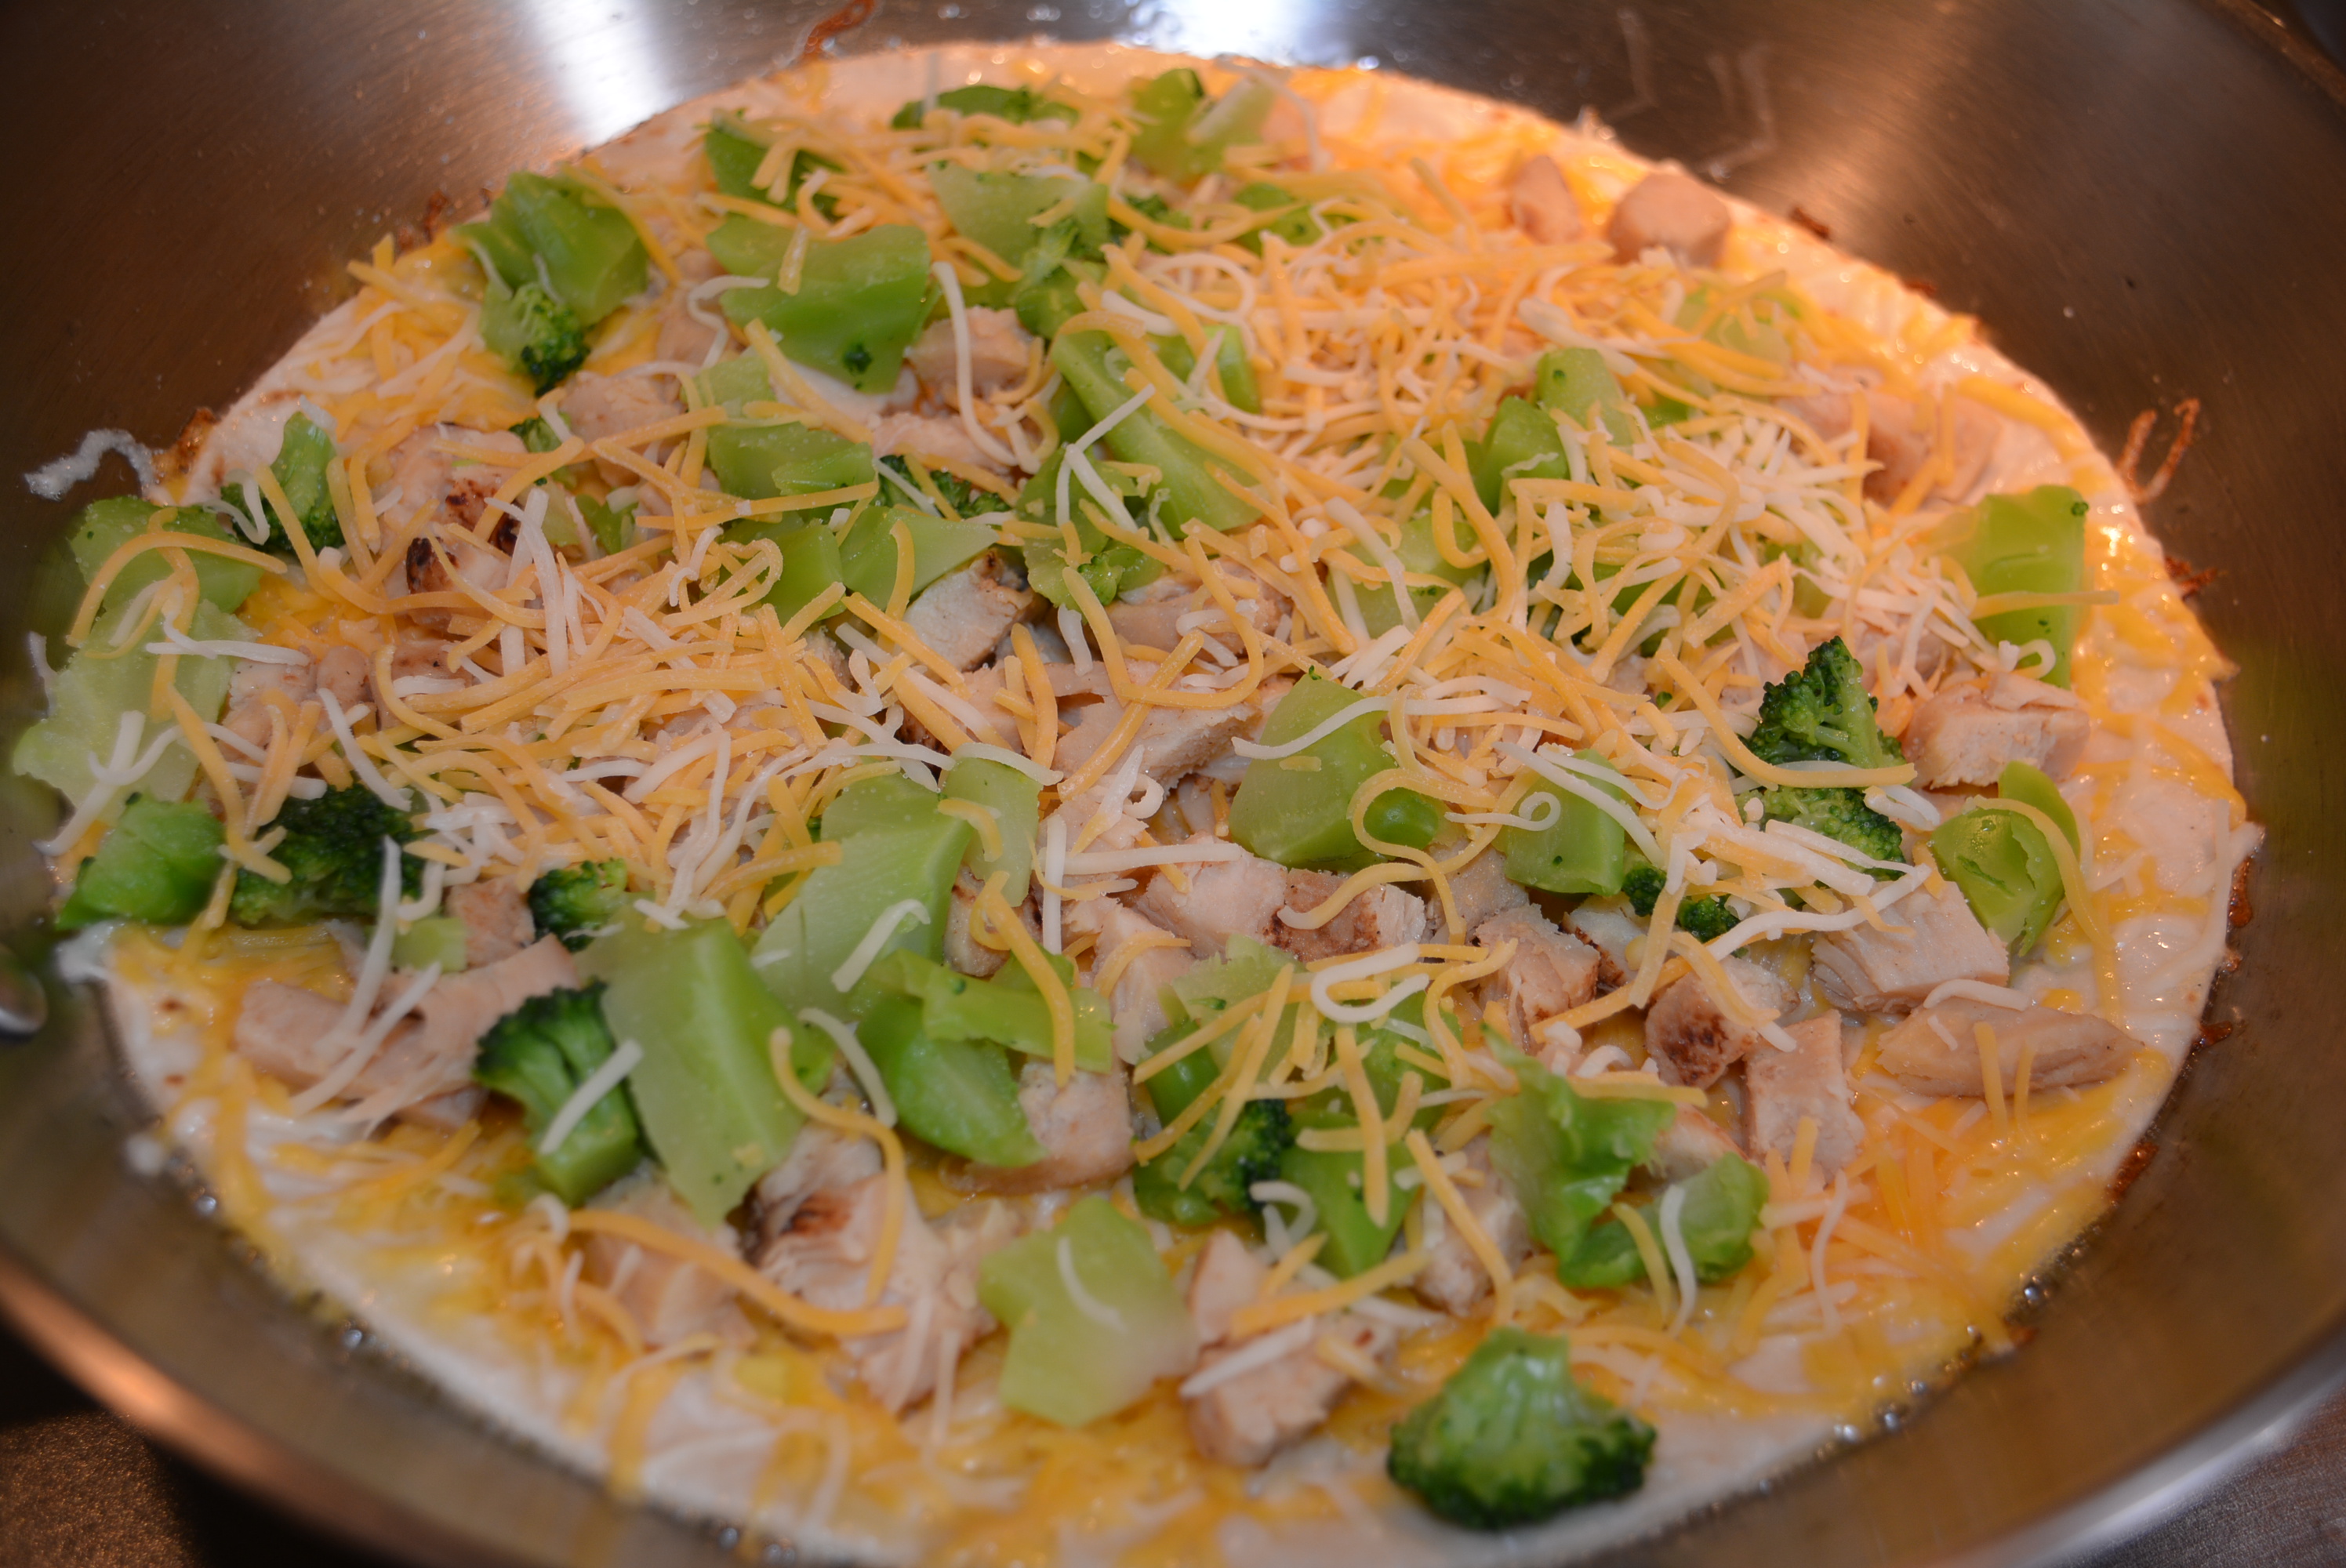
- Toss a little more shredded cheese on top of the fillings, just to help the second tortilla stick.
- Season fillings with a little salt and pepper if you wish and then top them with the second tortilla, butter side facing up.
- After only about 2-3 minutes of cooking on first side, using a spatula, carefully lift the bottom layer up to make sure it’s golden brown.
- Once the bottom tortilla has turned golden brown, using a large spatula carefully flip the quesadilla over so the uncooked, buttered tortilla is now face down on the skillet and the browned tortilla is face up.
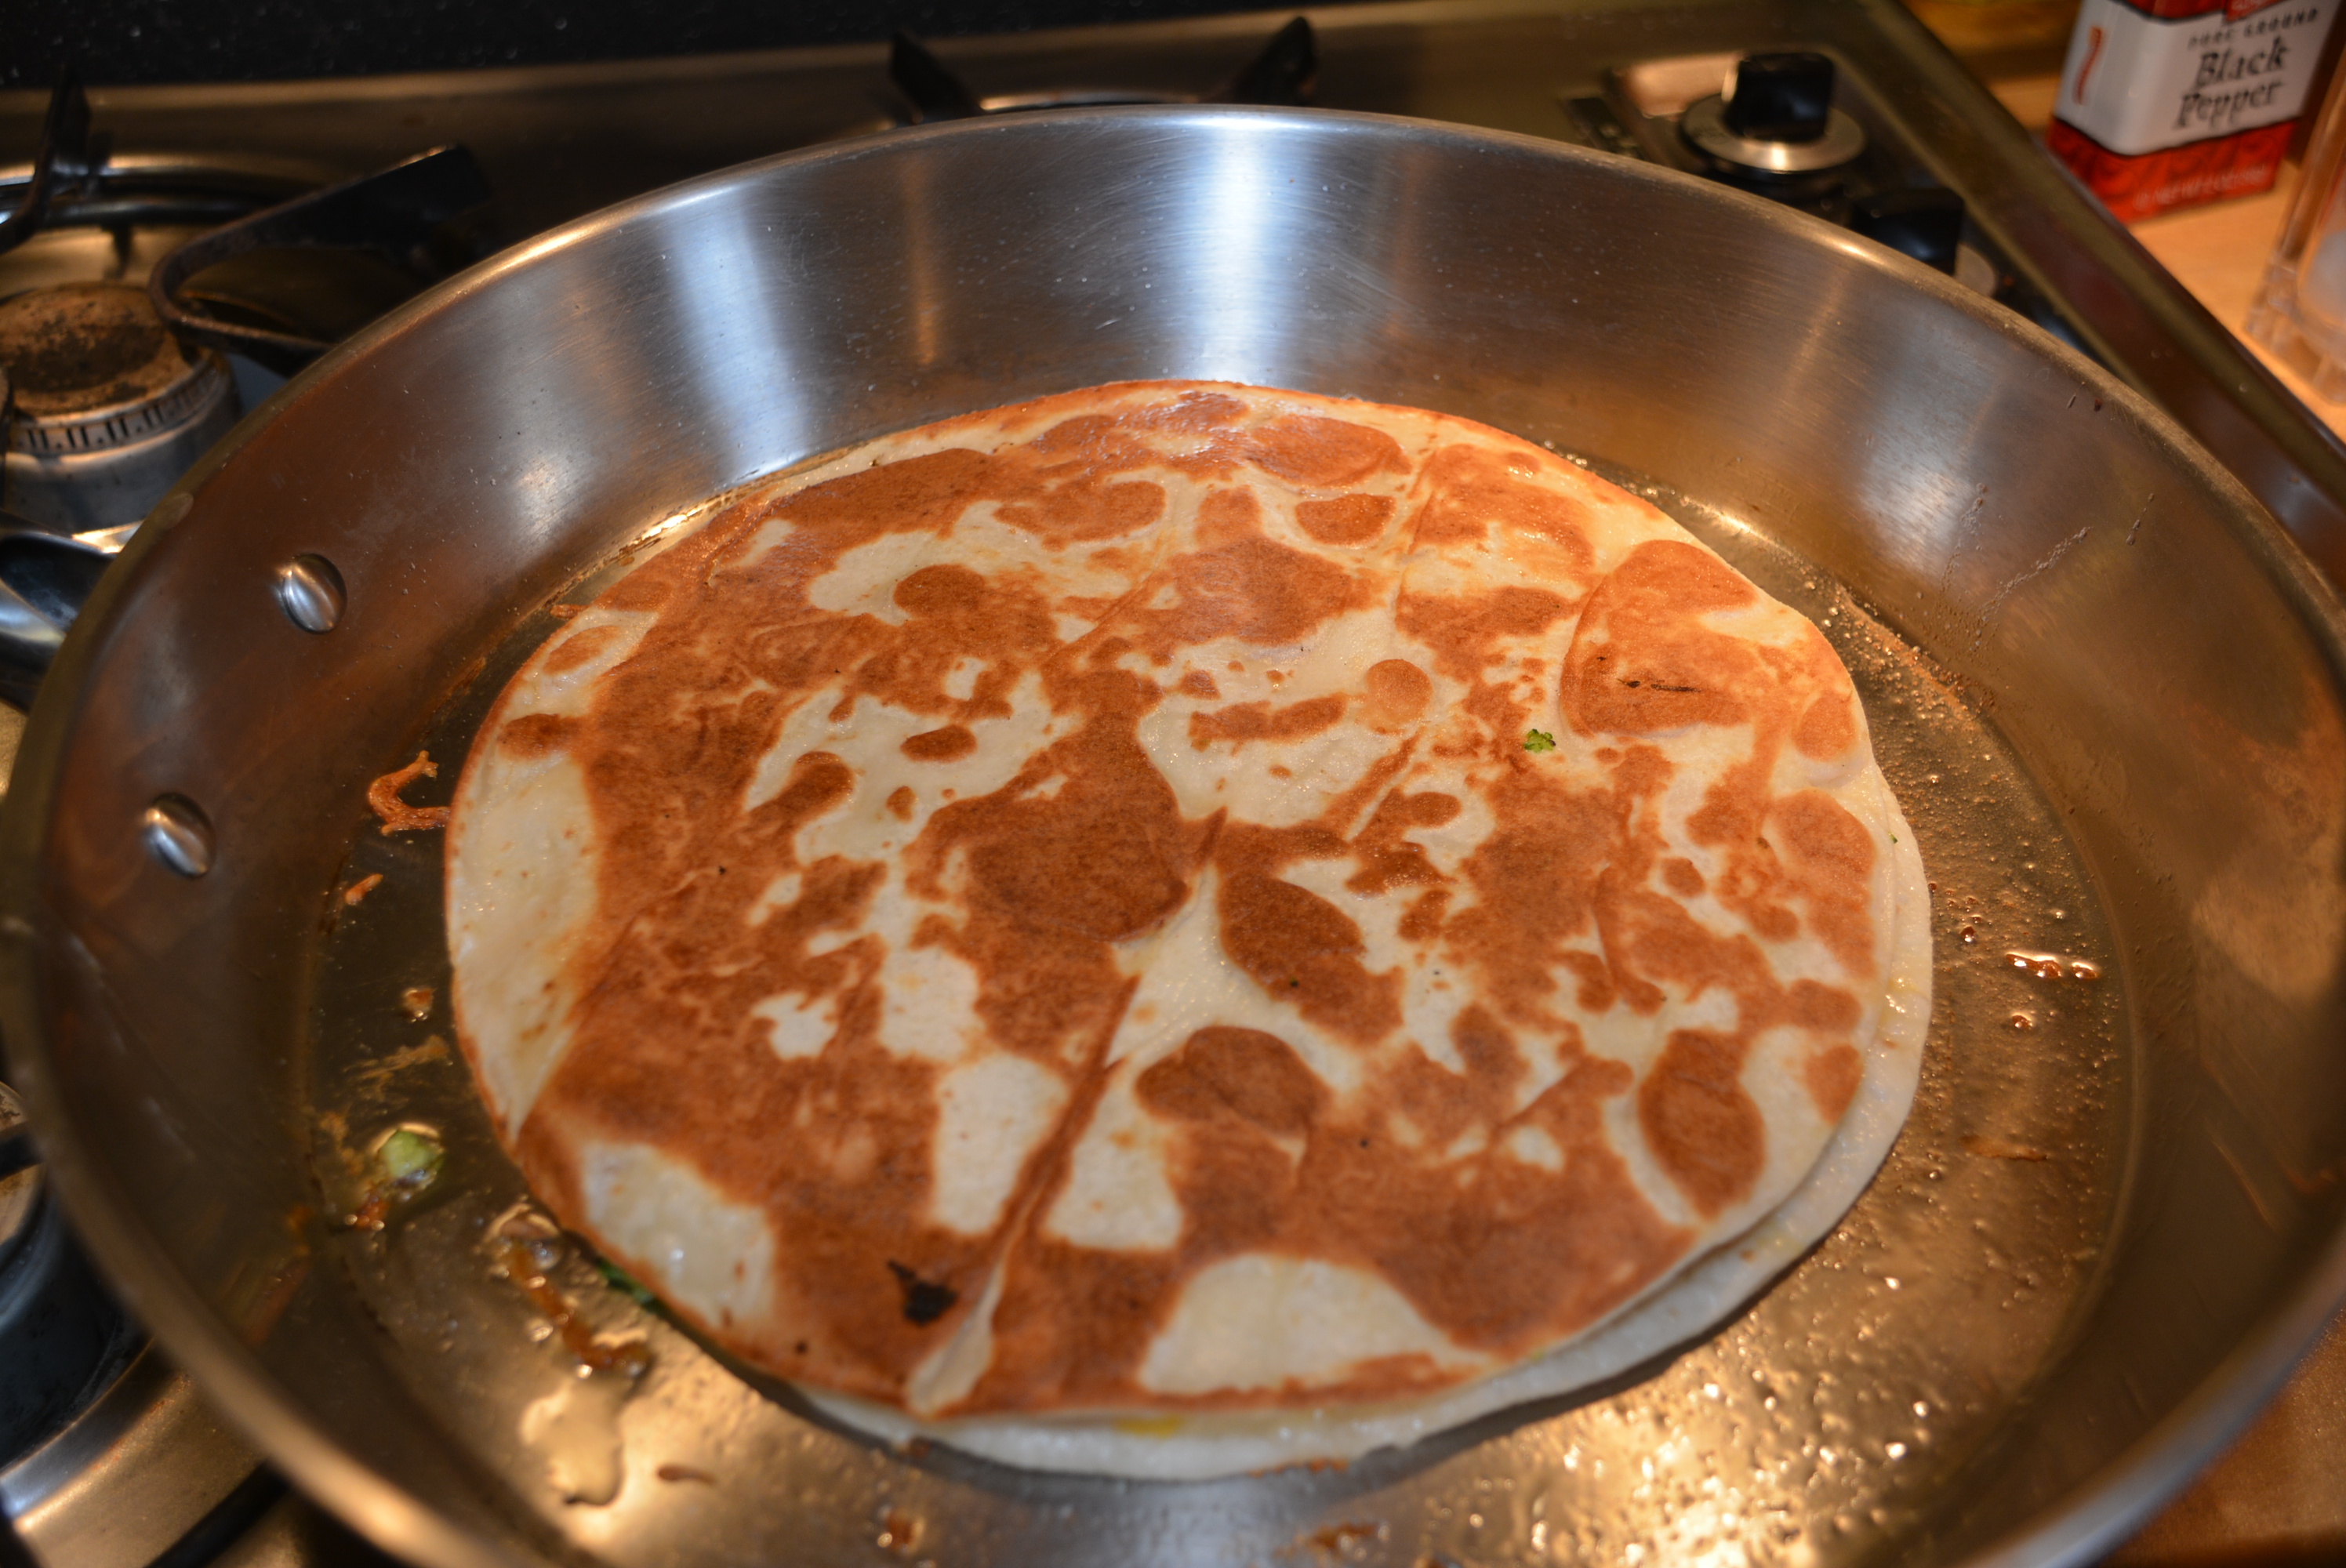
- After an additional 2-3 minutes cooking on the second side, carefully scoop out quesadilla and add it to a plate.
- Using a pizza cutter, cut your quesadilla into as many slices as you prefer.
- Repeat assembly and cooking steps for remaining tortillas and you’ll end up with three large portions of delicious and gluten free chicken, cheese, and broccoli quesadillas!
These quesadillas are a quick and tasty dinner, lunch, or even appetizer for a dinner party! They’re a different take on your traditional zesty quesadillas and satisfy even the pickiest diners. If you have non-gluten free diners in your family just split this recipe between gluten free and non-gluten free tortillas. For our family, I prepared one gluten free quesadilla for myself and two non-gluten free quesadillas for my husband and daughter. As always be careful of cross contamination, but what I like to do is prep all of the ingredients first and then make my gluten free quesadilla before I even take out the non-gluten free tortillas. Also, a little tip about minimizing your dirty dishes, just reuse your skillet between quesadillas. I make mine first so I don’t share a cook top, which is a big cross contamination no no, and then assemble and make the regular quesadillas in the same skillet afterwards.
So grab your favorite gluten free tortillas, I highly recommend Udi’s brand, and put these quesadillas together as soon as possible! I for one am so glad that I came upon these tortillas, as they’re by far the best gluten free tortillas that I’ve yet to experience. I certainly can see many a gluten free wrap and quesadilla in my future, especially during a future pregnancy. What a great pregnancy snack or meal!
Sincerely,
Lindsay
Gluten Free Chicken, Broccoli, And Cheese Quesadillas
2014-07-24 07:48:19
Ingredients
- 1 Package Large Udi's Tortillas
- 1 cup diced, grilled chicken (I used 1 9 oz boxes Perdue Shortcuts.)
- 1 8 oz bag shredded cheddar jack cheese
- 1 cup chopped broccoli
- Butter to cook quesadilla (I used Smart Balance.)
- Salt and pepper to taste
Instructions
- Out of each Udi's Large Tortilla package you'll get 3 quesadillas so you'll be repeating each of these steps three times.
- Spread a thin layer of butter on one side of each tortilla, making sure you cover the entire side of the tortilla.
- Warm up skillet at medium heat.
- Add your first buttered tortilla to a warmed skillet, butter side down. Next few steps involve assembling the quesadilla which I do in the skillet. It's much easier to quickly and carefully assemble the quesadilla in the skillet than trying to move the assembled quesadilla from plate to skillet (this gets quite messy).
- To the skillet tortilla, spread a thin layer of shredded cheddar jack cheese (I'd say about 1/4 cup).
- Add about 1/3 cup diced chicken on top of cheese layer. When I'm in a rush, I use Perdue Shortcuts, either grilled or honey flavored. They're so simple and easy to use and taste fantastic in this dish.
- Next, add about 1/3 cup chopped broccoli across chicken and cheese, making sure to spread evenly.
- Toss a little more shredded cheese on top of the fillings, just to help the second tortilla stick.
- Season fillings with a little salt and pepper if you wish and then top them with the second tortilla, butter side facing up.
- After only about 2-3 minutes of cooking on first side, using a spatula, carefully lift the bottom layer up to make sure it's golden brown.
- Once the bottom tortilla has turned golden brown, using a large spatula carefully flip the quesadilla over so the uncooked, buttered tortilla is now face down on the skillet and the browned tortilla is face up.
- After an additional 2-3 minutes cooking on the second side, carefully scoop out quesadilla and add it to a plate.
- Using a pizza cutter, cut your quesadilla into as many slices as you'd like.
- Repeat assembly and cooking steps for remaining tortillas and you'll end up with three portions of delicious and gluten free chicken, cheese, and broccoli quesadillas!
Gluten Free Mom To Be http://www.glutenfreemomtobe.com/
Gluten Free Cheeseburger Pasta Skillet Dinner: A Family Favorite!
Growing up I’ve never been part of the burger loving group, always more of a hot dog kind of girl. I was simple, a plain hot dog on a fluffy bun and I was all set, and maybe if I was feeling extra adventurous that day I’d add a smidge of yellow mustard but that was rare. After years have passed and I met my husband, my tastes have changed a tad and I’m a bit more willing to try different things. Thank goodness I did too because it turns out that I love my husband’s burgers! He mixes in seasoned salt and worcestershire sauce and makes our burgers more meatball shaped so they keep their juice! Some things don’t really change though, I usually like to keep things simple when I’m topping my burger, just adding some cheese and dill pickles.
Since developing a liking for burgers, this recipe for Cheeseburger Pasta definitely caught my attention. Combining yummy cheesy burger with gluten free pasta cooked perfectly seemed like an amazing idea. Using the base recipe in a Taste of Home magazine, I just tweaked it a little to be gluten free and make it more Gluten Free Mom To Be. It was so simple, and besides the pot to boil your gluten free pasta in, it only required one skillet to throw everything together. Flavor wise, this recipe was amazing, even for a simple girl like myself who admittedly doesn’t like many of these ingredients individually, but together they make magic happen and may have dialed up my adventurous side a little bit more. We loved loved loved this recipe and it goes perfectly with both my gluten free pasta and my daughter and husband’s regular pasta. So pick out your favorite gluten free pasta (I prefer Barilla or Ronzoni) and mix in some cheeseburger ingredient staples and you have one delectable Gluten Free Cheeseburger Pasta Skillet Dinner, a family favorite for sure!
Ingredients:
- 1 3/4 cups uncooked, gluten free elbow macaroni
- 3/4 lb lean ground beef (I usually use 85% or higher if available)
- 2 tbsp finely chopped yellow onion
- 1 can (14 1/2 ounces) no-salt-added diced tomatoes (Tuttorosso states gluten free on their packaging)
- 2 tbsp dill pickle relish (Heinz is gluten free)
- 2 tbsp prepared yellow mustard (French’s yellow mustard states gluten free on their website)
- 2 tbsp ketchup (Heinz is gluten free)
- 1 tsp steak seasoning (Use your favorite gluten free steak seasoning.)
- 1/4 tsp seasoned salt (I use Lawry’s)
- 3/4 cup shredded reduced fat cheddar cheese
Directions:
- Cook pasta according to package directions.
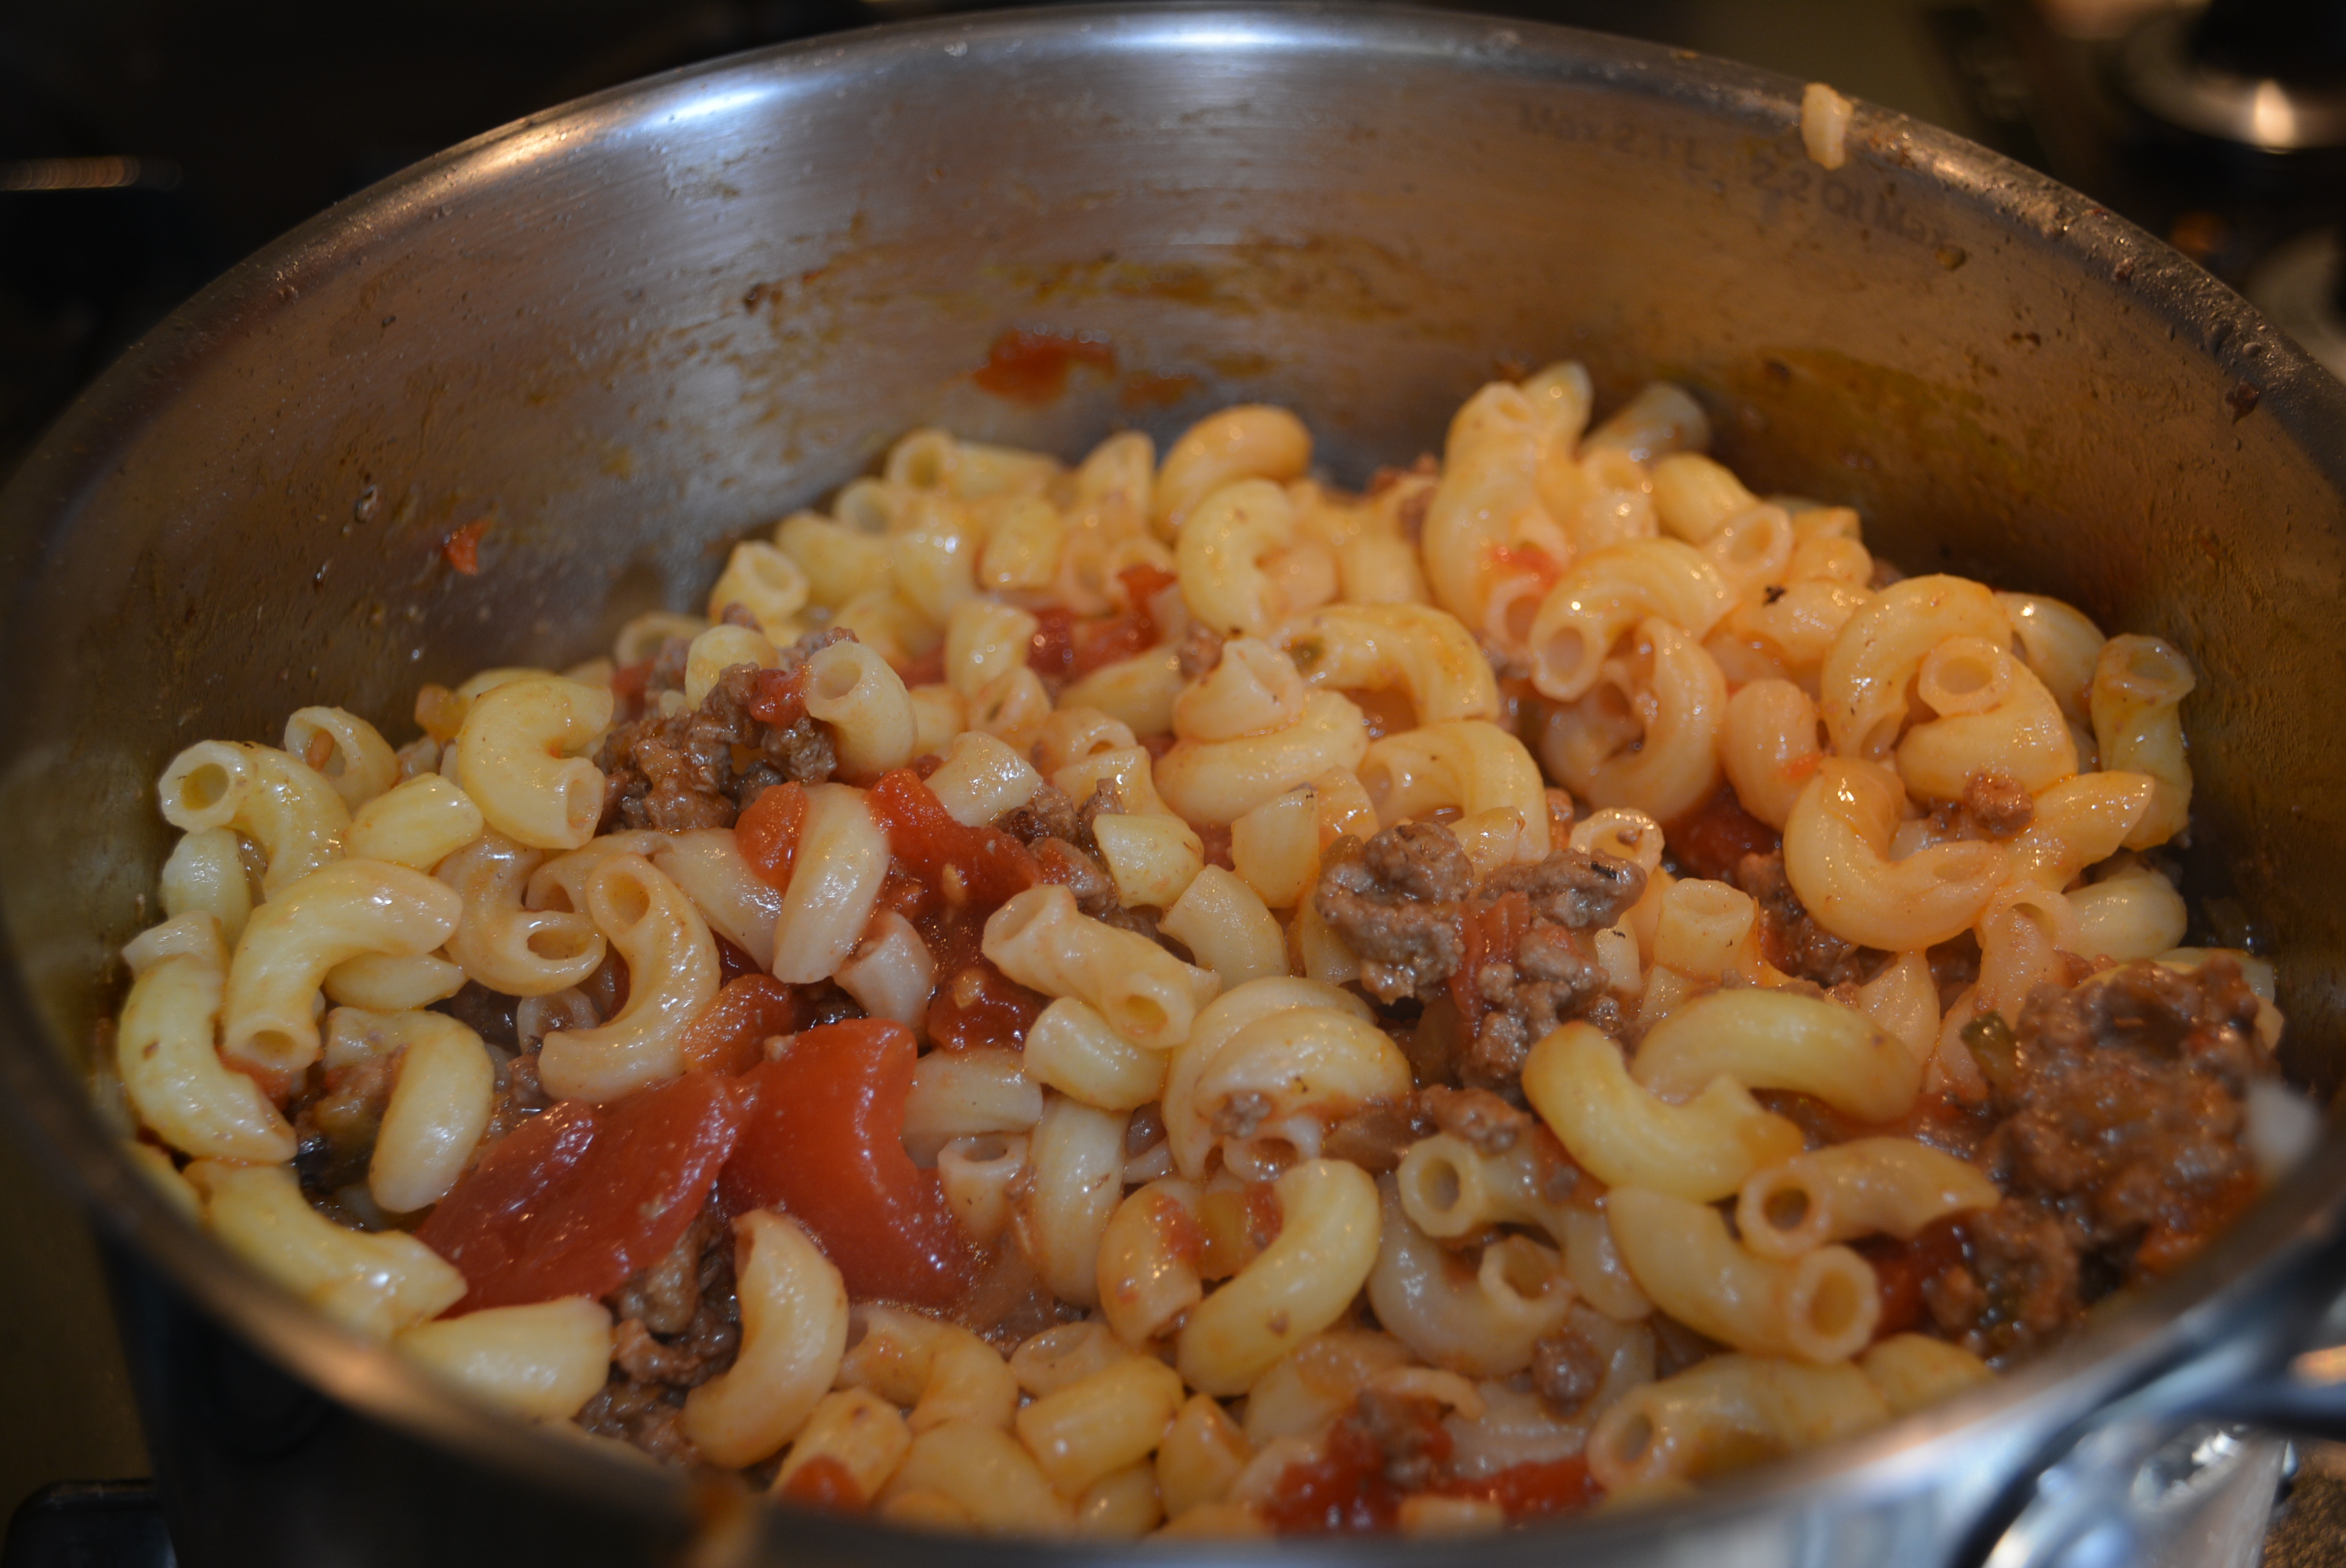
- Once pasta starts cooking, add 3/4 lb lean ground beef and 2 tbsp finely chopped yellow onion into a large skillet and brown over medium heat (cook until meat is no longer pink).
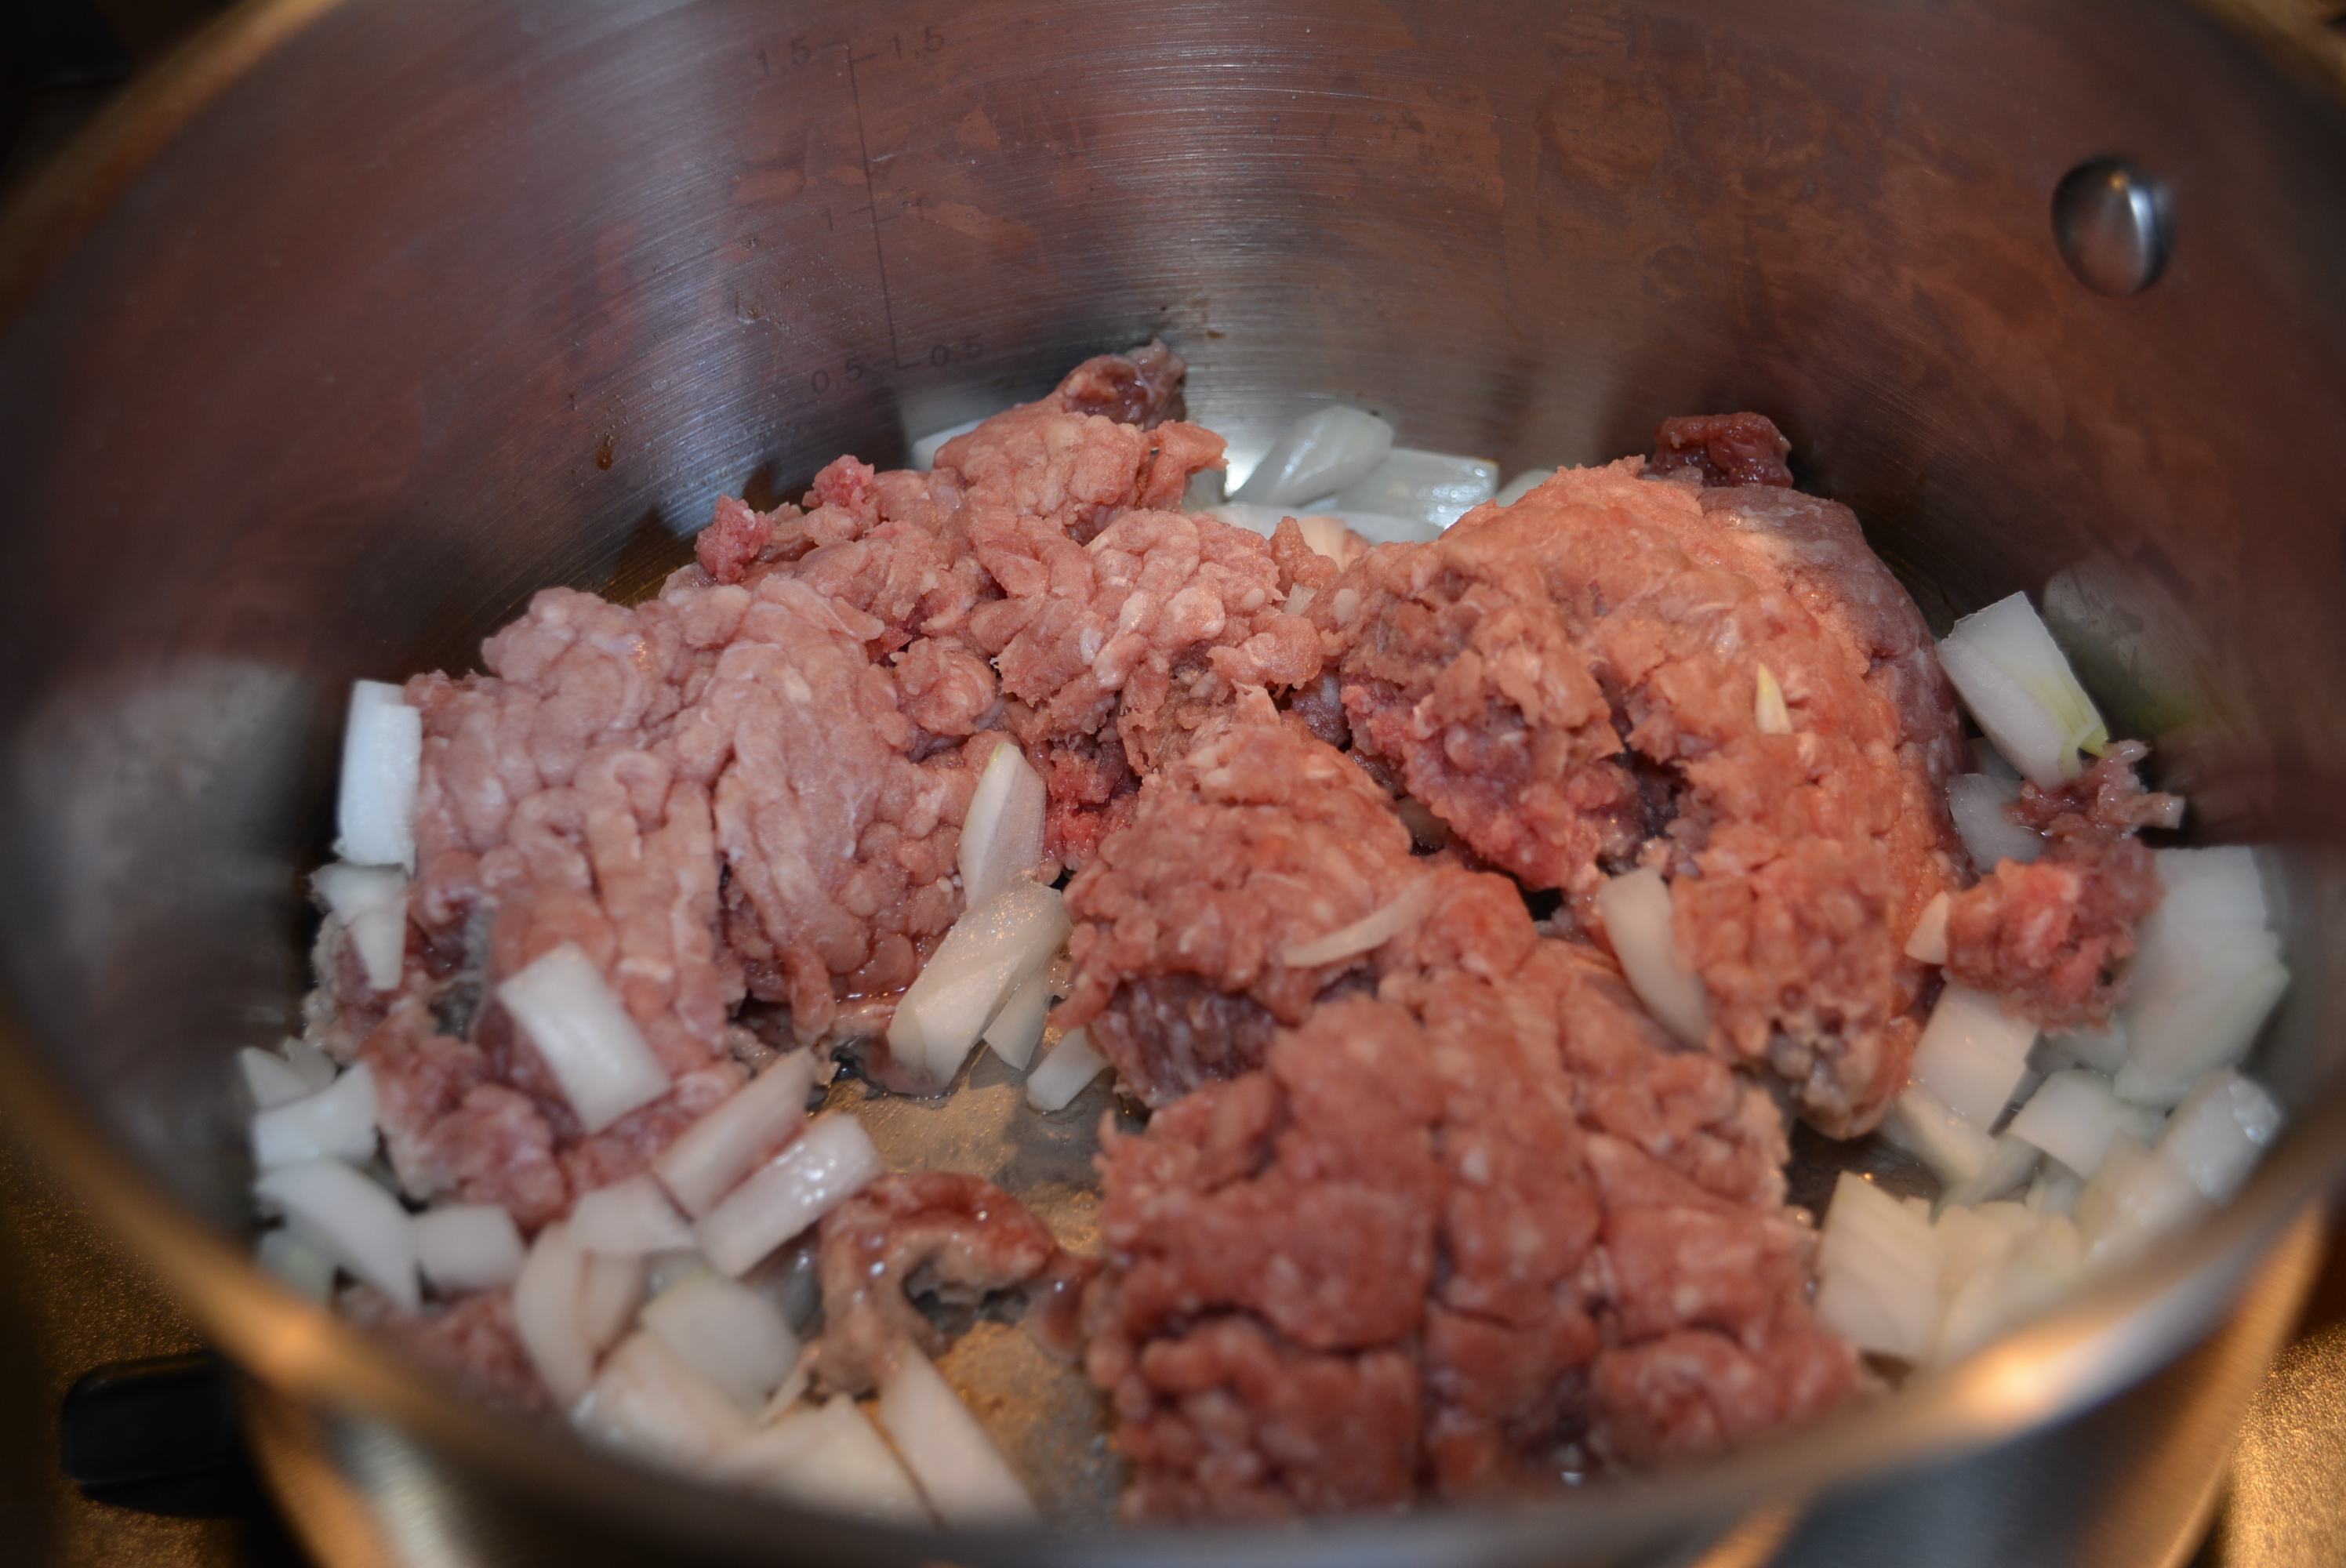
- Drain liquid off meat and onion mixture
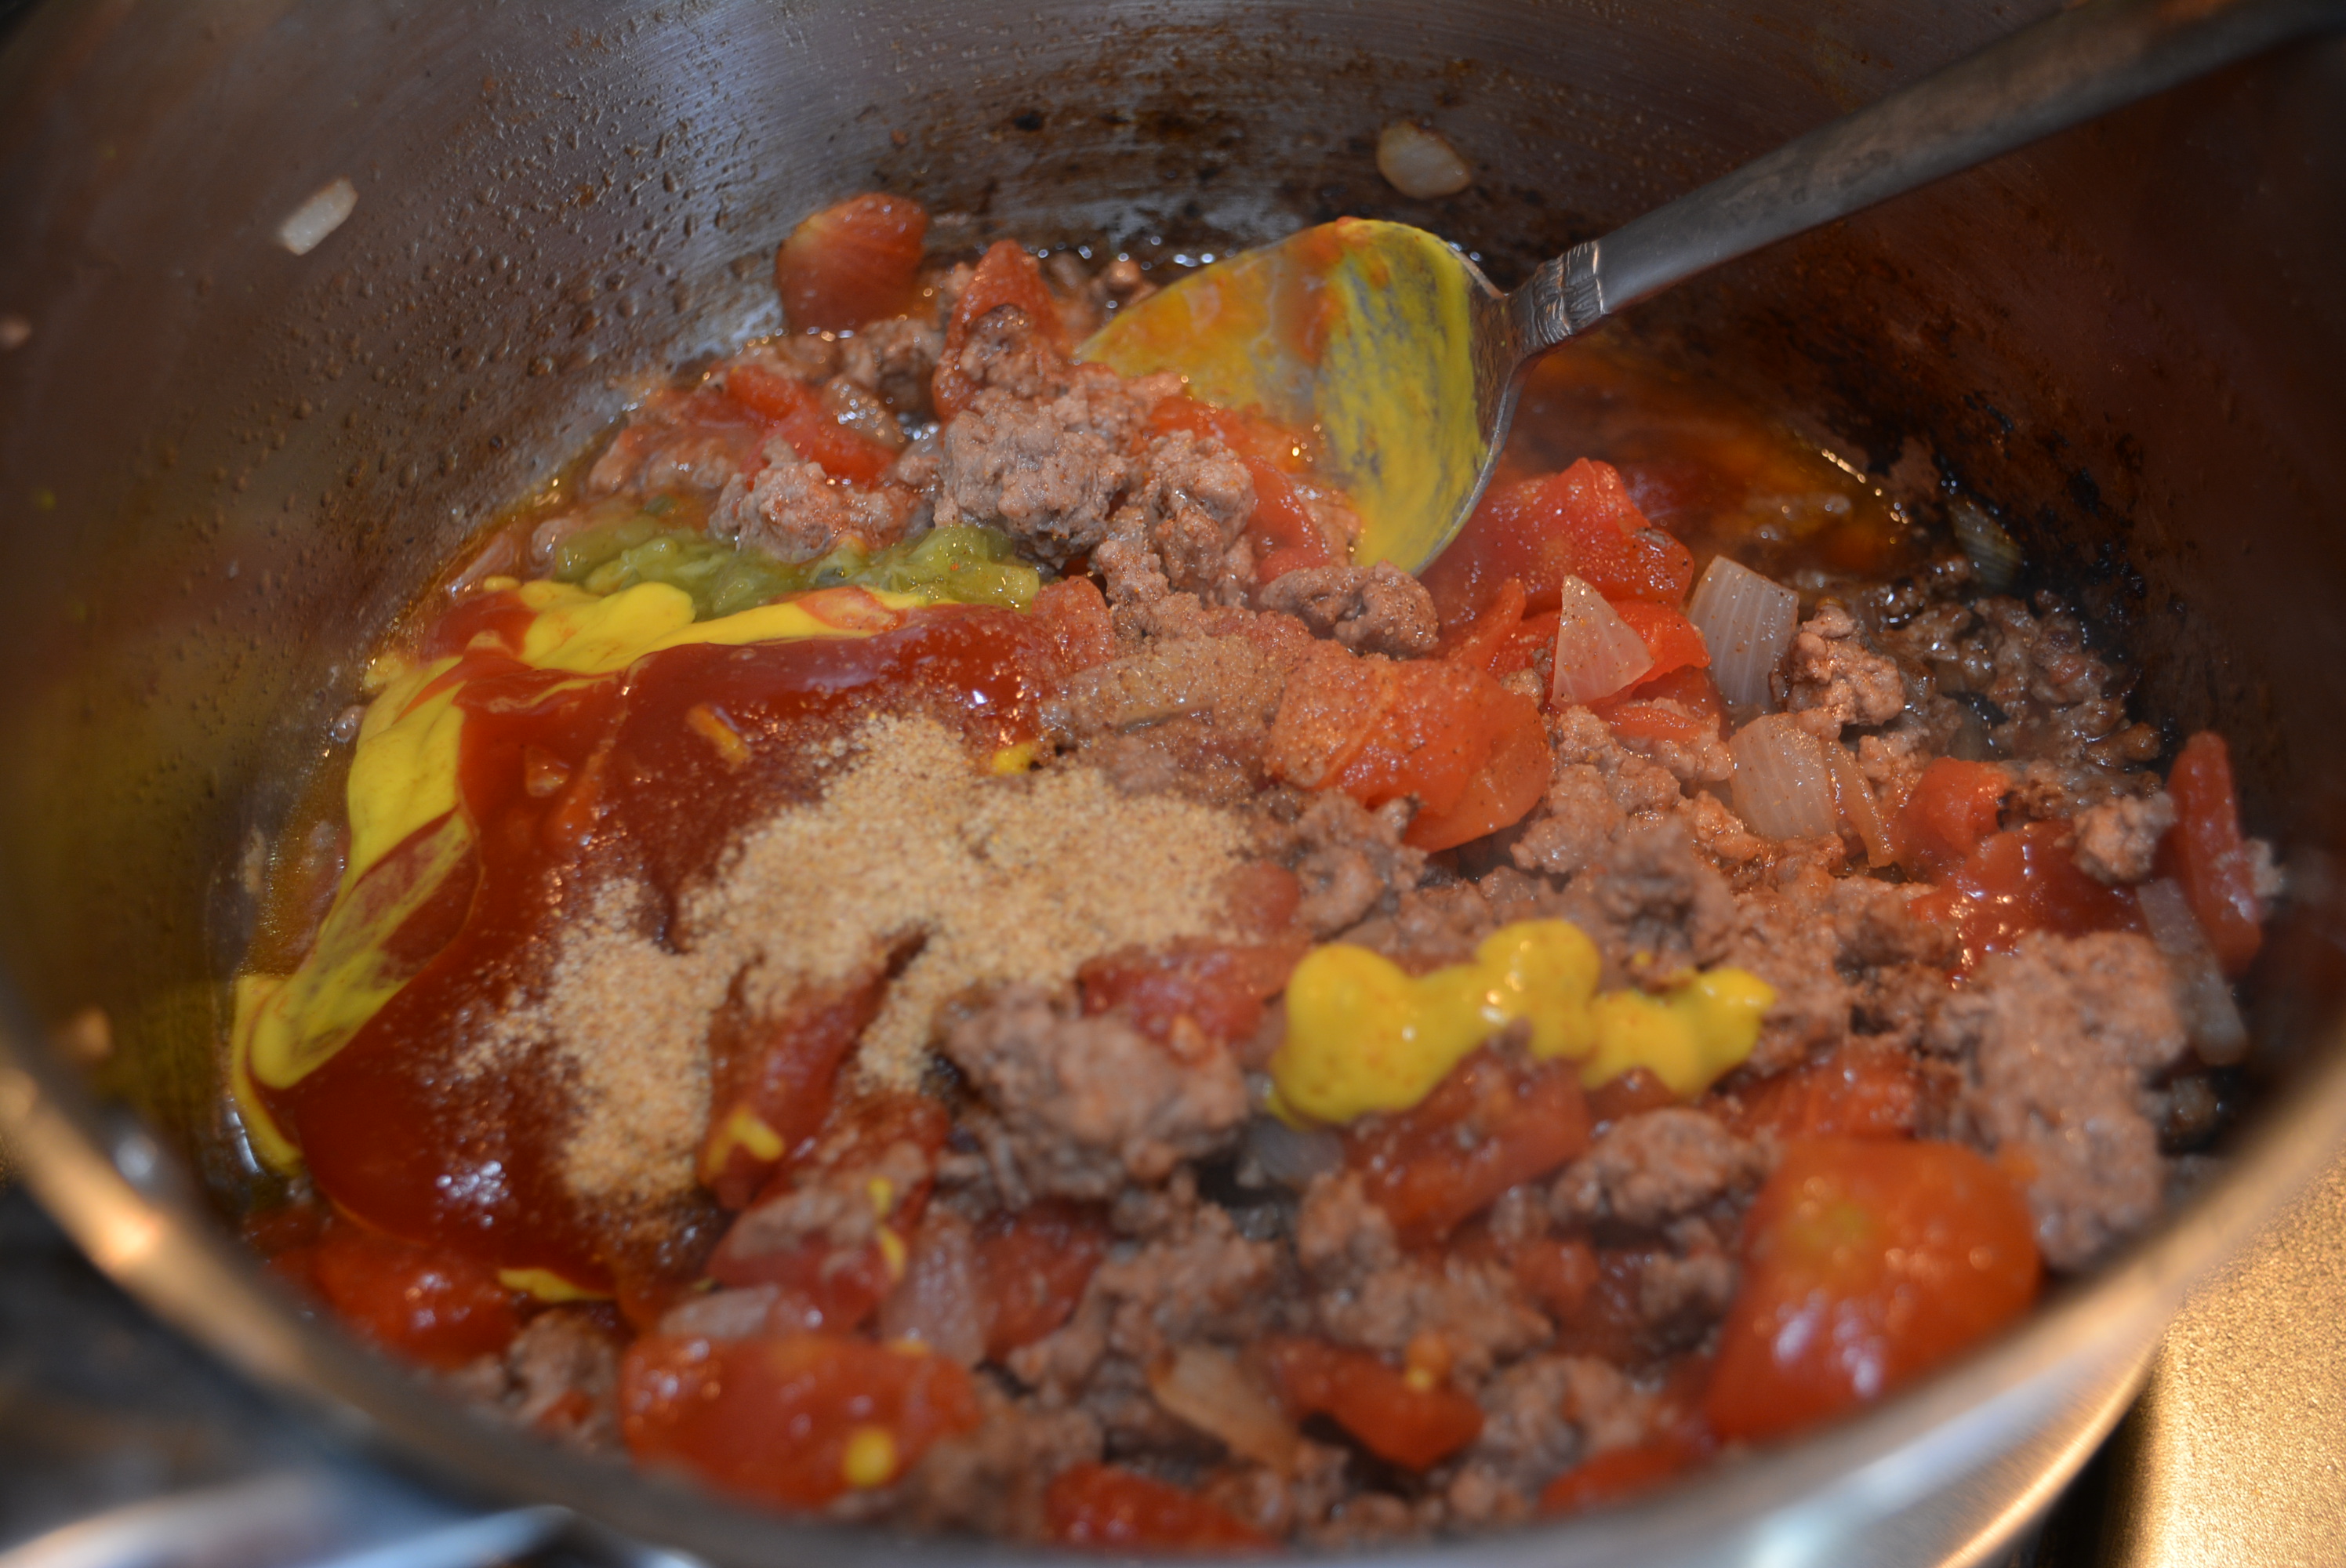
- Once pasta is done cooking, drain and add to the cooked meat and onion mixture in the skillet. (You can add the pasta before you add the additional ingredients as instructed at this step or after; when I made it this time I added in the pasta after I mixed in the other ingredients with the meat and onions and it came out just as tasty.)
- Continue to heat and mix in one 14 1/2 ounce can diced tomatoes, 2 tbsp dill pickle relish, 2 tbsp yellow mustard, 2 tbsp ketchup, 1 tsp steak seasoning, and 1/4 tsp seasoned salt.
- Bring mixture to a boil.
- Reduce heat and simmer uncovered for 5 minutes.
- Remove skillet from heat and sprinkle 3/4 cup shredded, reduced fat cheddar cheese.
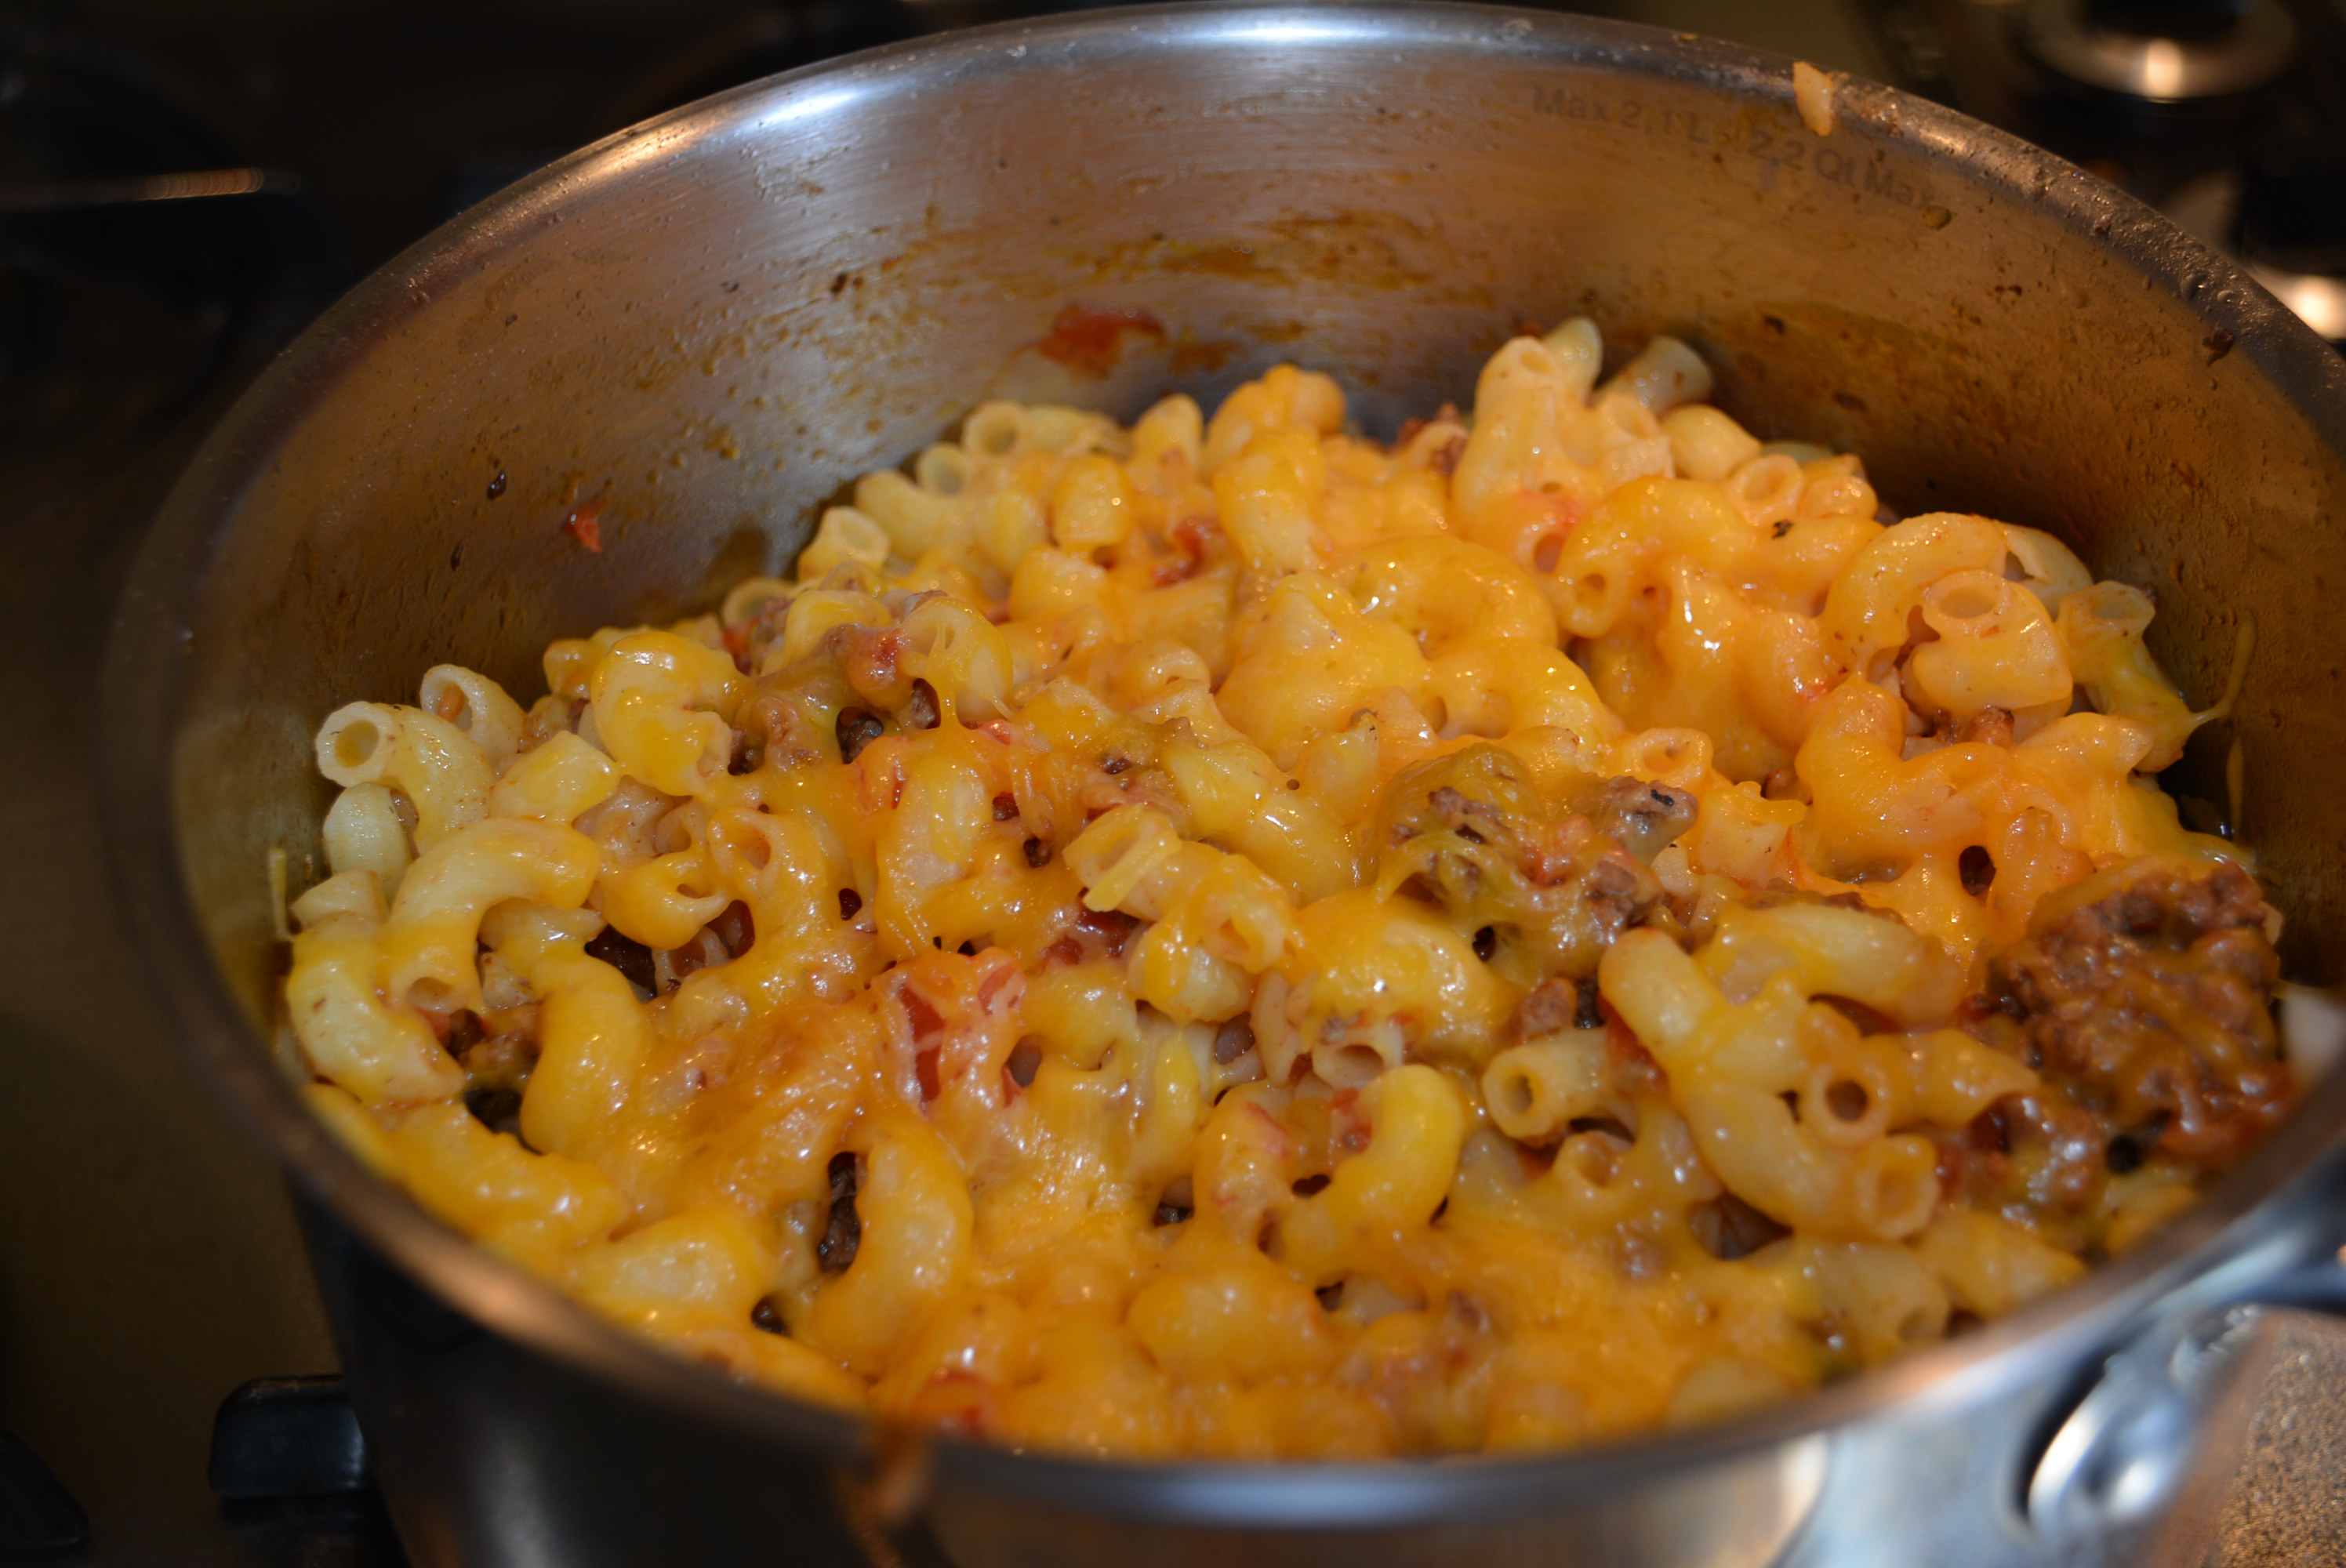
- Cover skillet and let it stand until cheese is melted.
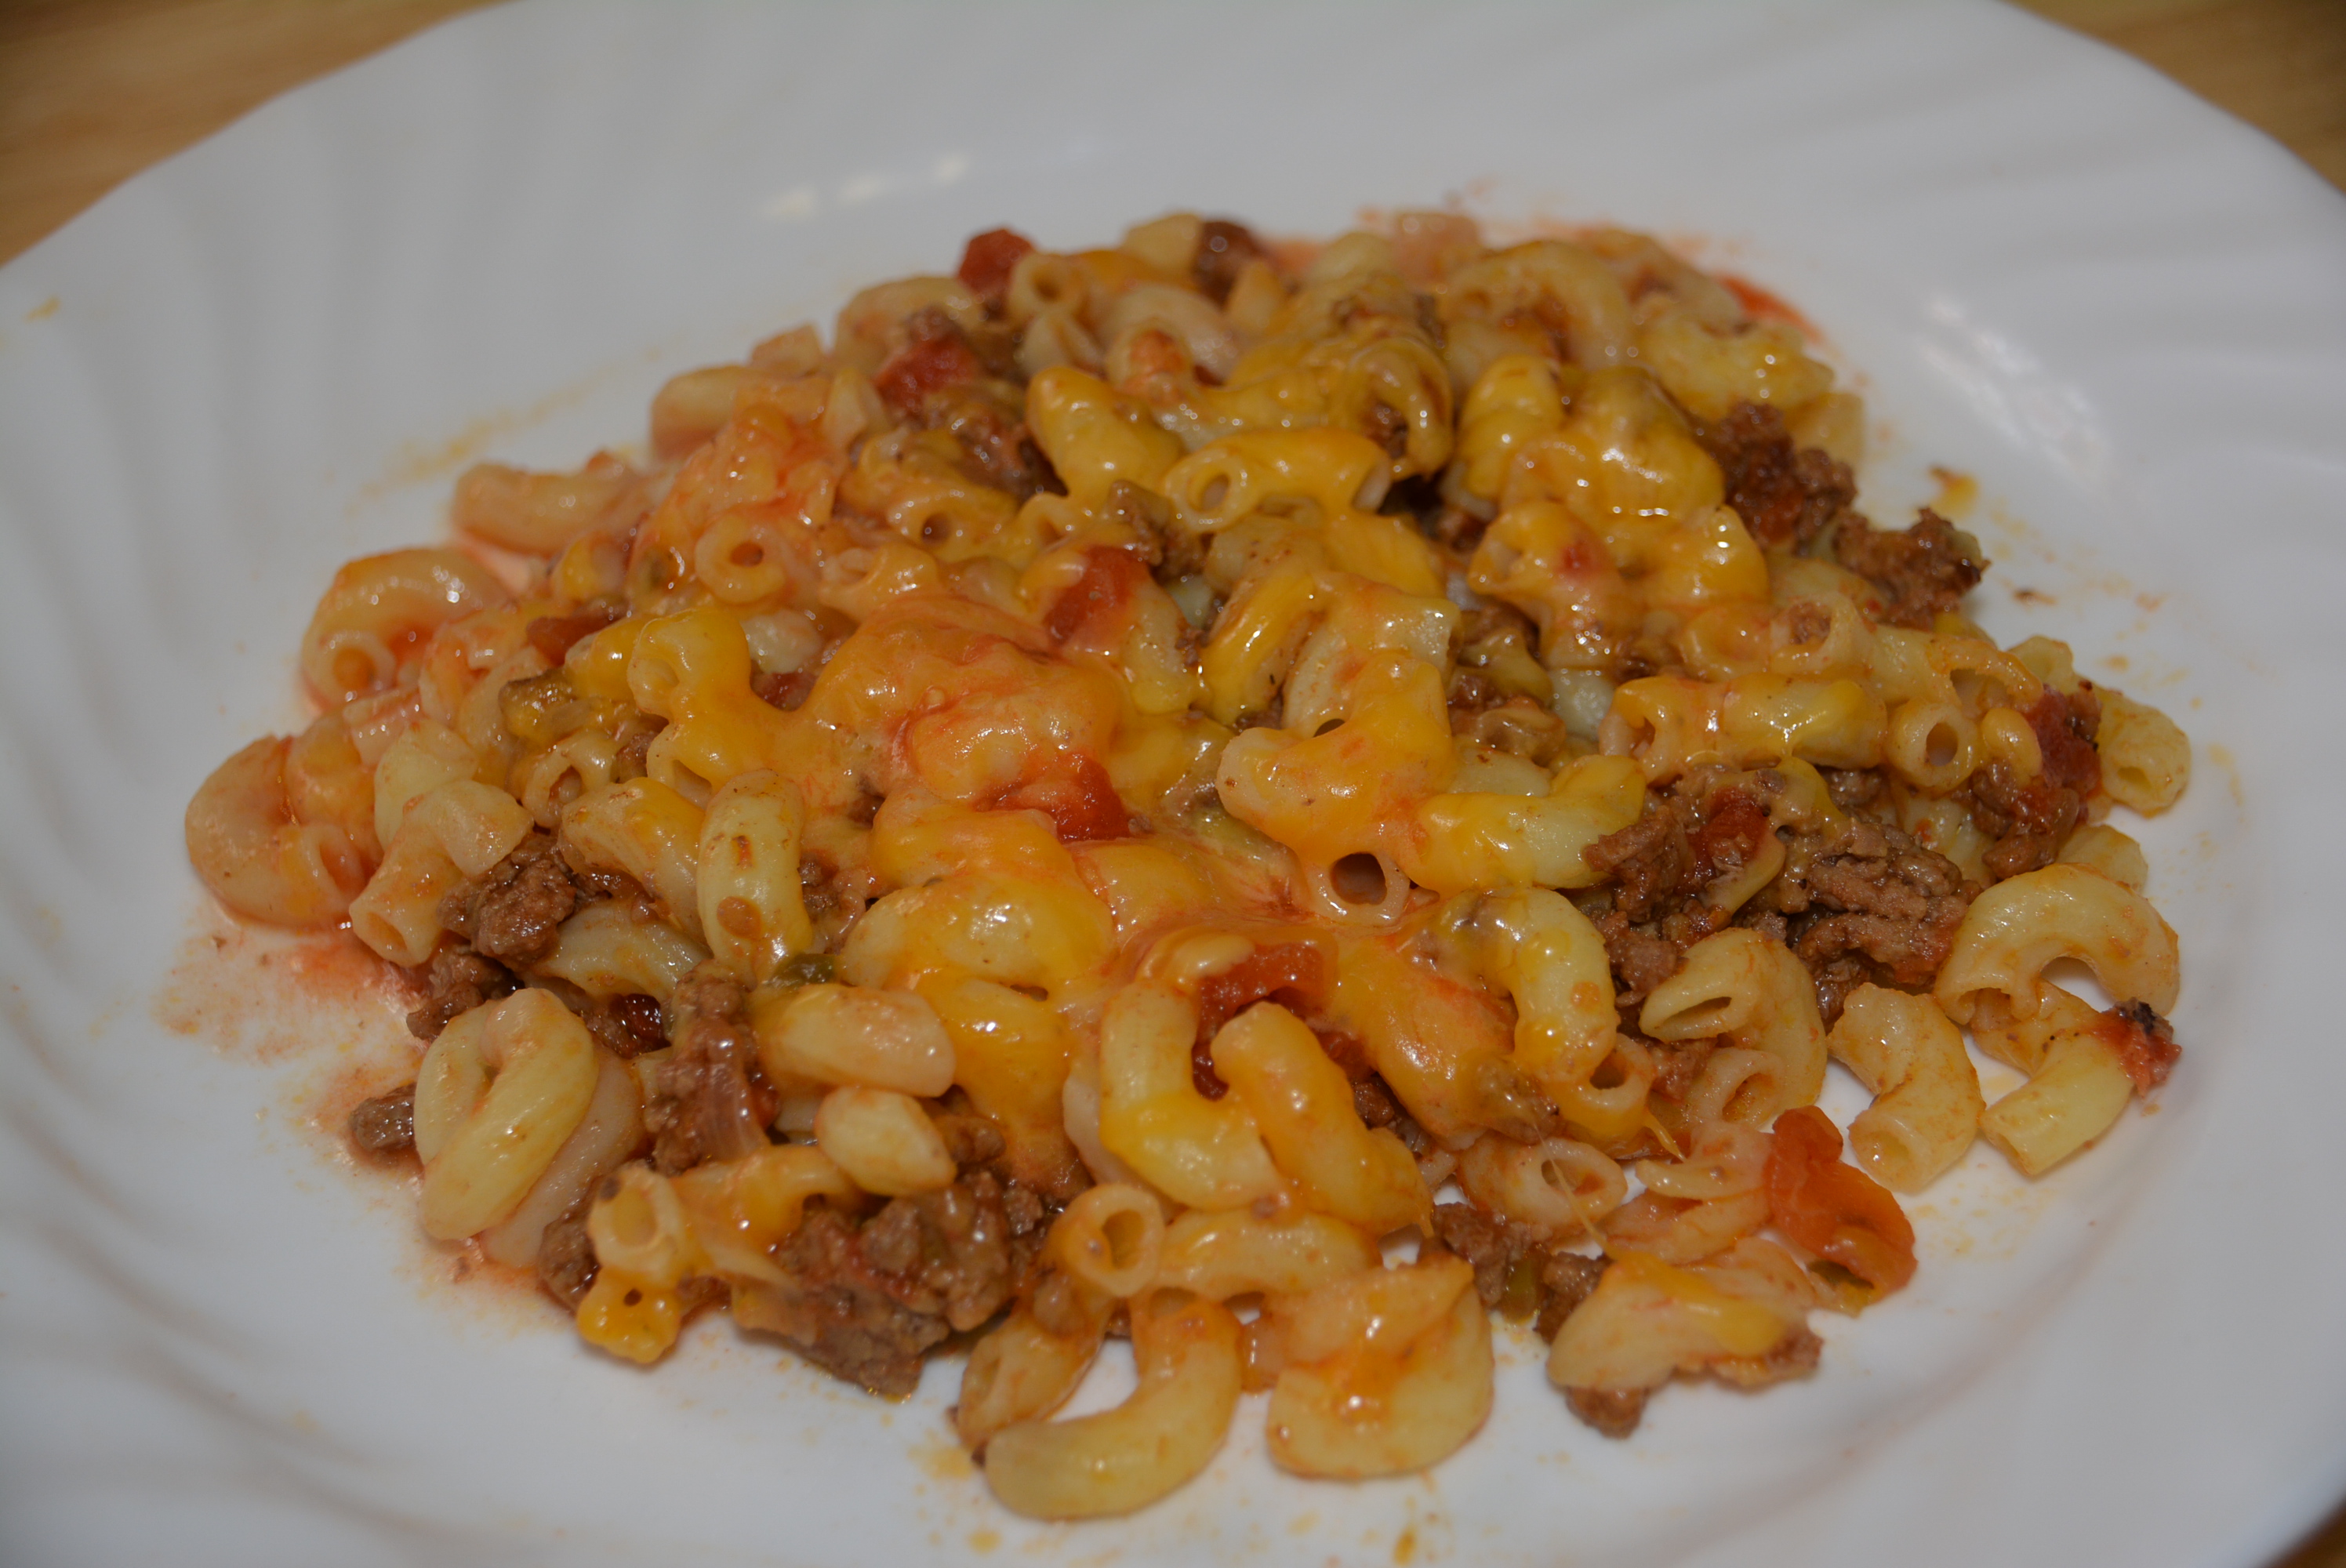
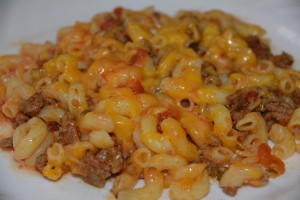
- Serve and enjoy!
The best part for me about cooking and baking are the smells that fill your house. I love walking through and sniffing in the sweetness of a batch of cookies or a cake or the mouthwatering savory flavors in this Cheeseburger Pasta dish. Every time I make this one, my husband comes in after work, takes a deep breath, and immediately draws a huge smile across his face, while running into the kitchen to catch a sneak peak before he even puts his stuff down. My Gluten Free Cheeseburger Pasta Skillet Dinner is definitely a winner in our book in all categories, from smell and presentation to the most important category of taste. It definitely gives you all of the flavors of a big cheeseburger but with the twist of some gluten free pasta mixed in. Add this dish to your weekly meal plan for sure, as your family will definitely be glad that you did!
TIP: If you’re making this dinner for both gluten free and non-gluten free family members as I usually do it’s really simple to split the recipe down the middle and make two separate portions safely. I usually boil up the two different kinds of pastas in their respective pots, and meanwhile I prepare the ground beef mixed with all of the other ingredients first. After the pasta has finished cooking, I just drain the water and divide the Cheeseburger components in the skillet in half between the two pots of pasta, and there you go, Gluten Free and Non- Gluten Free Cheeseburger Pasta Skillet Dinner!
Sincerely,
Lindsay
Gluten Free Cheeseburger Pasta Skillet Dinner
2014-07-13 21:32:59
Ingredients
- 1 3/4 cups uncooked, gluten free elbow macaroni
- 3/4 lb lean ground beef (I usually use 85% or higher if available)
- 2 tbsp finely chopped yellow onion
- 1 can (14 1/2 ounces) no-salt-added diced tomatoes (Tuttorosso states gluten free on their packaging)
- 2 tbsp dill pickle relish (Heinz is gluten free)
- 2 tbsp prepared yellow mustard (French's yellow mustard states gluten free on their website)
- 2 tbsp ketchup (Heinz is gluten free)
- 1 tsp steak seasoning (Use your favorite gluten free steak seasoning.)
- 1/4 tsp seasoned salt (I use Lawry's)
- 3/4 cup shredded reduced fat cheddar cheese
Instructions
- Cook pasta according to package directions.
- Once pasta starts cooking, add 3/4 lb lean ground beef and 2 tbsp finely chopped yellow onion into a large skillet and brown over medium heat (cook until meat is no longer pink).
- Drain liquid off meat and onion mixture
- Once pasta is done cooking, drain and add to the cooked meat and onion mixture in the skillet. (You can add the pasta before you add the additional ingredients as instructed at this step or after; when I made it this time I added in the pasta after I mixed in the other ingredients with the meat and onions and it came out just as tasty.)
- Continue to heat and mix in one 14 1/2 ounce can diced tomatoes, 2 tbsp dill pickle relish, 2 tbsp yellow mustard, 2 tbsp ketchup, 1 tsp steak seasoning, and 1/4 tsp seasoned salt.
- Bring mixture to a boil.
- Reduce heat and simmer uncovered for 5 minutes.
- Remove skillet from heat and sprinkle 3/4 cup shredded, reduced fat cheddar cheese.
- Cover skillet and let it stand until cheese is melted.
- Serve and enjoy!
Adapted from Taste of Home
Adapted from Taste of Home
Gluten Free Mom To Be http://www.glutenfreemomtobe.com/
Pacific Organic Gluten Free Soups
![]()
In the gluten free world it’s quite difficult to find a good and safe bowl of soup. A major brand that reminds probably each one of us of a warm childhood memory is Campbell’s Soup. Unfortunately Campbell’s Soups, as similar to many soups in restaurants and at your local grocery store, contain wheat and are thus off limits to those that are gluten free. Sadly, I had to say goodbye to nice warm bowls of chicken noodle and tomato soup on those cold winter days until I came upon Pacific Soups. Pacific is a huge brand of organic products ranging from drinks to soups to broths of all kinds. One of my favorite products though is their Creamy Tomato soup which is deliciously gluten free. More than just the Creamy Tomato soup is gluten free though, they offer so many gluten free soups and other products so be sure to check out Pacific’s gluten free products. See something that you want to try? Maybe that fantastic Creamy Tomato soup, which has by the way turned into my daughter’s new favorite lunch? Print out this coupon here and save a little on your purchase!
Sincerely,
Lindsay
A Reliable Gluten Free Dining Experience That Can Be Enjoyed By All: Thank You P.F. Chang’s!
Okay so I guess I’ve been bitten by the Chinese food bug lately. I blame Disney; ever since our trip a few months back and I enjoyed that fabulous Pan-Asian noodle dish at Kona Cafe, I’ve been craving Asian inspired cuisine like crazy. As I eluded to yesterday, when I’m not enjoying my homemade Chicken And Green Veggie Stir Fry at home, I’m getting my Chinese food fix at our local P.F. Chang’s. For those of you who haven’t been to a P.F. Chang’s, you absolutely must try it, their gluten free menu is fairly large and offers some very tasty Asian cuisine.
Now, anytime I venture out of the house to attempt a gluten free meal I feel incredibly nervous, with a bit of anxiety. It’s actually kind of sad to feel that way about having a night off from cooking and enjoying a meal out with your family, but unfortunately everywhere in the world is just not quite as prepared to offer entirely gluten free food causing myself to be glutened. Sadly I have been glutened before and it is an excruciating experience for me, so I never take eating out lightly at all. I usually only go to places that have had a great reputation as far as allergy free cooking is concerned, also they have phenomenal reviews from other gluten free diners, and finally that offer an impressive gluten free menu that truly demonstrates their desire to accommodate gluten free diners by not only offering a large variety but also items that include all of their parts and not just a plain piece of meat. That being said, it’s obvious that I’m extremely selective on our locations when we dine out, but hey I have to be.
Over the past few years, we’ve dined at P.F. Chang’s and will keep dining there as each and every experience that we’ve had has been nothing but impressive and enjoyable. Their staff is always extremely knowledgeable and they can accommodate not just gluten free folk, but allergies of all shapes and sizes, as even my dear nephew who has seemingly every food allergy under the sun has even successfully dined there without any reactions. You feel the love after just sitting down and taking a look at the menu and seeing their pretty large gluten free section, right there in the main menu, that’s right no separate menu for us! (Just a tip, if you have any other kind of food allergy, just request another menu that specifically addresses that allergy.)
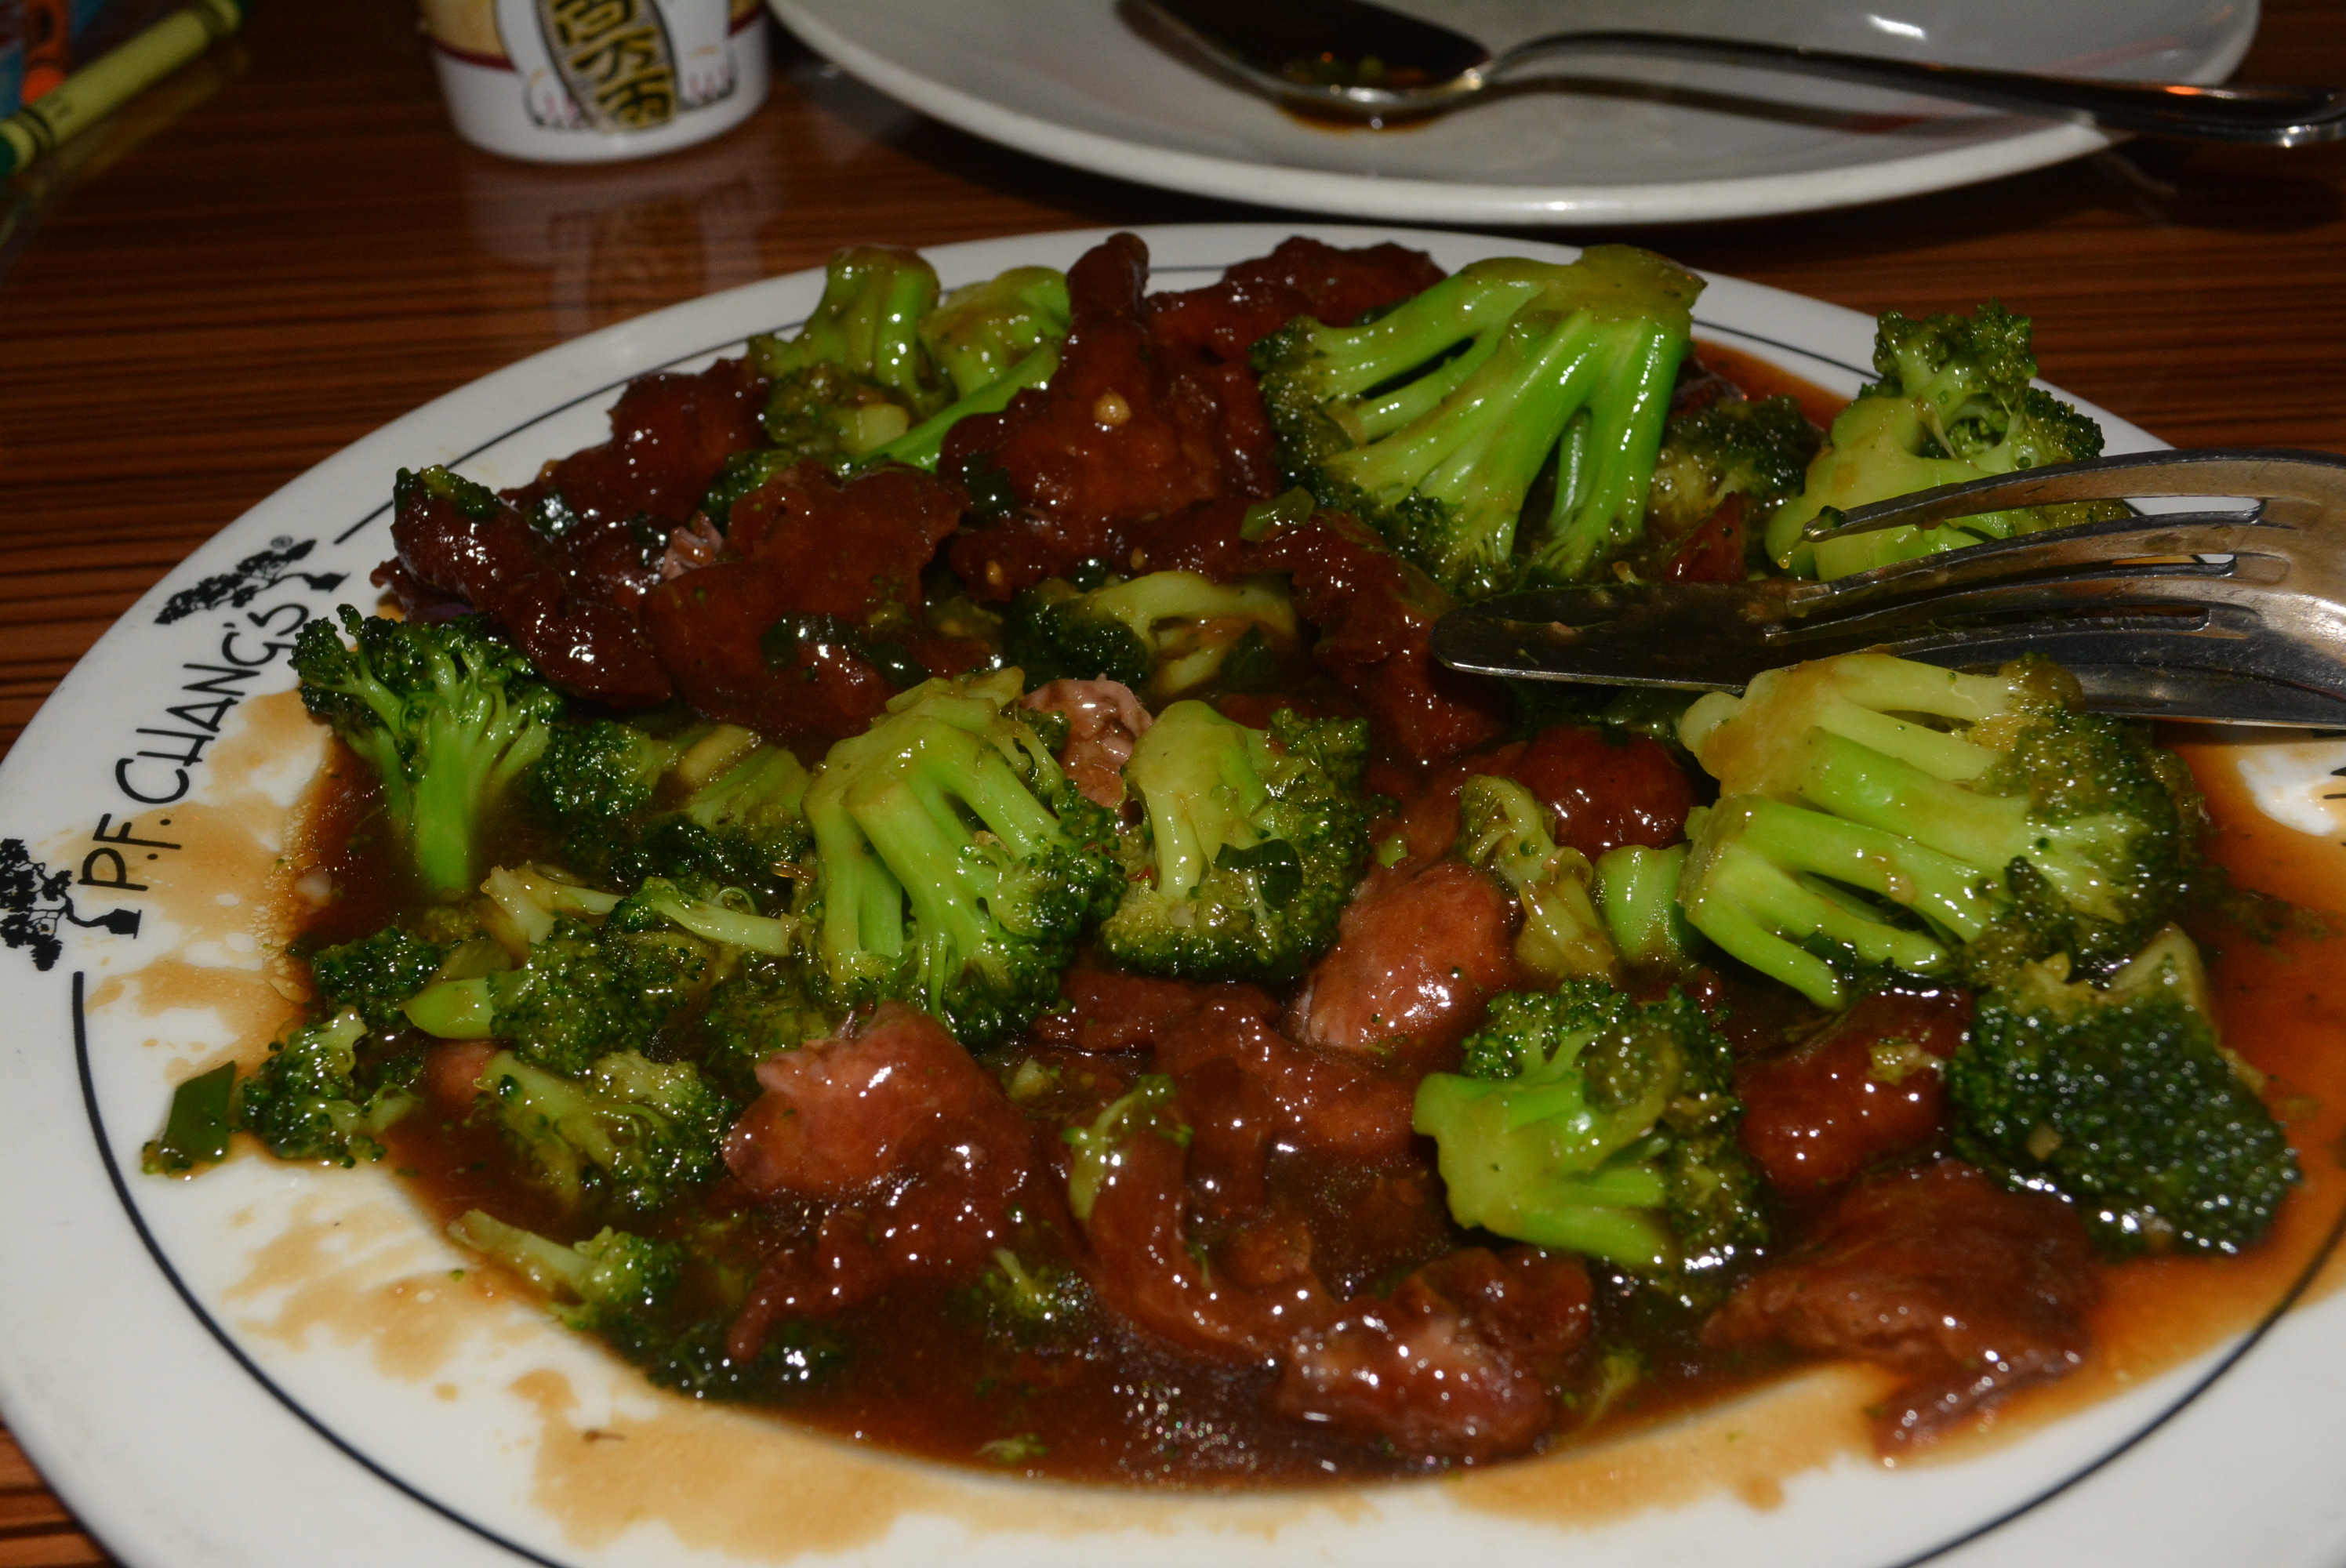
While P.F. Chang’s menu is intended for items to be shared, for us we usually don’t do this since my dishes are gluten free and my husband usually prefers to order a seafood, non-gluten free item. So, ordering for me is pretty simple, I typically go with the gluten free Chicken Lettuce Wraps and a Beef and Broccoli entree. I’m a creature of habit I guess and usually order the same thing, but I know what I like and I’ve never really gone wrong with either one of these. While ordering, I usually remind the waiter of the severe gluten intolerance that I have again, even though I already did that when ordering my drinks, but it makes me feel better if I state it a few times, impressing upon the staff the dire consequences of a slip up.
Soon enough, my gluten free Chicken Lettuce Wraps arrive on a beautiful allergy plate with a logo and line circling around it; that’s right, P.F. Chang’s identifies allergy free dishes with a different plate from other diners, a great identifier for yourself when your dish is placed down in front of you. When my husband hasn’t ordered an appetizer for himself then we usually do share this one since it’s usually way too much for just myself to finish. However, his new favorite small plate, non-gluten free appetizer are the steamed pork dumplings, so when that’s the case then it’s leftover Chicken Lettuce Wraps for tomorrow’s lunch, which is fine by me!
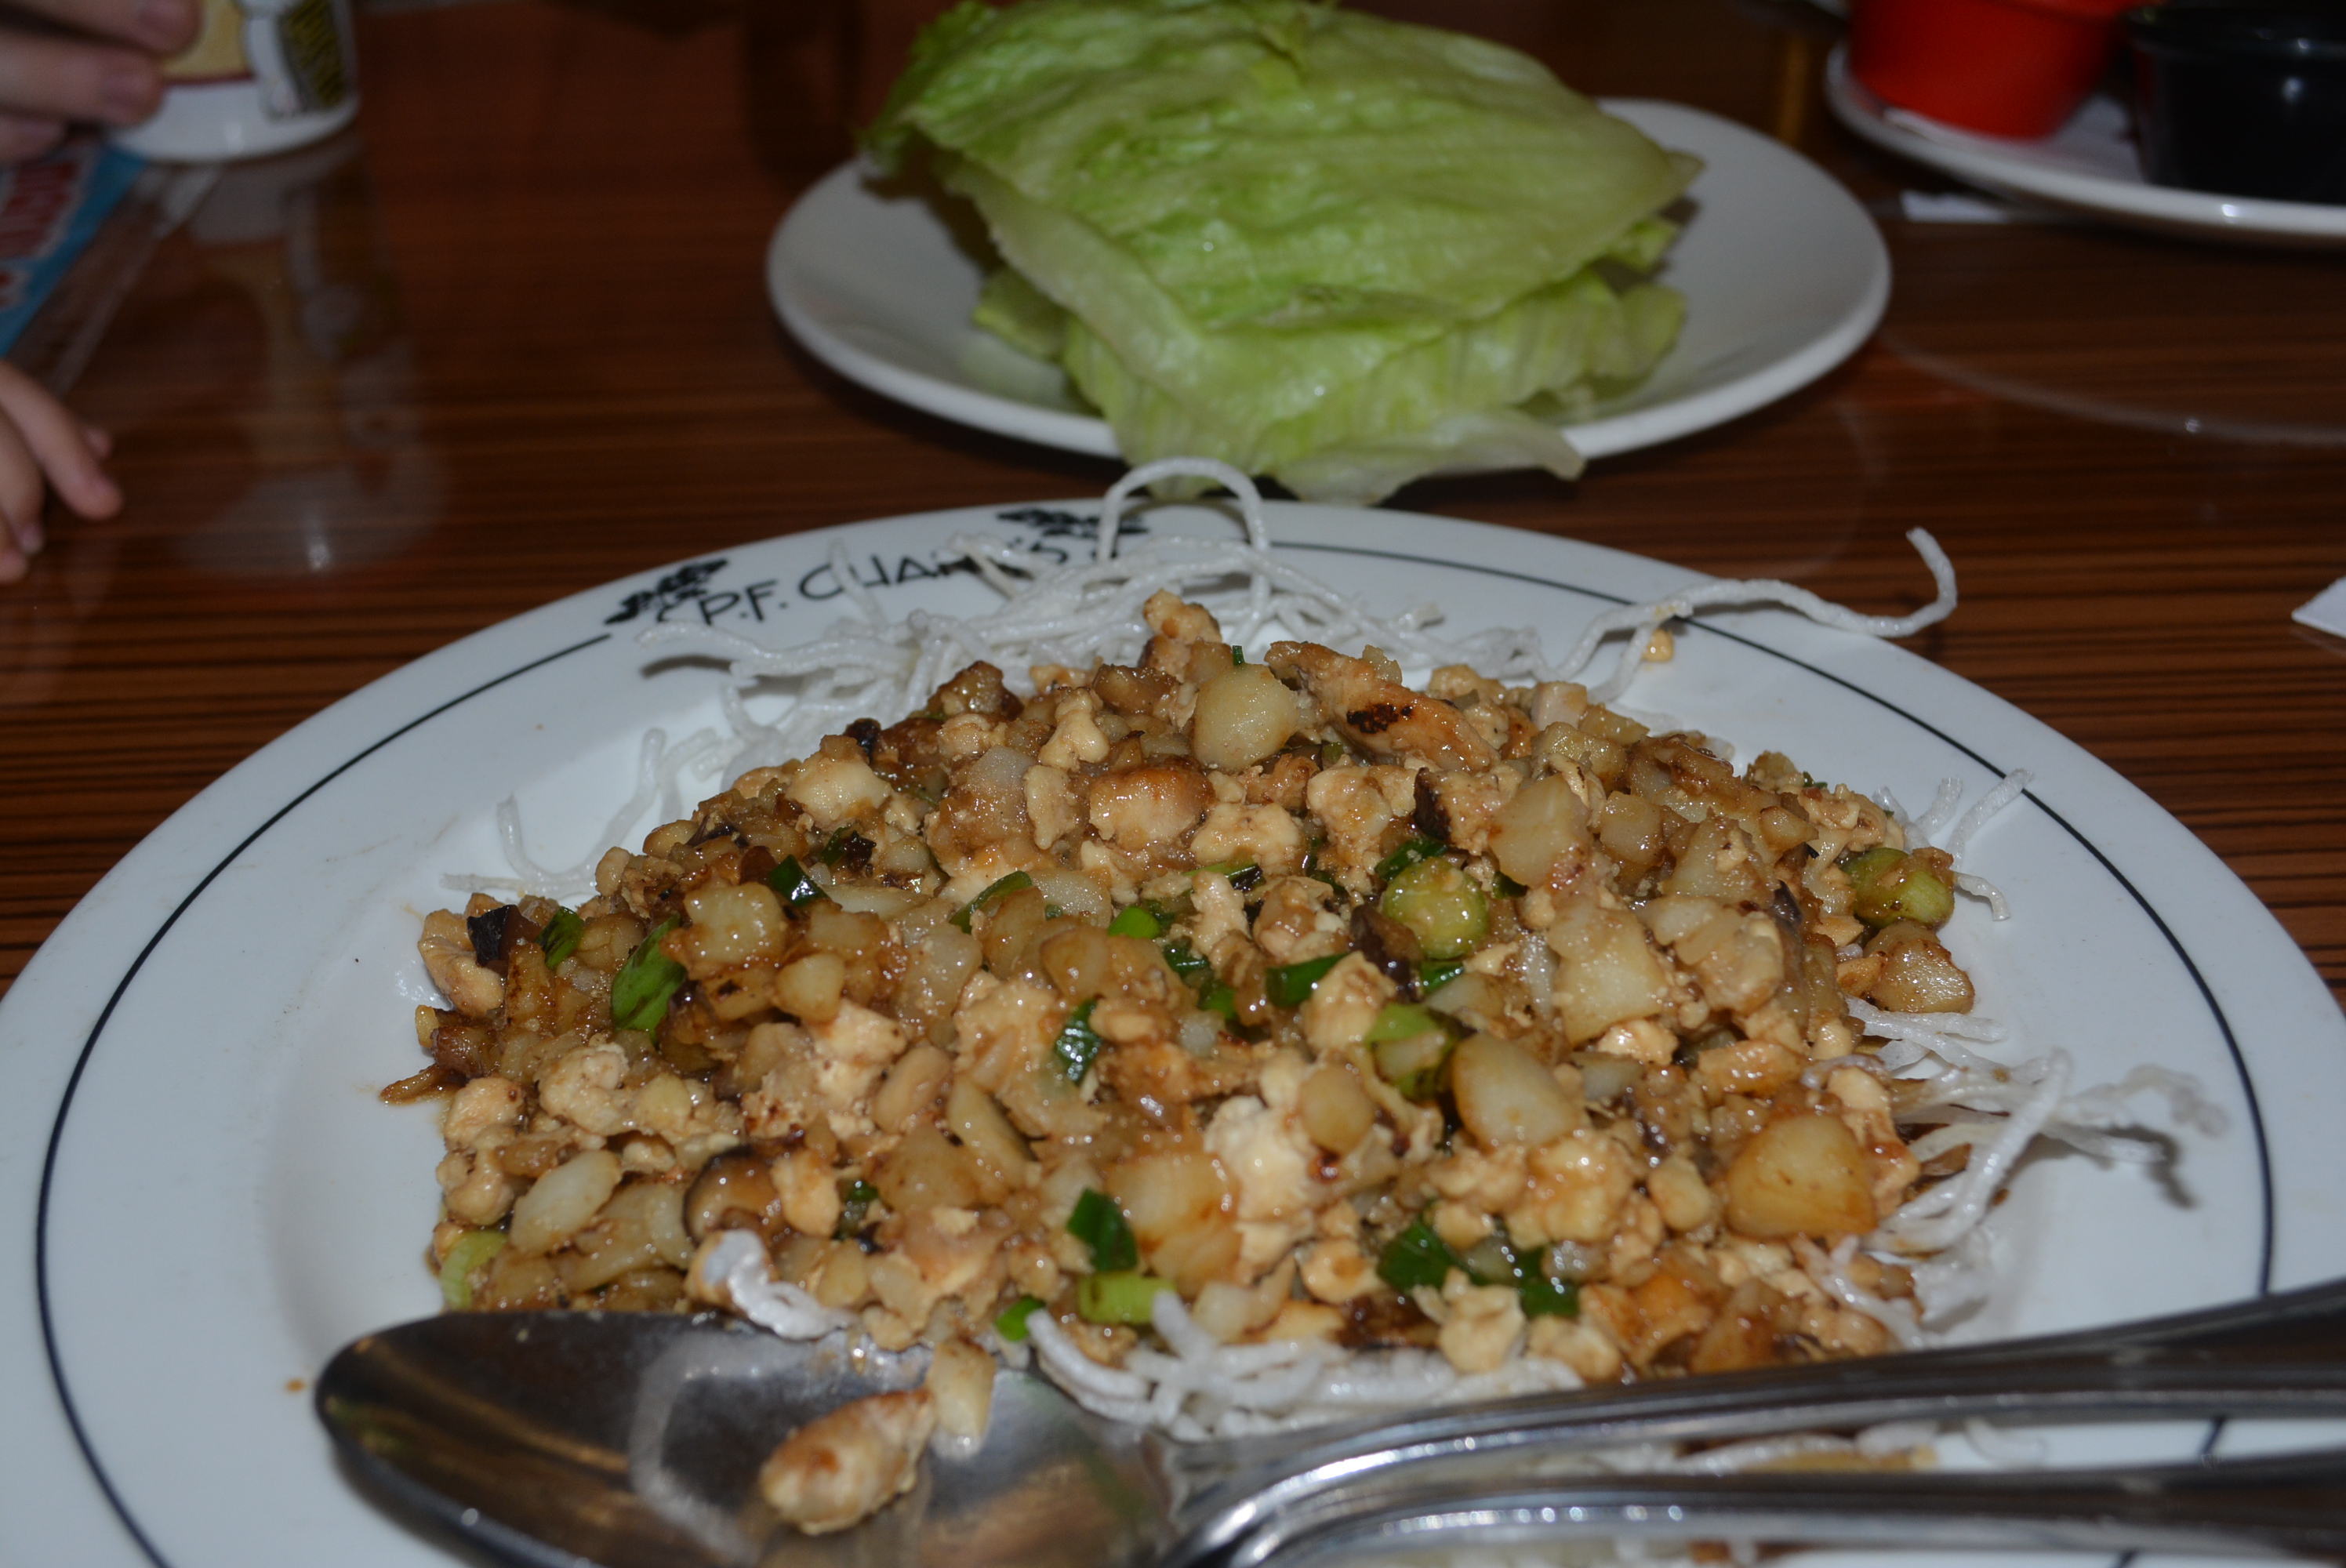
Now, down to the taste of these wonderful wraps! They are DELICIOUS! Every single time I order them I love them more and more. Chicken, green onions, and water chestnuts smothered in a gluten free soy sauce and all scooped into a lettuce cup, it’s such a great bite of food and a perfect appetizer. While these are a total winner for us adults, not everyone at our table agreed though on this dish.
On our most recent visit to P.F. Chang’s, which has really only been my daughter’s second time there her entire year and a half of life, we decided to leave behind a dinner from home and give her some of our meals. First up, were the chicken lettuce wraps which after my little girl’s first bite produced some type of sour face and shiver. Let’s face it, I knew it was a gamble giving her Asian cuisine, especially a dish with all new flavors and textures, like ground chicken and water chestnuts. Thankfully though our waiter came to the rescue and brought out some fresh veggies for her to munch on, which she LOVES, and she actually happened to really enjoy my husband’s steamed pork dumplings too. So, while little one enjoyed her Daddy’s dish, Mommy actually was able to gobble down a few lettuce wraps uninterrupted!
A few minutes later and our entrees had arrived. My gluten free Beef and Broccoli looked just as tasty as always. A huge allergy free, logo lined plate was placed down in front of me and was filled with thin, bite size pieces of flank steak and broccoli florets all cooked with fresh ginger, green onions, garlic, and a beautiful sauce. I love everything in this dish, but the star for me is the sauce that flavors it all. The seared beef and broccoli are perfectly flavored thanks to it and I always leave wishing that I knew how to recreate such a spectacular dish. Although I love this dish, I rarely am able to finish it in the restaurant. So even better, I always have leftovers for the next day’s lunch or dinner and let me tell you the Beef and Broccoli reheats perfectly, tasting just like it did the day before.
Every single meal at P.F. Chang’s we’ve enjoyed, while all for the great food and even better company, others thanks to extra special memories like watching our little girl enjoy a different cuisine for the first time. It means so much to my family to be able to create memories like these and enjoy a meal together where all of us are eating dishes that are equally tasty and safe. So many thank yous go out to P.F. Chang’s for offering a restaurant that not just myself, but many other allergy diners too can sit down with their families and share in the enjoyment of dining out. If you have a local P.F. Chang’s near you, make sure you pay them a visit and check out their gluten free menu ahead of time to pick out your favorite dishes!
TIP: One of the perks that I love about P.F. Chang’s is that they offer lunch sized portions of their gluten free menu so you can enjoy their dishes at either meal. In fact, since we usually don’t share dishes, we’ve sometimes ordered lunch takeout on Saturday before 4 pm and have paid considerably less for plenty of food for dinner (not many leftovers, but certainly enough for dinner). Another feature that I love with P.F. Chang’s, is that they offer pretty good happy hour deals too. These typically run until 6 pm, I believe, and you can save a few dollars on their Chicken Lettuce Wraps, which happen to come in a gluten free version! Yay for saving a little bit of money while being gluten free!
Sincerely,
Lindsay
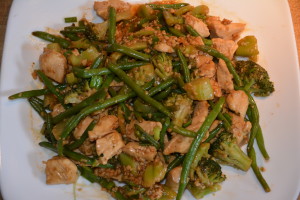
How About Dinner In? Try This Gluten Free Chicken And Green Veggie Stir Fry!
Mmmm I just love Chinese food. Okay so not really all Chinese food but really just my absolute favorite dishes that I always ordered, which were lomein and chicken with broccoli. I LOVED lomein with veggies, the noodles were just perfection, flavored with just the right amount of a beautiful soy sauce. Over the years my family and I enjoyed Chinese food here and there, and after meeting my husband the tradition continued. Unfortunately after our first three years together, the tradition had come to an end, at least the part where we could order from our favorite local Chinese food restaurant right around the corner. On the brighter side though, we discovered P.F. Chang’s, a fantastic Chinese food chain that offers some really great gluten free alternatives to your traditional Chinese food dishes. Our enjoyment of this cuisine thankfully didn’t end with my diagnosis, in fact I’ve enjoyed many a Chinese food night safely thanks to P.F. Chang’s. Stay tuned for for a sneak peak at some of my favorite gluten free eats at this chain.
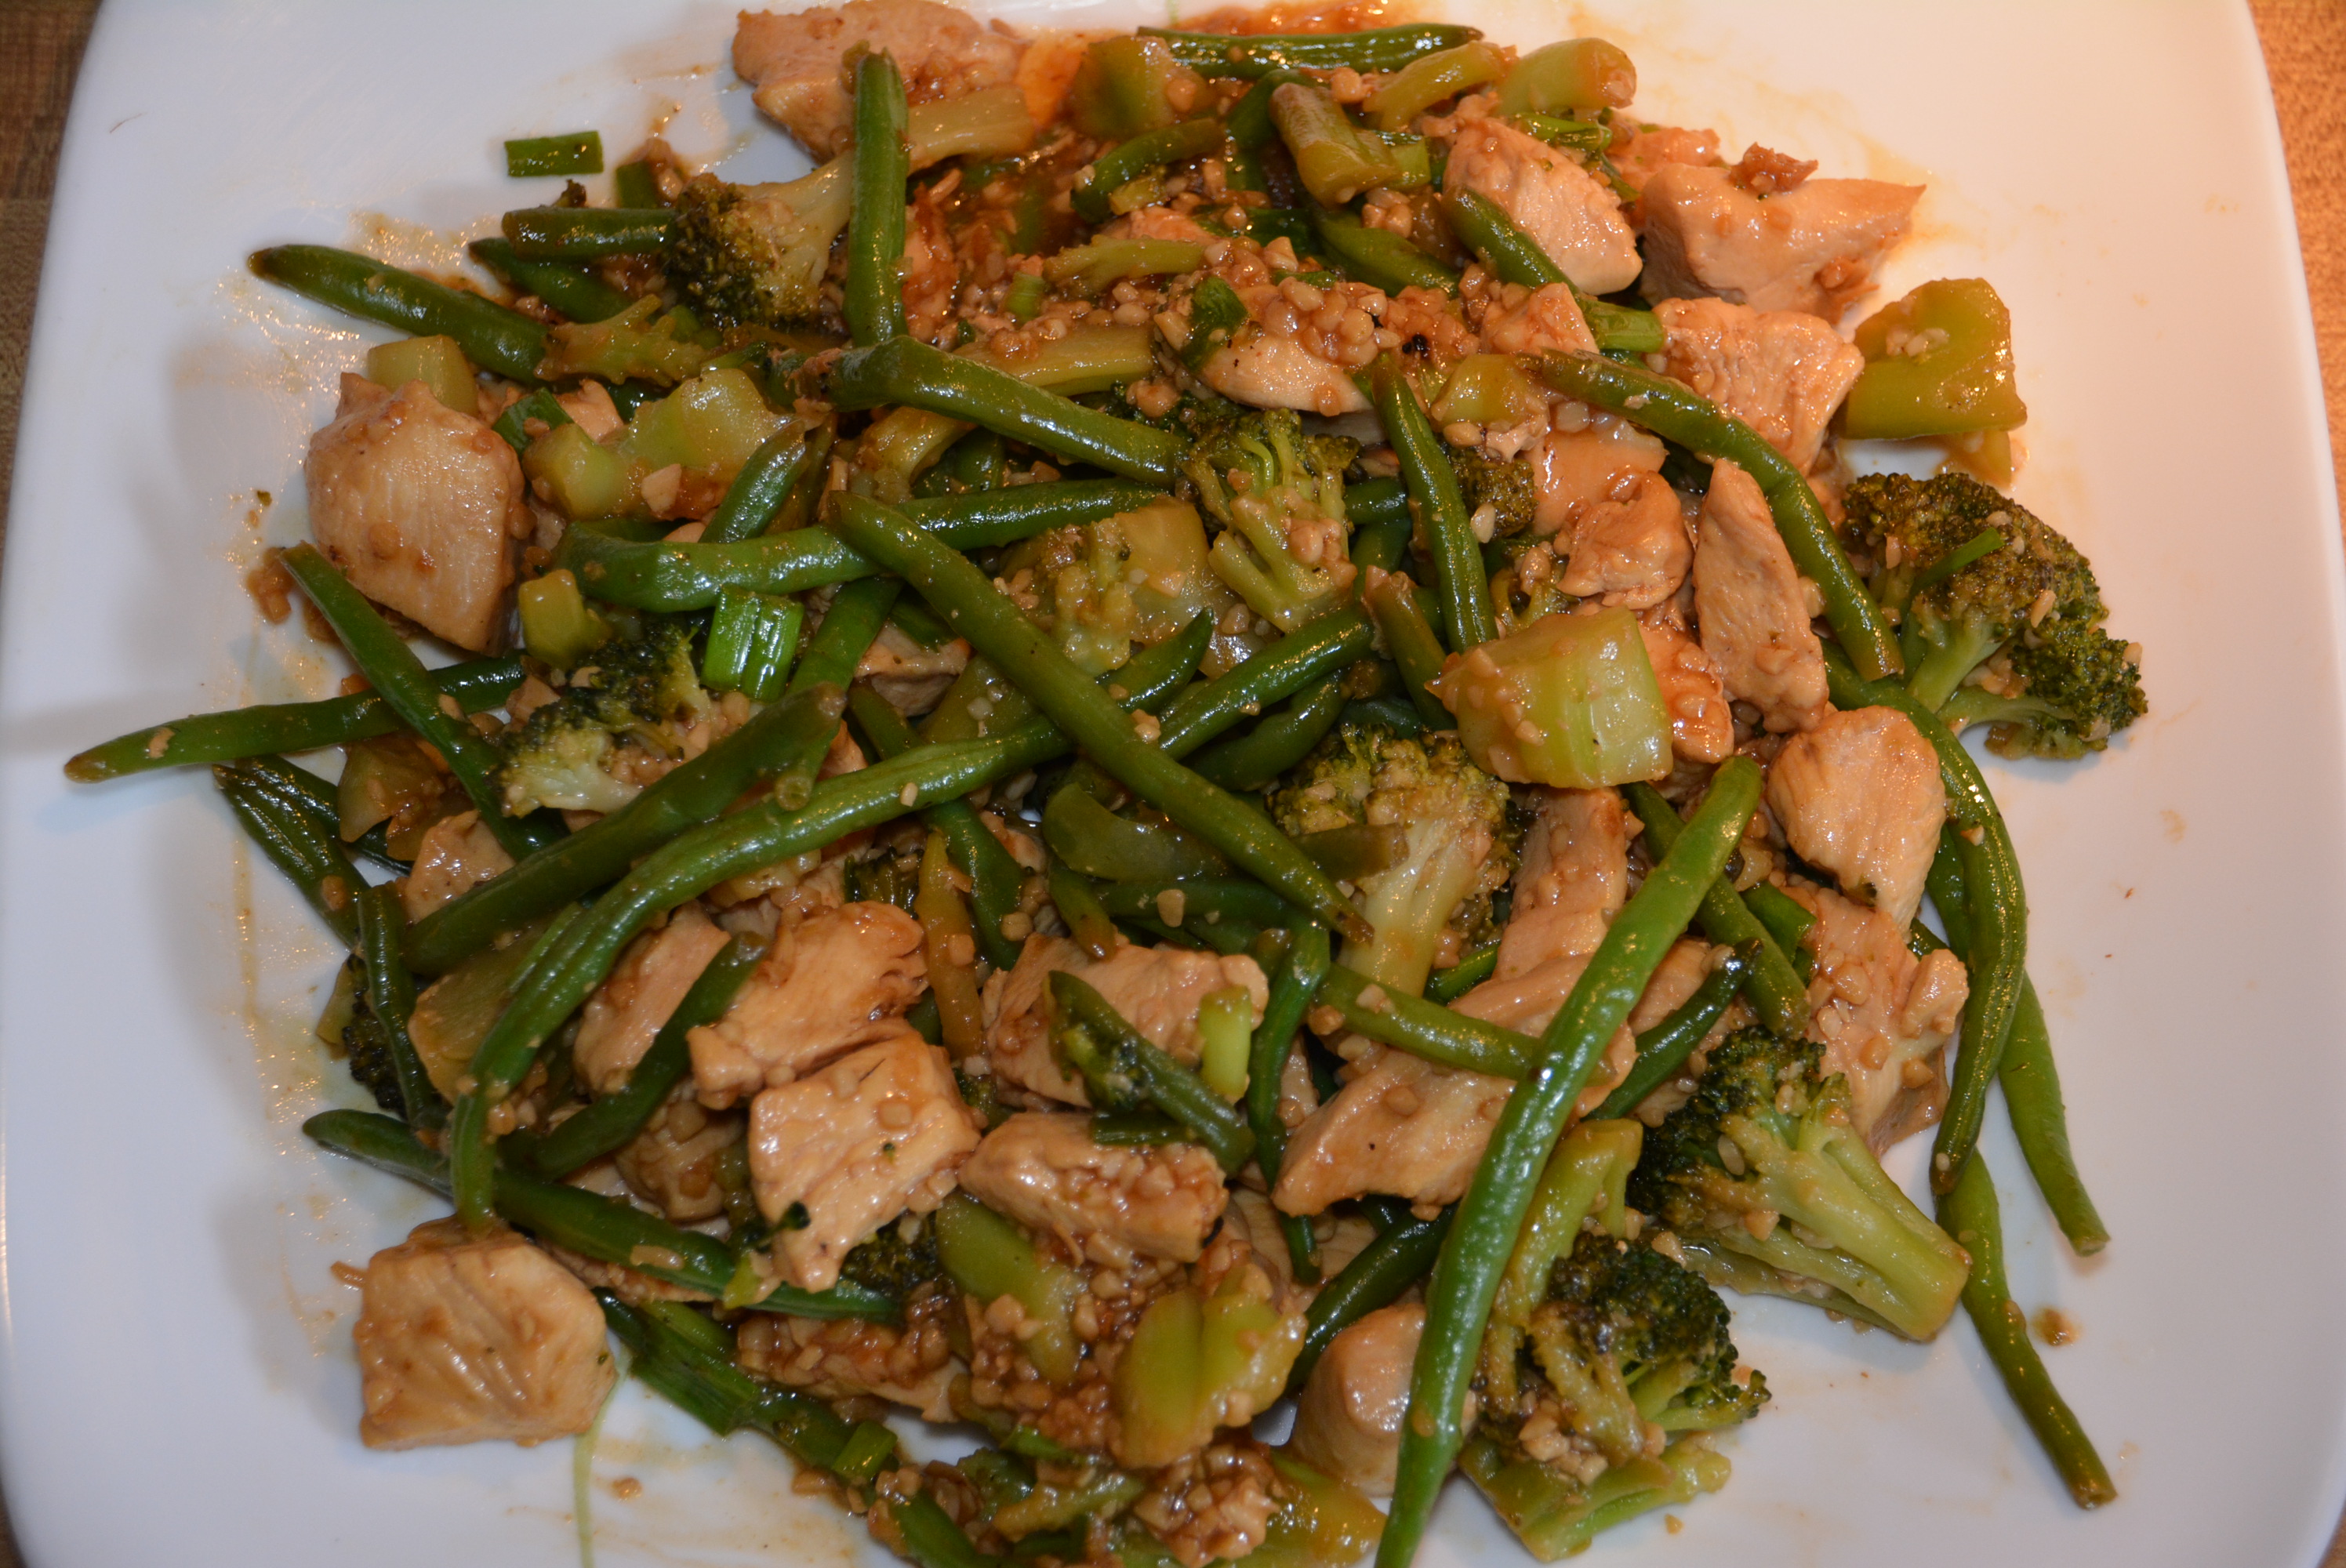
Thank goodness there is a restaurant that offers gluten free Asian cuisine, but many a night we’re just not in the mood to eat out or make the longer trek out to P.F. Chang’s. Thankfully, a few brands have released gluten free versions of their soy sauces so we can enjoy a little gluten free, Chinese inspired concoction at home. I’ve dabbled a bit with these gluten free soy sauces, with my favorite being Kikkoman, but haven’t quite mastered Asian cooking yet. Thanks to my Dad, who is always on the hunt for new recipes to try for my mom, he stumbled upon a stir fry in one of their diabetic magazines. After tweaking some of the ingredients in the sauce to be gluten free friendly and mixing in my two favorite veggies with chicken I made my Gluten Free Chicken And Green Veggie Stir Fry. The chicken is so flavorful thanks to the gluten free soy sauce, and the extra thin green beans and broccoli are just as spectacular and by far the favorites for my veggie loving little girl. Just like my little one, I too love this recipe, it’s so quick and tasty, a perfect dinner for those busy summer days and freezing cold winter nights. So when you’re not in the mood to eat out for your favorite Chinese food, why not make this stir fry and dine in.
Ingredients:
- 12 oz skinless, boneless chicken breasts (Cut these into small bite size pieces or thin slices,)
- 2 tsp freshly grated ginger
- 1 heaping tbsp minced garlic
- 1 cup extra thin frozen green beans (My family loves these so we always keep a bag from Wegmans.)
- 1 cup frozen broccoli
- 1/2 cup thinly sliced green onions
- Vegetable oil (I use Smart Balance.)
Sauce:
- 1/3 cup cold water
- 2 tbsp gluten free soy sauce (I like Kikkoman. (I prefer to use reduced sodium however I’ve found it’s a bit difficult to find one in a gluten free variety.))
- 1 tbsp reduced sodium chicken broth (I use Progresso which marks gluten free on their packaging.)
- 2 tsp cornstarch
Directions:
- Trim and slice 12 oz chicken breasts into thin strips or bite size pieces. Set aside for cooking shortly.
- Next, stir together sauce ingredients by first combining 1/3 cup cold water and 2 tsp cornstarch. Then stir in 2 tbsp gluten free soy sauce and 1 tbsp reduced sodium chicken broth. Set prepared sauce aside to add in at the end.
- Heat a large skillet over medium-high heat and add a little bit of vegetable oil to lightly coat bottom of skillet.
- Add 1 heaping tbsp minced garlic and 2 tsp freshly grated ginger to skillet and saute for about 30 seconds (garlic will barely begin to brown).
- Then add 1 cup each of frozen broccoli and extra thin green beans to skillet with garlic and stir fry for about 6-8 minutes or until veggies are soft and tender.
- Remove cooked veggies from skillet and add to bowl, set aside.
- To warmed skillet, add chicken strips/pieces and cook on medium-high heat for about 2-4 minutes or until chicken is cooked through.
- Once chicken is cooked, stir soy sauce mixture and add to skillet. Stir to coat chicken with sauce and cook until sauce has thickened and bubbles.
- Add green veggies back into skillet, mix with sauce and chicken, and heat for an additional minute or two until all components are warmed and flavors have combined.
- Thinly slice 1/2 cup green onions and sprinkle on top of stir fry or mix in.
- Empty stir fry ingredients into serving dish or serve in skillet.
- Enjoy!
This was one of my favorite dishes to make this past winter, since it was quite a doozy in my neck of the woods. With frozen veggies up the wazoo in our freezer and a stockpile of chicken to boot, it was so easy to throw them together in this quick and tasty stir fry. With the extra thin green beans still having a little crunch to them and the broccoli scattered throughout, each bite was the perfect ratio of tender veggies and flavorful chicken. Not to mention the amazing sauce and minced garlic that coats it all, delicious!
Now that summer is here, this being one of my daughter’s favorite dishes, it still makes a frequent appearance in our house with either fresh or frozen veggies; honestly, I usually just throw in whatever veggies I have on hand at the time, whether they are fresh or frozen, either way they’re equally as healthy. So feel free to combine your two favorite fresh or frozen veggies and put this dish together. Just make sure you cook all of your veggies to become nice and tender before adding in your chicken and sauce and enjoy!
Sincerely,
Lindsay
Gluten Free Chicken And Green Veggie Stir Fry
2014-07-07 08:19:50
Ingredients
- 12 oz skinless, boneless chicken breasts (Cut these into small bite size pieces or thin slices,)
- 2 tsp freshly grated ginger
- 1 heaping tbsp minced garlic
- 1 cup extra thin frozen green beans (My family loves these so we always keep a bag from Wegmans.)
- 1 cup frozen broccoli
- 1/2 cup thinly sliced green onions
- Vegetable oil (I use Smart Balance.)
Sauce
- 1/3 cup cold water
- 2 tbsp gluten free soy sauce (I like Kikkoman. (I prefer to use reduced sodium however I've found it's a bit difficult to find one in a gluten free variety.))
- 1 tbsp reduced sodium chicken broth (I use Progresso which marks gluten free on their packaging.)
- 2 tsp cornstarch
Instructions
- Trim and slice 12 oz chicken breasts into thin strips or bite size pieces. Set aside for cooking shortly.
- Next, stir together sauce ingredients by first combining 1/3 cup cold water and 2 tsp cornstarch. Then stir in 2 tbsp gluten free soy sauce and 1 tbsp reduced sodium chicken broth. Set prepared sauce aside to add in at the end.
- Heat a large skillet over medium-high heat and add a little bit of vegetable oil to lightly coat bottom of skillet.
- Add 1 heaping tbsp minced garlic and 2 tsp freshly grated ginger to skillet and saute for about 30 seconds (garlic will barely begin to brown).
- Then add 1 cup each of frozen broccoli and extra thin green beans to skillet with garlic and stir fry for about 6-8 minutes or until veggies are soft and tender.
- Remove cooked veggies from skillet and add to bowl, set aside.
- To warmed skillet, add chicken strips/pieces and cook on medium-high heat for about 2-4 minutes or until chicken is cooked through.
- Once chicken is cooked, stir soy sauce mixture and add to skillet. Stir to coat chicken with sauce and cook until sauce has thickened and bubbles.
- Add green veggies back into skillet, mix with sauce and chicken, and heat for an additional minute or two until all components are warmed and flavors have combined.
- Thinly slice 1/2 cup green onions and sprinkle on top of stir fry or mix in.
- Empty stir fry ingredients into serving dish or serve in skillet.
- Enjoy!
Gluten Free Mom To Be http://www.glutenfreemomtobe.com/
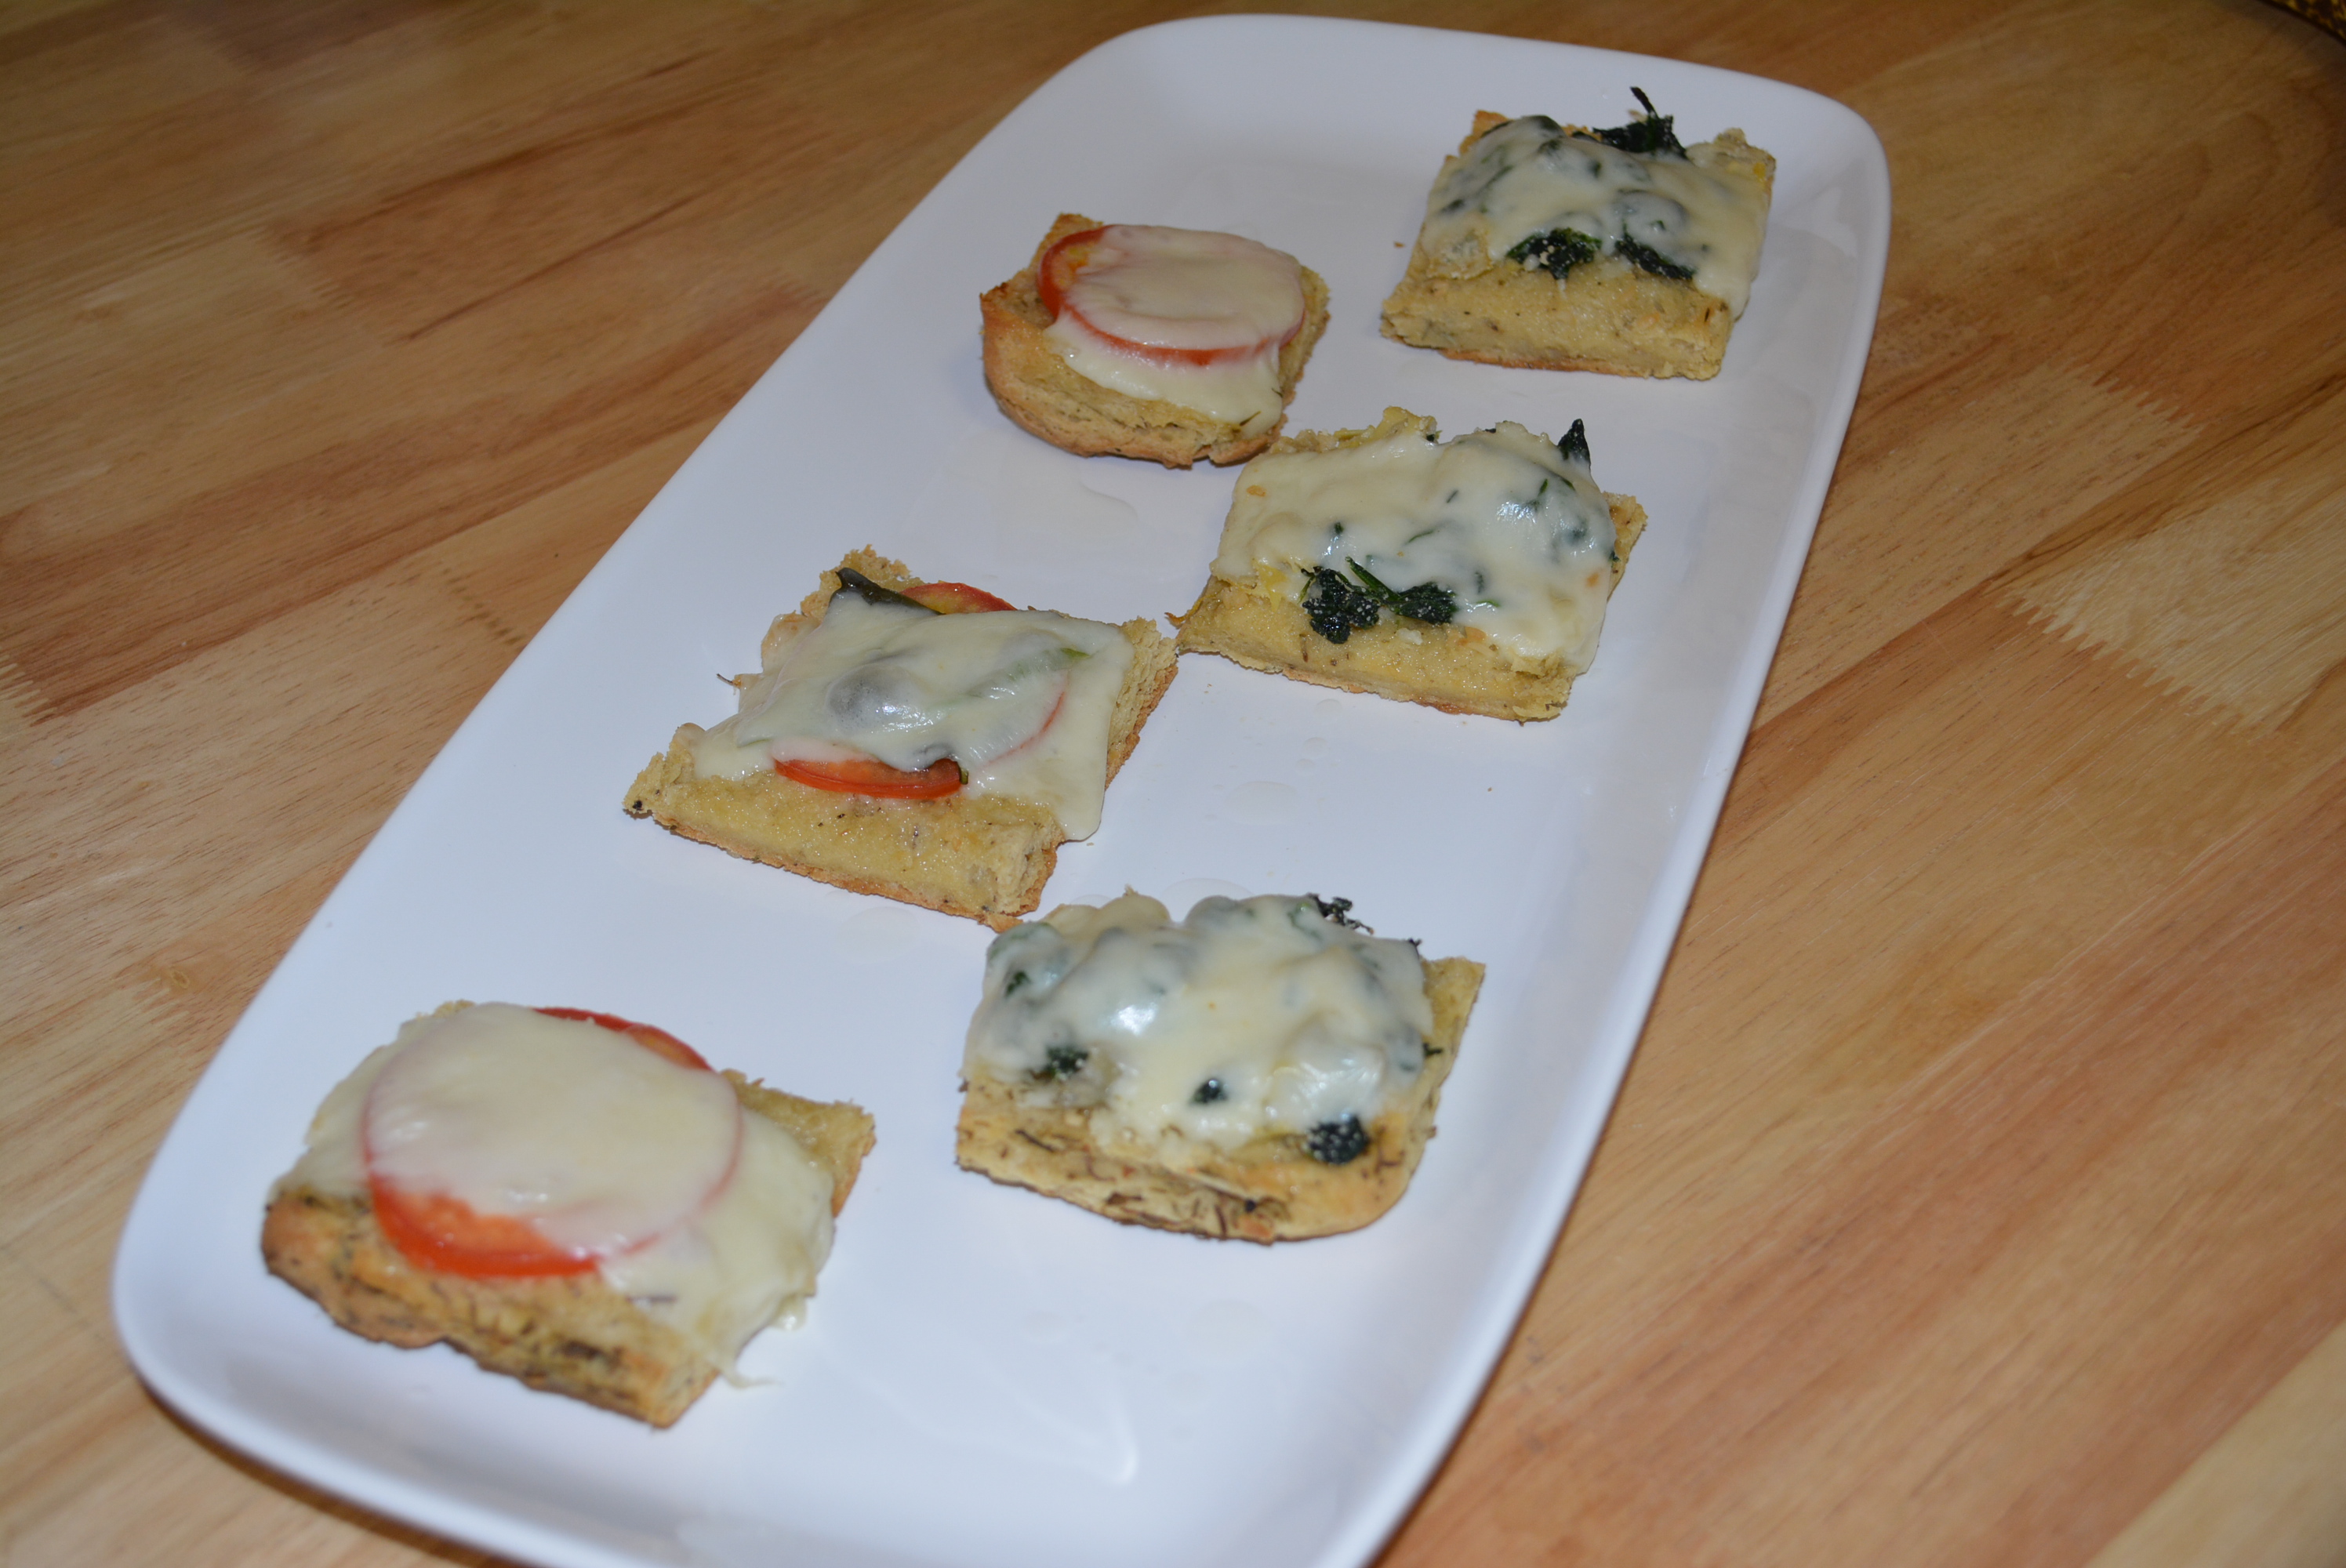
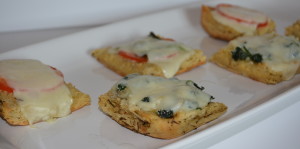
Gluten Free Garlicky Focaccia Appetizers, Perfect For Any Occasion
I’m always on the lookout for a delicious new gluten free bread option that bears some resemblance to non-gluten free bread that I once enjoyed. A few years back, I used to enjoy Panera sandwiches on all sorts of different breads, but one of my favorites by far was their focaccia, it was so light and perfectly seasoned. Flash forward several years and Panera sandwiches are off of our list of safe gluten free dinners out. I’m not going to lie, not being able to enjoy a soup and sandwich at Panera is a hard one to lose, especially since this restaurant holds a special place in my heart. I still remember my years in college when my parents would come up and visit me and we would head over to the local Panera. It was such a great environment for us to sit, eat, and catch up on my days at school. Not to mention, we would top it off by sharing a dessert or two and they’d always send off their poor college student with a to go bag of treats.
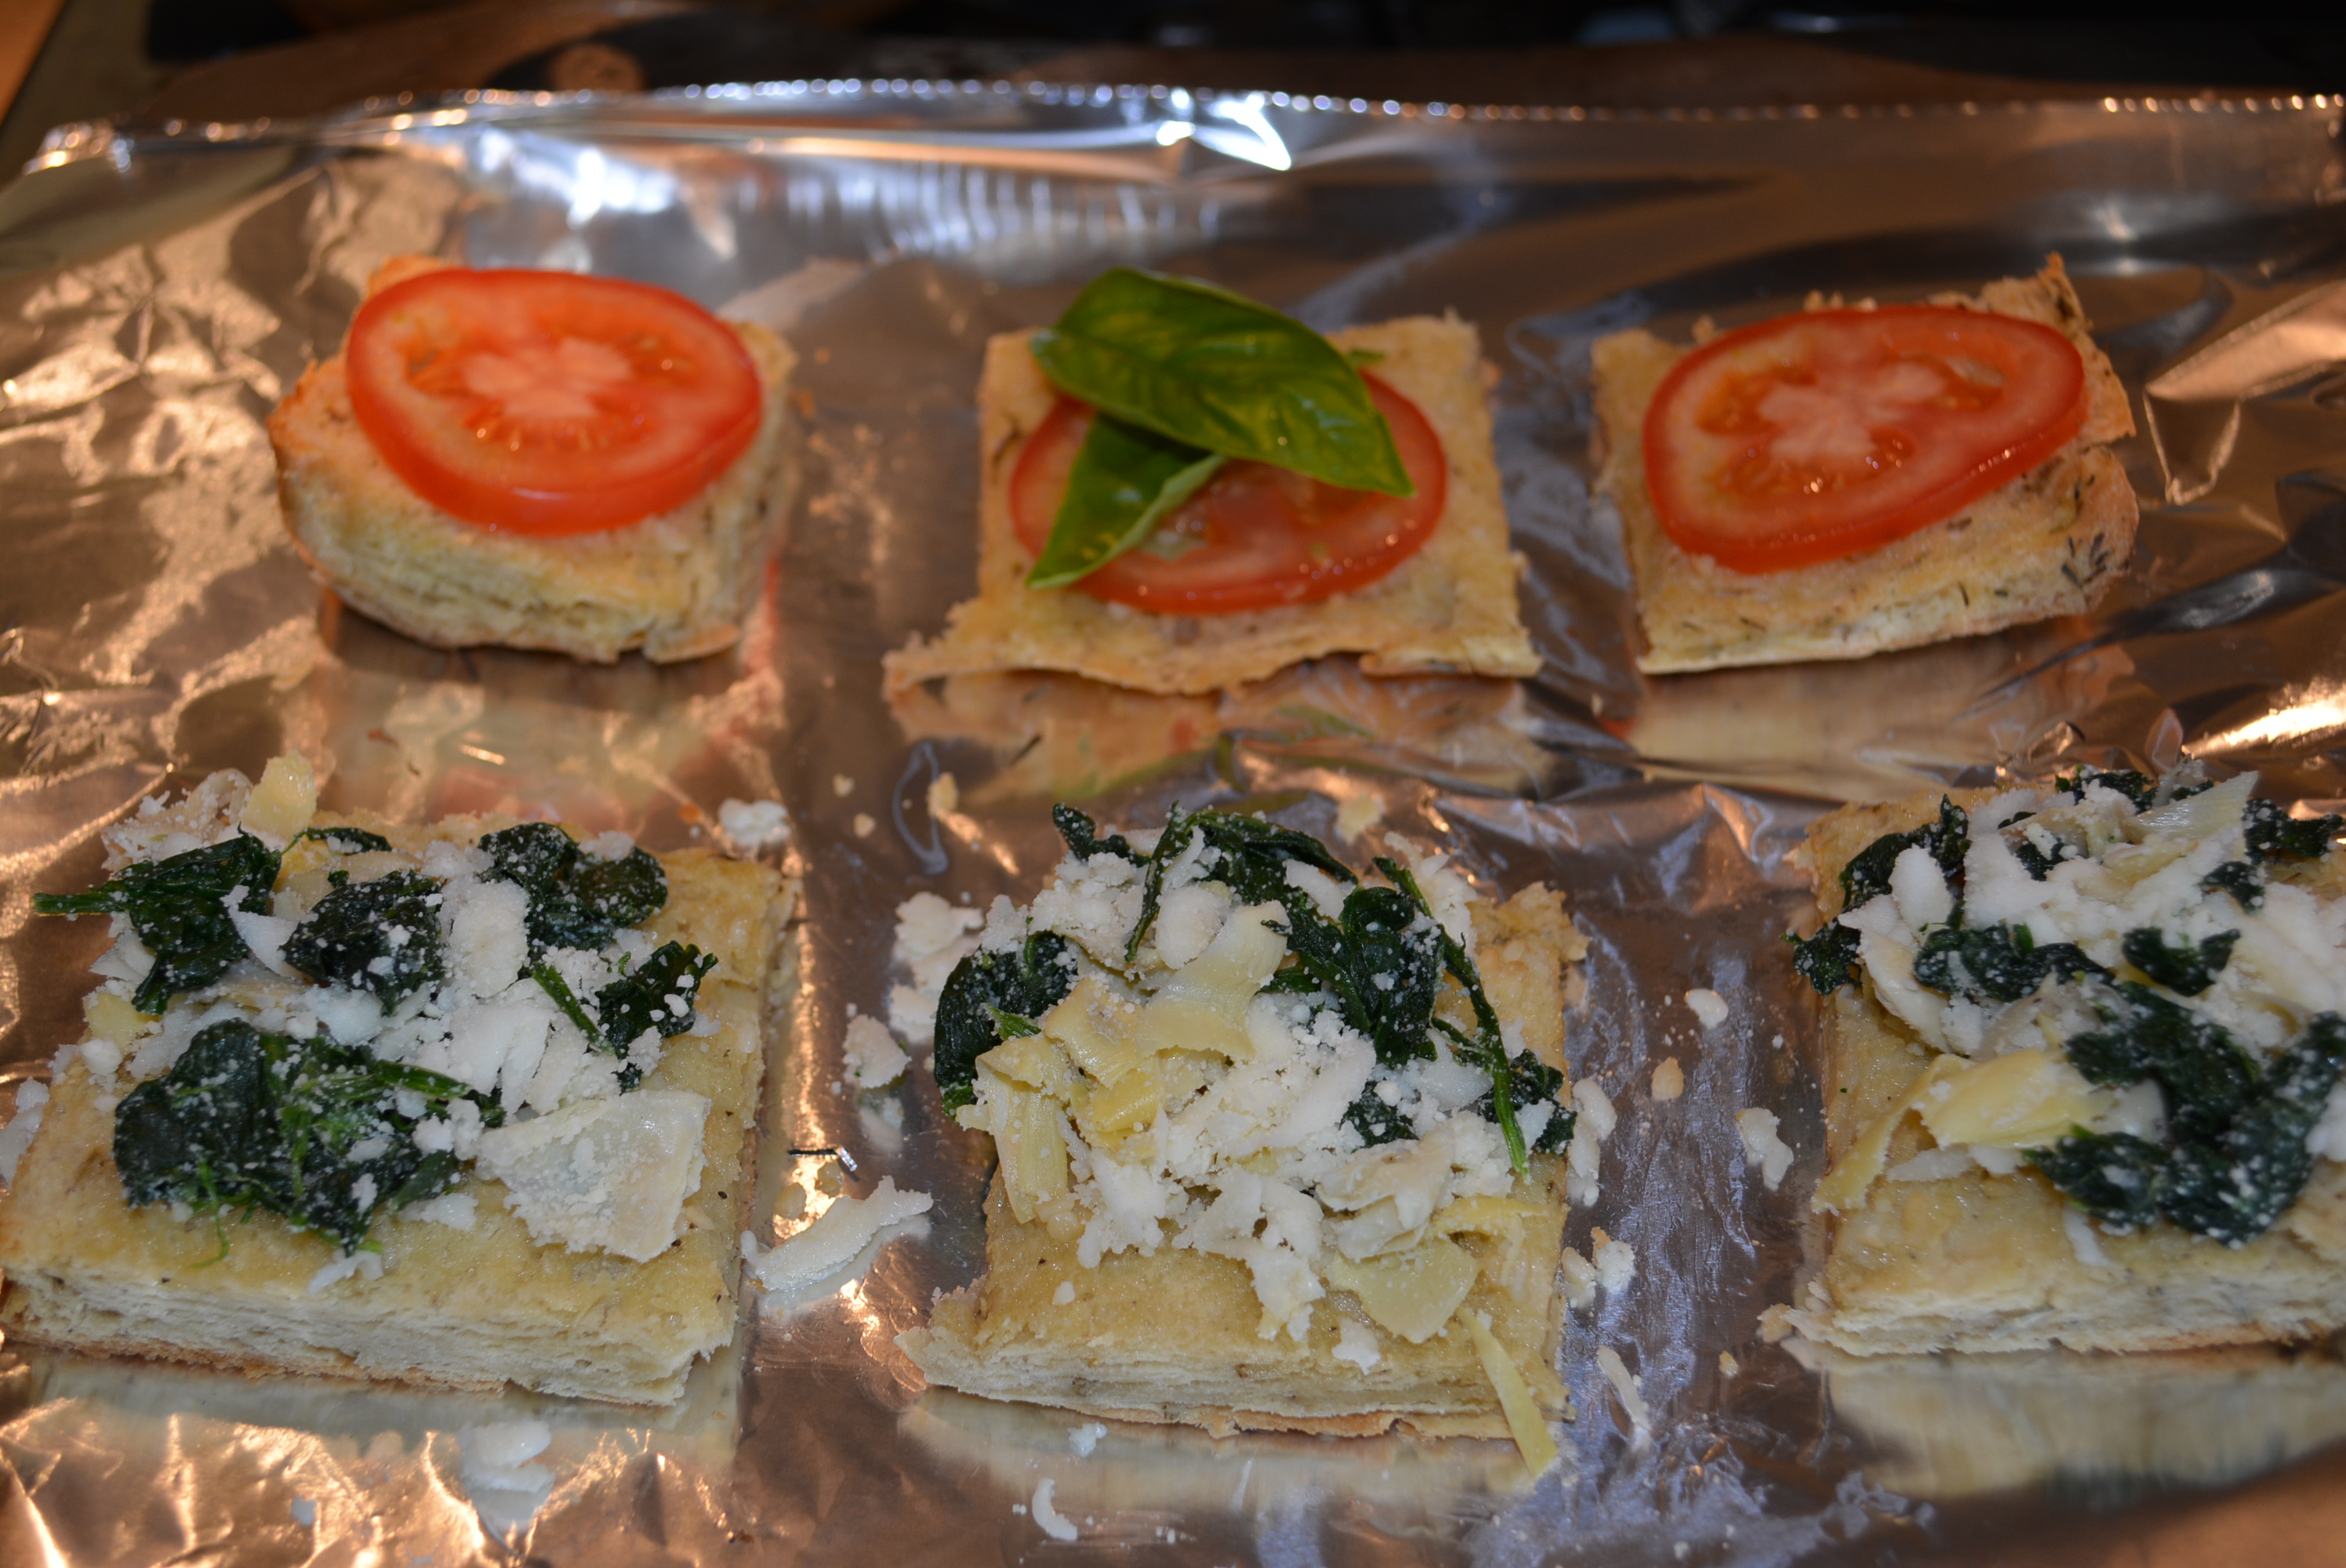
All grown up now with no more gluten allowed, my Panera days are something of the past and so are those delicious bread choices (tear). Much to my surprise though, a couple of weeks ago I stumbled upon gluten free focaccia by Canyon Bakehouse. They’ve accomplished the impossible it seems in the gluten free world and have produced a fantastic product. Their focaccia is soft and moist and perfectly seasoned with rosemary and thyme, take a peak at how beautiful Canyon Bakehouse’s Focaccia is. It is definitely one of my new favorite breads and is perfect for a sandwich, dipping in some olive oil and seasonings, or something a bit fancier like my Gluten Free Garlicky Focaccia Appetizers, topped with caprese and spinach artichoke toppings. Top with either set of toppings and you’re good to go with some delicious appetizers or a side to your dinner. My little one and husband gobbled these up so quickly, I’m just lucky I got to try some too! Enjoy!
Note: Feel free to use as much or as little of each topping ingredient as you’d like. This recipe only lists the combination of topping ingredients you should use but really depends on which variety and how many of the focaccia appetizers you wish to make.
Ingredients:
- Canyon Bakehouse Focaccia
- Butter (I use Smart Balance.)
- 4 tbsp minced garlic
- Shredded part-skim mozzarella cheese
- Salt and pepper to season
Caprese Toppings:
- 2-3 plum tomatoes
- Fresh basil leaves
Spinach Artichoke Toppings:
- Spinach (I like the frozen steamer bags of spinach.)
- Artichokes (Jar of Cento artichokes are gluten free.)
Directions:
- Preheat oven to 350 degrees.
- Slice focaccia lengthwise and cut into four long slices (2 from the top of the bread and 2 from the bottom).
- Spread a thin layer of gluten free butter across each slice of bread.
- Add 1 tbsp minced garlic to each slice of buttered focaccia and spread across the slice.
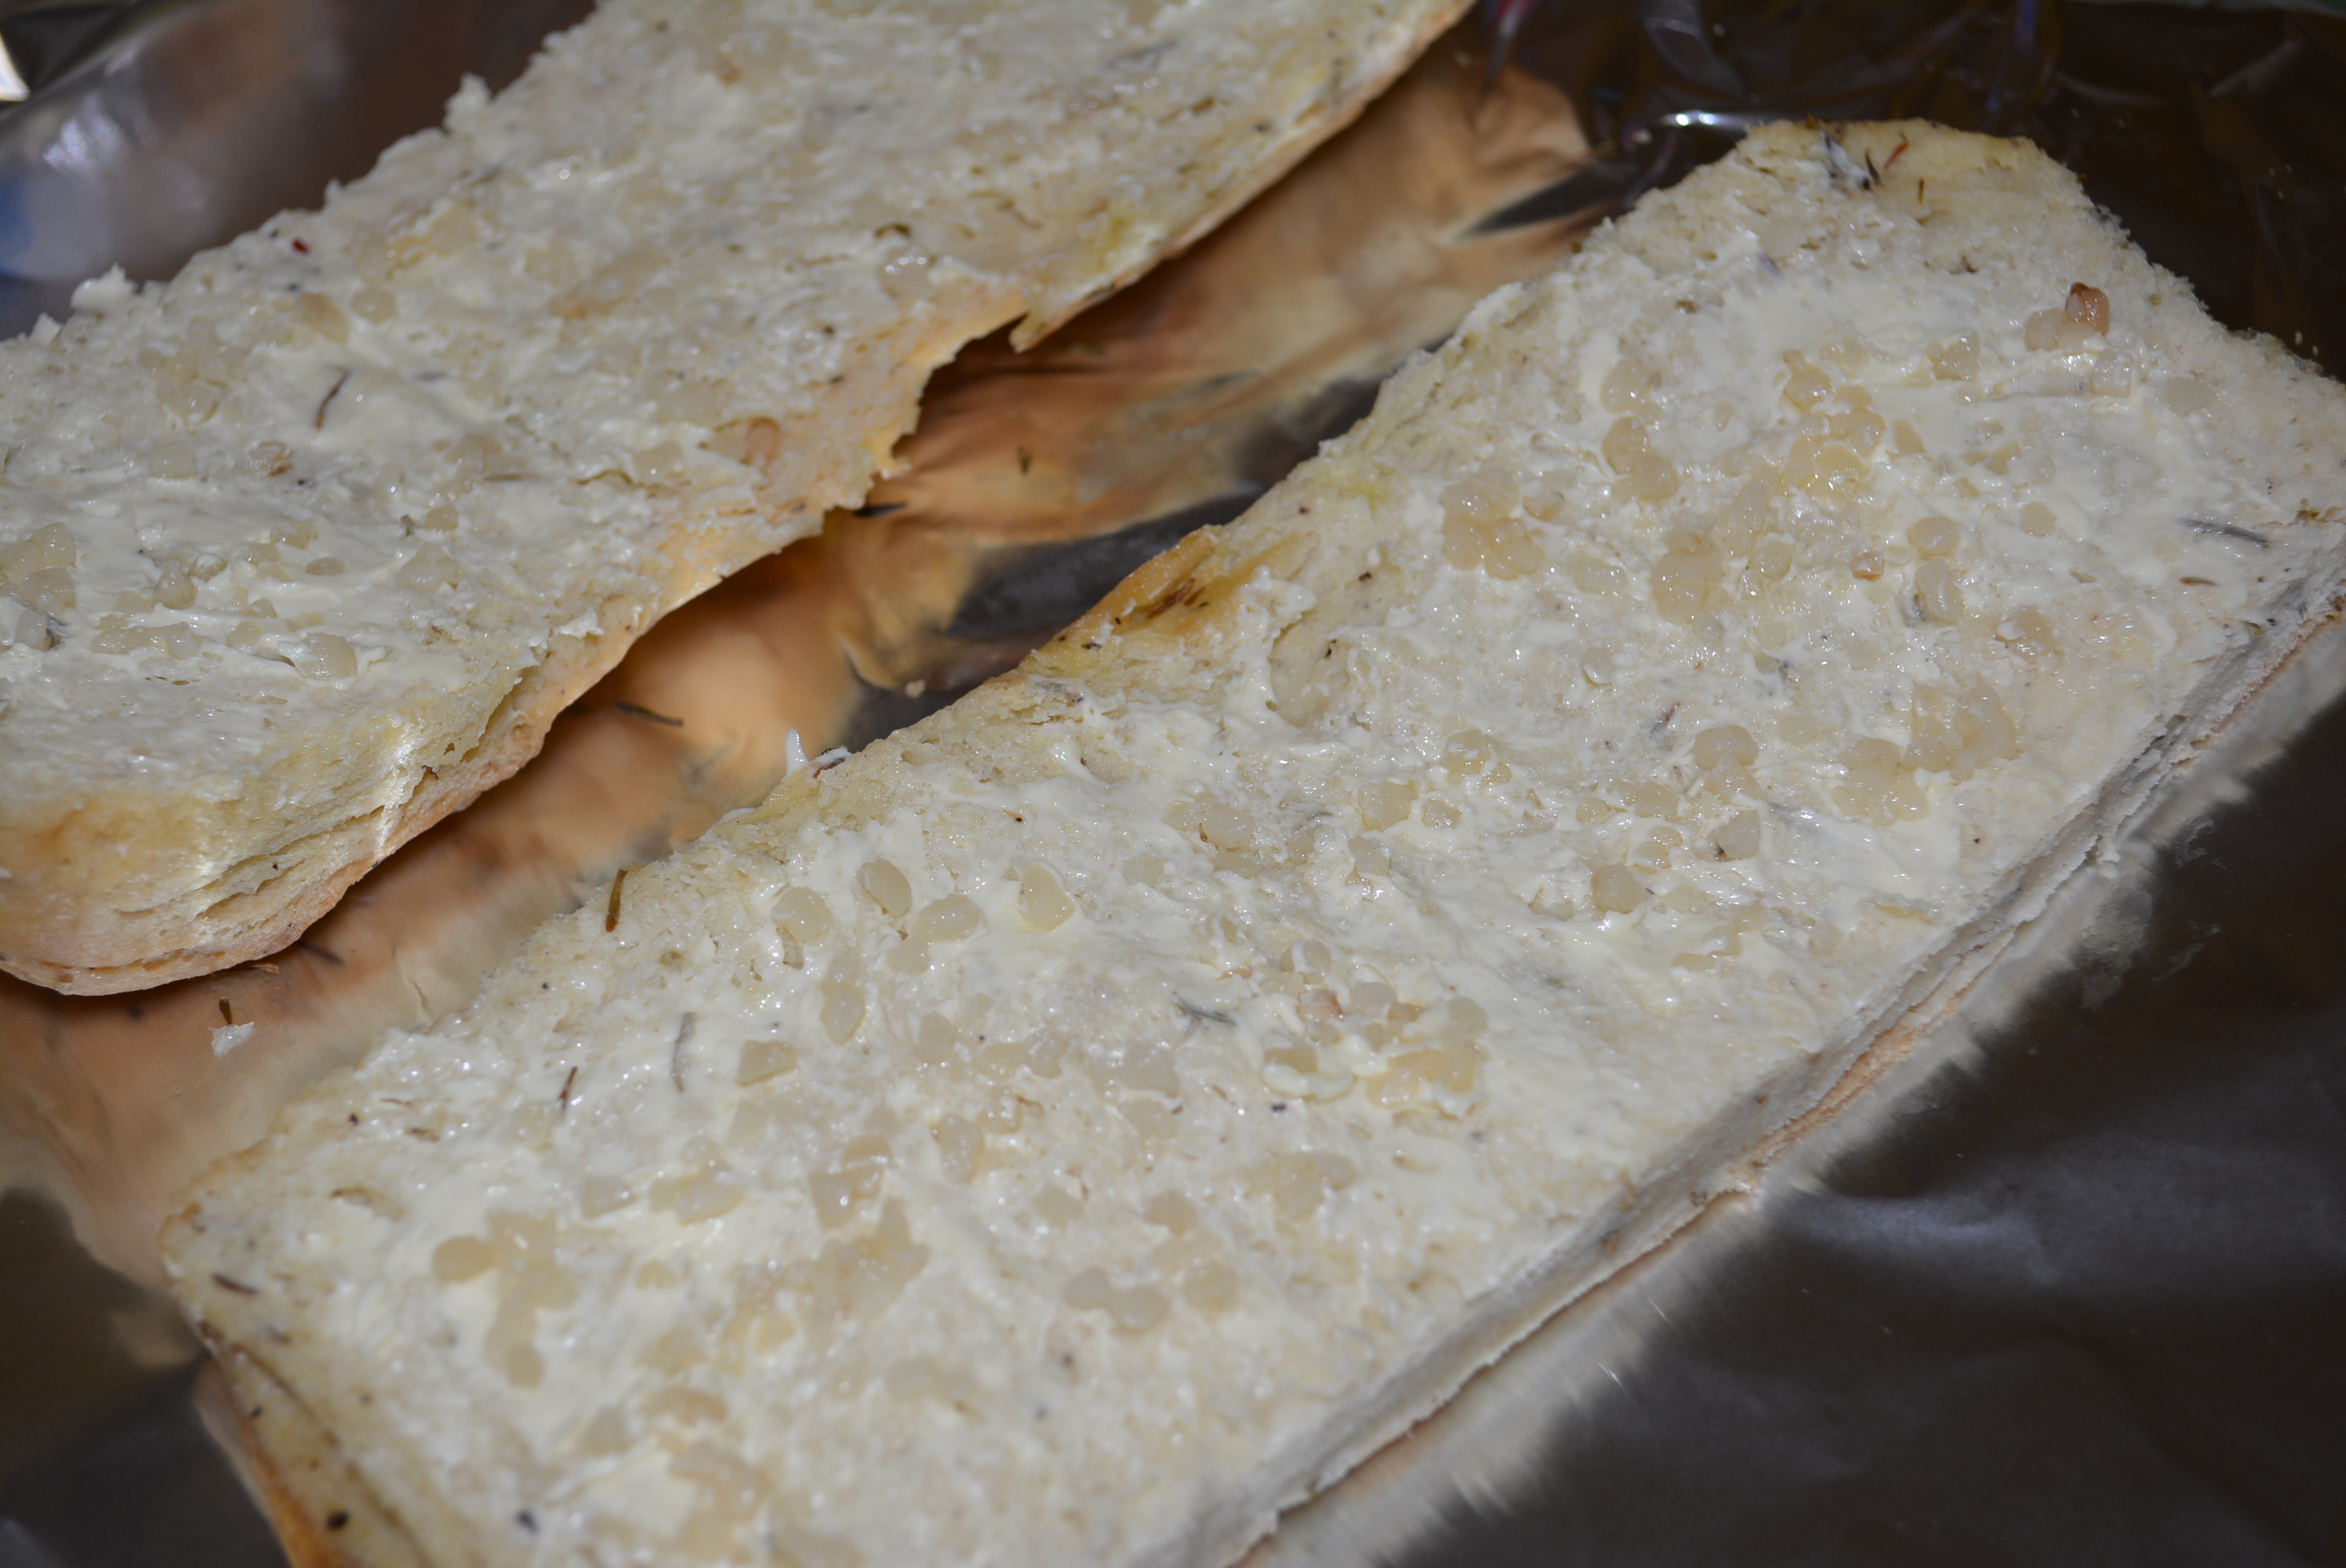
- Toast focaccia in the oven for 15 minutes.
- While focaccia is toasting, prepare desired toppings to either do half caprese and half spinach artichoke or to do all of one or the other.
- Slice 2-3 medium tomatoes.
- Prepare frozen spinach.
- Rinse and chop artichokes.
- In a small bowl, combine even parts (about 1/2 cup, this amount really depends on which route you go with toppings) spinach and artichoke and add 2 tbsp shredded part-skim mozzarella and 2 tbsp parmesan cheese.
- Remove toasted focaccia from the oven and carefully cut into small squares.
- To sliced focaccia bites, add toppings. For the caprese garlicky focaccia bites, add a single slice of tomato and basil leaves on top. For the spinach artichoke garlicky focaccia, add 1 tbsp of spinach/artichoke mixture to bread.
- On both versions, top with part-skim mozzarella cheese (I used slices, but I’d use shredded next time I make these.).
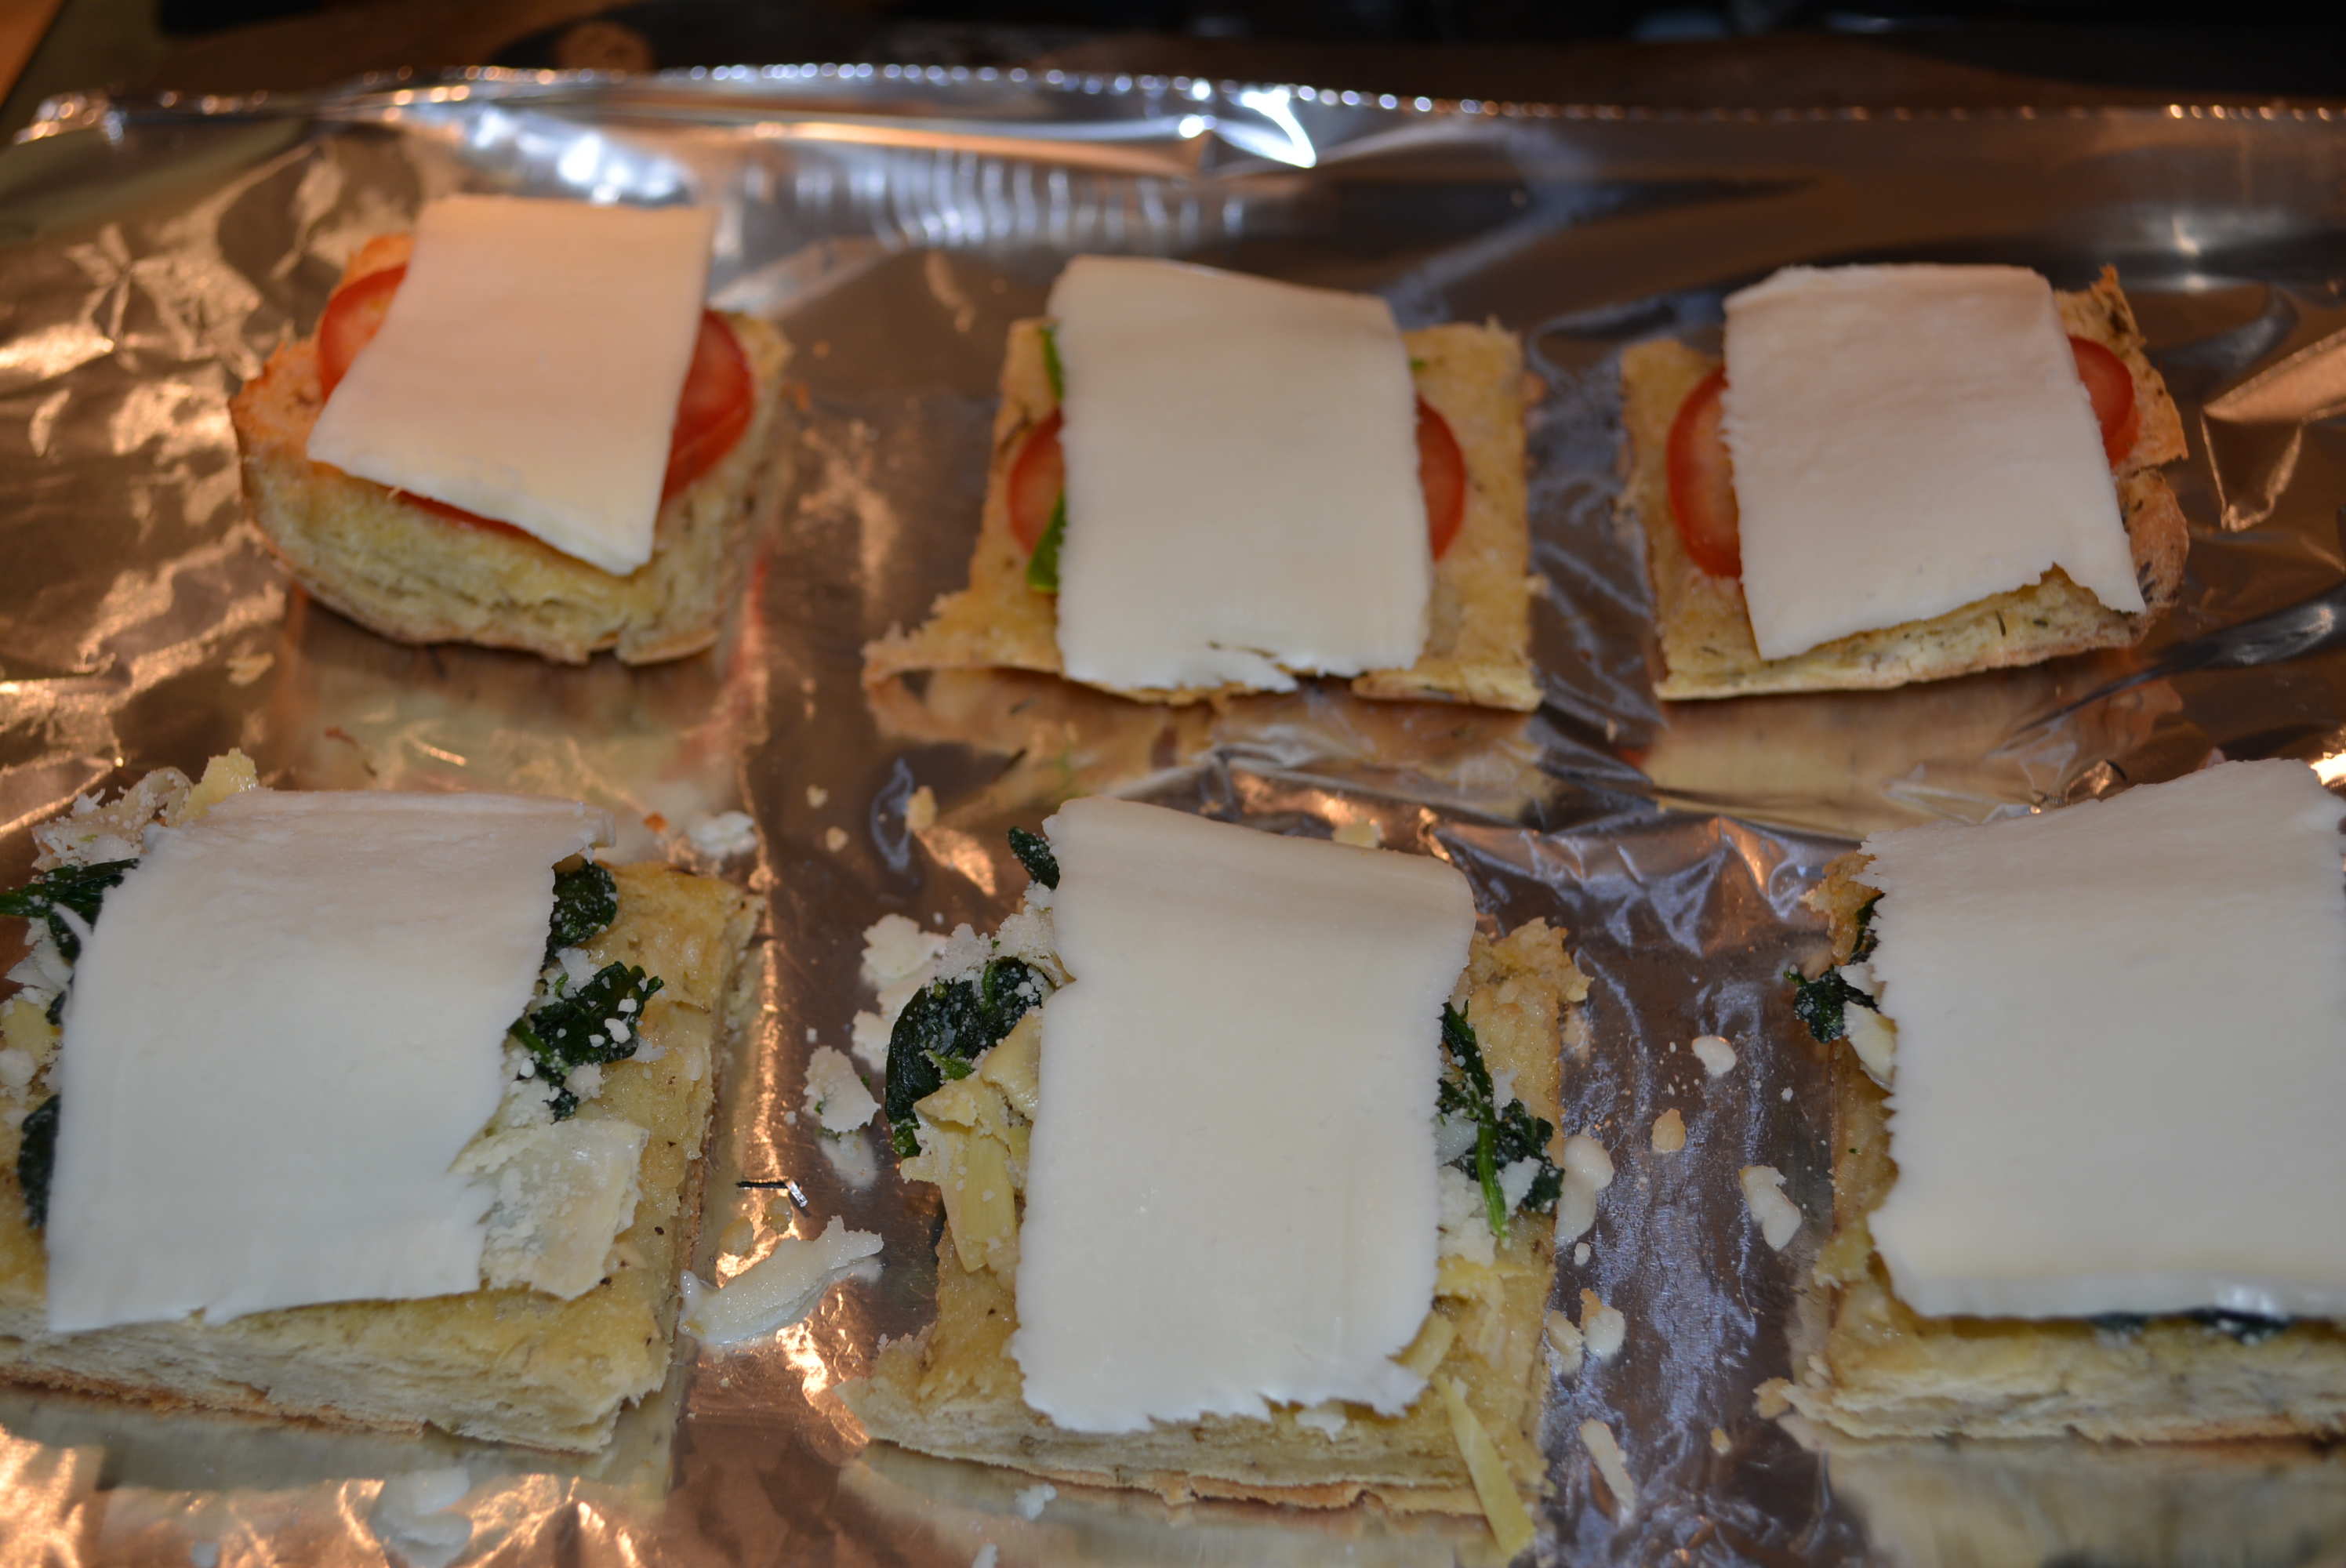
- Toast focaccia bites in the oven for an additional 10-15 minutes until cheese has melted and begun to brown.
- Carefully remove bread from baking sheet and add to serving dish.
- Drizzle with a little bit of olive oil and season with salt and pepper if you’d like.
- Serve warm and enjoy!
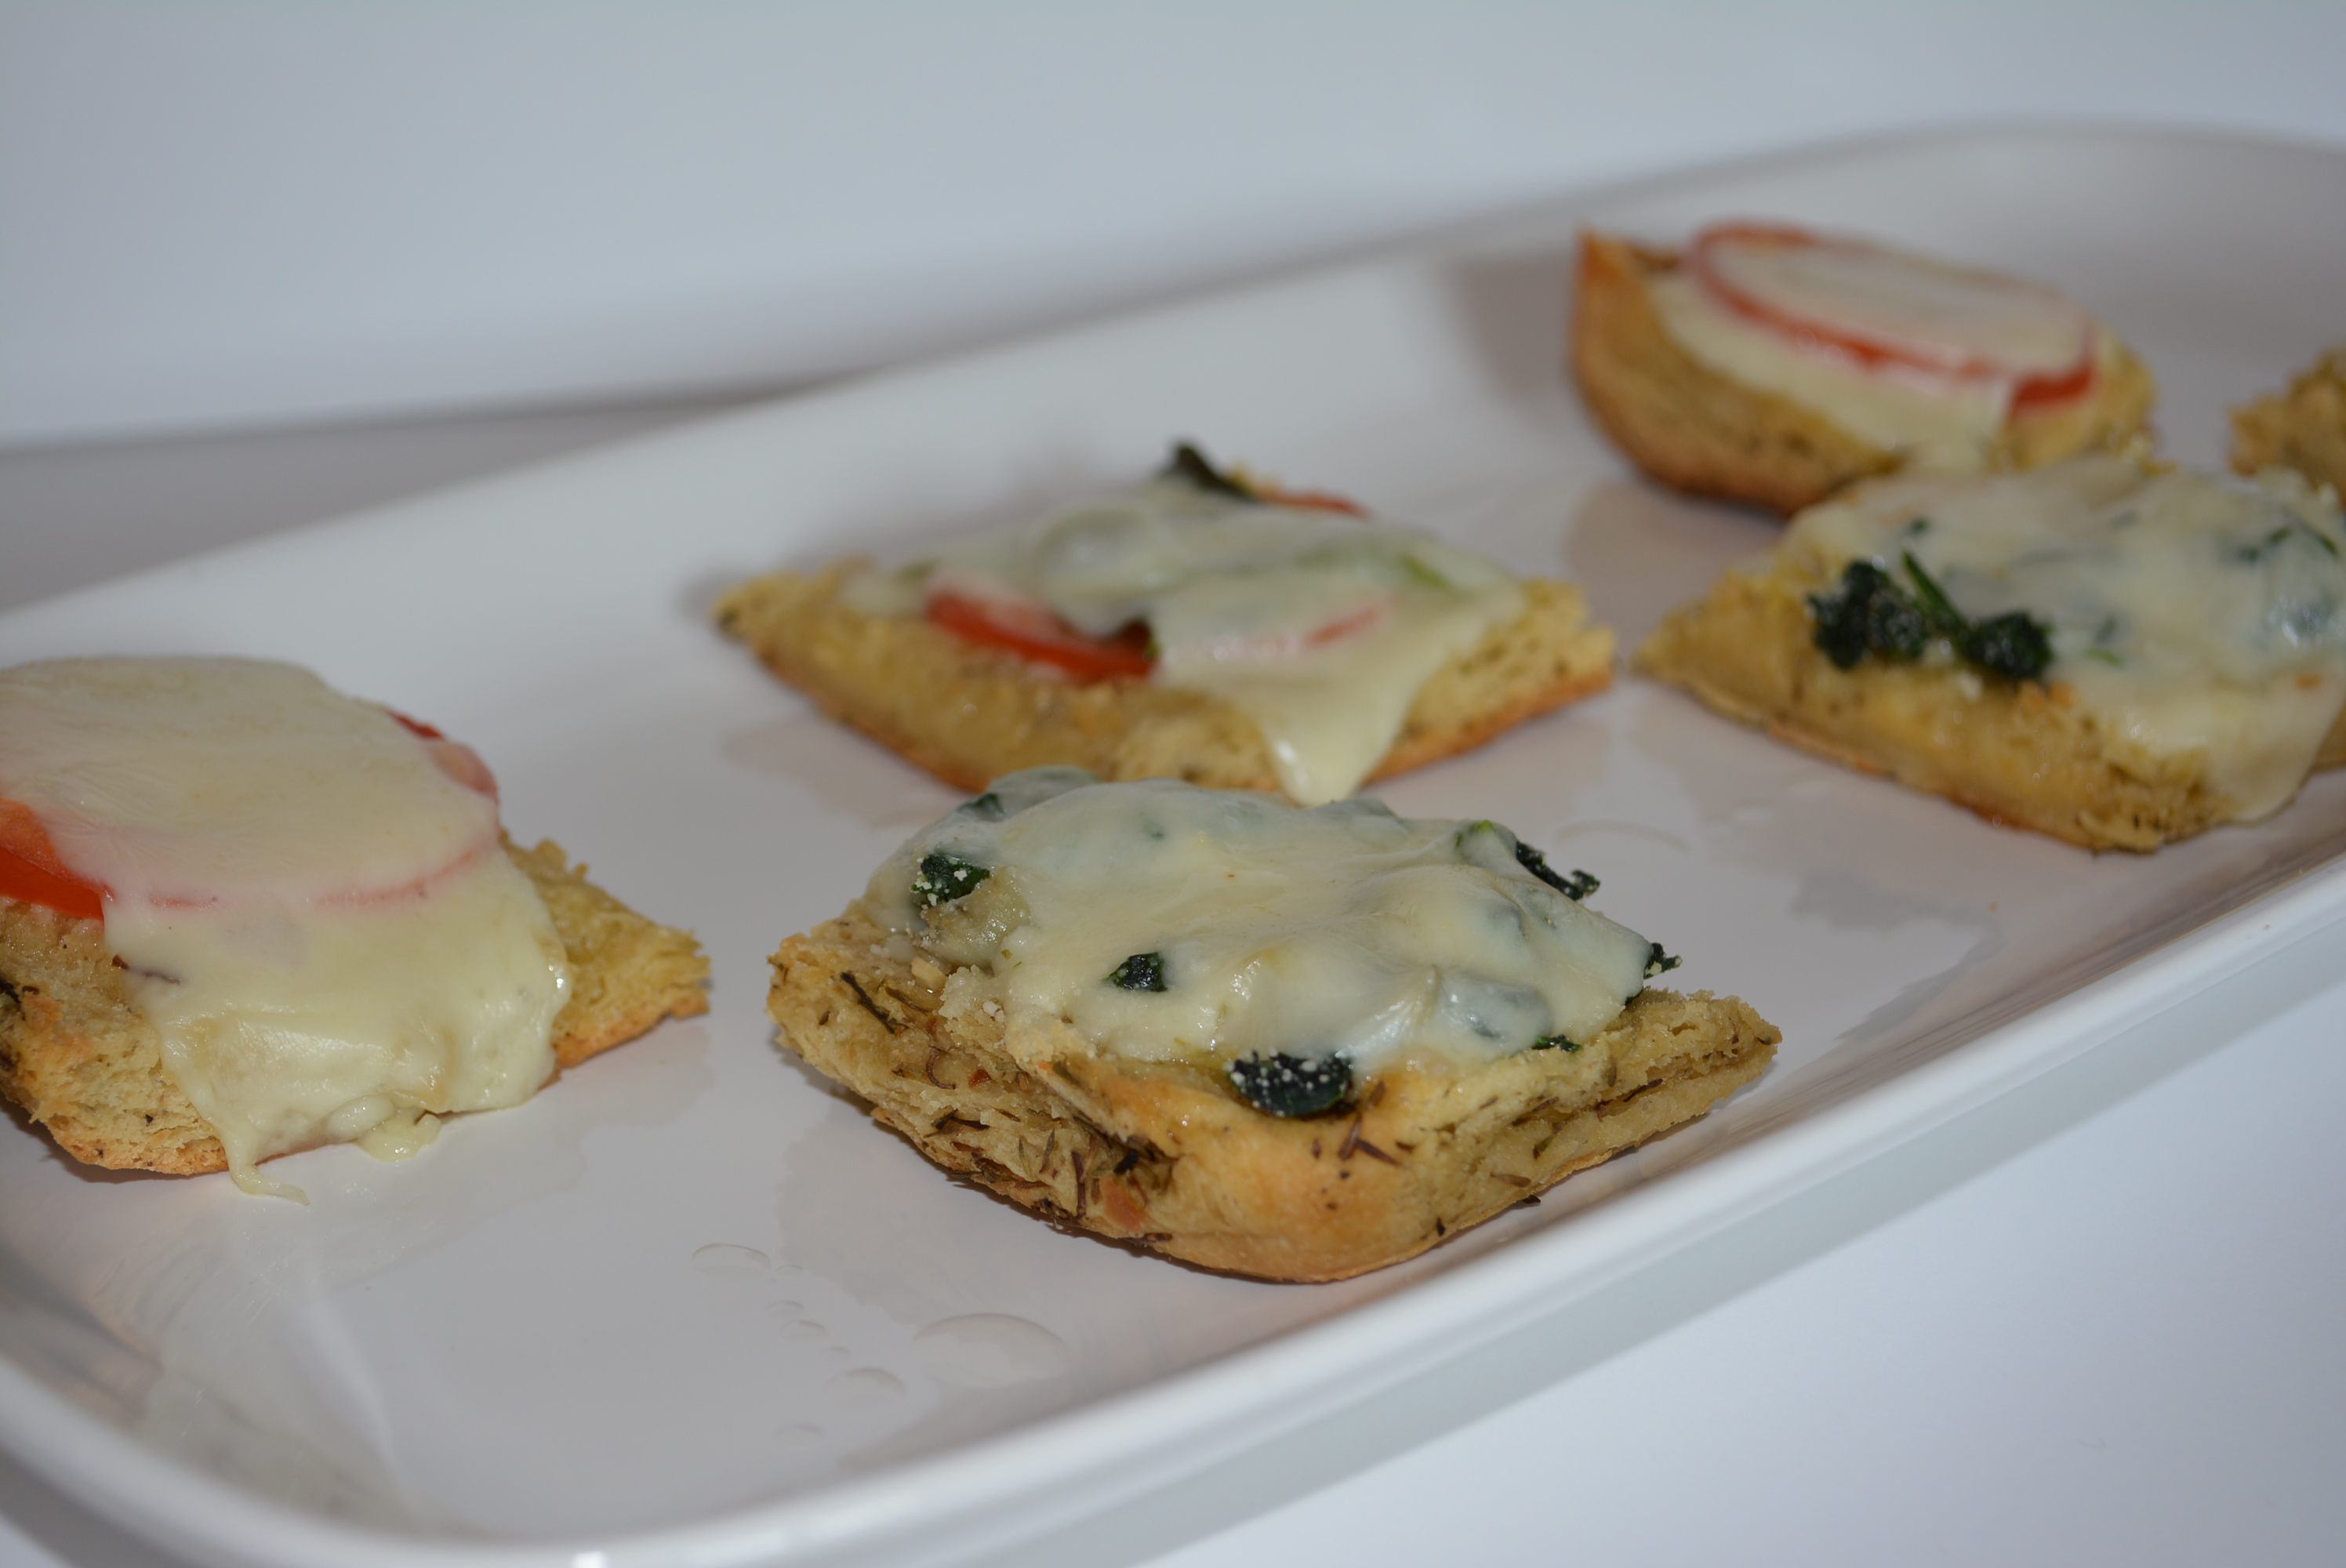
After making both varieties and having them taste tested by my toughest critics, the non-gluten free eaters in the house, seeing as not a crumb was left of each of them, I’d say that both are winners! The fresh basil combined with the tomatoes was so delicious, just like my favorite caprese summer salad; while the spinach artichoke bites reminded me my creamy spinach artichoke dip that I love to make, but instead of the dip part, a delicious piece of garlicky butter bread was in its place. In my opinion, you certainly can’t go wrong with buttering up and adding garlic to a tasty piece of bread, but why not take it a step further and add your favorite appetizer flavors too.
Thanks to Canyon Bakehouse, these focaccia bites will be making an appearance in our house on a number of occasions in the future and will surely please all of our diners. The possibilities are truly endless with this kind of bread, so if you have any extra after making these appetizers, feel free to use it for your next lunch meat sandwich or cut it up and dip it in your favorite spices and olive oil! I can’t wait to incorporate this bread into another one of our meals in the near future!
Sincerely,
Lindsay
Gluten Free Garlicky Focaccia Appetizers
2014-06-30 07:54:25
Toasted focaccia garlic bread, topped with caprese and spinach artichoke toppings.
Ingredients
- Canyon Bakehouse Focaccia
- Butter (I use Smart Balance.)
- 4 tbsp minced garlic
- Shredded part-skim mozzarella cheese
- Salt and pepper to season
Caprese Toppings
- 2-3 plum tomatoes
- Fresh basil leaves
Spinach Artichoke Toppings
- Spinach (I like the frozen steamer bags of spinach.)
- Artichokes (Jar of Cento artichokes are gluten free.)
Instructions
- Preheat oven to 350 degrees.
- Slice focaccia lengthwise and cut into four long slices (2 from the top of the bread and 2 from the bottom).
- Spread a thin layer of gluten free butter across each slice of bread.
- Add 1 tbsp minced garlic to each slice of buttered focaccia and spread across the slice.
- Toast focaccia in the oven for 15 minutes.
- While focaccia is toasting, prepare desired toppings to either do half caprese and half spinach artichoke or to do all of one or the other.
- Slice 2-3 medium tomatoes.
- Prepare frozen spinach.
- Rinse and chop artichokes.
- In a small bowl, combine even parts (about 1/2 cup, this amount really depends on which route you go with toppings) spinach and artichoke and add 2 tbsp shredded part-skim mozzarella and 2 tbsp parmesan cheese.
- Remove toasted focaccia from the oven and carefully cut into small squares.
- To sliced focaccia bites, add toppings. For the caprese garlicky focaccia bites, add a single slice of tomato and basil leaves on top. For the spinach artichoke garlicky focaccia, add 1 tbsp of spinach/artichoke mixture to bread.
- On both versions, top with part-skim mozzarella cheese (I used slices, but I'd use shredded next time I make these.).
- Toast focaccia bites in the oven for an additional 10-15 minutes until cheese has melted and begun to brown.
- Carefully remove bread from baking sheet and add to serving dish.
- Drizzle with a little bit of olive oil and season with salt and pepper if you'd like.
- Serve warm and enjoy!
Notes
- Feel free to use as much or as little of each topping ingredient as you'd like. This recipe only lists the combination of topping ingredients you should use but really depends on which variety and how many of the focaccia appetizers you wish to make.
Gluten Free Mom To Be http://www.glutenfreemomtobe.com/
Dining Gluten Free At Outback Steakhouse
After the magic of dining out in Disney World wore off, we were back to our normal routine without chefs catering to my every gluten free wish and characters wandering around during our meals. Ah, really makes me miss Disney just thinking about it. Well anyway, back in our neck of the woods it was business as usual on the eating out front. One of our go to dining out locations is Outback Steakhouse, a reasonably priced chain that offers a huge gluten free menu.
This restaurant got us through many a dinner in my very pregnant months. In fact, I craved their chicken and swiss sandwich, minus the sandwich part, at least once a week, making my husband a recognized regular at the curbside take out. Now, with baby out and about, we still enjoy a meal now and then at Outback with my new standby being the Alice Springs Chicken (only because the sandwich was taken off of the menu). This consists of a chicken breast, layered with bacon and cheese, along with a side of your choice, I typically get either a baked potato or a baked sweet potato.
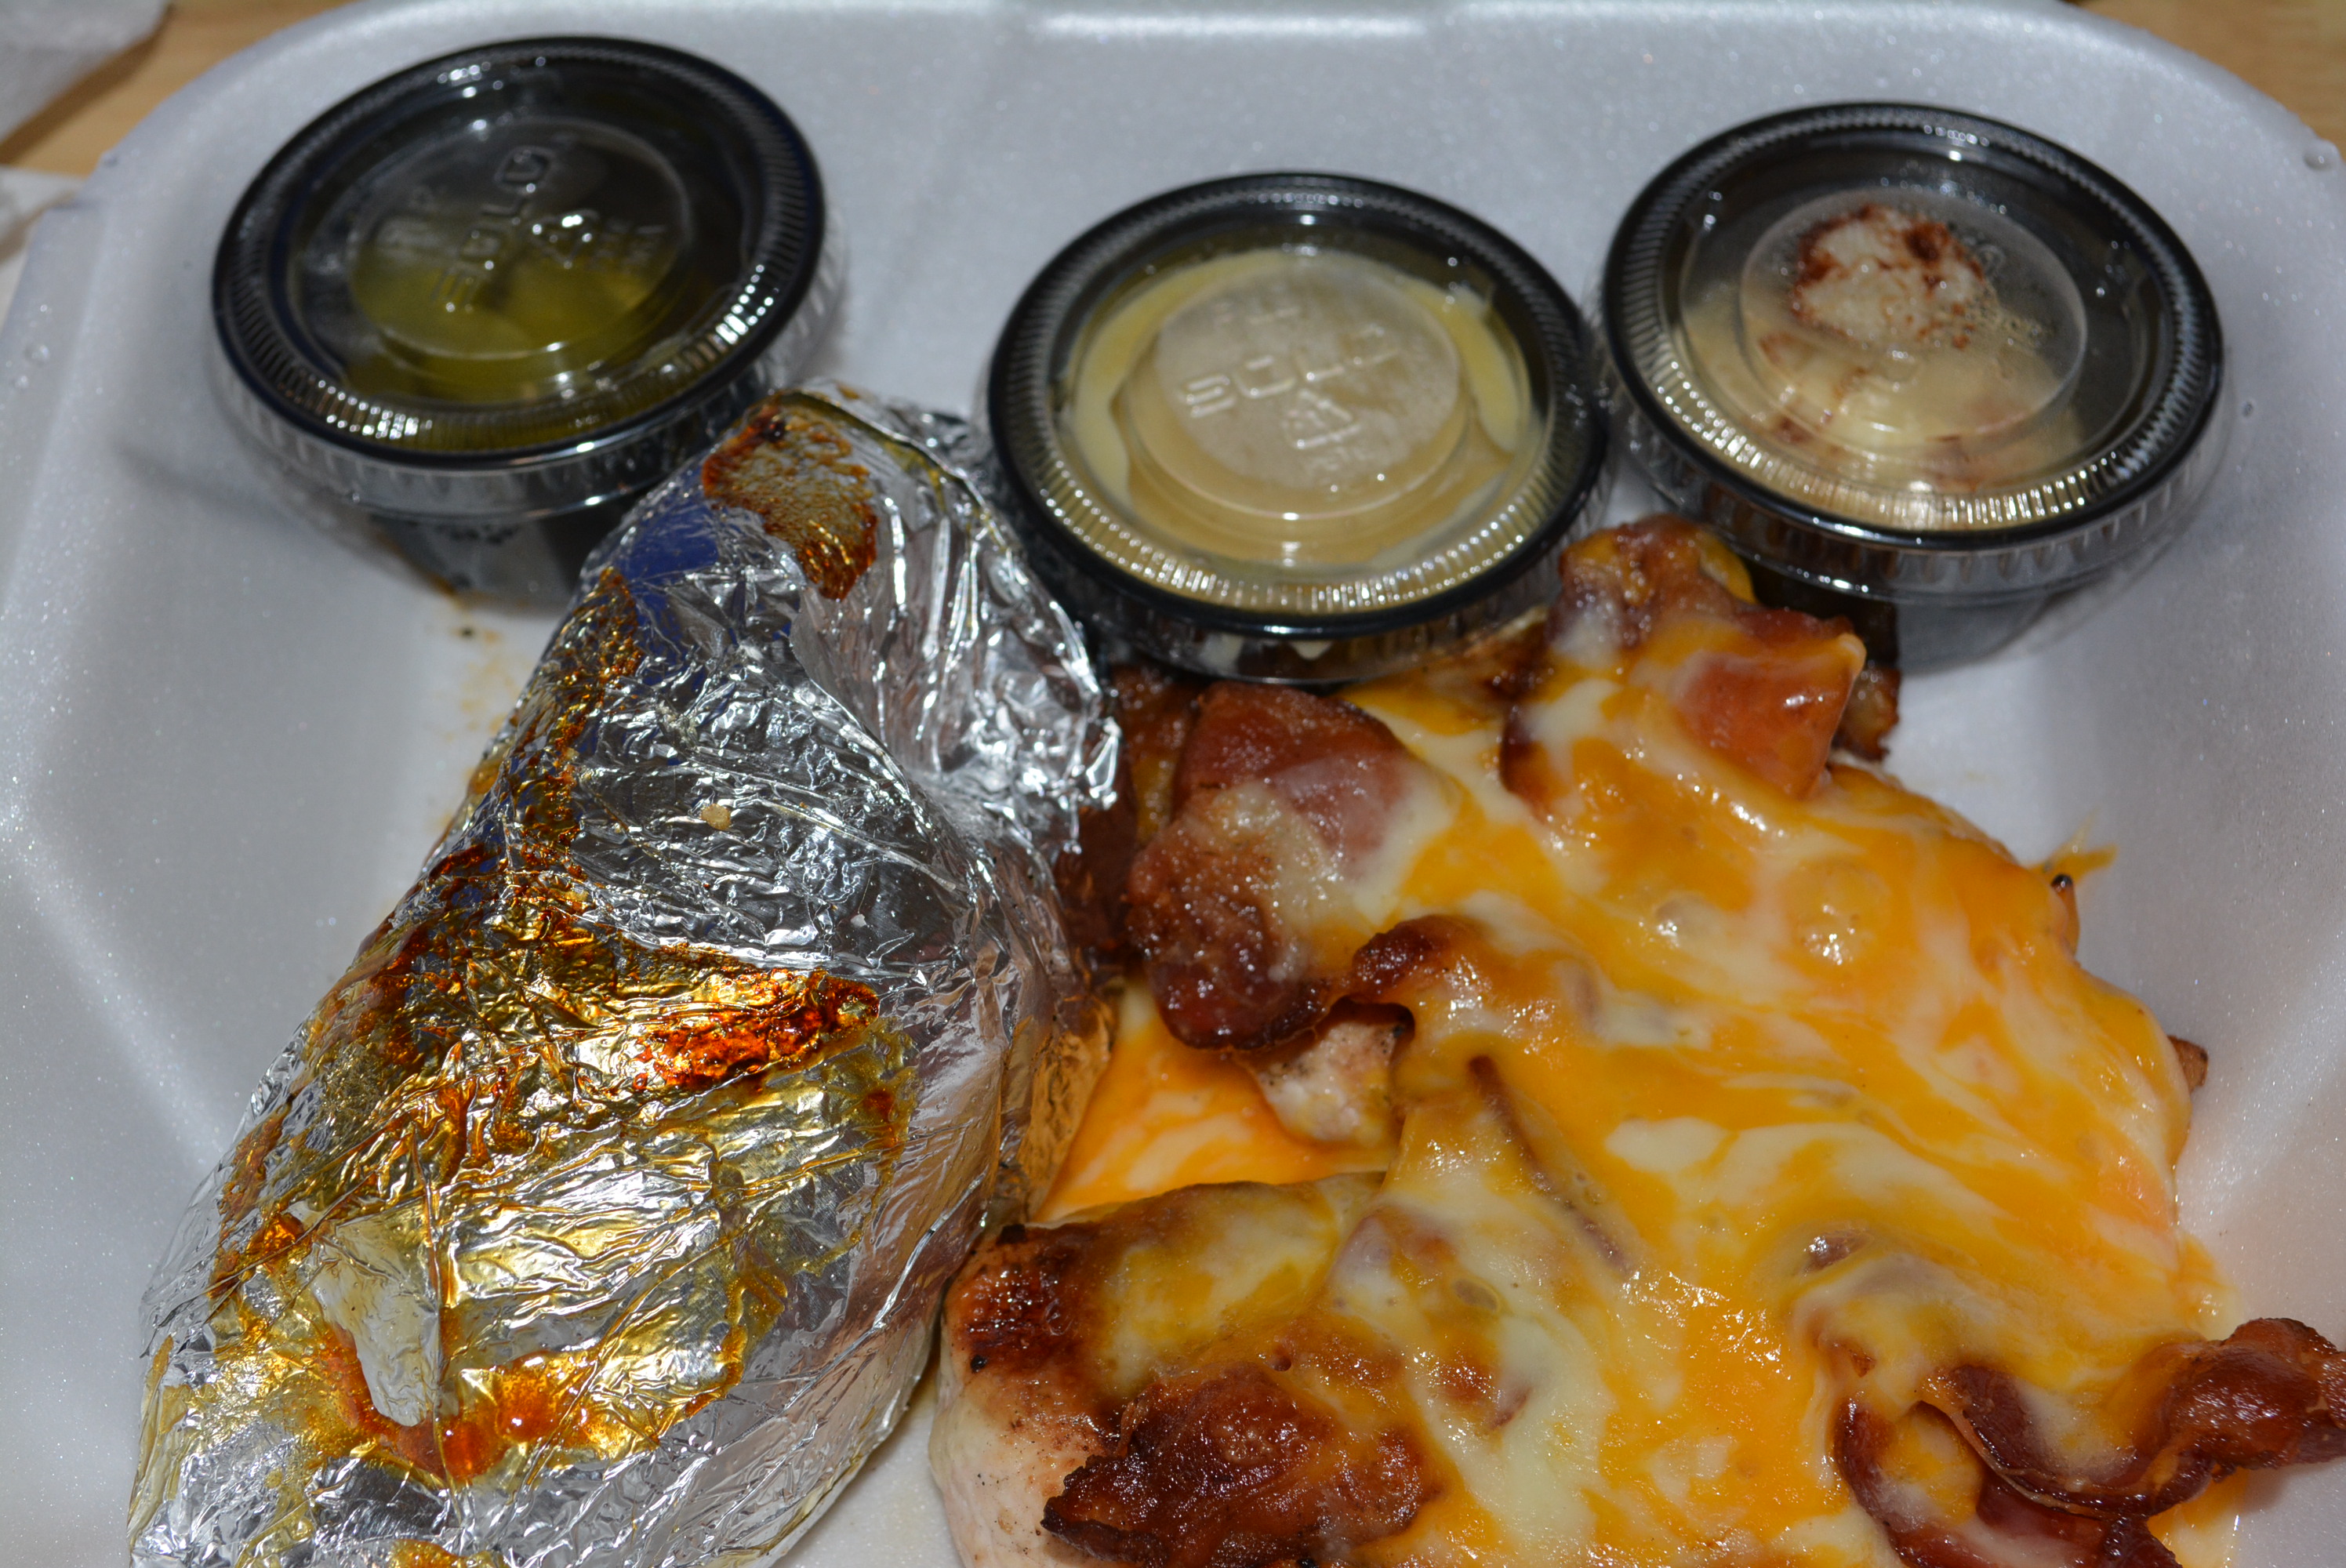
Now, when I order the gluten free Alice Springs Chicken, I pretty much recreate the sandwich by ordering the extras on the side so I can put it together with my favorite gluten free bread at home. So for me, I usually order a revamped Alice Springs Chicken which consists of a chicken breast with extra crispy bacon and cheddar, american, or provolone cheese on top, along with pickles, honey mustard sauce, tomatoes, and lettuce on the side. I just love the combination of the chicken with their honey mustard sauce and pickles (these were one of my all time favorites while I was pregnant and have kind of stuck around since)!
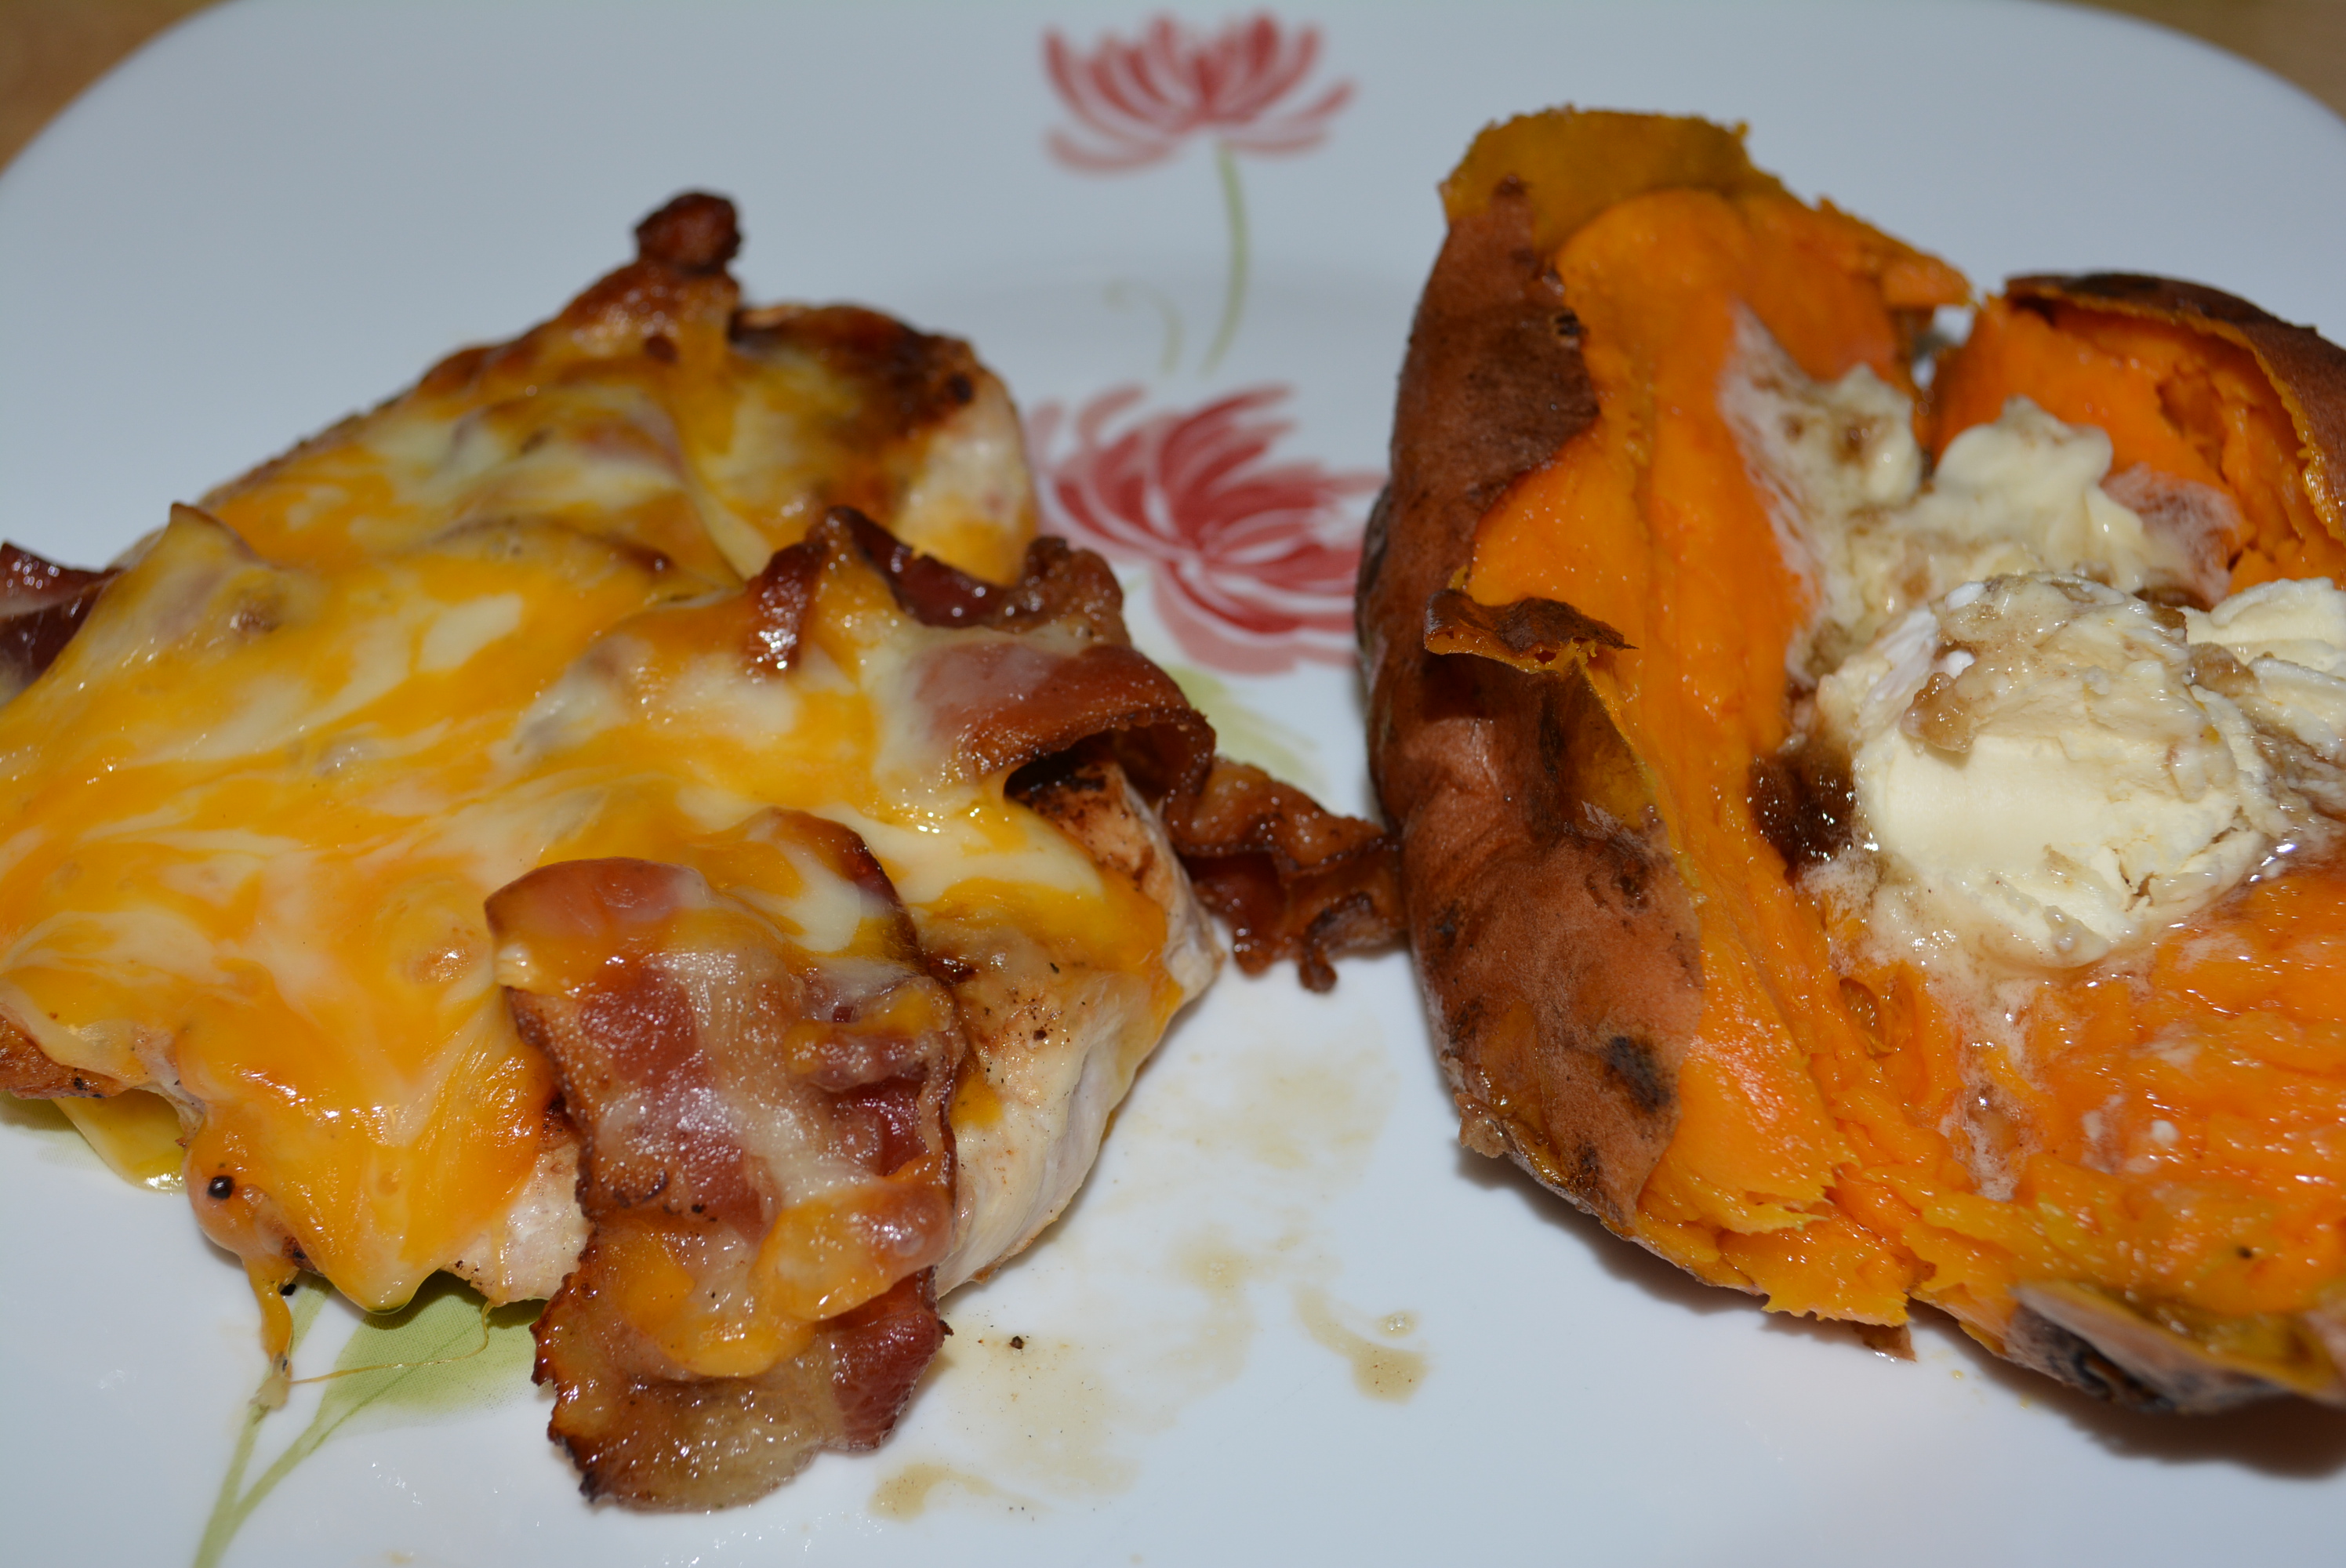
This chicken can definitely be enjoyed without the sandwich fixins, but for me I can’t resist assembling my grilled chicken sandwich with all of these flavors; while I have brought a roll along with me to the restaurant, their carry out process, which was our best friend in my last month of pregnancy, definitely makes my gluten free sandwich assembling a bit easier. Either way, after a little prep, my sandwich is ready to be enjoyed and indeed it is. They season the chicken so well and with the addition of bacon and cheese, who can really go wrong with that. On the side, I like to enjoy a baked sweet potato topped with their gluten free butter and brown sugar, This is a sweet side to complement the savory sandwich and perfect with the melted butter and brown sugar mixed in.
All together, we always enjoy a meal at Outback Steakhouse. They offer so many gluten free options including chicken dishes, steaks, seafood, salads, and sandwiches/burgers without the bread part. Along with each dish tasting great, their prices are just as fantastic, allowing a party of two to get away with a bill of about $25. Outback offers an affordable and tasty dining experience for the whole family, but as a gluten free diner, I always leave with a full belly and a smile on my face. My only hope is that one day in the near future Outback joins its fellow chains, like Uno’s or Red Robin, and offers their gluten free diners a bread option, making a whole side of the menu a bit more appealing. Fingers crossed!
Sincerely,
Lindsay
Happy Gluten Free Mommy = A Homemade Gluten Free Carmine’s Salad
Is there any restaurant that you absolutely loved in your pre-gluten free life that you feared you’d never eat at again? I’m sure I’m not alone when I say ABSOLUTELY. I’m pretty sure each and every one of us has a similar anecdote, remembering our life before gluten was discovered as the source of our pain. Sadly, many a restaurant I’ve not been back to since going gluten free. However, there are those restaurants that have come through for us gluten free folk, like one of my all time favorite restaurants, Carmine’s. Carmine’s, which has locations in NYC, Las Vegas, Bahamas, Atlantic City, and Washington D.C., is a family style Italian restaurant that offers delicious food in an environment filled with a love and family atmosphere.
I first met Carmine’s early on in our marriage before I removed gluten from my diet. It was love at first bite. I just loved the family sized style of serving, plastering gigantic sized menus on their walls rather than passing them out at the table (check out the pic below!), and finally my favorite feature is the overwhelming feeling of family that you get just from walking in the door, kind of like a big Sunday dinner at your grandmom’s house.

It was such a memorable first visit to Carmine’s and I imagined so many more in the years to come in our marriage. Little did I know that my world would change drastically in the next few months. Fast forward a year from then and I was now eating gluten free, scouring the internet to see what my dining out options may or may not be. I couldn’t help but to check Carmine’s, a place that we enjoyed not too long ago as newlyweds. Much to my surprise they offered a gluten free menu, as well as a number of other allergen free menus too! Check out their fantastic gluten free menu here!
I can’t explain how happy I was after I’d found out that Carmine’s had a gluten free menu. Better yet though, their gluten free menu wasn’t just their normal dishes minus sauces and sides, only offering plain pieces of meat or gluten free pasta, but they were their actual, mouthwatering dishes! I have to admit that after finding out this glorious news about Carmine’s we’ve enjoyed many a gluten free dinner since, especially while pregnant. Amazingly, I can still get my favorite dishes from before, just done to be gluten free now. My typical meal when we dine at Carmine’s is the Carmine’s Salad, Vodka Rigatoni, and the Titanic for dessert (this is a massively huge brownie ice cream sundae but so much more than just that, and was certainly a gluten free pregnant woman’s dream come true!), each of these dishes are made to be shared by the entire family but no worries, our comfy twosome make do just fine and always had leftovers for the next day.
Since Carmine’s isn’t a local restaurant that we can go to every weekend (tear), which I know I know makes it even more special when we do go, I purchased their cookbook to make my gluten free versions at home. Now, even though I love each and every part of our Carmine’s meal, I’ve yet to recreate the vodka rigatoni and titanic dessert, but I had to attempt the Carmine’s Salad. This salad is not just a boring, regular salad. Despite it’s intimidating size when it’s plopped down in the center of your table, it is loaded chock full of fix-ins from assorted meats and cheese to loads of veggies and different leafy greens! My favorites in here are the mortadella, provolone, and roasted red peppers!
With recipe in hand, I recreated our favorite starter at Carmine’s but making a gluten free Lindsay version. After some washing and chopping, I throw it together, mixing in lots of the veggies with the leafy greens and laying the meats and cheeses atop to add that pretty presentation factor that Carmine’s is known for. I tend to leave the dressing to add on per plate along with some of the wetter toppings like the roasted red peppers and pepperoncinis to prevent any sogginess if we have leftovers, which we always do. This is an amazing appetizer or main course, definitely a crowd pleaser in both presentation and taste!
Note: This recipe is for a family sized salad (feeds about 4-5 people), so feel free to scale down or up according to your needs.
Ingredients:
- Head of iceberg lettuce
- 2-3 handfuls of arugula
- 2-3 plum tomatoes quartered
- 1 small cucumber, chopped into bite size pieces
- 3 tbsp of roasted red peppers
- 1/2 medium sized red onion sliced
- 1/4 pound chopped provolone cheese
- 1/4 pound chopped mortadella
- 1/4 pound chopped genoa salami
- Handful of large green olives
- Handful of large black or kalamata olives
- Handful of pepperoncini
- Vinaigrette or I prefer Olive Garden Italian Dressing
- Optional add ins: thinly sliced radicchio and you can even swap out the arugula for watercress but I prefer arugula
Directions:
- Wash all vegetables thoroughly.
- Chop 1 head of iceberg lettuce and 2-3 handfuls arugula into smaller pieces.
- Peel and chop 1 small cucumber into small, bite size chunks
- Cut 2-3 plum tomatoes into quarters or smaller slices if you prefer.
- Slice 1/2 of a medium red onion into thin slices and separate rings.
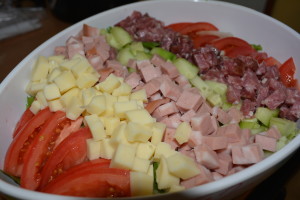
- To a large mixing bowl (make sure you use a large one so you can mix together the ingredients), add some of the leafy greens and chopped veggies and mix them all together, setting the rest aside to scatter on top to make a very pretty, Carmine’s like presentation.
- Next up, roughly chop up a 1/4 lb of the mortadella, genoa salami, and provolone. Make sure you pick out gluten free brands of these. There are a lot of prepackaged salamis and provolone that you can purchase that may mark gluten content on the label, if not you can call the company. As far as the mortadella, I had to order this one at the deli counter, selecting the Black Bear version that I know is gluten free.
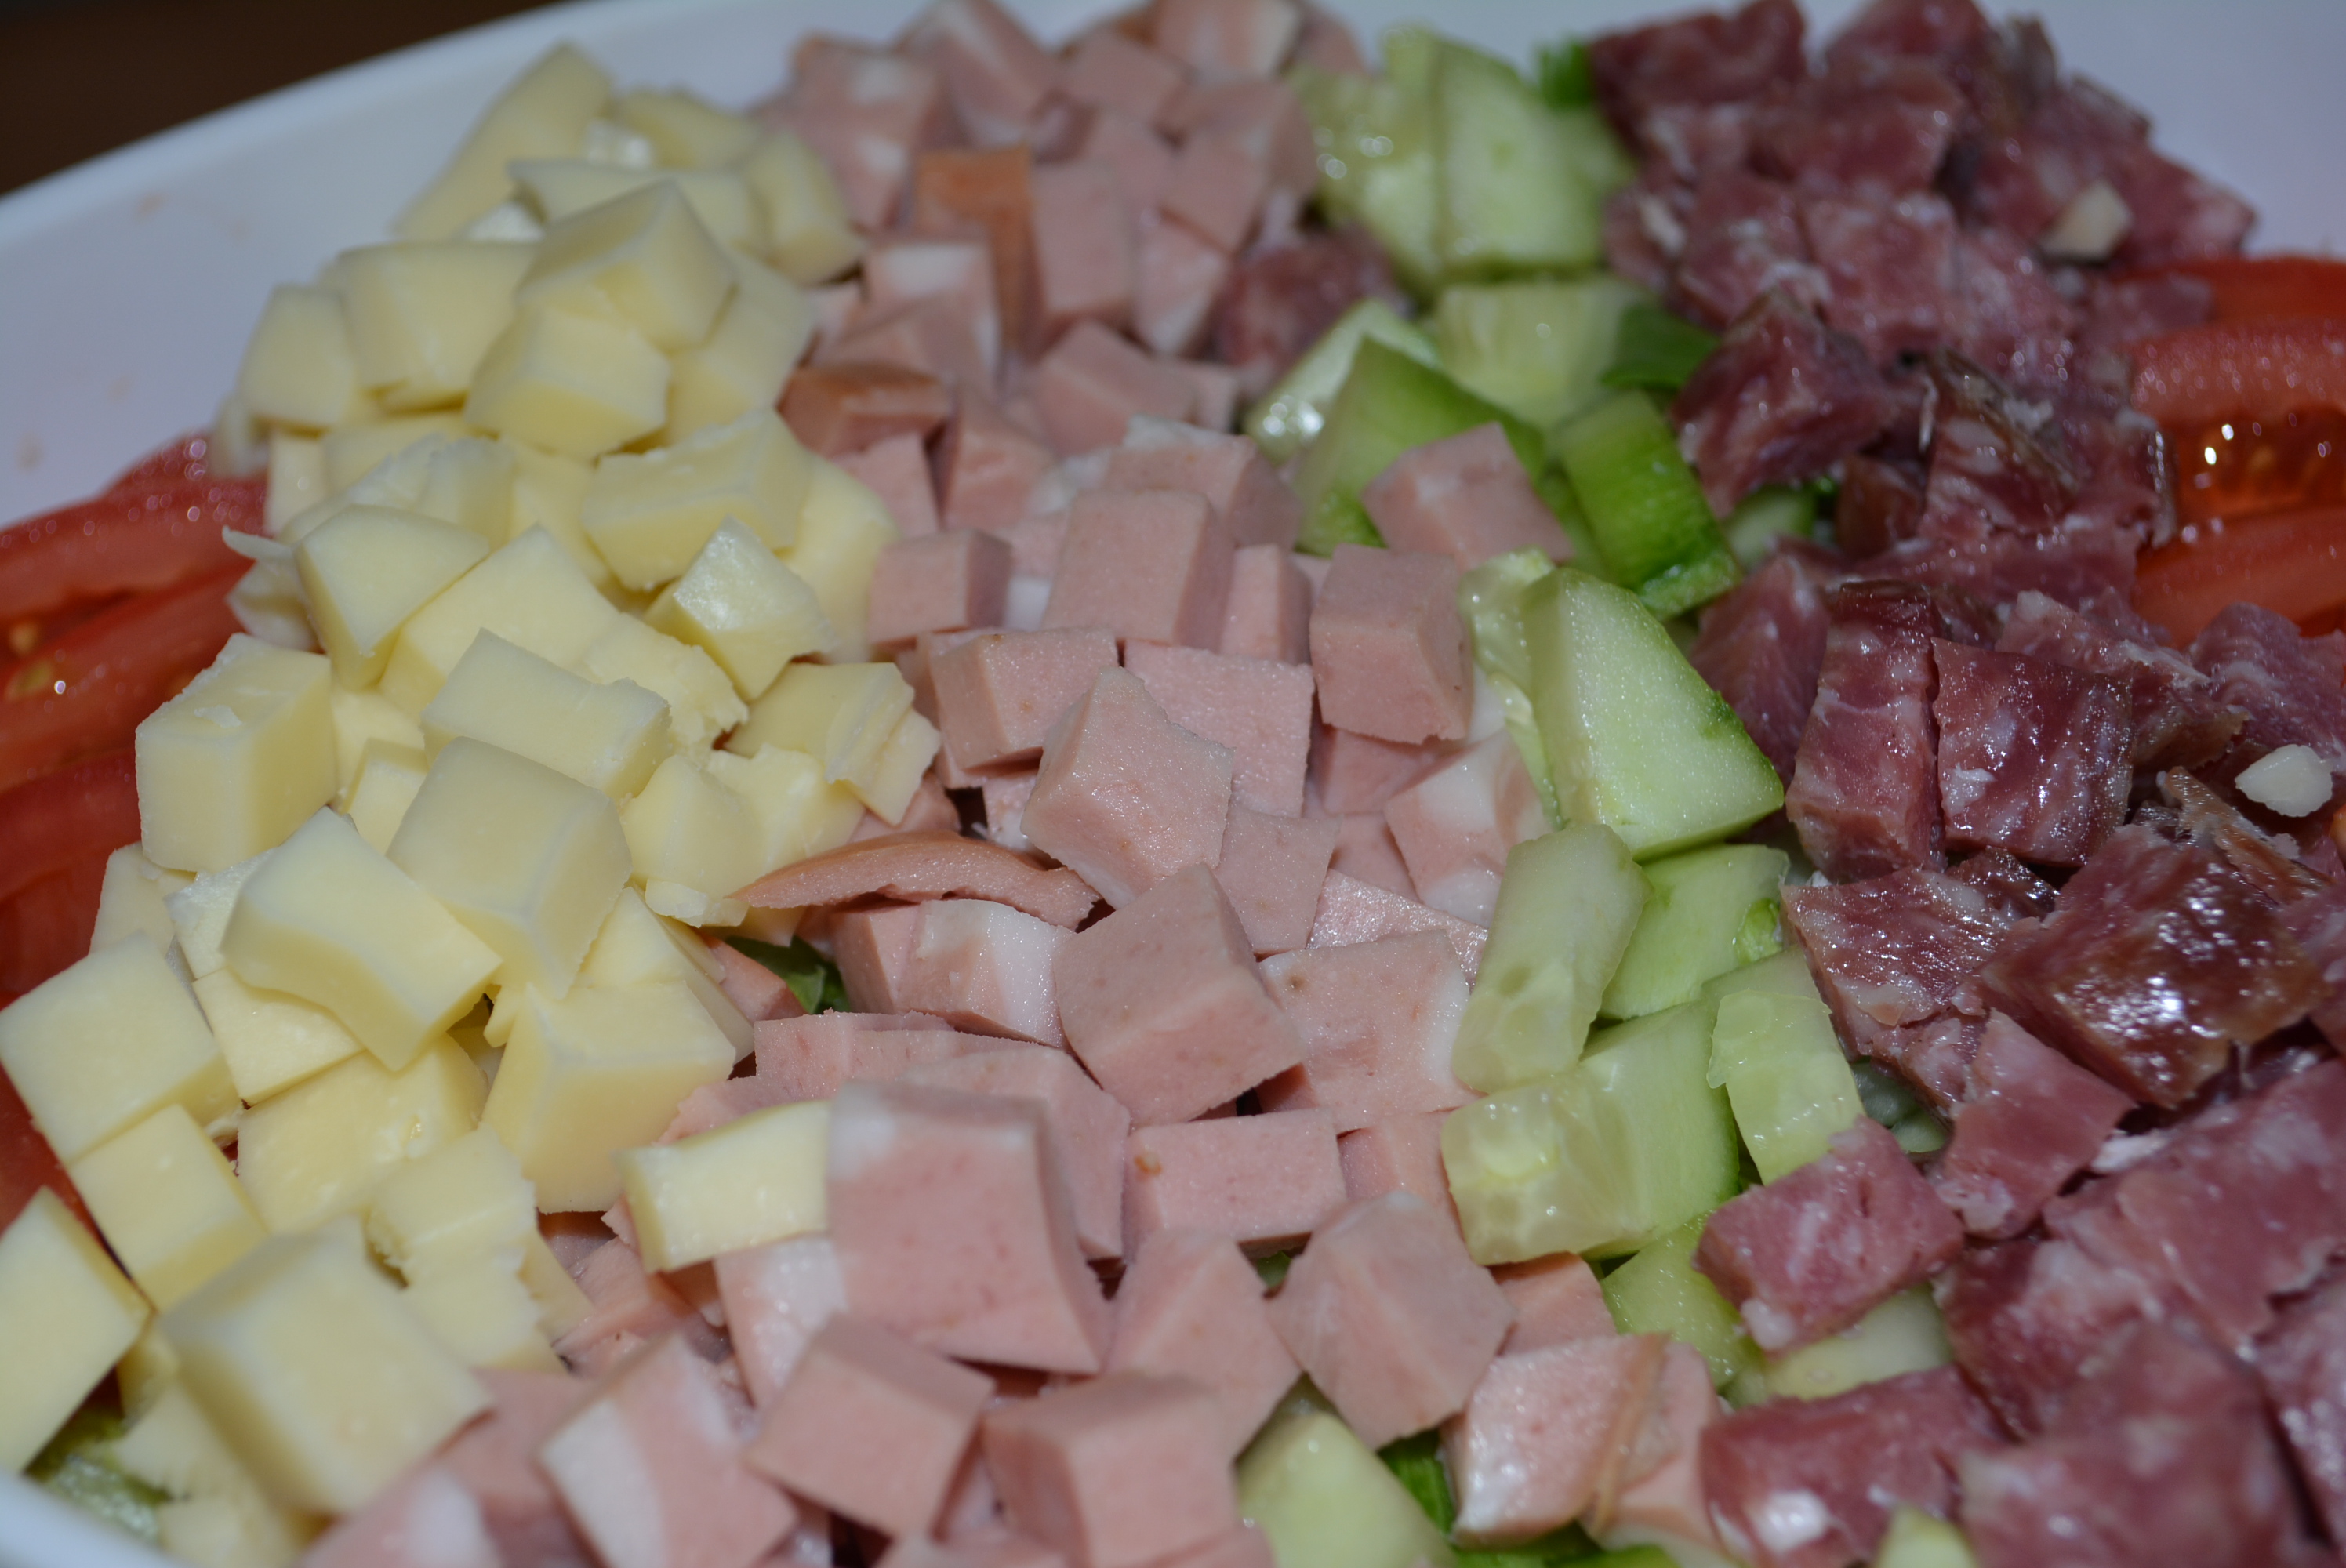
- What I like to do, similar to the veggies, is mix in some of the meats and cheese into the salad mixture and put the rest aside to layer on top for a pretty presentation.
- Once all of the pieces have been washed, chopped, and either mixed in or set aside, add your mixture to a large serving dish. Unfortunately, I didn’t have a larger dish on hand, but if you can, use a shallow, wide and long dish that you can really see all of the different ingredients in the salad!
- Scatter the onion and cucumbers on top of the salad.
- Add the green olives and black or kalamata olives, scattering them across the top.
- Now, layer each of the meats and cheese, along with the tomatoes in sections on the salad, do in whatever order or pattern you’d like.
- Now, you can either top the salad with the pepperoncini scattered around and the roasted red peppers placed in the center on top of the meats or you can leave them in separate serving bowls on the side. I recommend keeping them separate if you don’t anticipate eating all of the salad and would like to save for leftovers, it just keeps everything dry without becoming extremely soggy later on. However, if you have a larger family or making this for a party, add those babies on top and it’ll complete a beautiful salad!
- As far as dressing, I do the same for this one, keeping it separate. However, for a large party, I would add to the mixing bowl and mix in the desired amount before plating it on the serving dish. As far as what dressing I use, I’ve tried to make the Carmine’s vinaigrette at home but haven’t loved how it’s turned out so I go with one of my favorite dressings that really adds to the salad, Olive Garden’s Signature Italian Dressing. Use whatever dressing you love though, I would recommend to use a vinaigrette or a lighter dressing of some sort.

- And voila! Here’s your finished product! I left the roasted red peppers and pepperoncinis aside so we could add them on as desired since I knew we’d have leftovers for the next day to enjoy. TIP: Here’s where a shallow but wide and long serving dish is fantastic because you’d be able to see all of the amazing additions underneath the beautifully chopped meats, cheese, and tomatoes on top. No worries though, it all tastes the same, so use whatever dish you have and arrange the ingredients in whatever fashion you’d like!
This is by far one of my favorite salads that I’ve ever enjoyed and I’m a big salad person. The mixture of the meats and cheeses is amazing and I just love the iceberg lettuce with the arugula mixed in as well. This makes for a great summer dinner and can serve as an appetizer or a main course. Also, it’s an incredibly filling meal with all of the special additions. I have to say, although it satisfied my Carmine’s craving, it did make us both eager to return to Carmine’s for another meal in the near future. So I guess we’ll have to get planning, but for now I have my cookbook in hand and the gluten free versions that I’ve created over the years!
Enjoy!
Sincerely,
Lindsay
Homemade Gluten Free Carmine's Salad
2014-06-09 08:30:51
Ingredients
- Head of iceberg lettuce
- 2-3 handfuls of arugula
- 2-3 plum tomatoes quartered
- 1 small cucumber, chopped into bite size pieces
- 3 tbsp of roasted red peppers
- 1/2 medium sized red onion sliced
- 1/4 pound chopped provolone cheese
- 1/4 pound chopped mortadella
- 1/4 pound chopped genoa salami
- Handful of large green olives
- Handful of large black or kalamata olives
- Handful of pepperoncini
- Vinaigrette or I prefer Olive Garden Italian Dressing
- Optional add ins: thinly sliced radicchio and you can even swap out the arugula for watercress but I prefer arugula
Instructions
- Wash all vegetables thoroughly.
- Chop 1 head of iceberg lettuce and 2-3 handfuls arugula into smaller pieces.
- Peel and chop 1 small cucumber into small, bite size chunks
- Cut 2-3 plum tomatoes into quarters or smaller slices if you prefer.
- Slice 1/2 of a medium red onion into thin slices and separate rings.
- To a large mixing bowl (make sure you use a large one so you can mix together the ingredients), add some of the leafy greens and chopped veggies and mix them all together, setting the rest aside to scatter on top to make a very pretty, Carmine's like presentation.
- Next up, roughly chop up a 1/4 lb of the mortadella, genoa salami, and provolone. Make sure you pick out gluten free brands of these. There are a lot of prepackaged salamis and provolone that you can purchase that may mark gluten content on the label, if not you can call the company. As far as the mortadella, I had to order this one at the deli counter, selecting the Black Bear version that I know is gluten free.
- What I like to do, similar to the veggies, is mix in some of the meats and cheese into the salad mixture and put the rest aside to layer on top for a pretty presentation.
- Once all of the pieces have been washed, chopped, and either mixed in or set aside add your mixture to a large serving dish. I didn't have a larger dish on hand, but if you can use a shallow, wide and long dish that you can really see all of the different ingredients in the salad!
- Scatter the onion and cucumbers on top of the salad.
- Add the green olives and black or kalamata olives, scattering them across the top.
- Now, layer each of the meats and cheese, along with the tomatoes in sections on the salad, do in whatever order or pattern you'd like.
- Now, you can either top the salad with the pepperoncini scattered around and the roasted red peppers placed in the center on top of the meats or you can leave them in separate serving bowls on the side. I recommend keeping them separate if you don't anticipate eating all of the salad and would like to save for leftovers, it just keeps everything dry without becoming extremely soggy later on. However, if you have a large party, add those babies on top and it'll complete a beautiful salad!
- As far as dressing, I do the same for this one, keeping it separate. However, for a large party, I would add to the mixing bowl and mix in the desired amount before plating it on the serving dish. As far as what dressing I use, I've tried to make the Carmine's vinaigrette at home but haven't loved how it's turned out so I go with one of my favorite dressings that really adds to the salad, Olive Garden's Signature Italian Dressing. Use whatever dressing you love though, I would recommend to use a vinaigrette or a lighter dressing of some sort.
- And voila! Here's your finished product! I left the roasted red peppers and pepperoncinis aside for us to add in as desired since I knew we'd have leftovers for the next day to enjoy. TIP: Here's where a shallow but wide and long serving dish is fantastic because you'd be able to see all of the amazing additions underneath the beautifully chopped meats, cheese, and tomatoes on top. No worries though, it all tastes the same, so use whatever dish you have and arranged the ingredients in whatever fashion you'd like!
Adapted from Carmine's Cookbook
Adapted from Carmine's Cookbook
Gluten Free Mom To Be http://www.glutenfreemomtobe.com/